-
Announcement
Welcome to the forums!
If you are a newly-approved member, make sure you check out the New Member Checklist!
If you are a Detachment member and can't see the member-only area, post here for access.
-DV
Leaderboard


Popular Content
Showing content with the highest reputation since 07/19/2024 in all areas
-
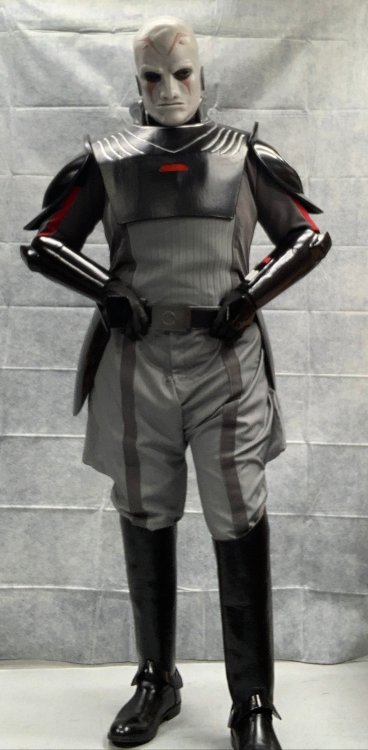
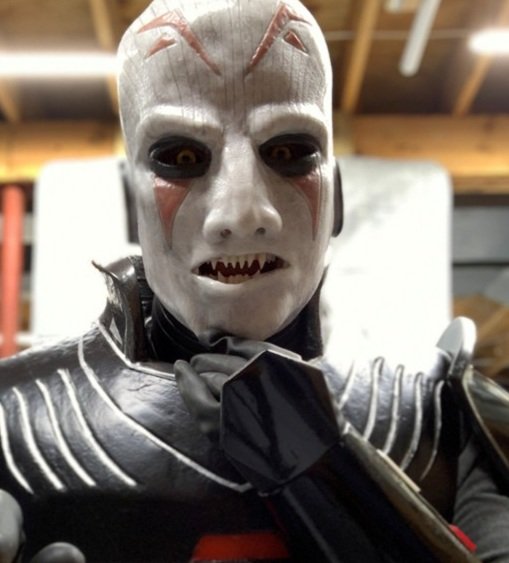
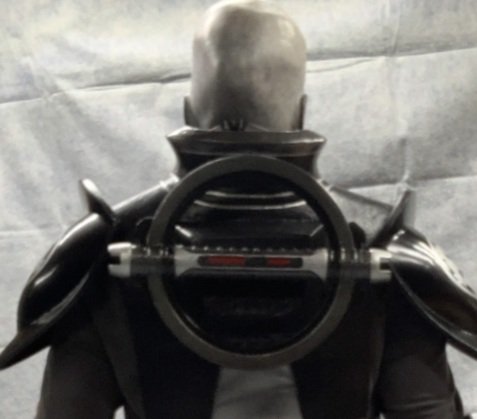
Finished product!
 3 points
 -
While working on the other gauntlet, I figured I'd work on other stuff as well, including her pauldron. Including pics of it and hers for reference.3 points
-
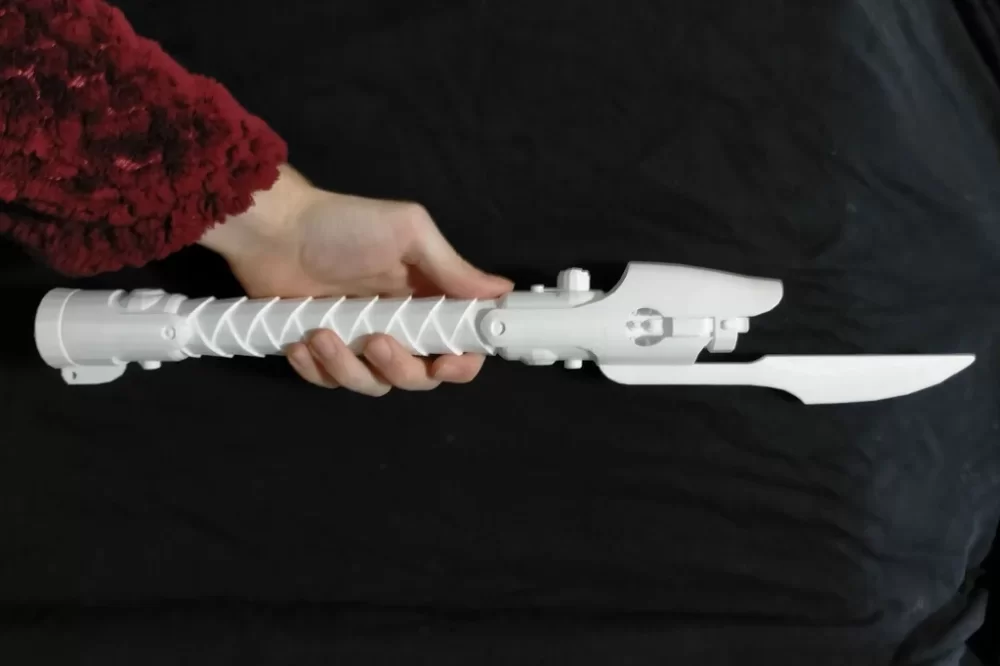
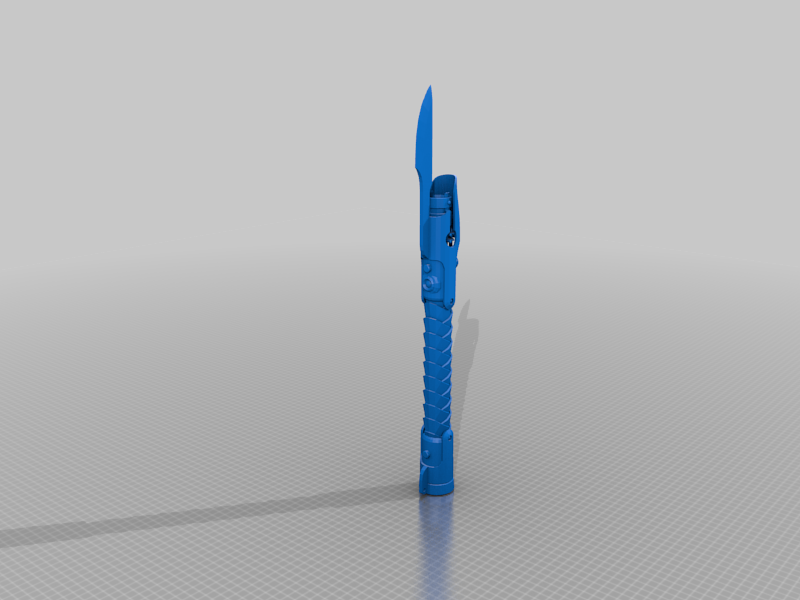
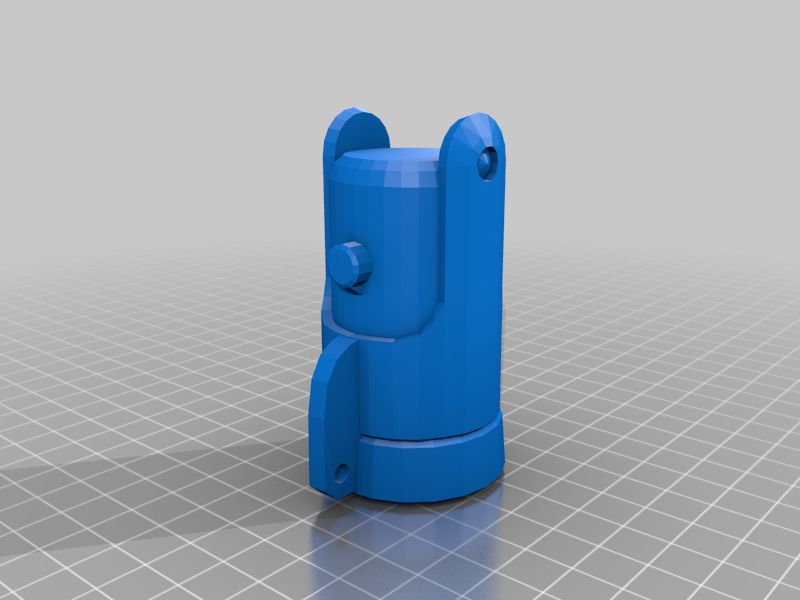
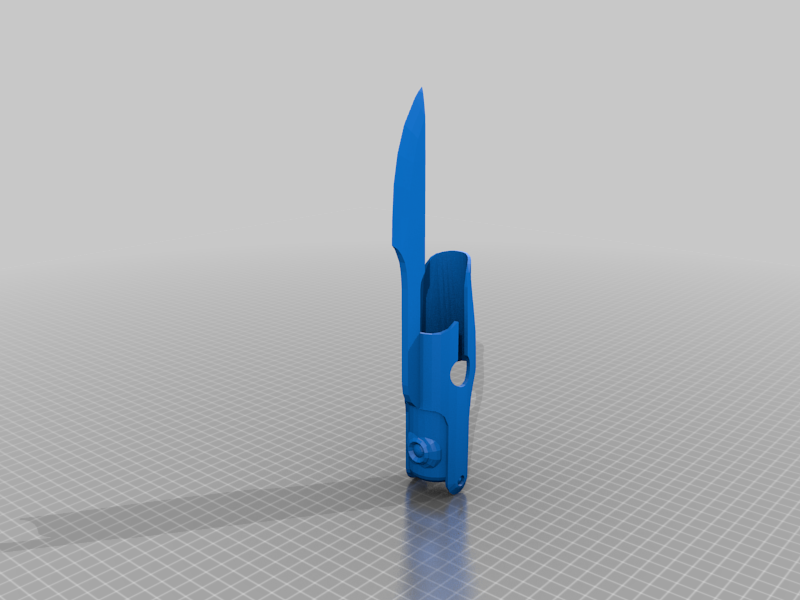
Okay! So I now have a painted blaster! I also worked on the blade modeling over the last day and today and I am currently printing it out. I am adding pictures of it from Blender. When it's done I will updated this post to include the printed version. Anyways, here are some pictures... cause we all love progress pictures! Enjoy Blade3 points
-
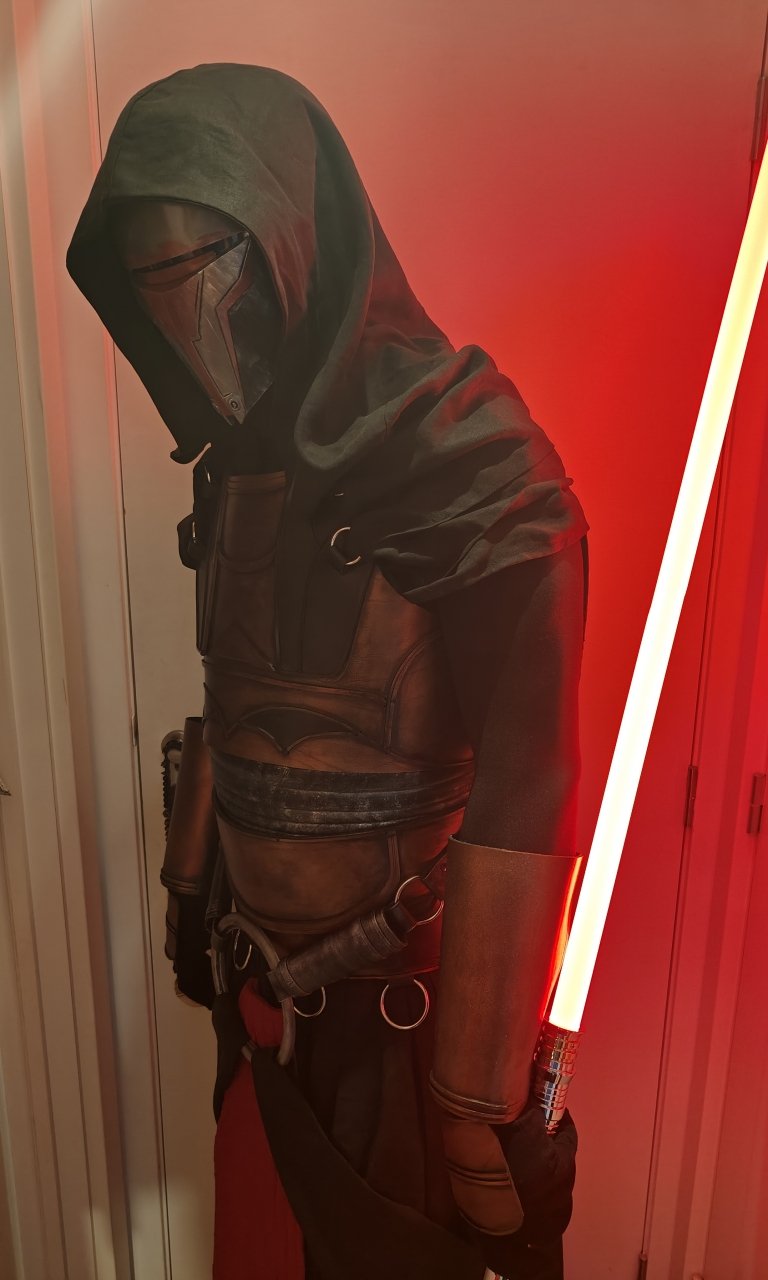
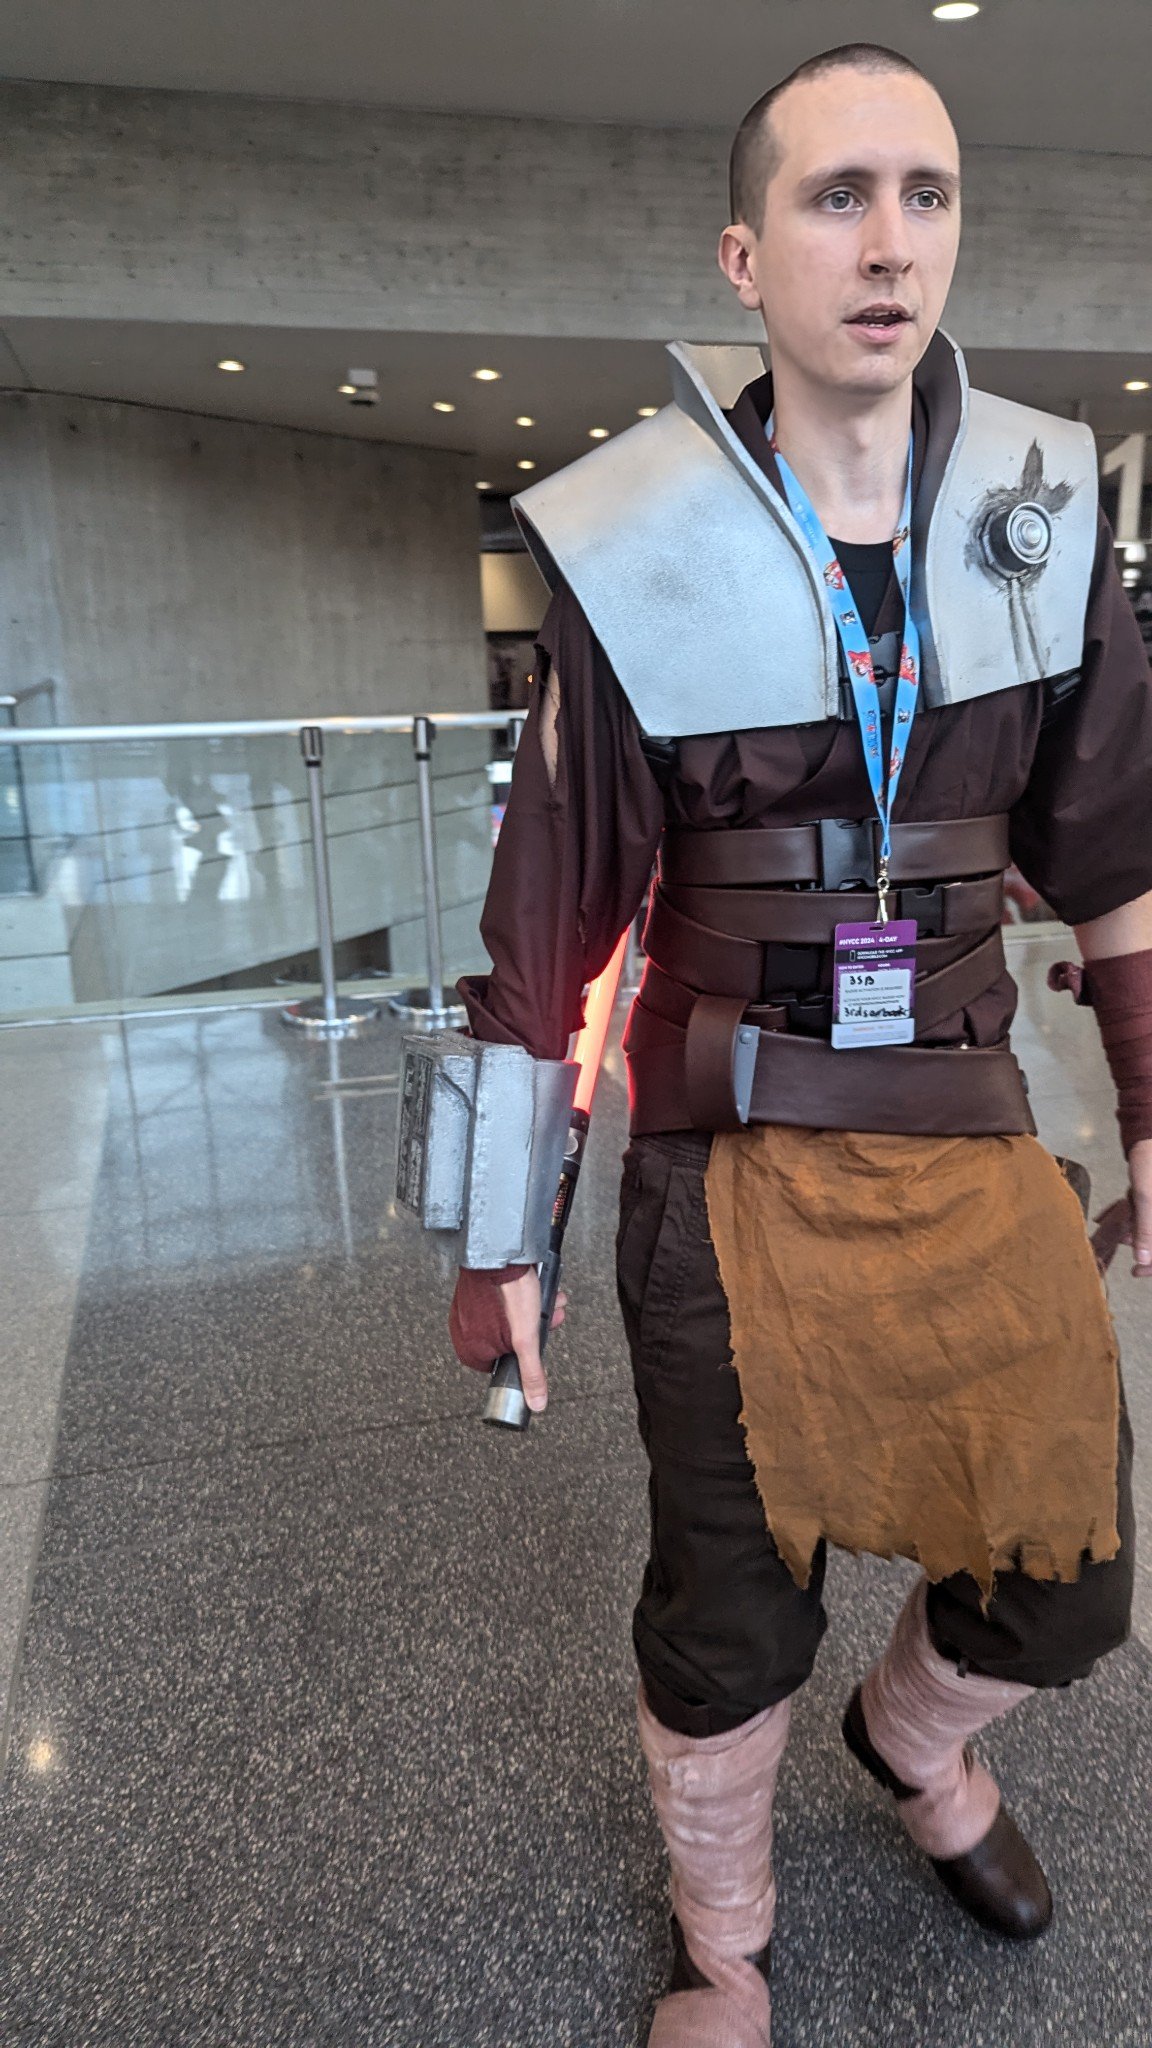
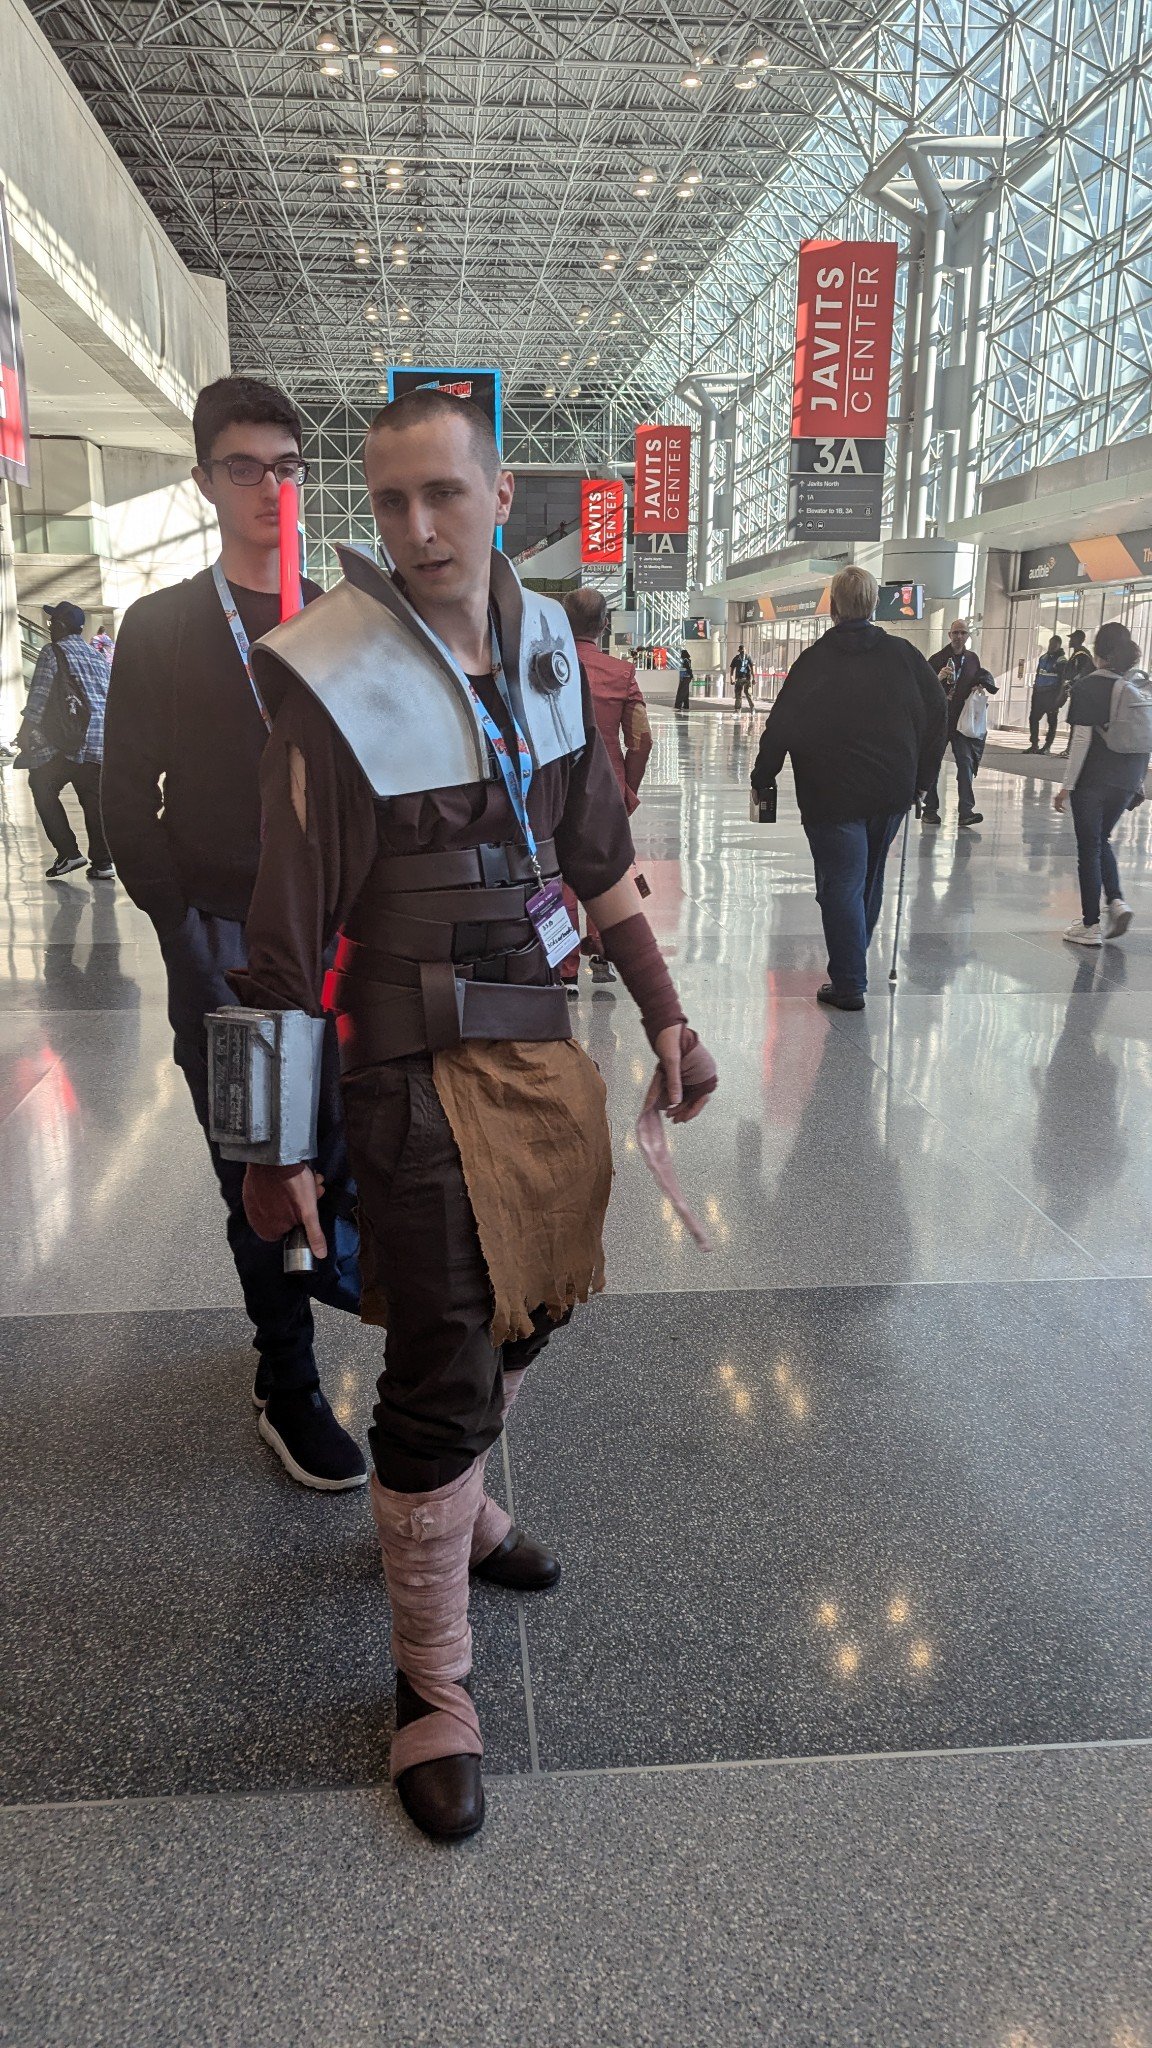
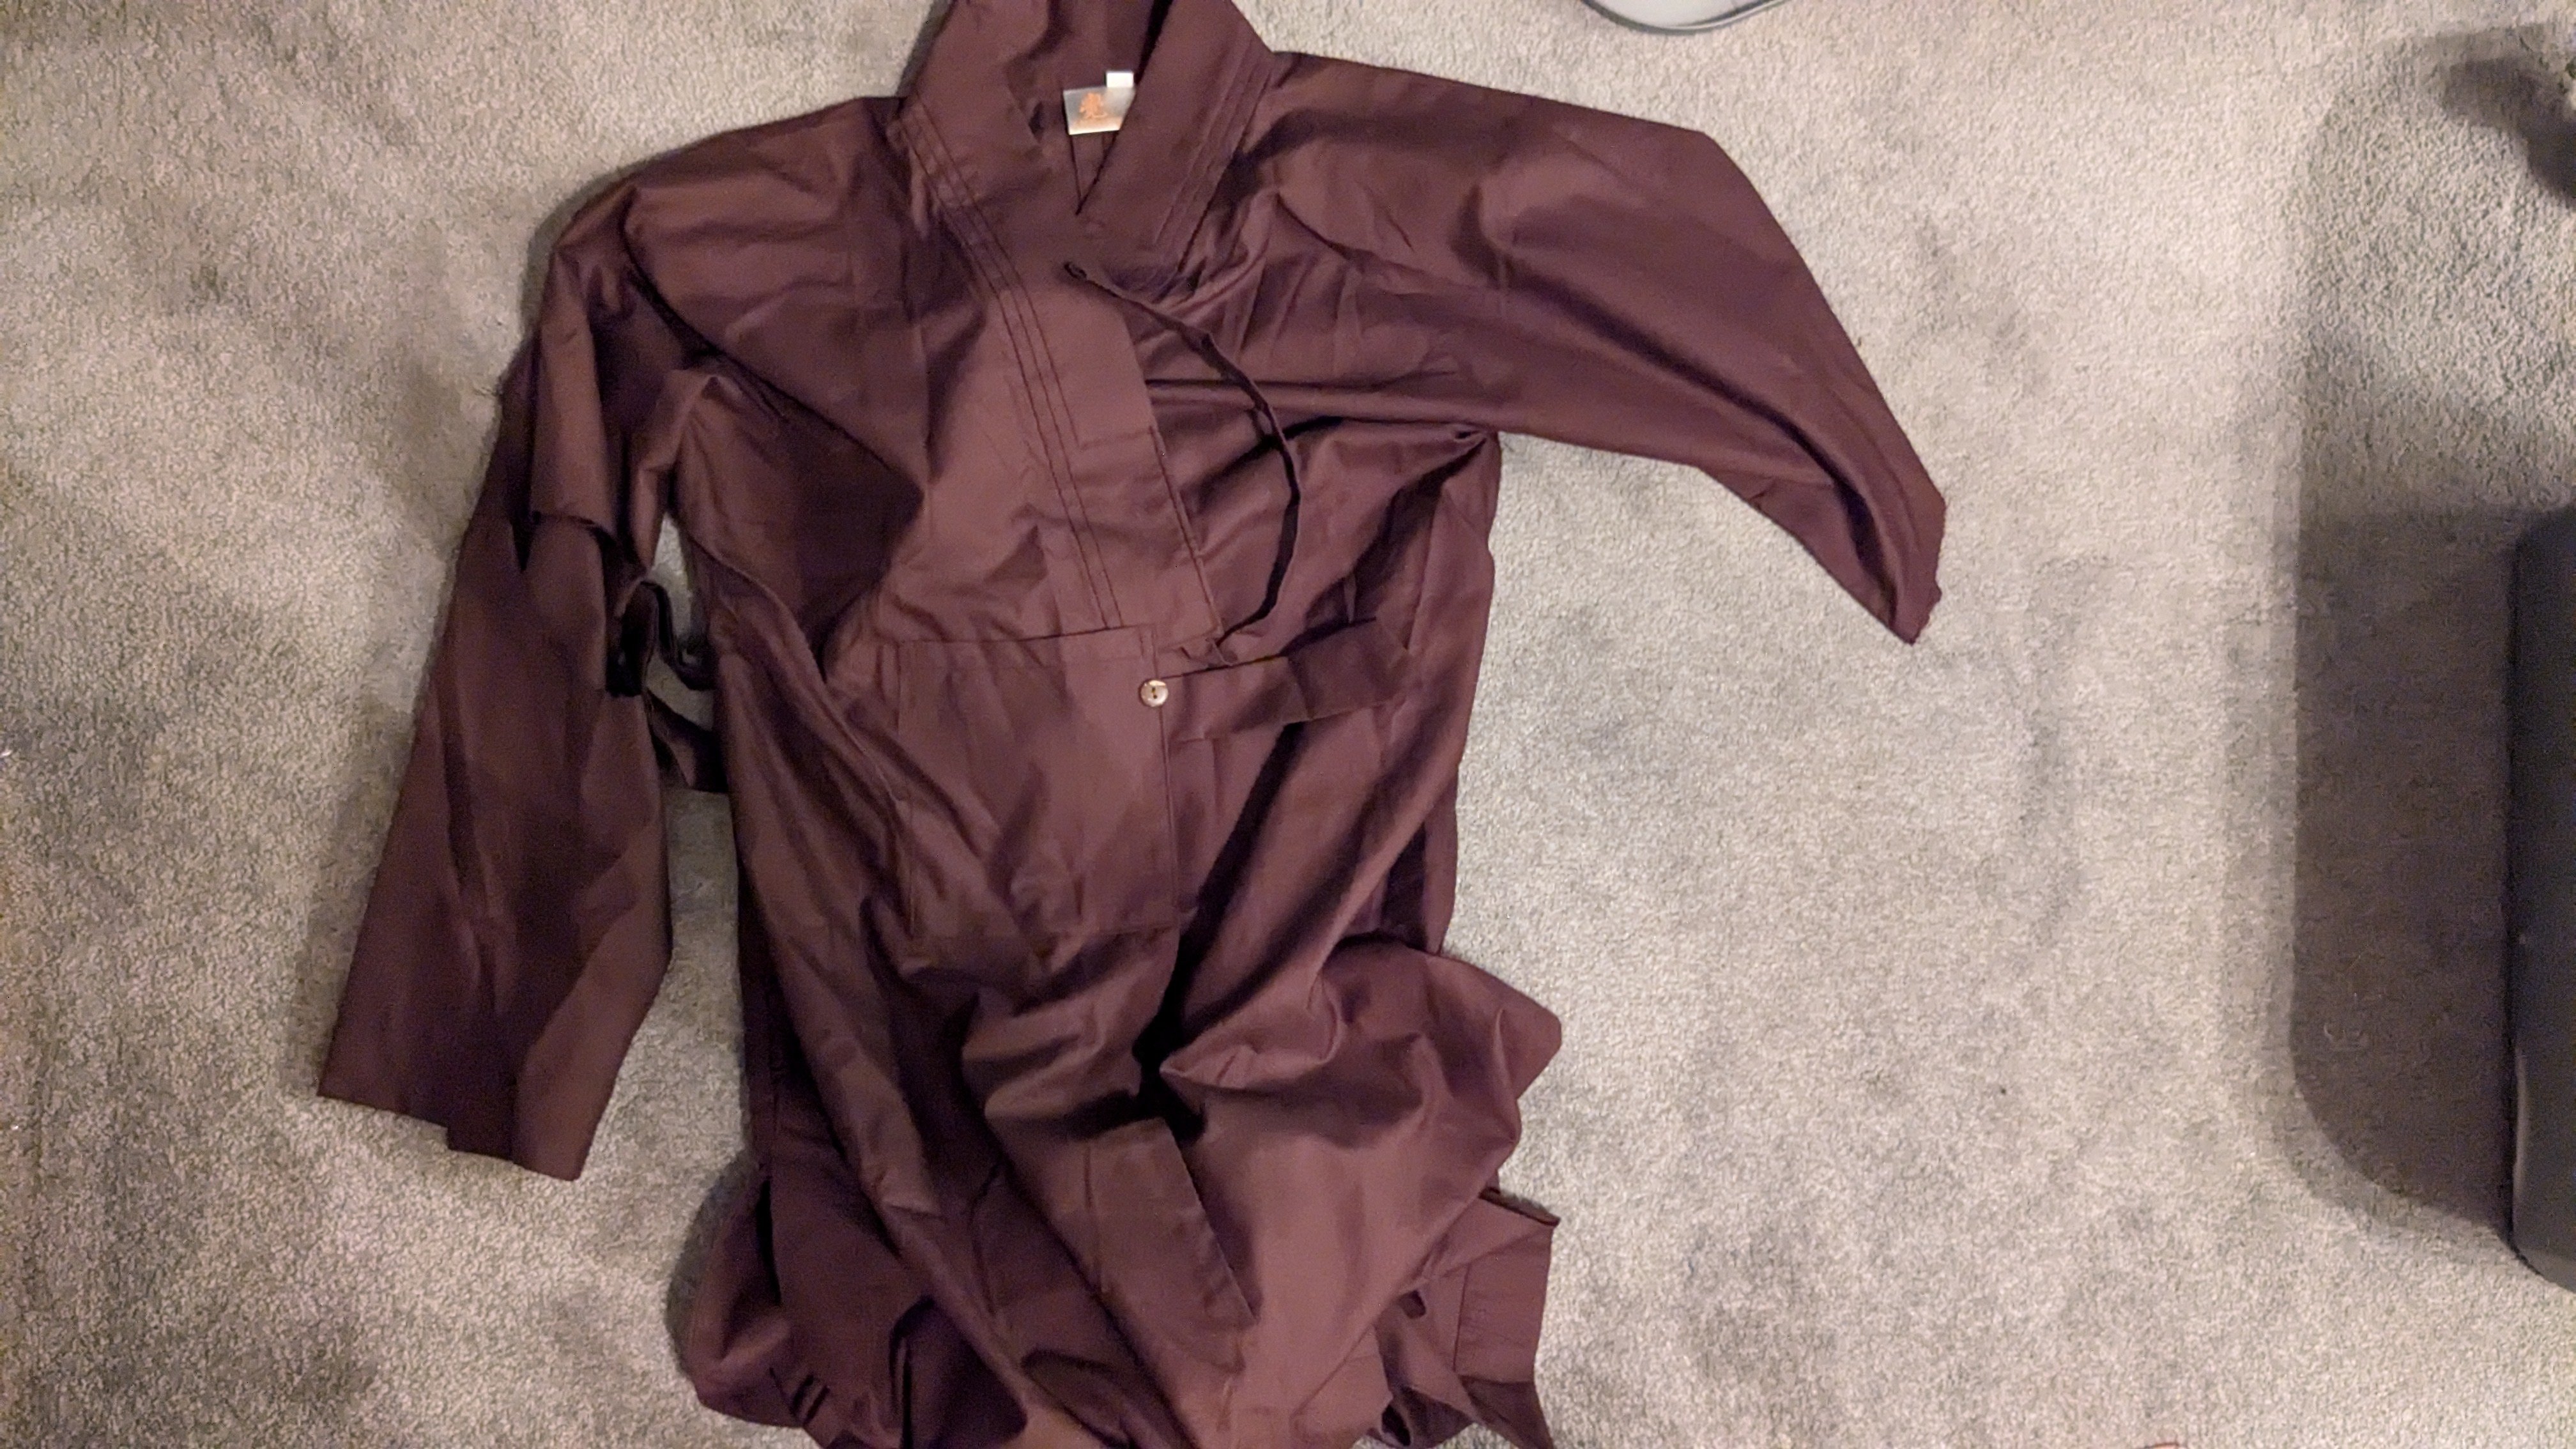
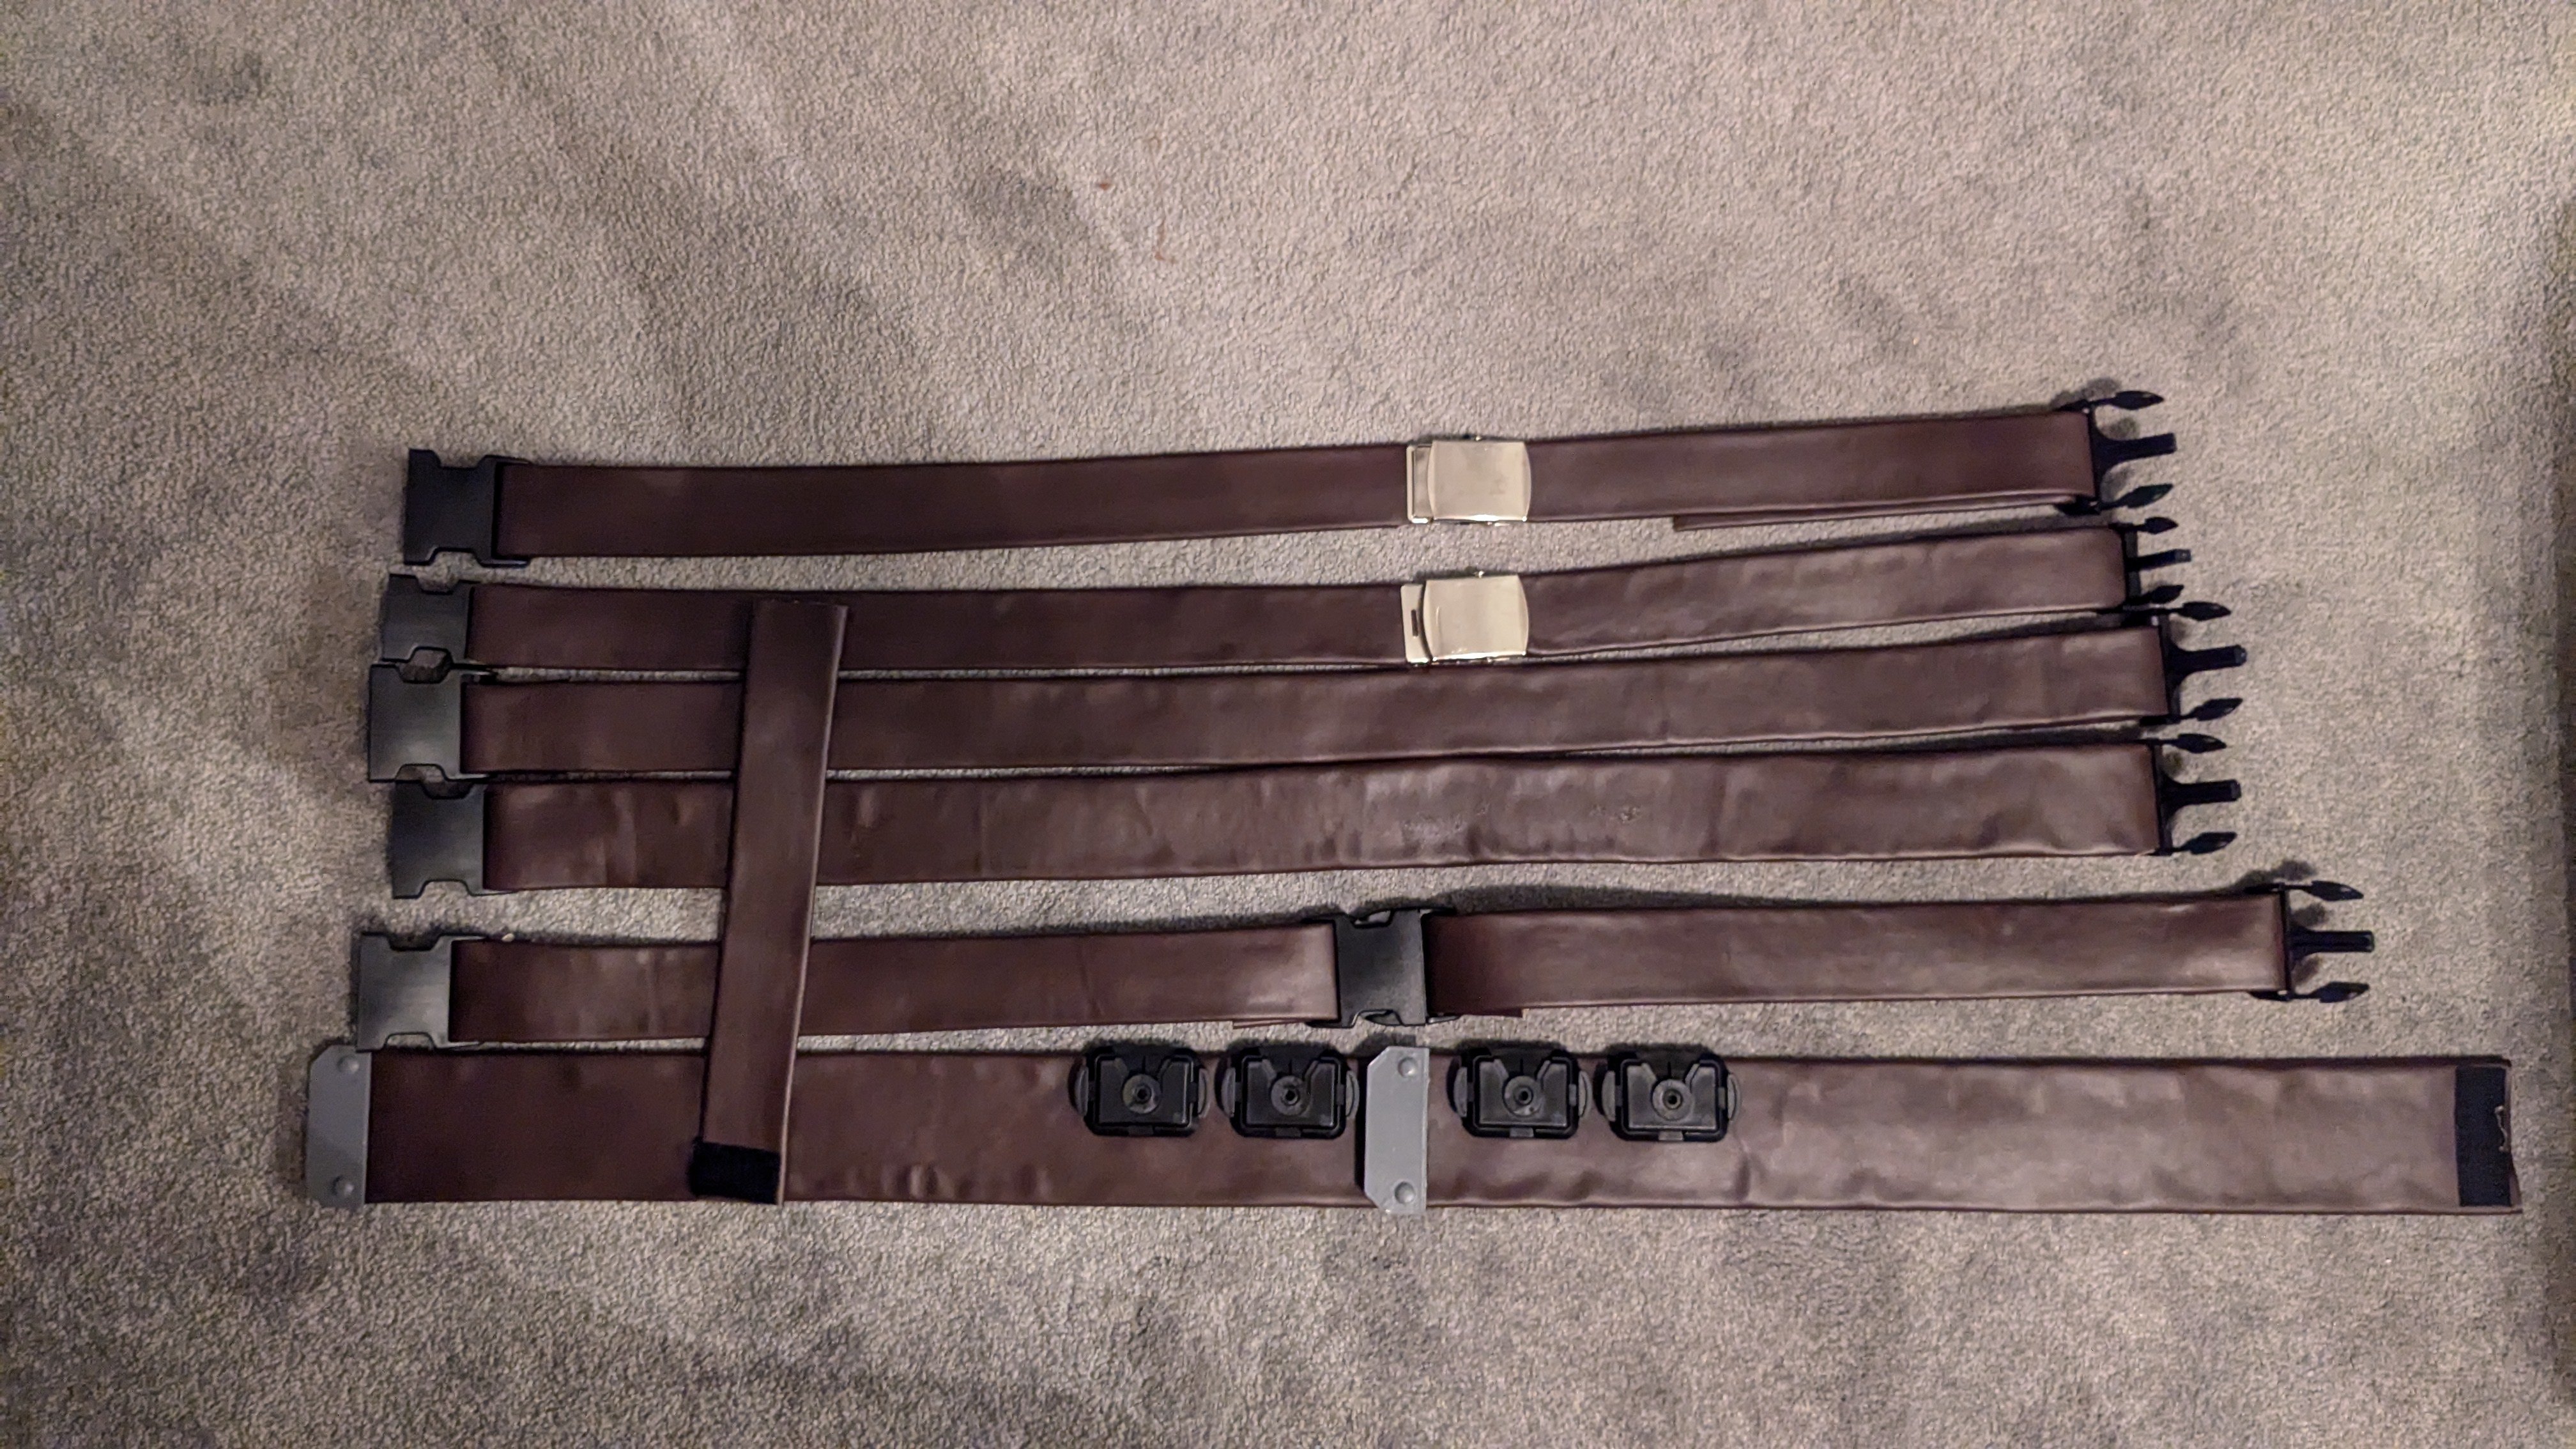
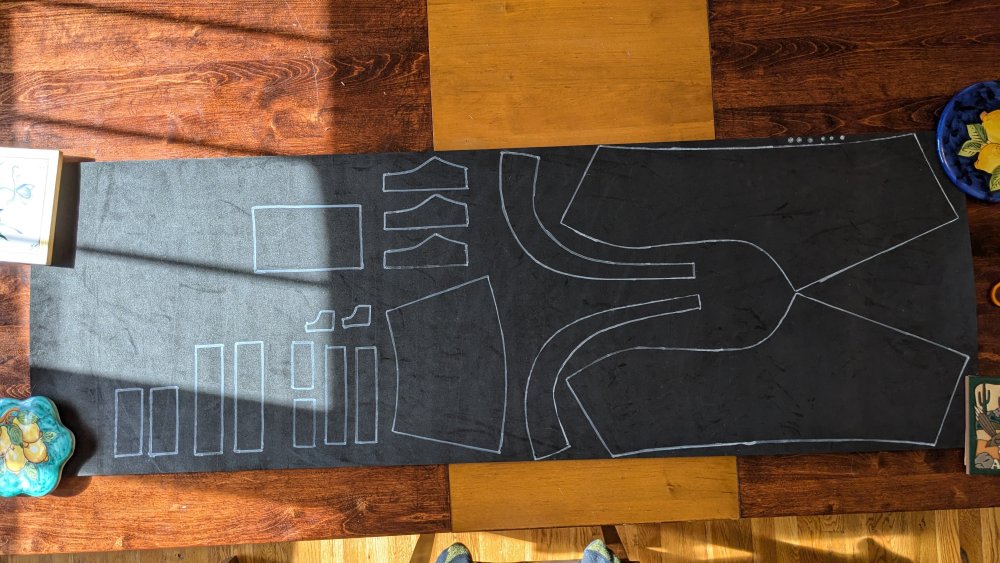
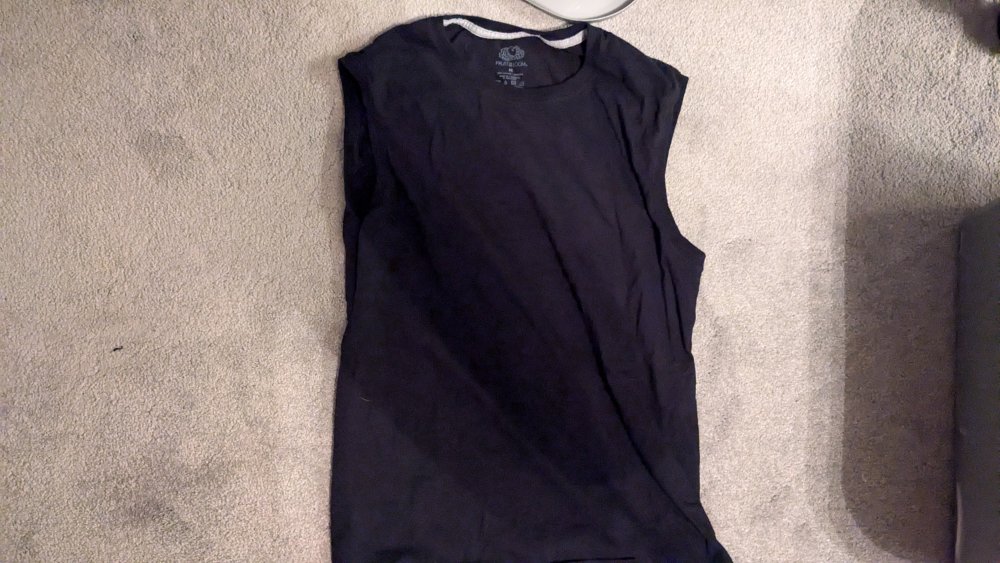
So I've gotten some stuff done. I decided to try on what I have so far. I'm working on finishing the boots. Just got the backpack pinned to the shoulder straps and x straps along the back. I'm going to be adding some Sintra or thin metal to help the shoulder straps keep their shape and prevent the sagging in the back. Pouches are almost completely done. I had to blue tape the small additional pouches on the backpack, but they kept falling off. I'm happy with how they look so I plan on gluing them down. I also started on the belt. I have to make the second layer and fix up the side where her light saber hangs. and I also have to make a mount for the lightsaber. I also started working on the bracers. Played around with a concept which seems to have worked so I am moving forward with it. When I'm further along with them I'll post pictures. Once I have the boots finished, the backpack and straps finished, and the belt finished, I'll start modeling the blaster and the knife. Then make the holster and sheath. Either way, please excuse the untidiness of everything and that my husband took a few weird photos. Oh and pinning through multiple layers of leather and neoprene sucks. And pliers are important!!3 points
-
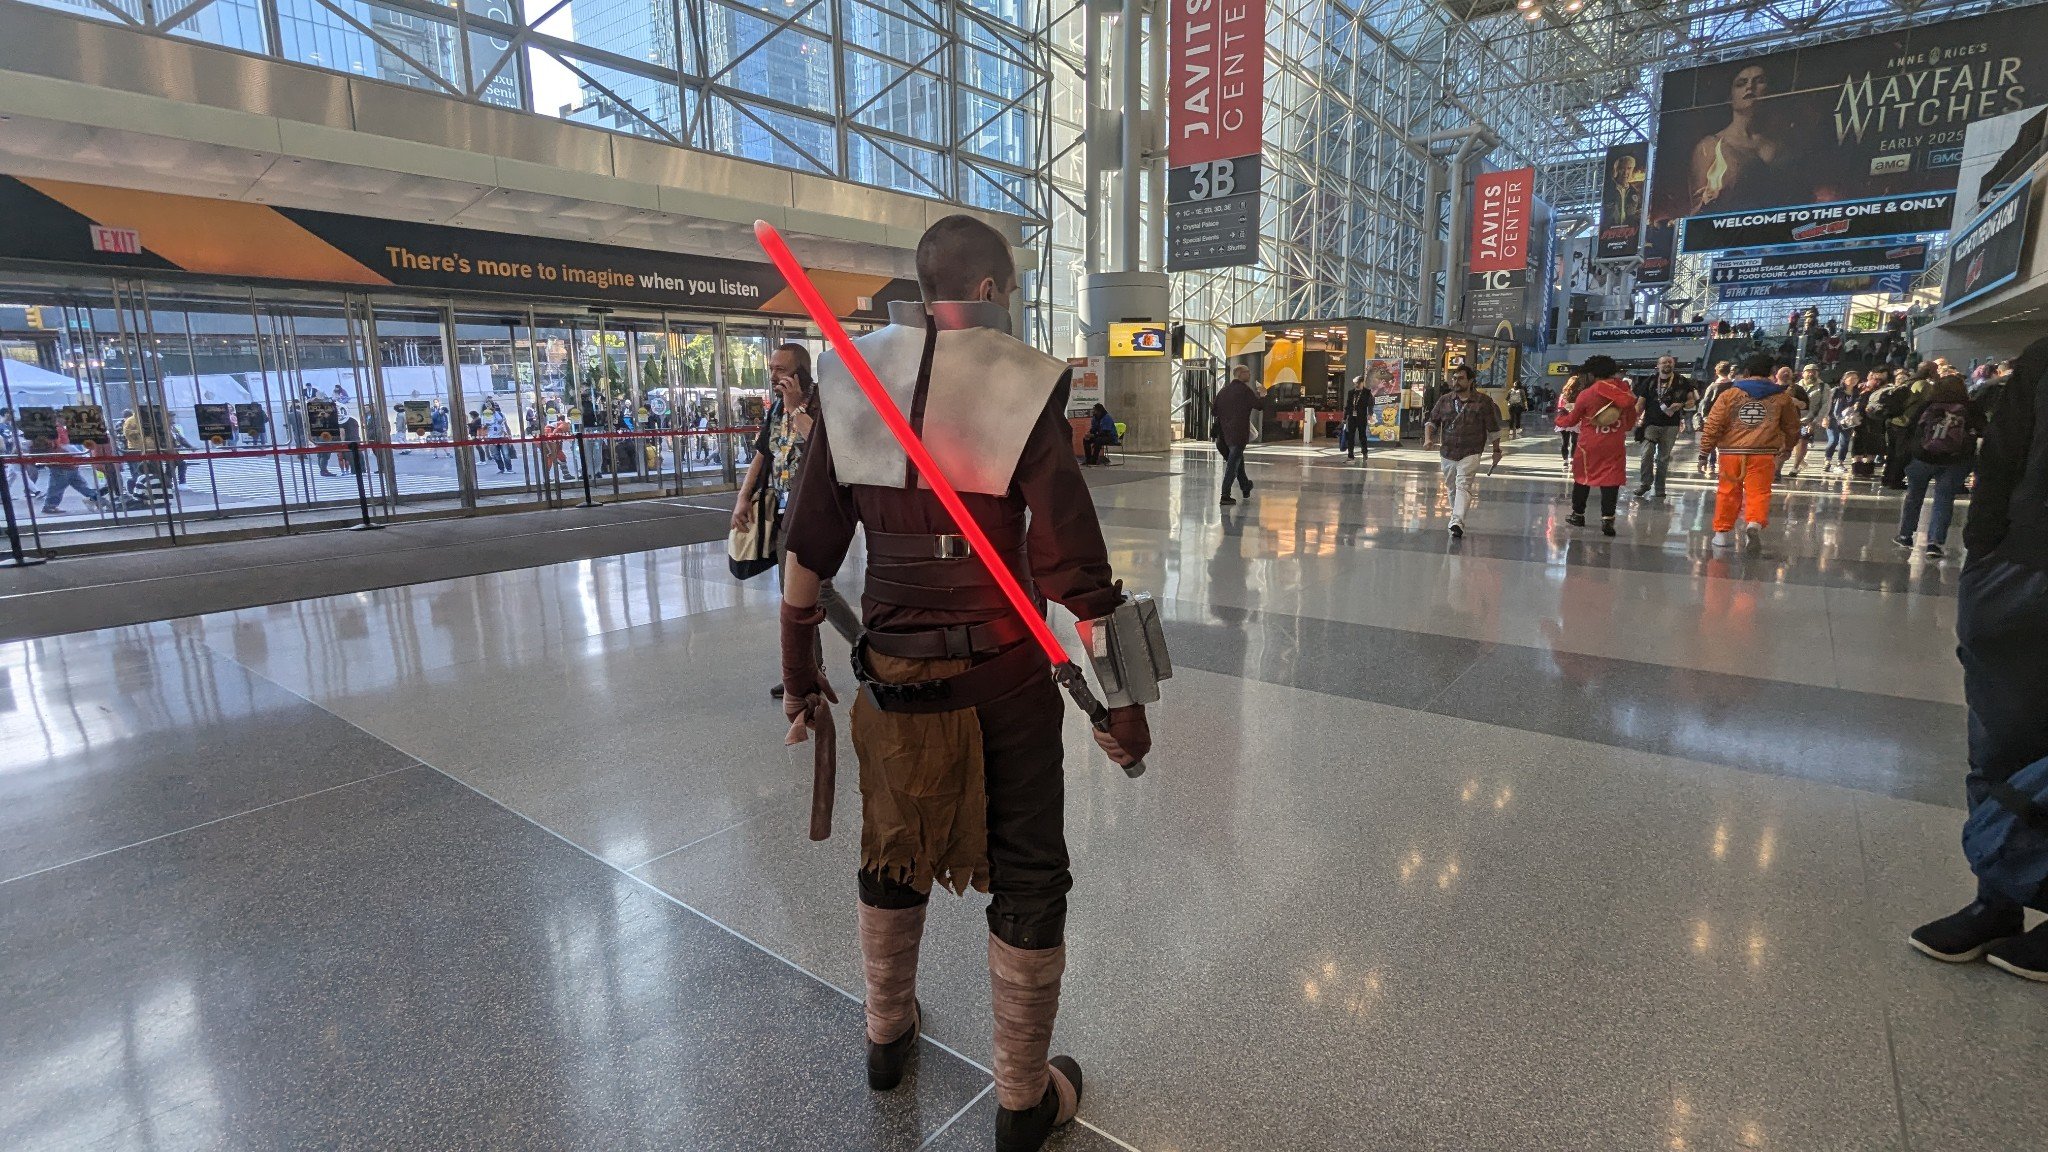
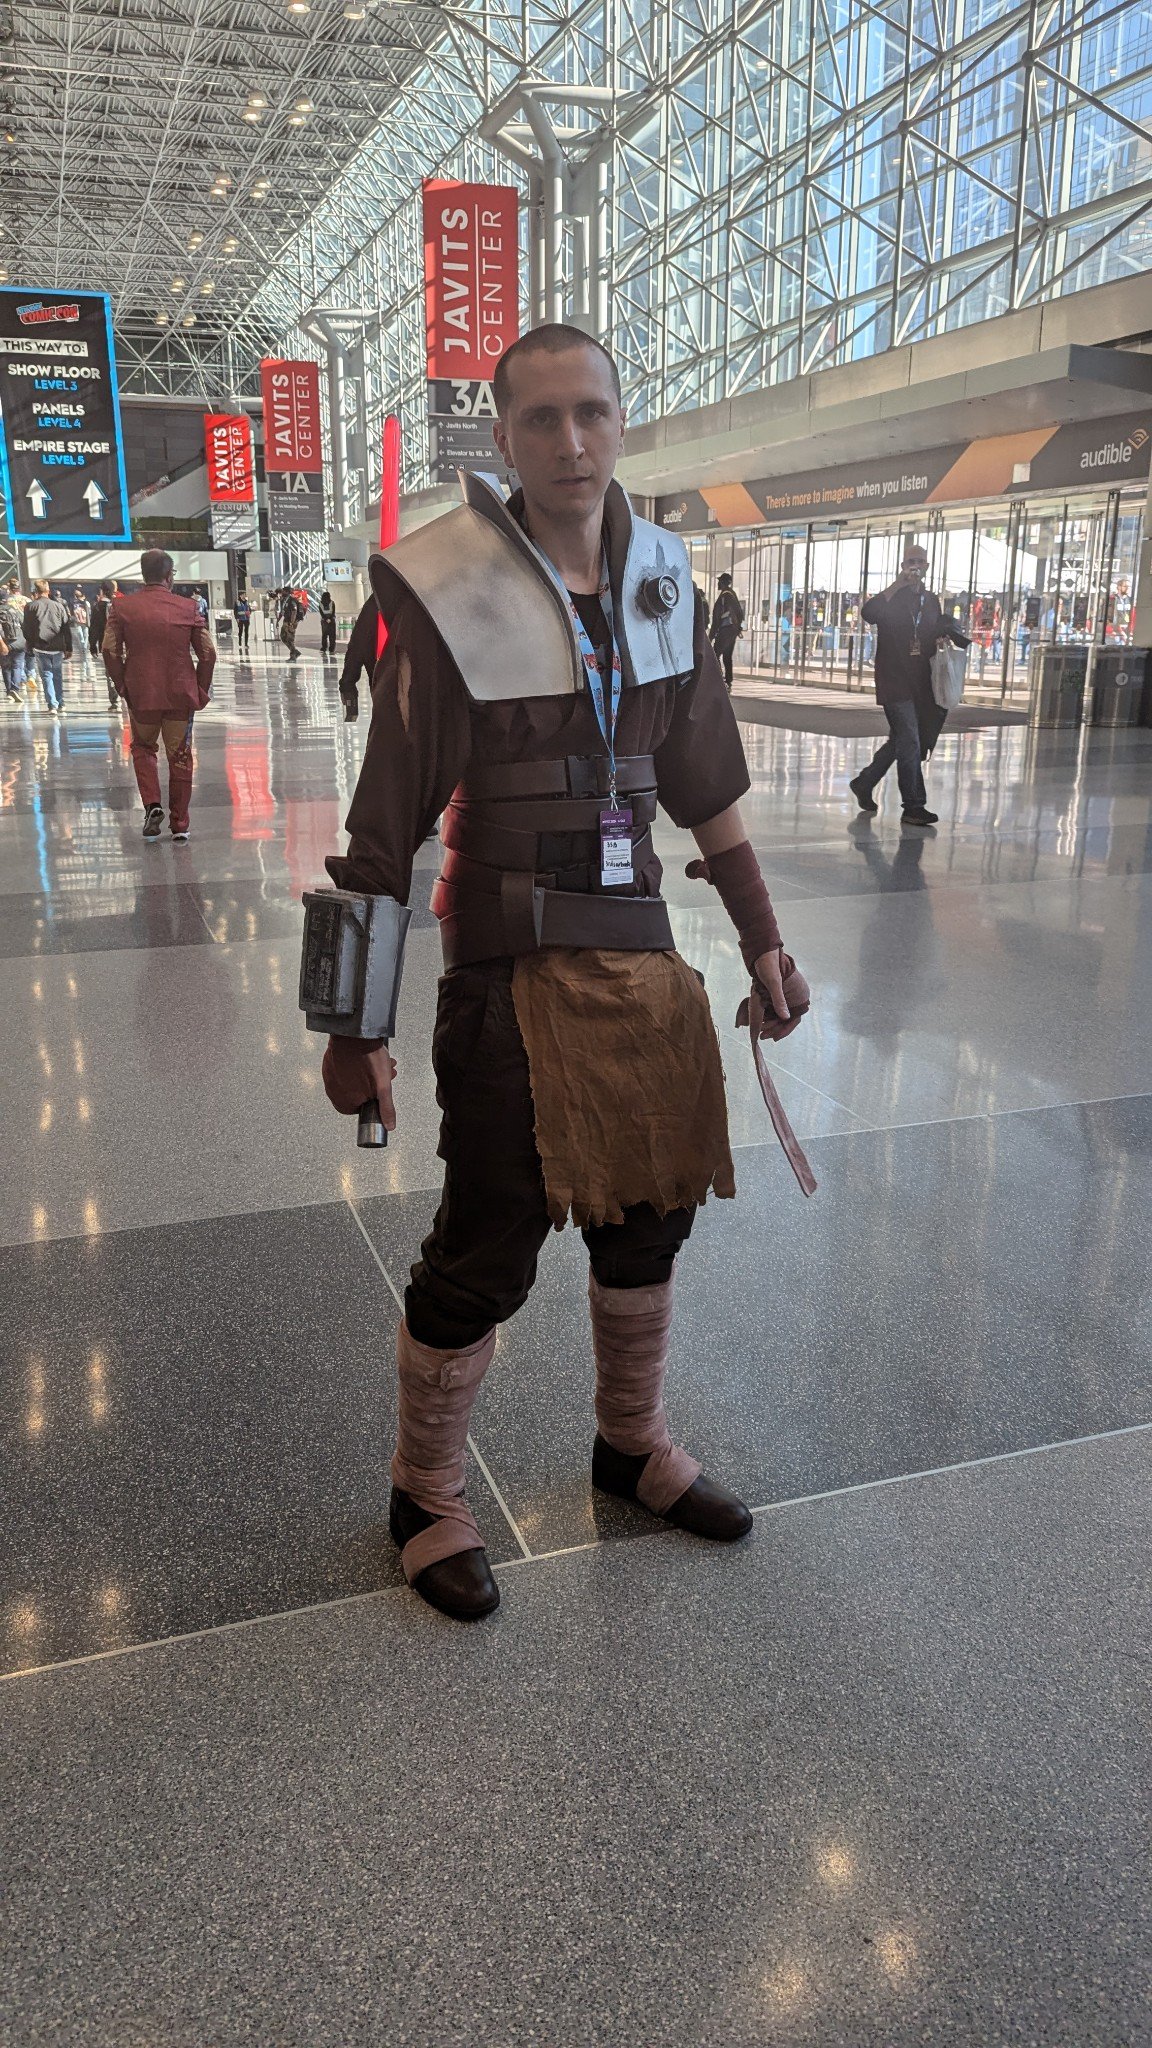
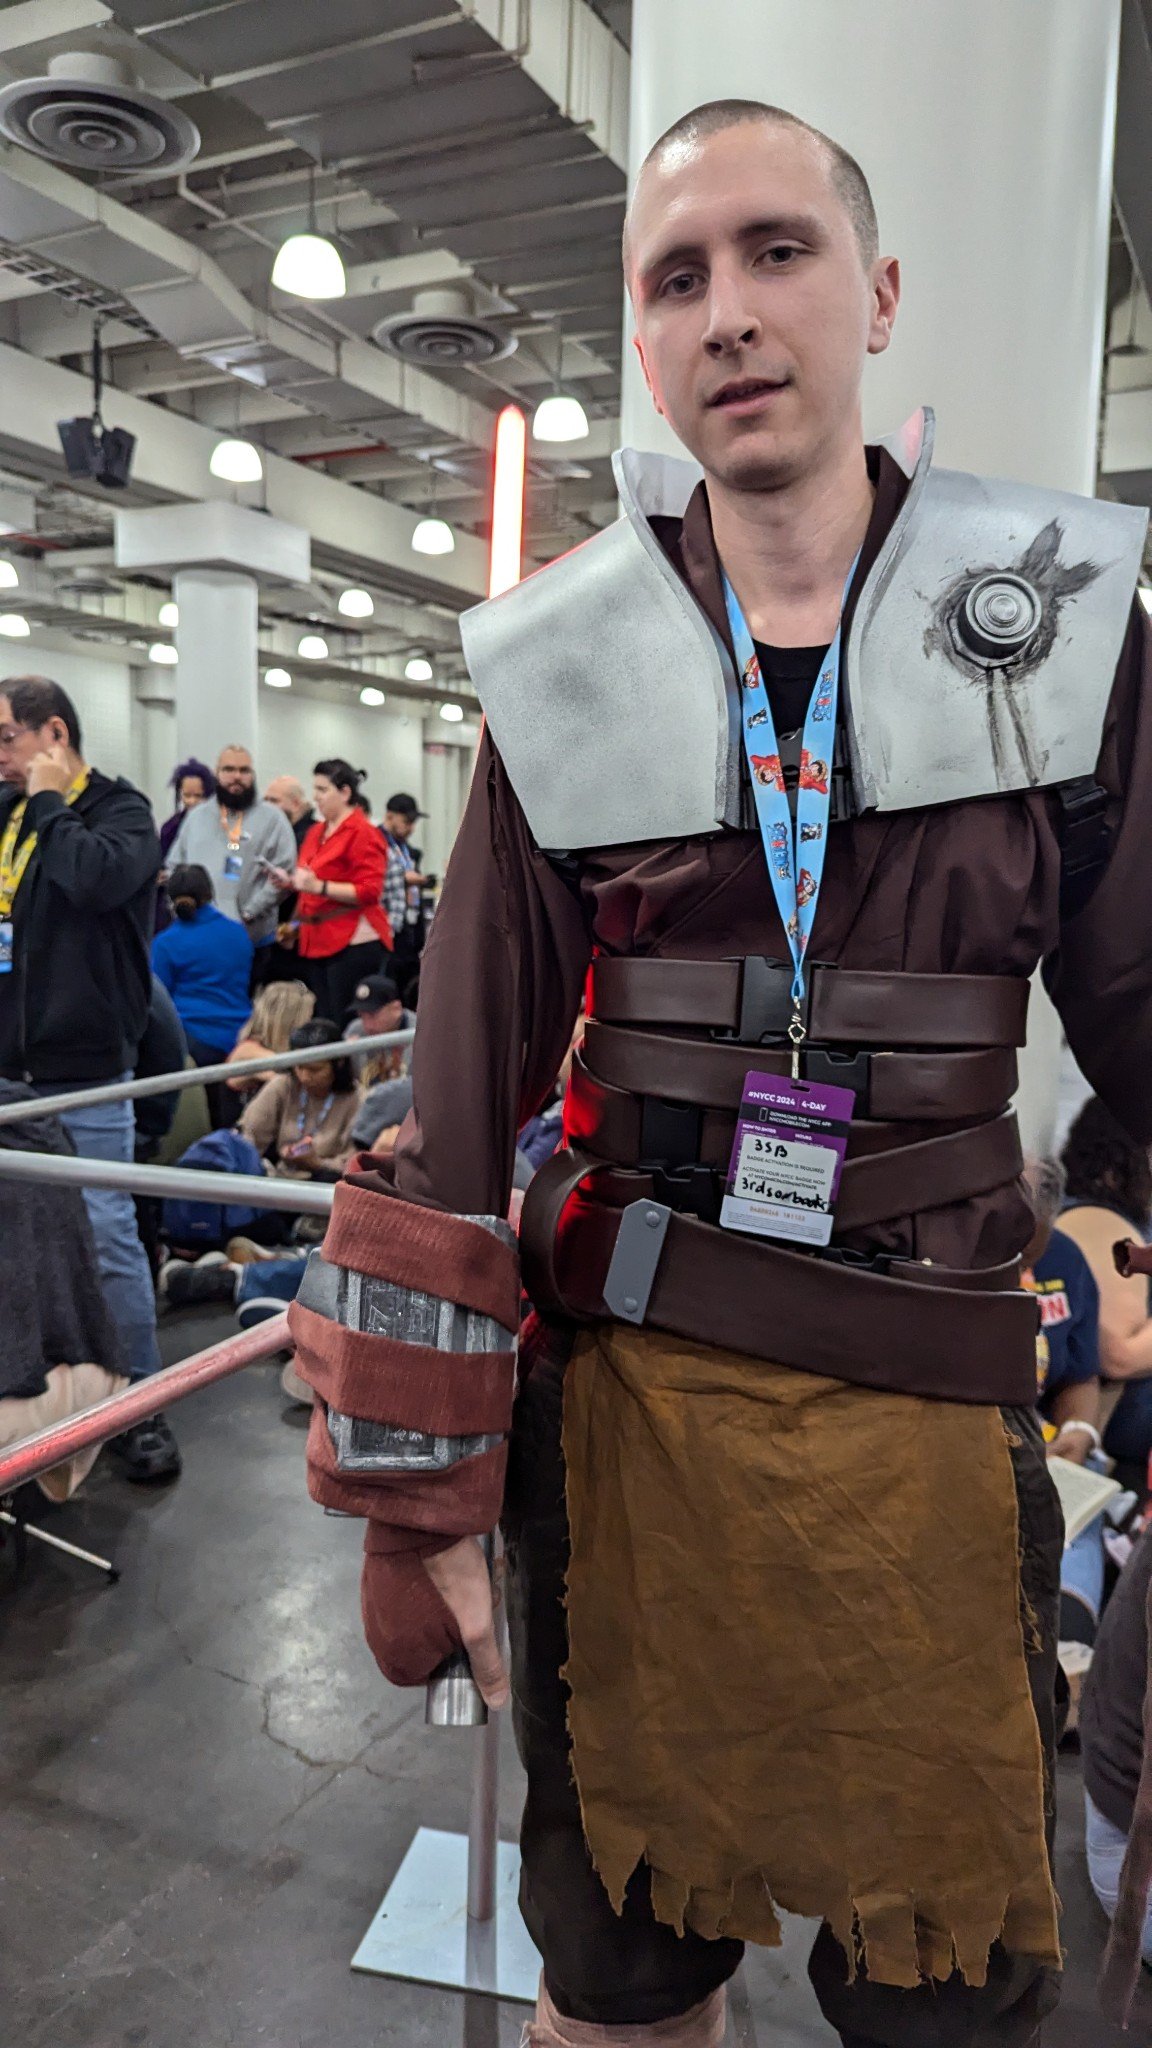
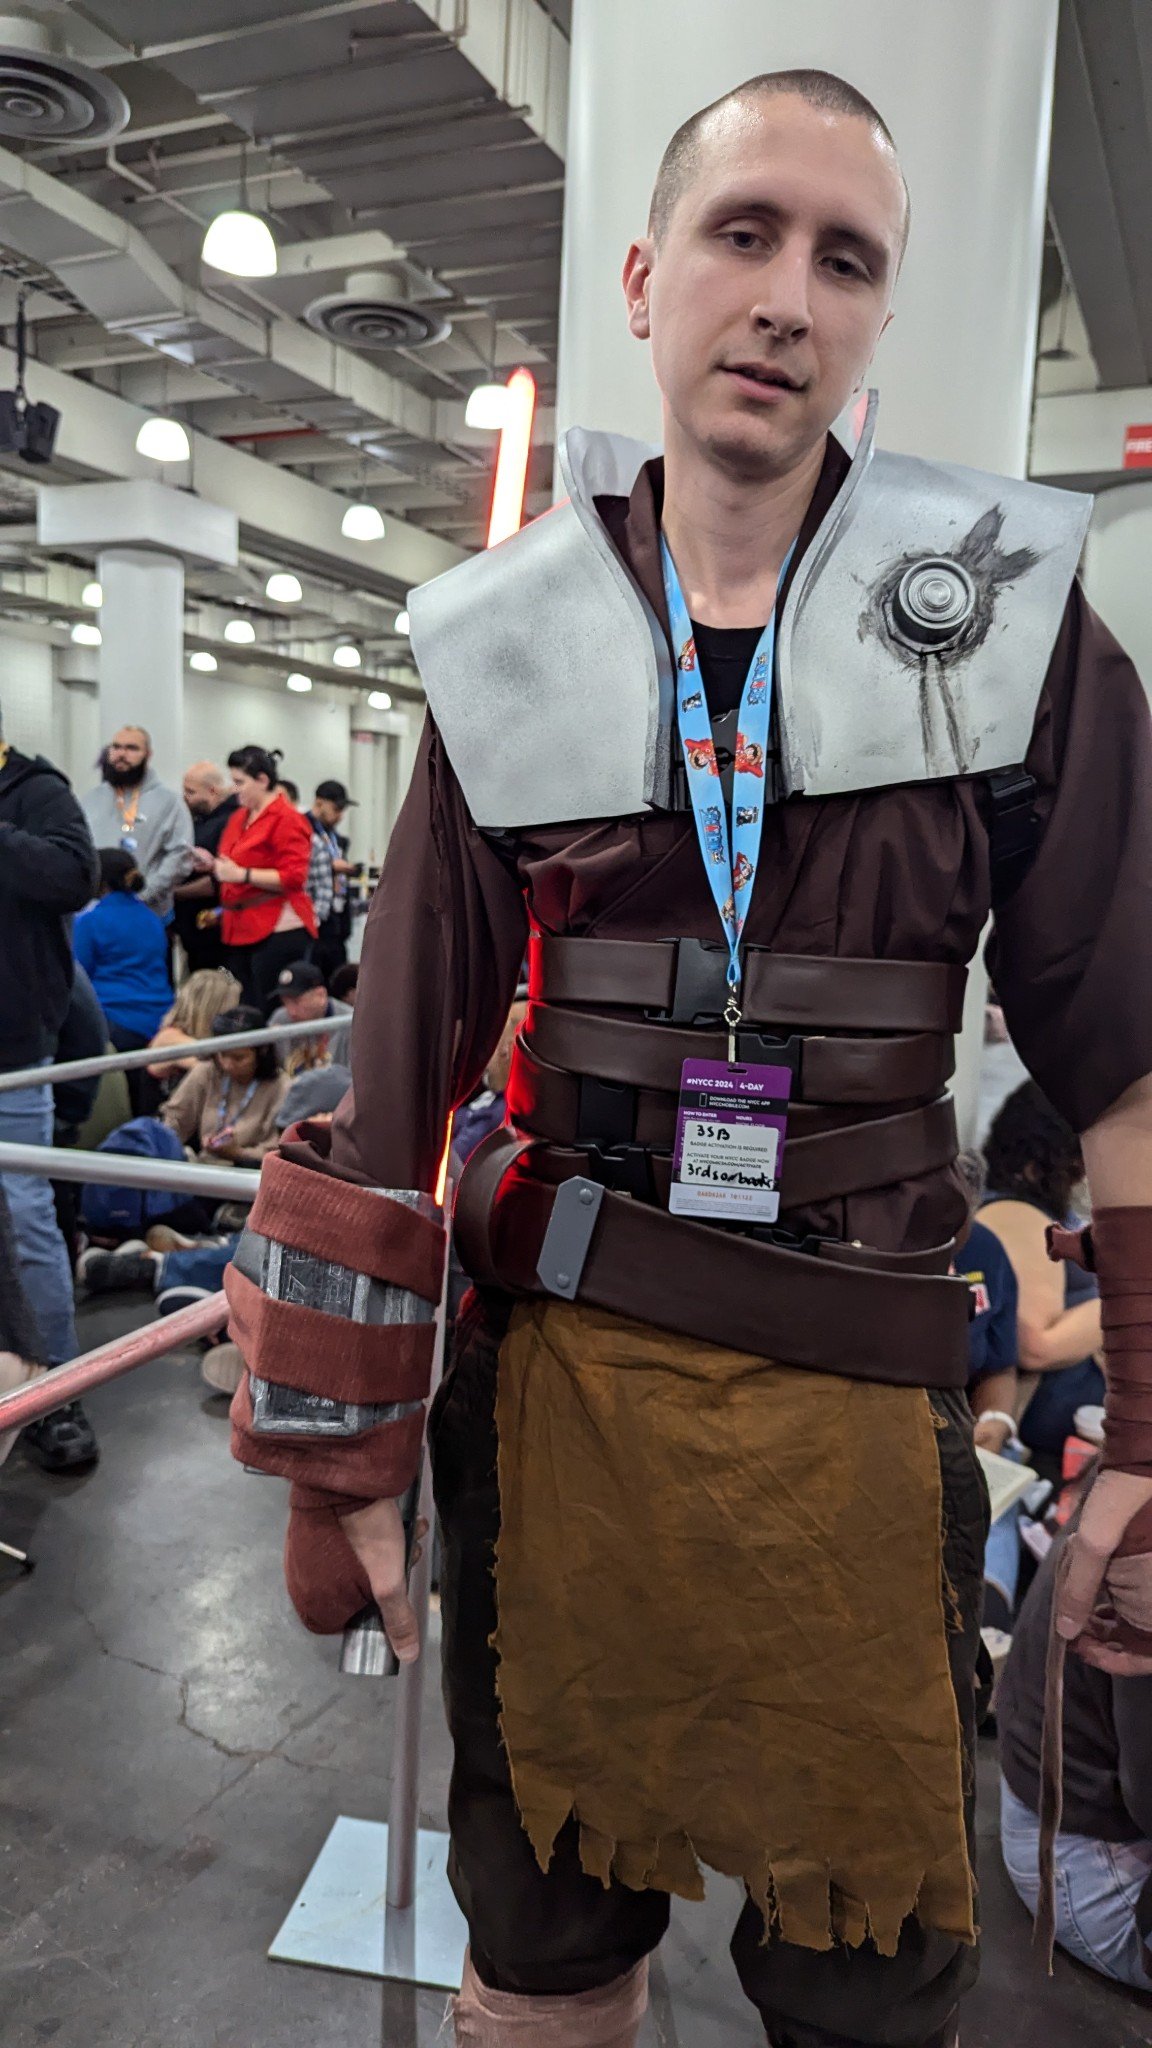
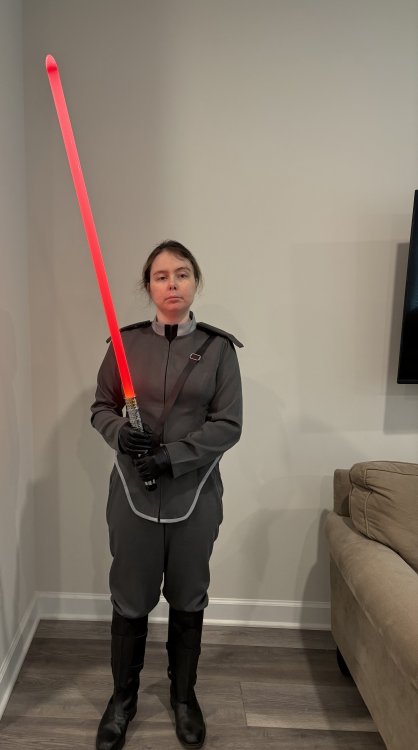
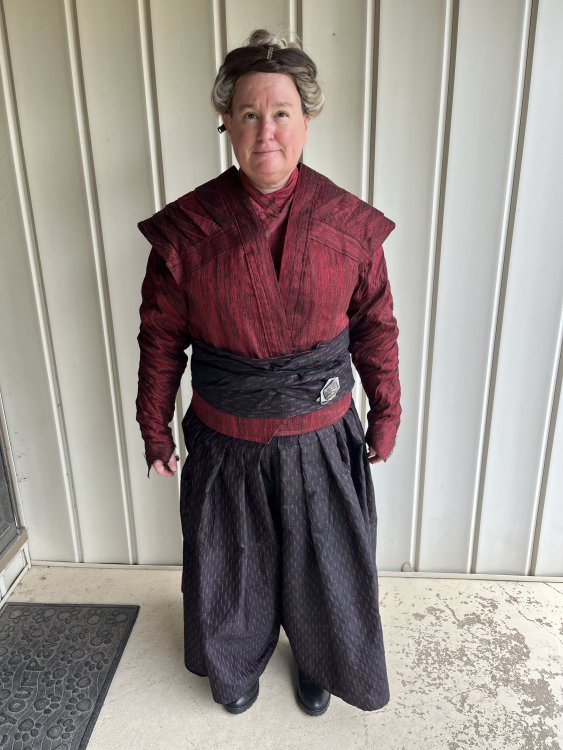
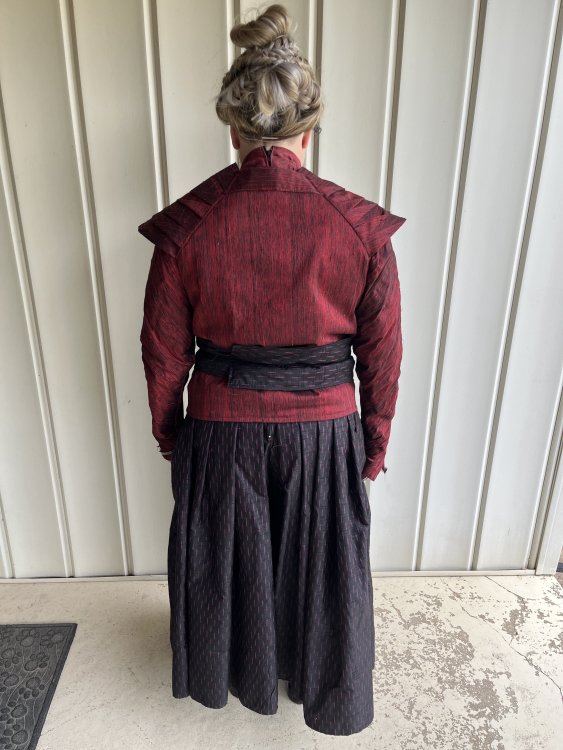
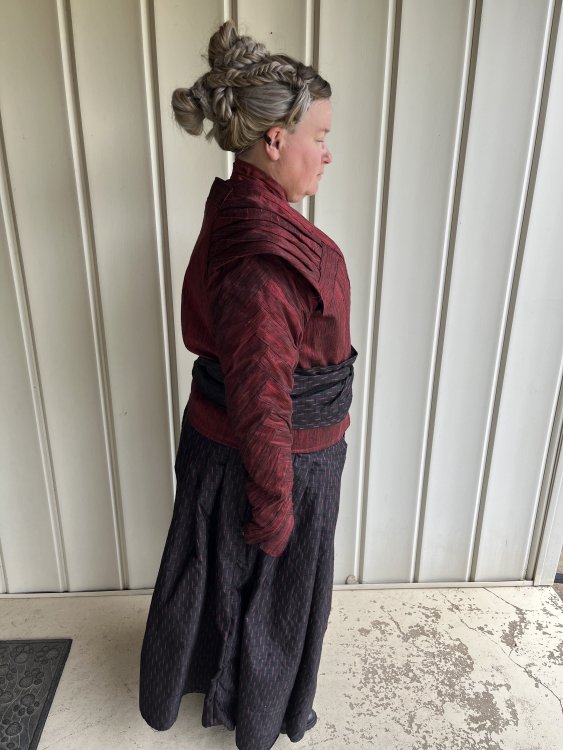
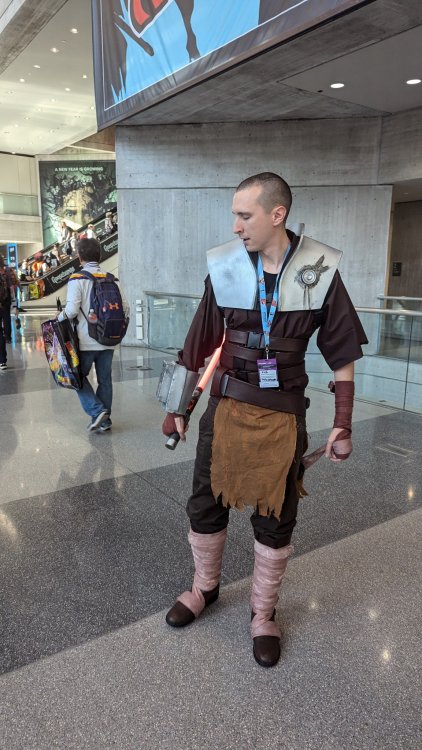
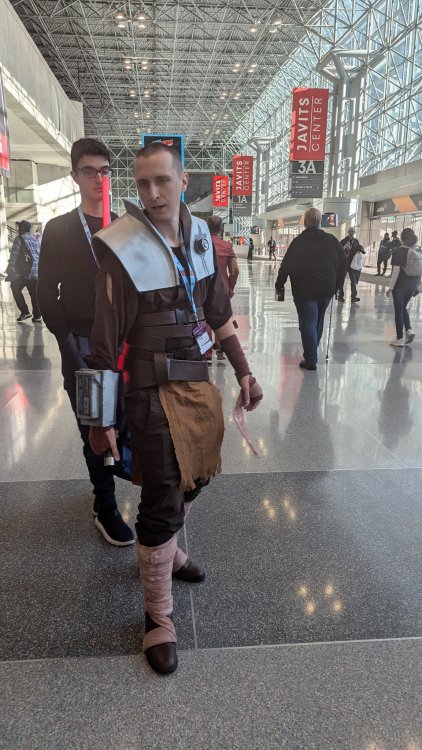
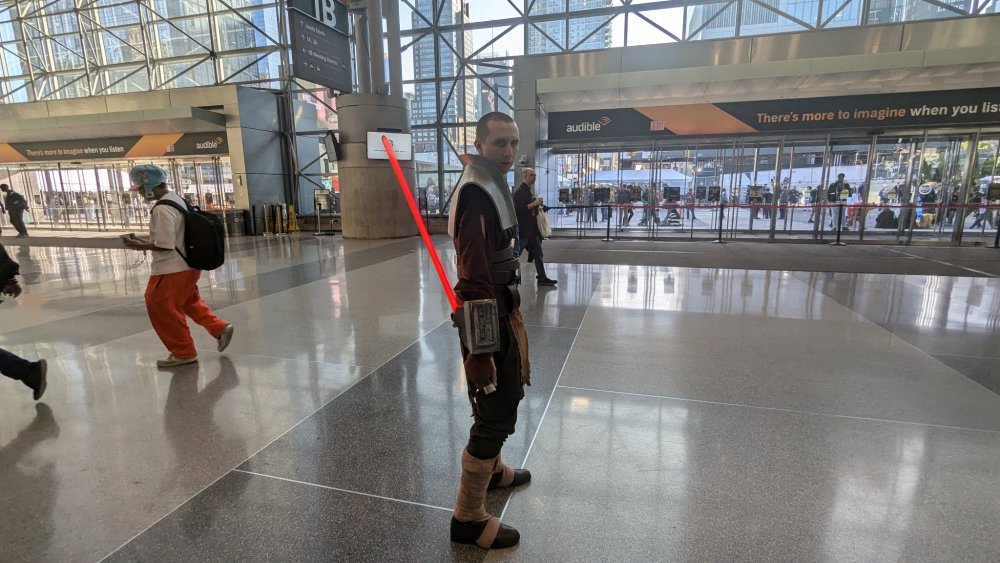
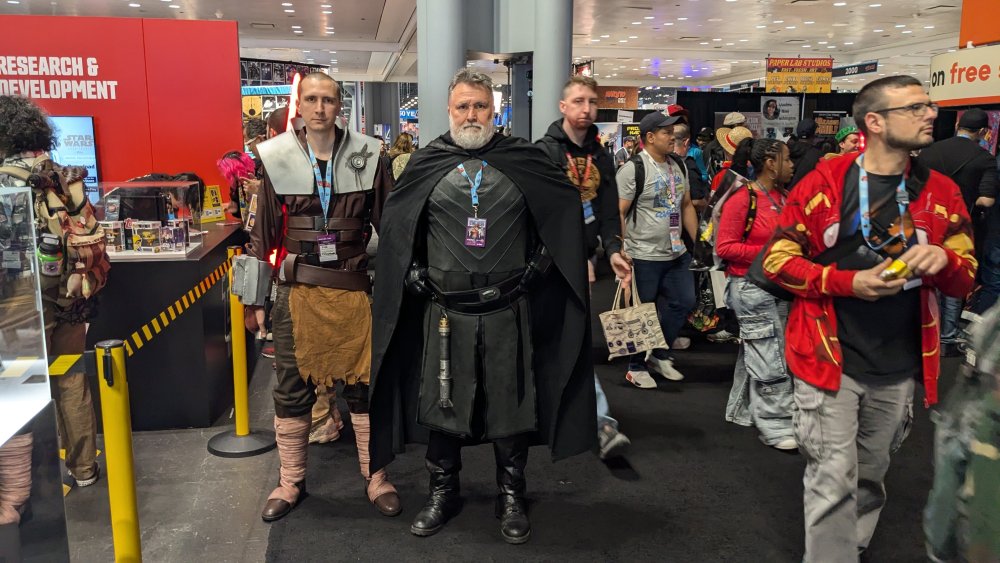
I’m very excited to announce… Thats right! The costume is now completely assembled. Now the next steps I’m not entirely sure. I imagine some tweaks may need to be made or what not but I have never made a CRL before so I guess we’ll see. Any advice is appreciated!3 points
-
Hello from France (but like one foot in Belgium and one in France) I'm Antoine (but prefere my nickname Gaz😀) SL-62477 🙌 I have my Darth Revan approuved this month and proud to be part of the 501st / The Flagship Eclipse detachment after some trooping invitations with the Belgian Garrison 🤝 And special thanks to @VadeRick62023 for time and patience
 3 points
 -
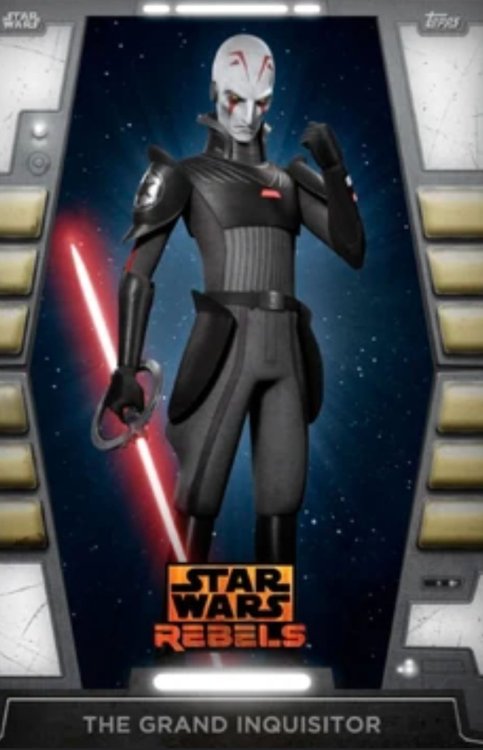
Hi all. I'm Tracy. I recently got approved in the IOC for an ISB officer to be able to troop sooner. I have to big goals with costumes. One is Grand Admiral Thrawn. And the other, which I anticipate will be much more complicated, is the Grand Inquisitor. I get the feeling I'll be working on it for awhile, but got to start somewhere, and will be asking a lot of questions. I'm based in the Pensacola area of Florida, but I'm a travel RN right now so will be seeing many different areas. Don't have my tools with me right now, but I can plan. I hope to make as much of the Grand Inquisitor costume as I can. In the process, learning a lot about makeup and masks and armor. If it something more than I can do, I hope you all can help me.3 points
-
Hi everyone! I absolutely loved The Acolyte and I am happy to start a build thread for this super comfy Osha outfit! I have been mostly in the research phase, but I am hoping to start this build very soon. To start, I do have a rough write-up started as well as an album of reference images. I'll link the gallery here :) Here's an overview of my build plans; - Wig: I have 3B/3C curls, but I am dedicated to my current hairstyle. As such I have been looking for a wig either already curled, or a wig I can curl, in as close colors as possible. I might have to custom dye a wig but we shall see! For a visual idea, here's a few ideas I found from Amazon and a couple other wig websites; wig 1, wig 2, wig 3, wig 4, wig 5 - Hoodie: I think my current plan is to use my favorite knit shirt pattern (Simplicity 9226), modifying it by cropping it in the right spot, adding the under layer, and extending the sleeves/adding the shoulder cut-outs. I'll probably dig through my stash for a hood pattern, but otherwise I might be able to draft it myself. For fabric, I am thinking of using either ponte de roma knit or scuba knit. I am not ready for the possibility of dyeing more grey fabric so I am hoping to find some already in the correct color. - Pants: They look like pretty simple leggings. I have a couple of patterns for leggings, but might also try my hand at pattern drafting if I can't find a pre-made pair. I'll be making them from a charcoal grey ribbed knit. - Boots: Looking at references, they appear to be calf-height black leather boots with a suede over layer and flat soles. I'll probably look around for a base pair of leather boots (either second-hand or I'll look online too!) and add the suede myself. - Saber: My cosplay partner HiraethSolo is working on Qimir, so I'll probably lovingly borrow it from him. I'm not sure what he wants to do though, so I will look at options - Knife: I am looking at one of these options on Etsy, and hopefully will print them myself once the printer is working. ImperialArmorSurplus or BigFredsCustoms. - Tank top configuration: The tank top configuration removes the hoodie and is a matching rib knit as the pants. It also features her arm tattoo. I'll probably design some temporary tattoos, and will make the tank top myself unless I can find the tank top and pants in the wild to purchase. Let me know if you have any questions or advice!3 points
-
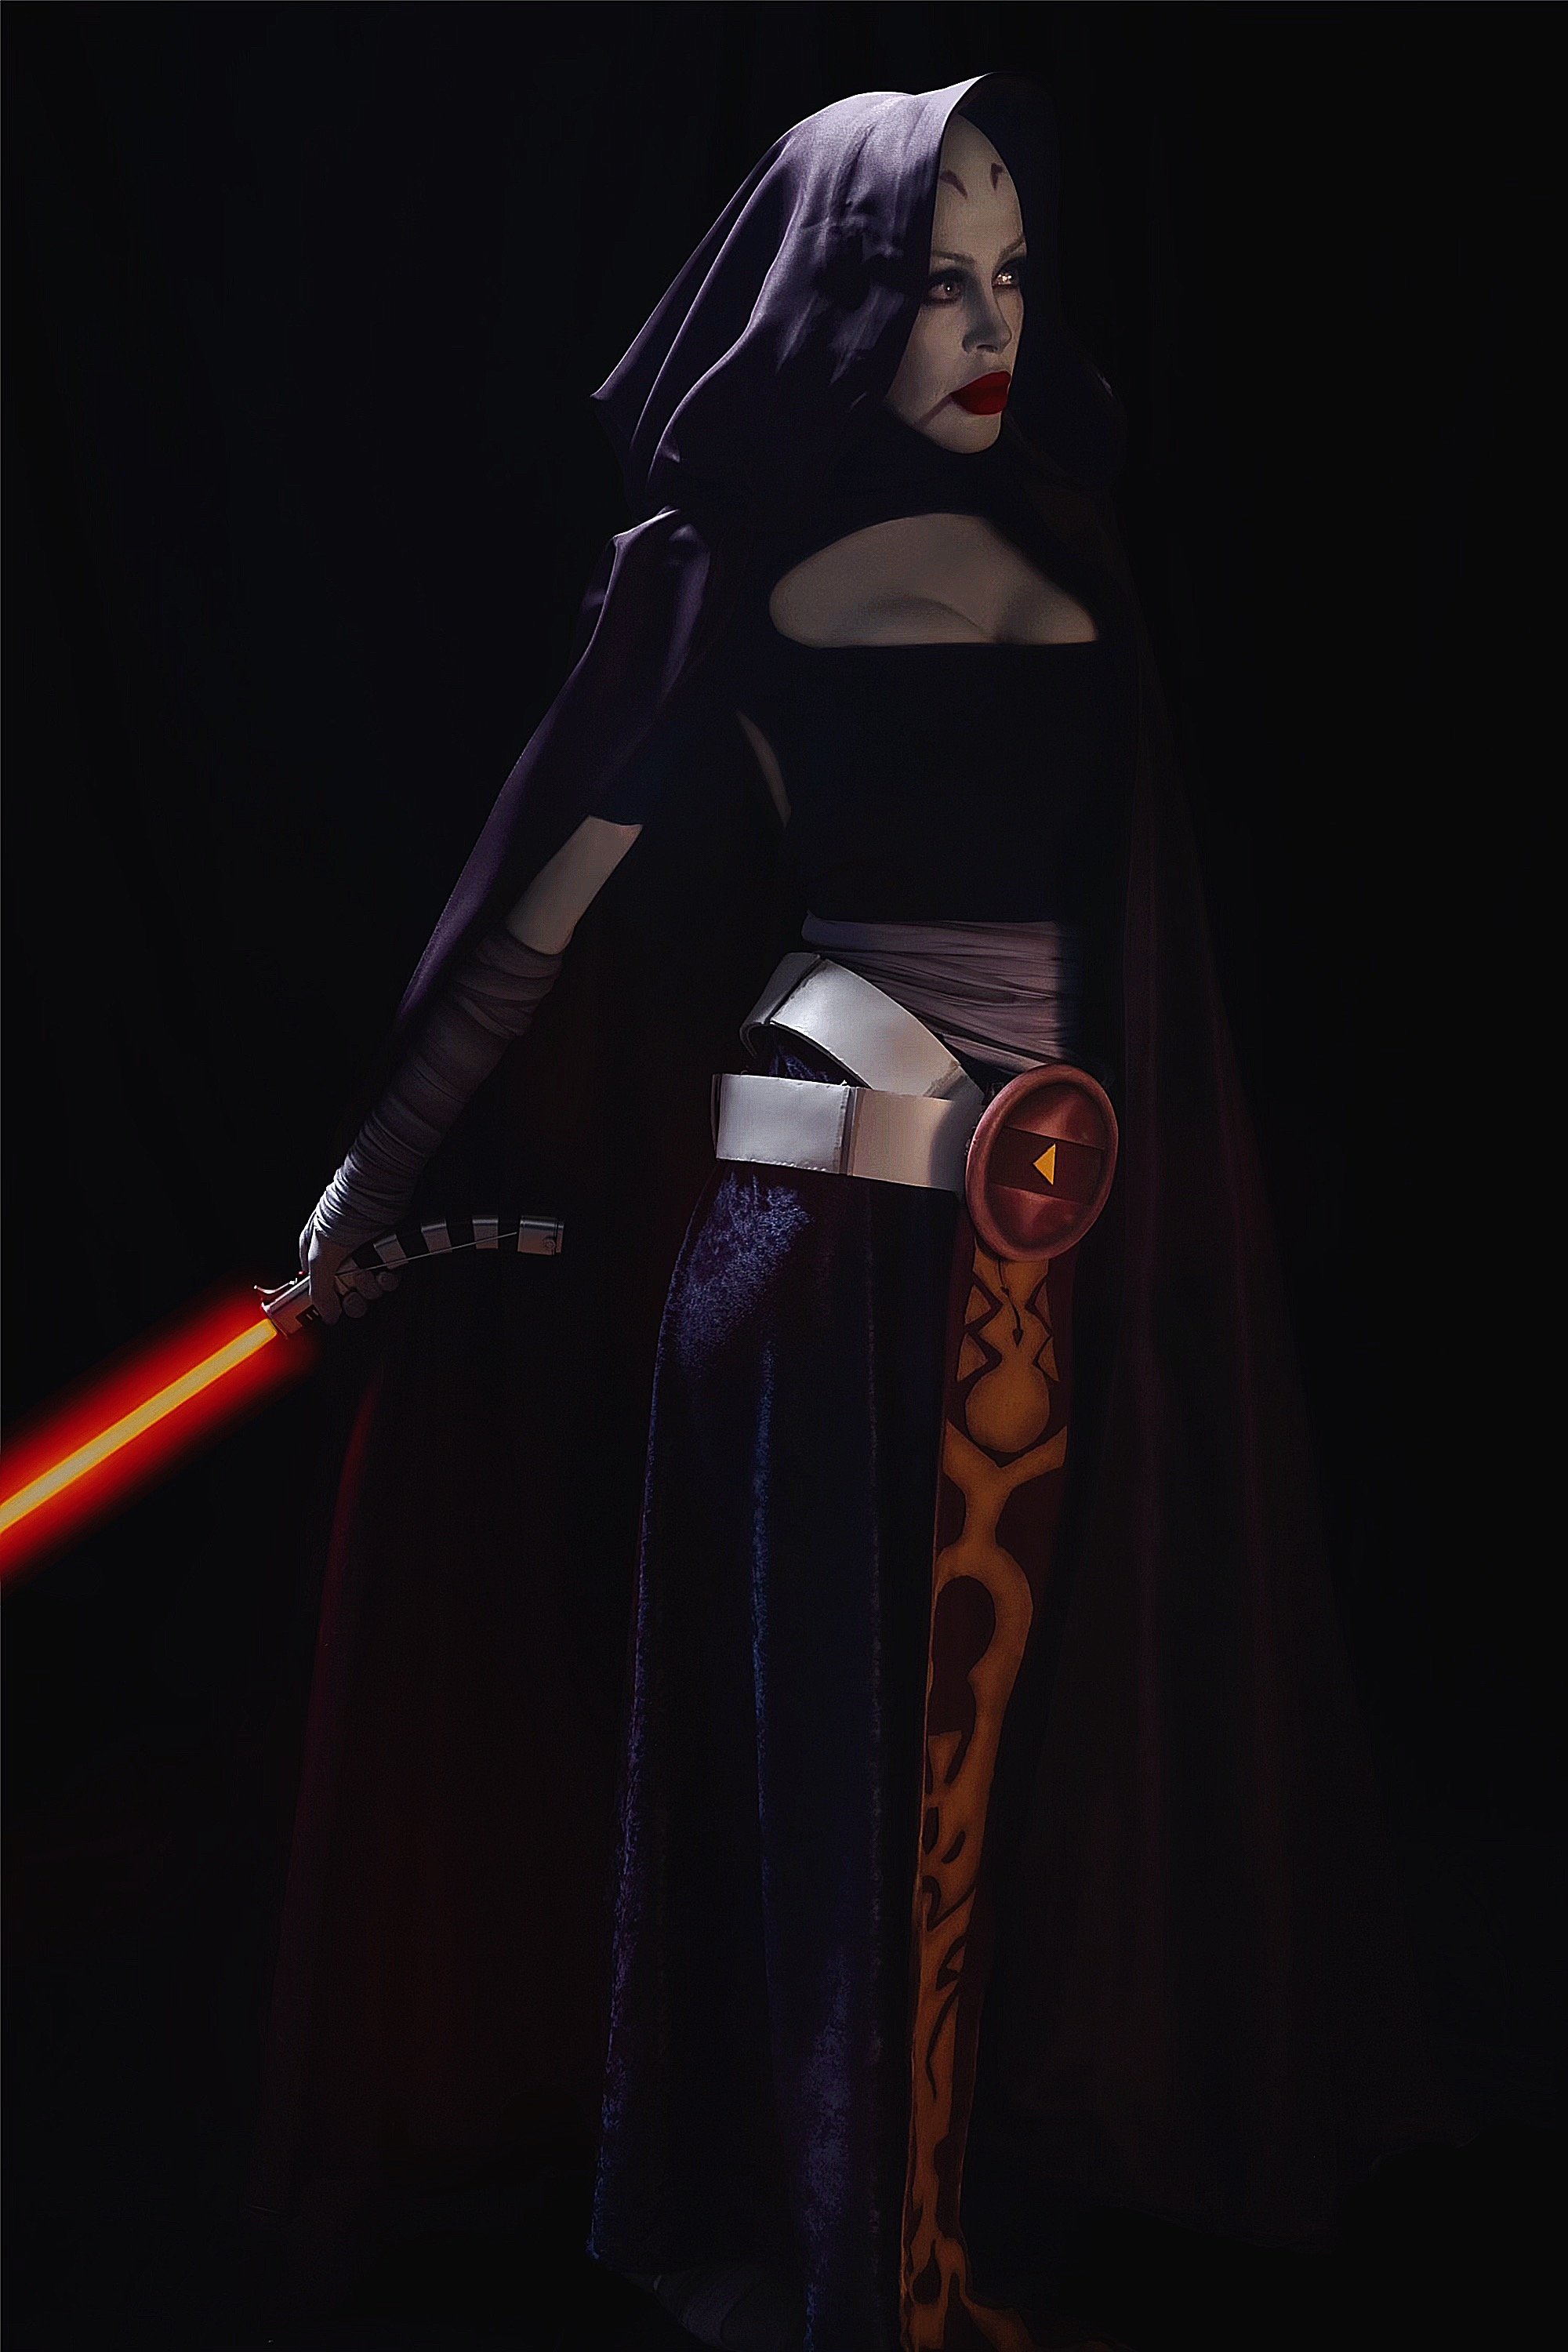
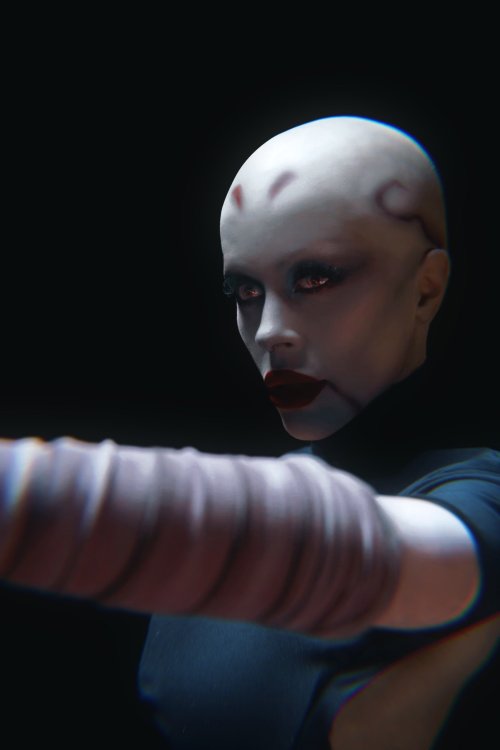
Hi everyone! Finally got my butt in gear and got my clone wars asajj approved and hopefully the first of many asajj approvals for me. I made every single aspect (except my lightsaber) from scratch without much experience before so I’m really proud of this one 😊🥰 I’m a brand new member of the pikes peak squad and the mountain garrison! Excited for all the new experiences to come 💕


 3 points
 -
Barry, this is absolutely amazing! I am constantly in awe of your hard work and the amount of details and energy you put into anything Asajj. They're currently updating how CRL's are stored as they were taking up too much room on the website and it needed a good ole overhaul because of just how many new costumes were being created. Hopefully that should be done soon and this will be released into the world. You should be so, so proud of yourself.2 points
-
The CRL isn't on hold btw. I'm currently working on doing the initial writeup. This is my test of final items. I'm getting fully kitted and makeup (etc.) for photos tomorrow. And I will hopefully have a pre-edited CRL by the end of this week, or by latest Monday next week. I'm the person holding stuff up. I'm just being fabulously late to the ball darling! 😜2 points
-
This is super well done! I loved seeing this look from Asajj in the show and you captured it perfectly. Heres hoping the whatever is putting new CRLs on hold is finished soon so this can be made official hopefully. I don’t know how much longer I can calibrate my enthusiasm haha2 points
-
I ended up modifying the backpack today. After rewatching of the Tales From the Underworld I could see the shape of the backpack better. I tapered it so it came in at the bottom more. I also modified the two boxes to be angular. I also added the toggle buttons (they are functional and hold the lid closed). Yes, I will be supplying the 3d files for them and how i made them. I tend to get hyper focused on stuff and choose to just work and record as i go. I figure i can do a writeup afterwards. I can go more into detail when I'm done for each part if folks are interested. I'm almost done with the build. The biggest hurdle was getting the pack to sit correctly without affecting the shoulder straps. Anyways, I need some sleep... it been a very long week hammering this kit out. Oh and a happy Father's day to all the Dads out there. Cheers Here's picture of the pack as it stands currently modified.2 points
-
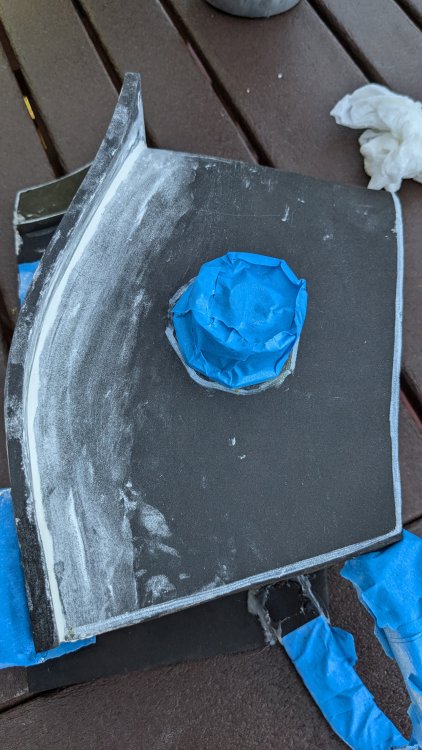
Well 3rd time is the charm. I ended up using double knit neoprene on top of the sintra and scuba fabric. I didn't cut into the sintra this time. I just went and added the whole raised shape as one peice, and then gluing the final layer down to cover everything. It took around 8 layers of the purple paint before it was done. I did do two layers of wet sanding to help smooth out the surface. I also did a dry sanding to give it a weathered look along with the silver paint. It now bends when needed and doesnt crease or resist movement. Sort of creating my own custom vinyl. I now have to go back and remake the other gauntlet to match.2 points
-
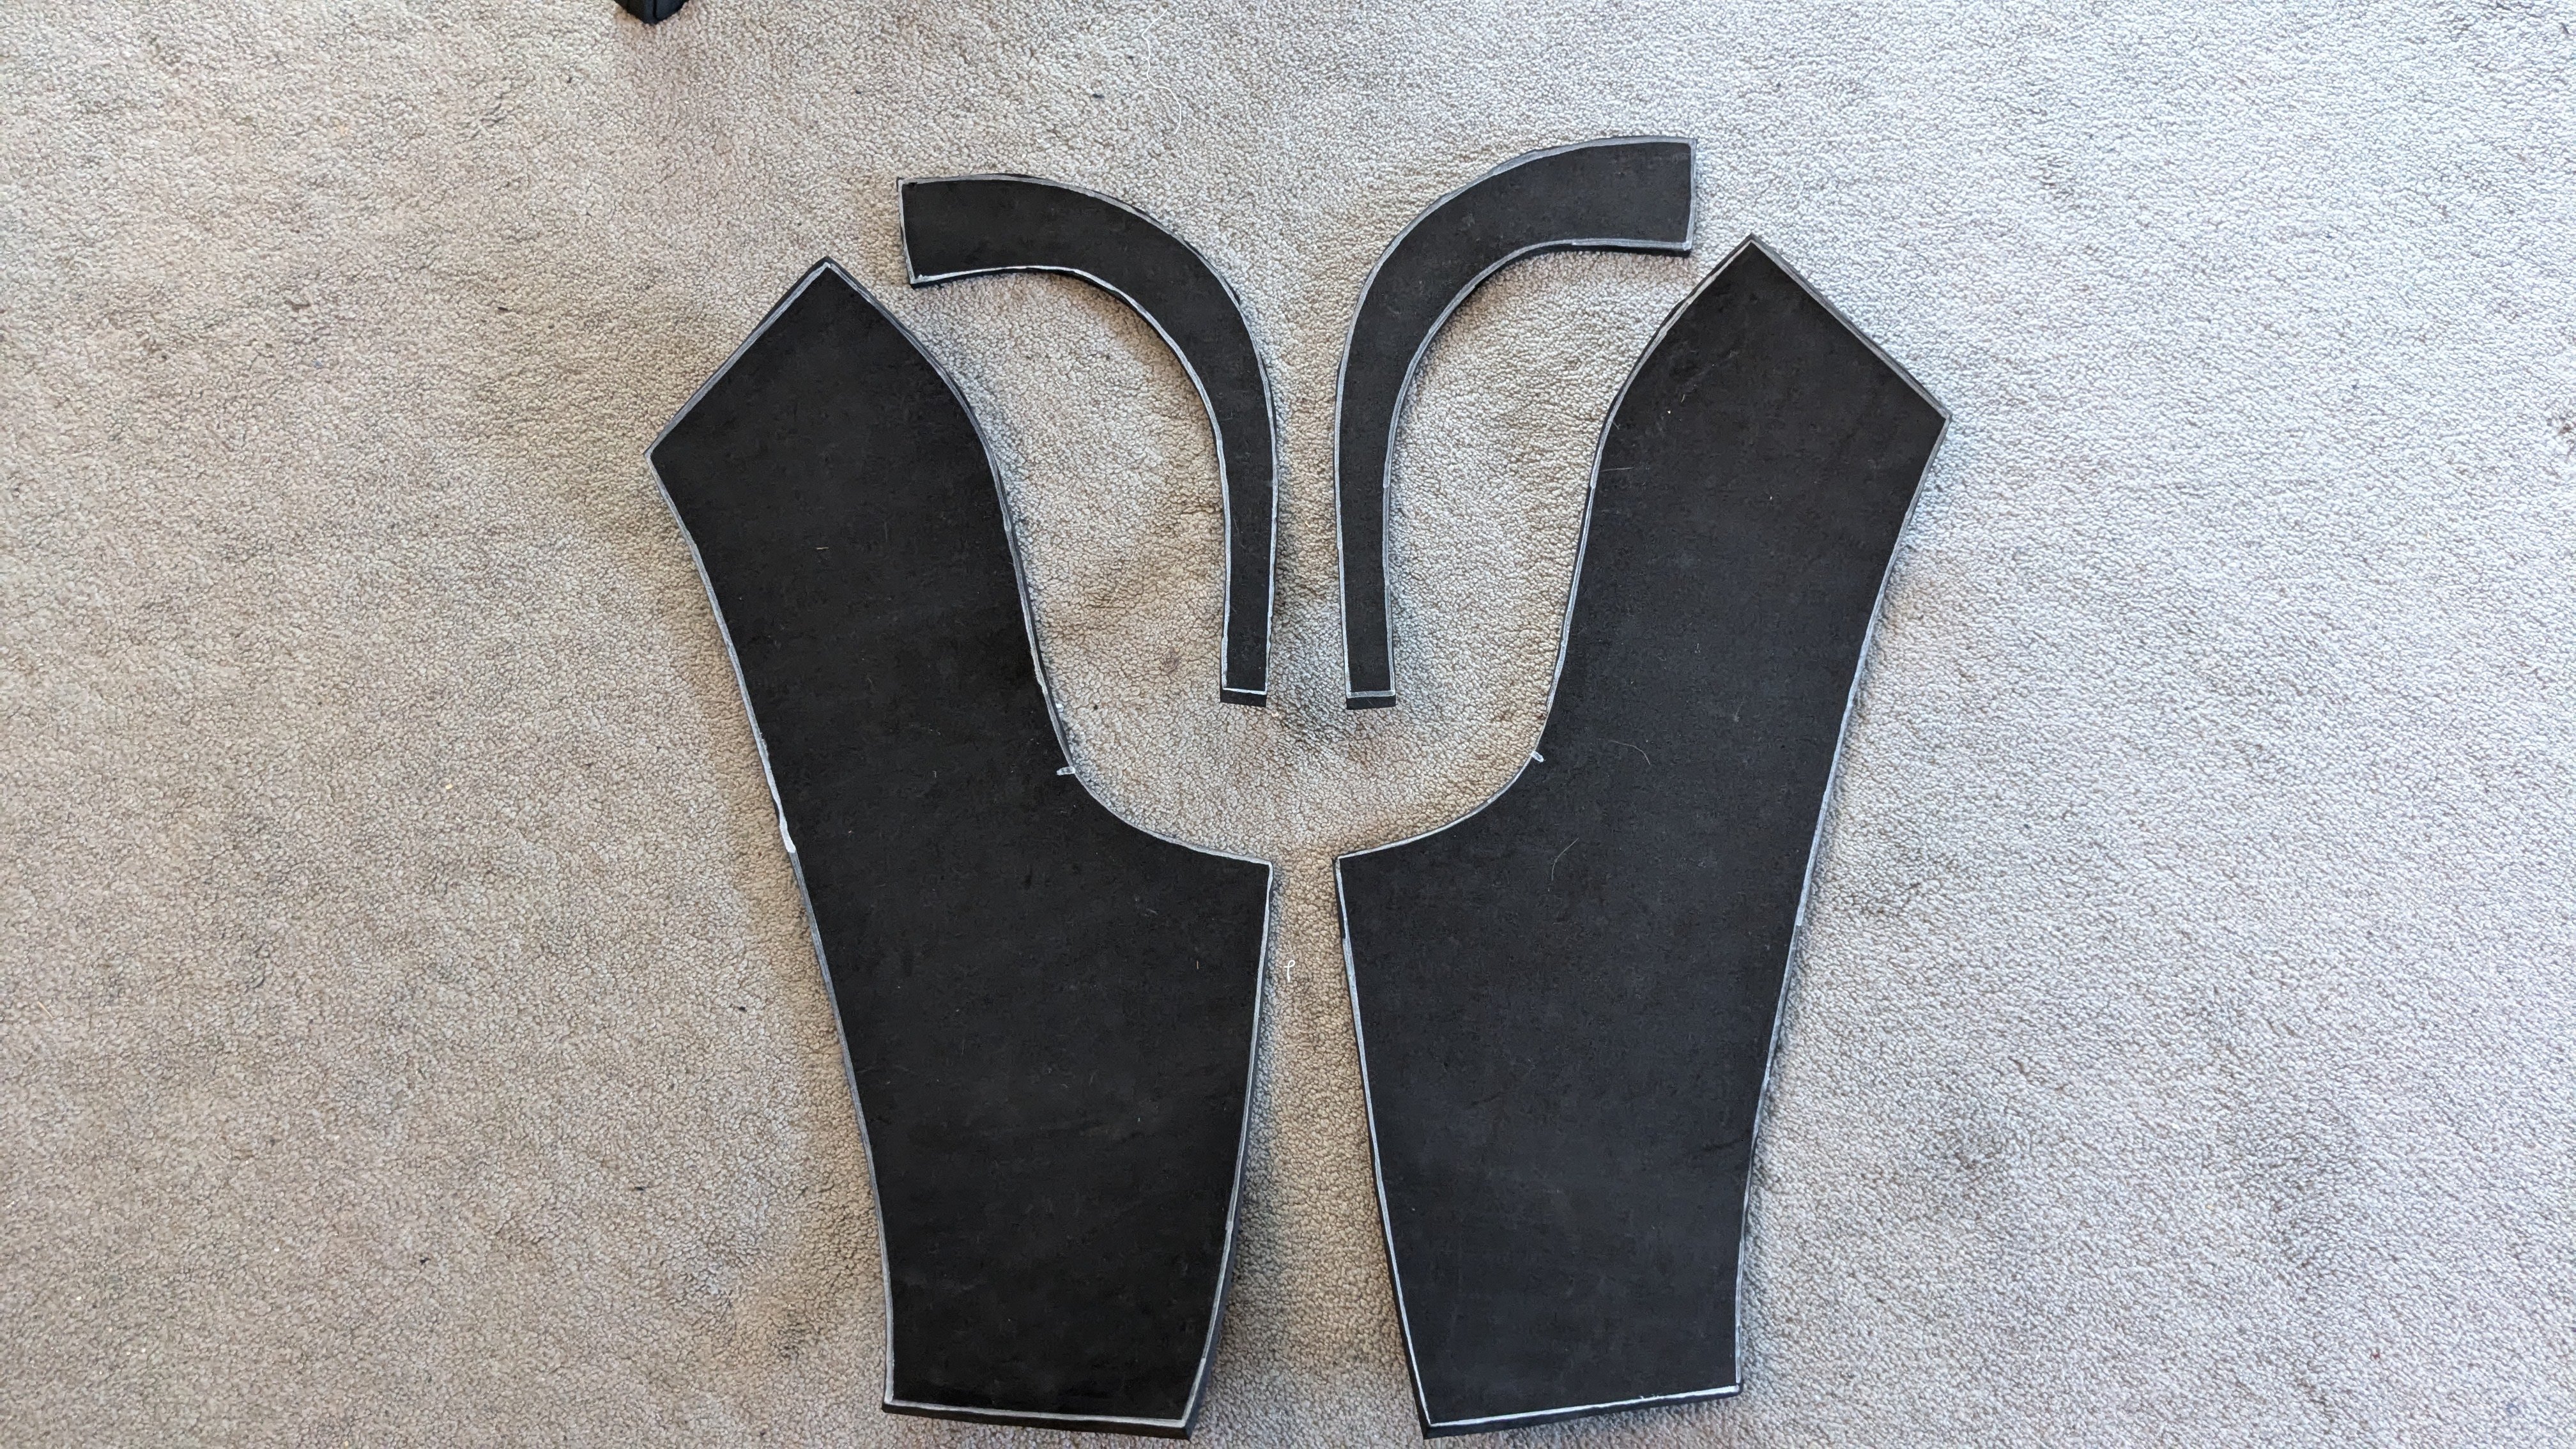
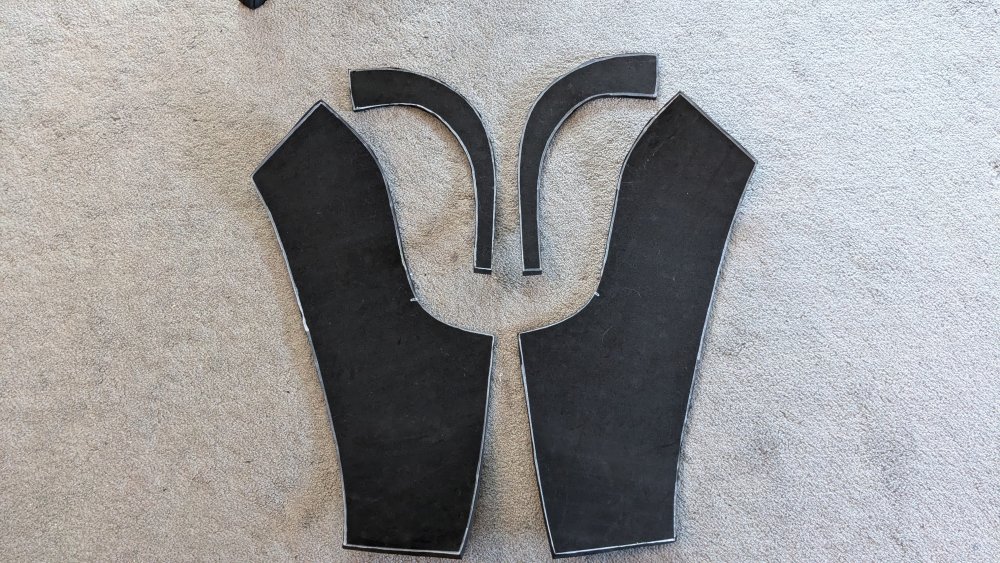
I've been working like a fiend trying to get a few things going. I have been working on the blade, sheath, blaster, holster and now the gauntlets (including sewing the arm part of the gloves to fit a bit better). I will get more photos of the blade with sheath and the blaster with it's holster when they are closer to being finished, possibly with me updating this post with the photos. For now though I wanted to try and hit another hurdle and make sure my idea would work, the gauntlets. I'm showing pictures of what I did for the pattern along with what I did to make it so the part over the hand section will be able to move some. It's not done and will be Velcro'd to the glove for a better effect when it is done. I also will be painting the surface of the gauntlets with paints. This is just what will make up the base part of the shape of the gauntlet. I'm using neoprene fabric and Sintra (the white material for those who are not familiar with it). I will also need to shape the foam around the hand area to continue the inner design shape of the gauntlet.2 points
-
Here's a preview of the printed blaster. I'm currently painting the base primer on it. When I have it cleaned up I will post more images. BUT for now...2 points
-
Had a chance to do a bit of the 3d modeling for her blaster yesterday afternoon (yay for rainy days). Using Blender. It's been a while since I've played with the program. I just need a rudimentary model for this to be printed. Have a bit more to do, and I'm happy with the progress. I decided to work a bit more today on this so I can essentially say I'm done with the modeling. I do have like two more small things. But I have to stop for the moment. Here's the updated blaster.2 points
-
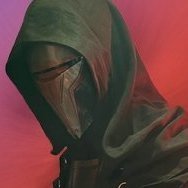
Well time to necro my own thread. After far too long sitting on a shelf collecting dust, everything is back up in progress again. The seamstress is working on the robe. The voice program is still working nicely, pending a bit of last minute testing. The biggest thing I have to figure out is getting the mask and hood assembled together. No major update pictures yet, but figured I'd get myself held accountable by posting it publicly now. 🤪2 points
-
Hello! I’m not in the detachment staff or anything, so I don’t have any information about this other than what I can see on the forums. I know there was some work done with the costume on here by some members, but as far as I can tell there hasn’t happened a lot on that front for several years now. To make a CRL someone must have made a full costume that can be used for the CRL-photos and I don’t believe we have a member with a complete Kenobi version costume at the moment. I imagine there’s also some work to be done with the actual CRL-text. and on top of that there’s the CRL-migration that’s putting a hold on all CRL:s in process. correct me if I’m wrong! @DarthValkyria //Malte2 points
-
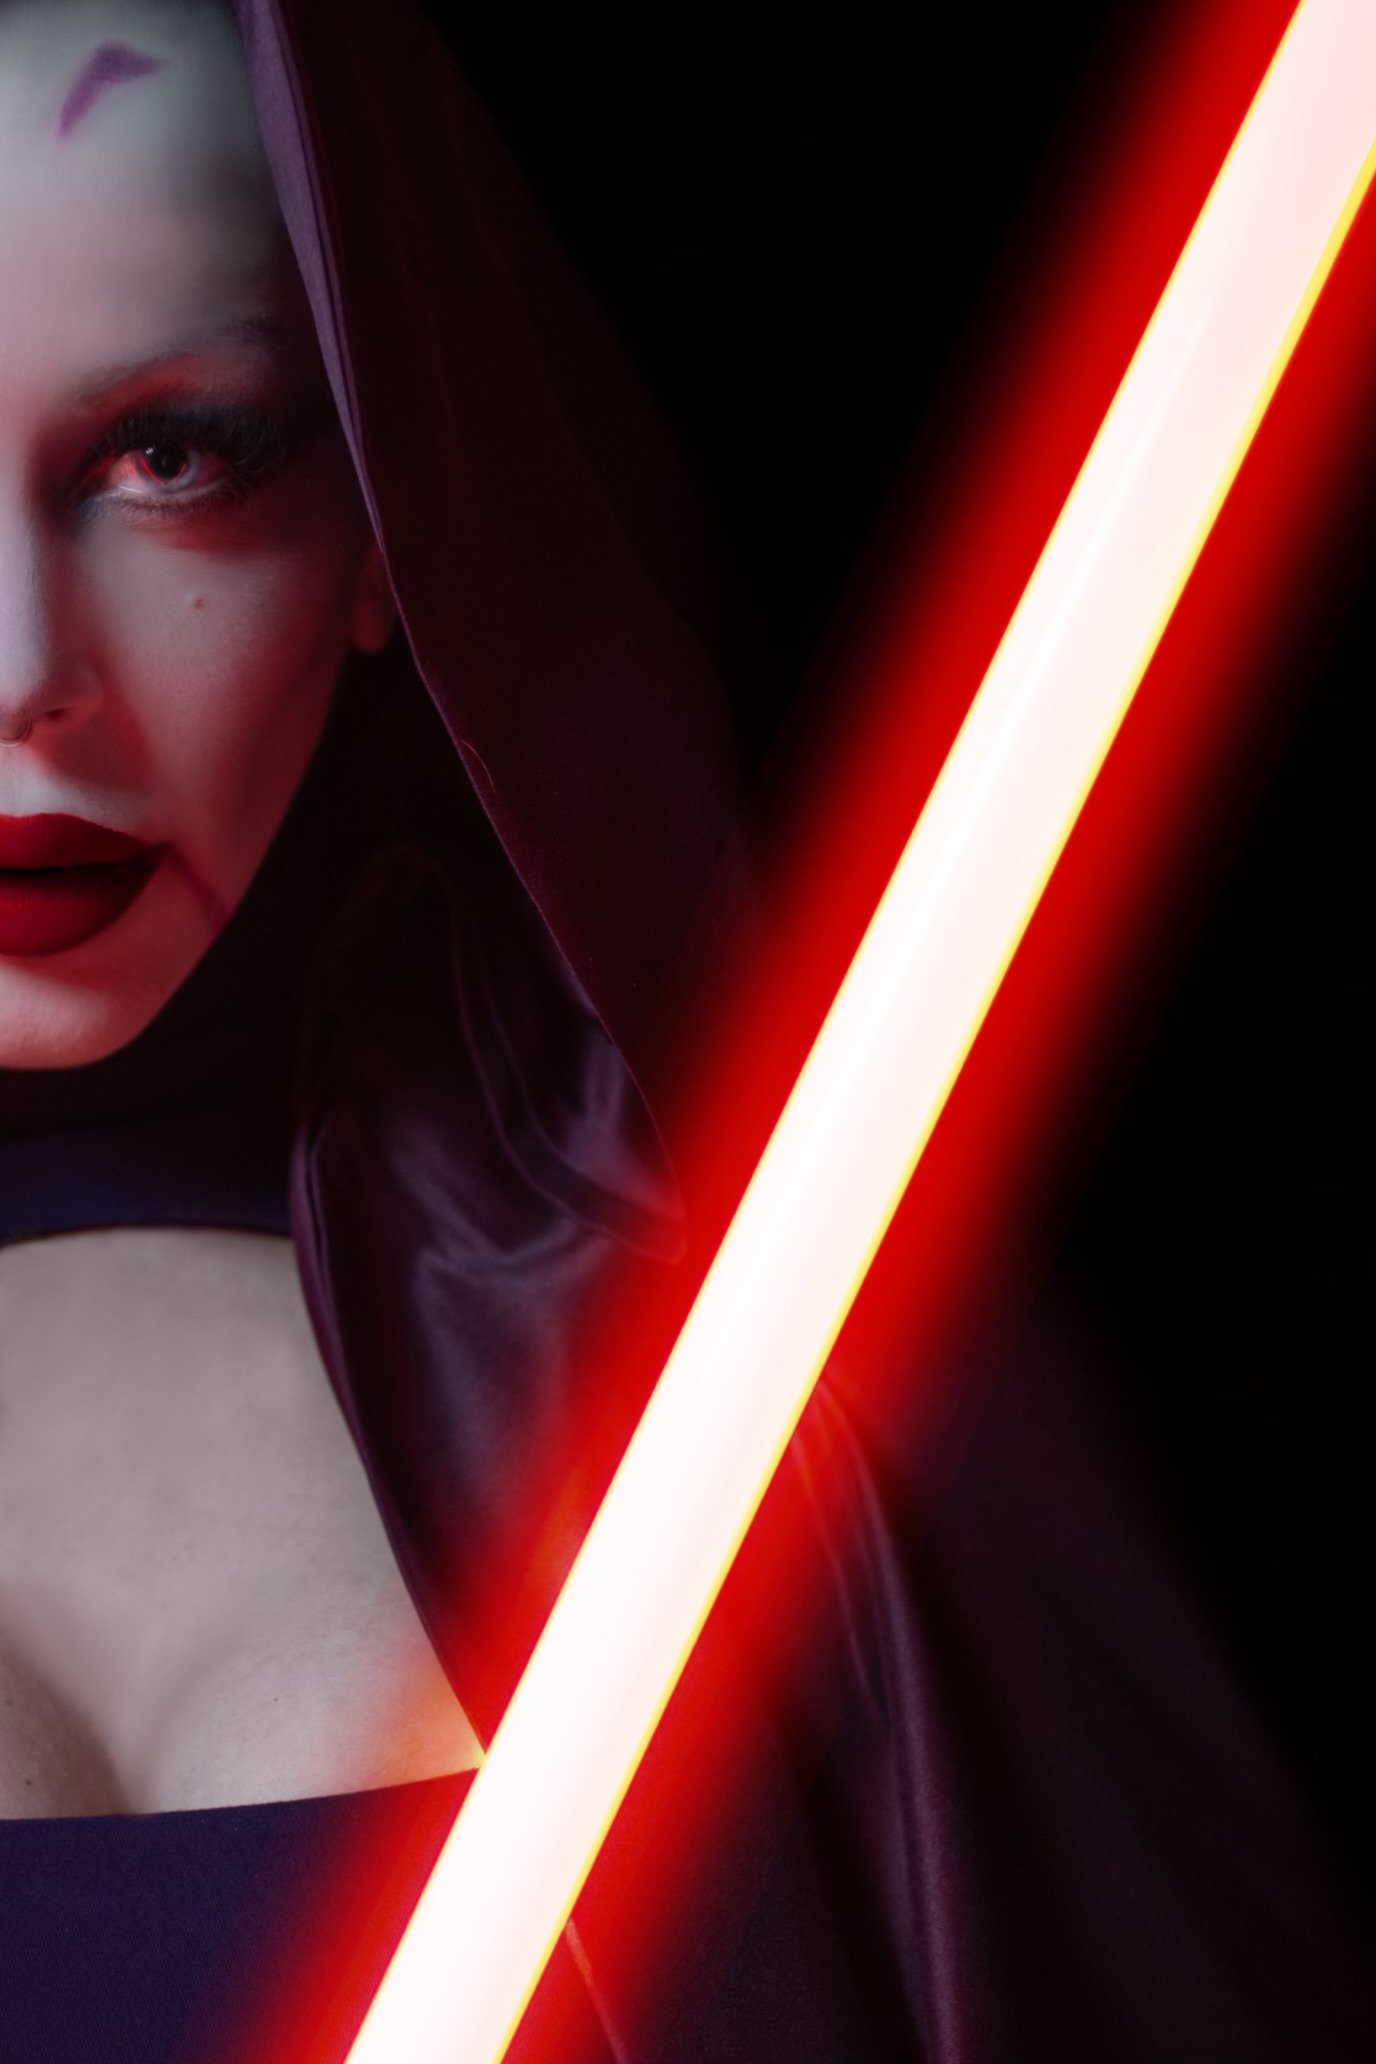
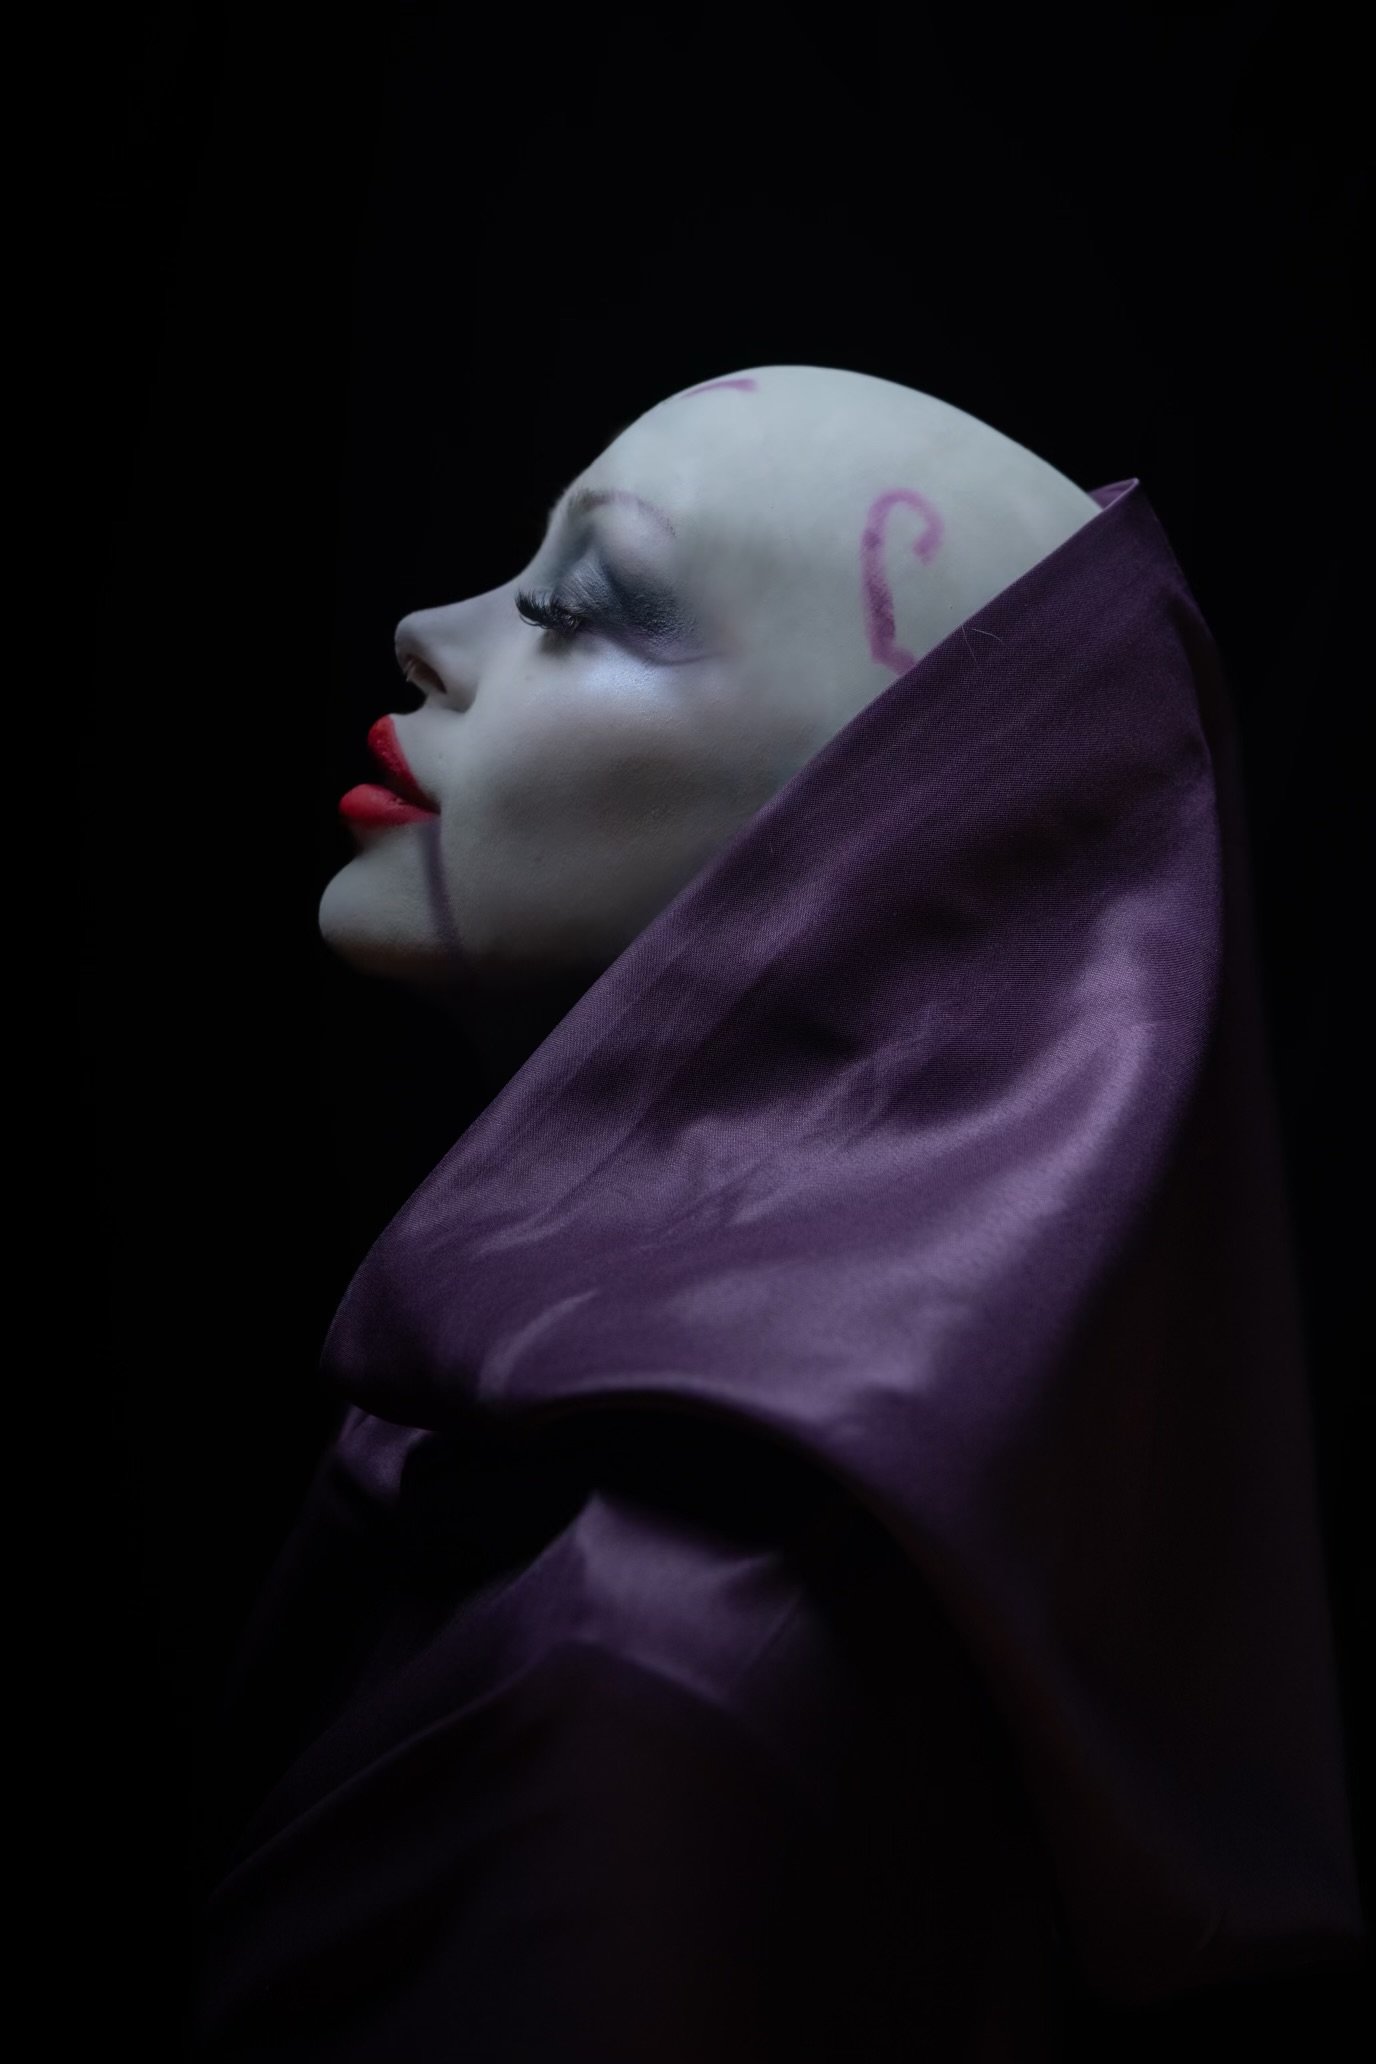
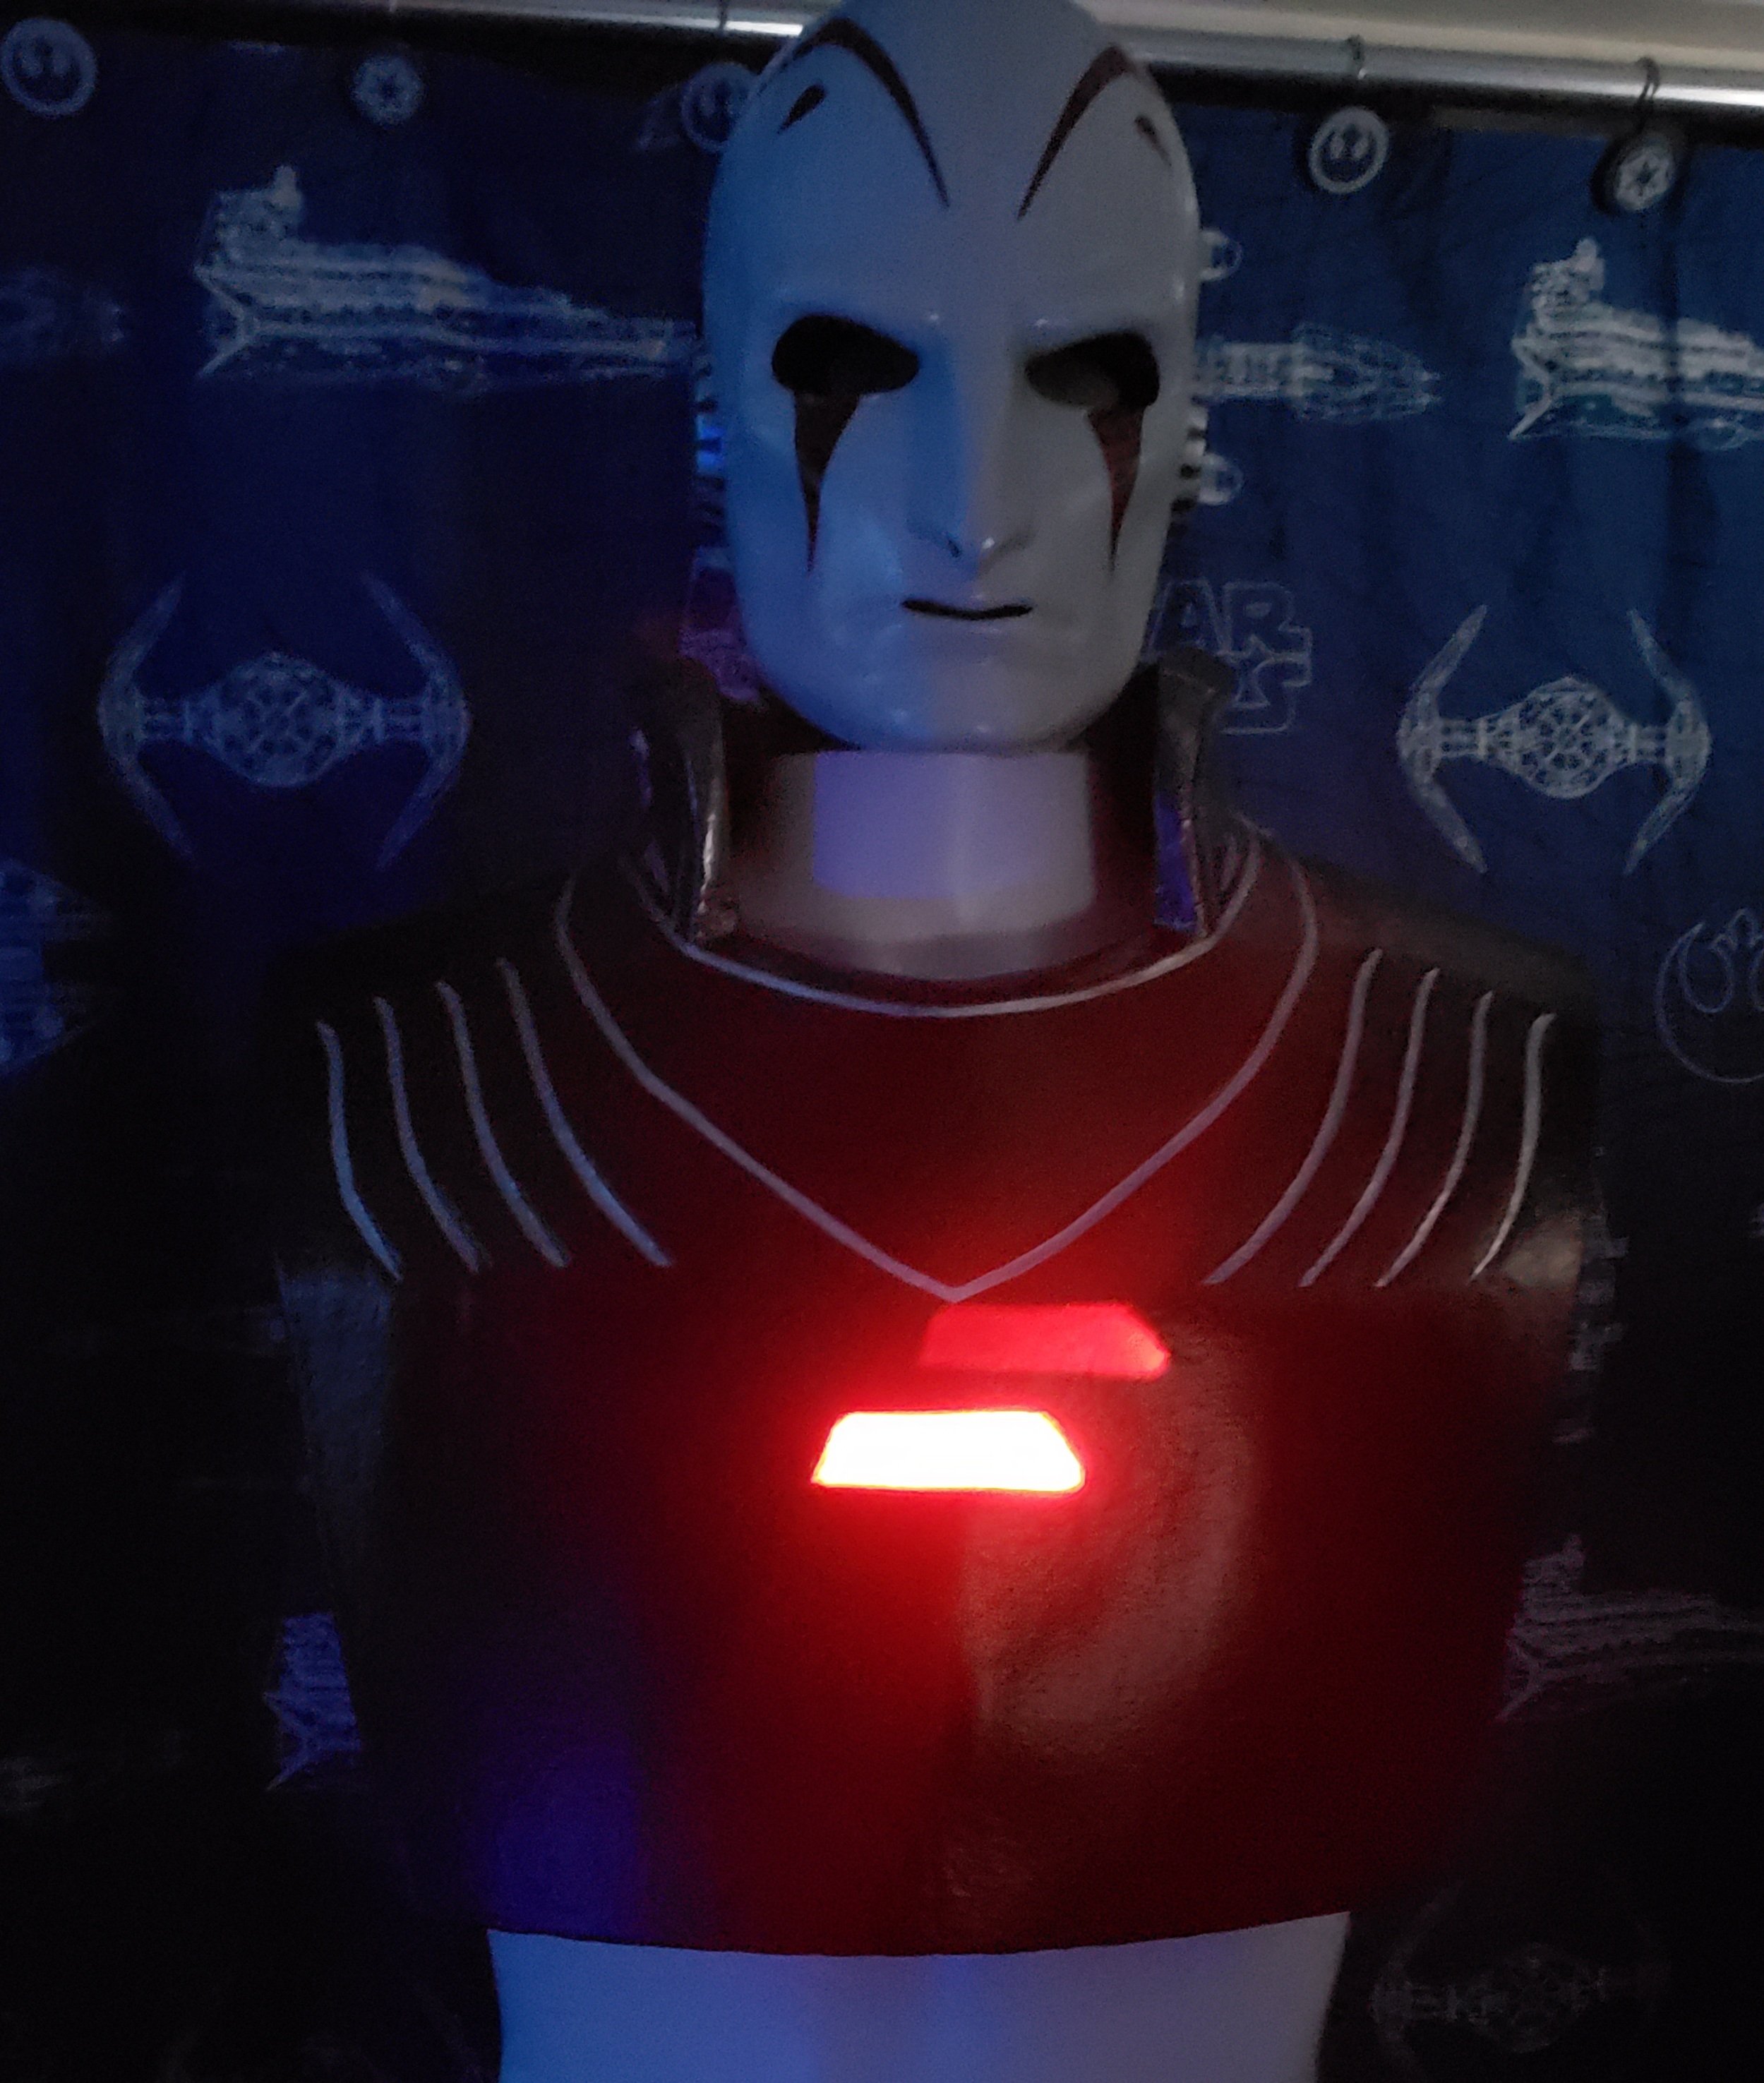
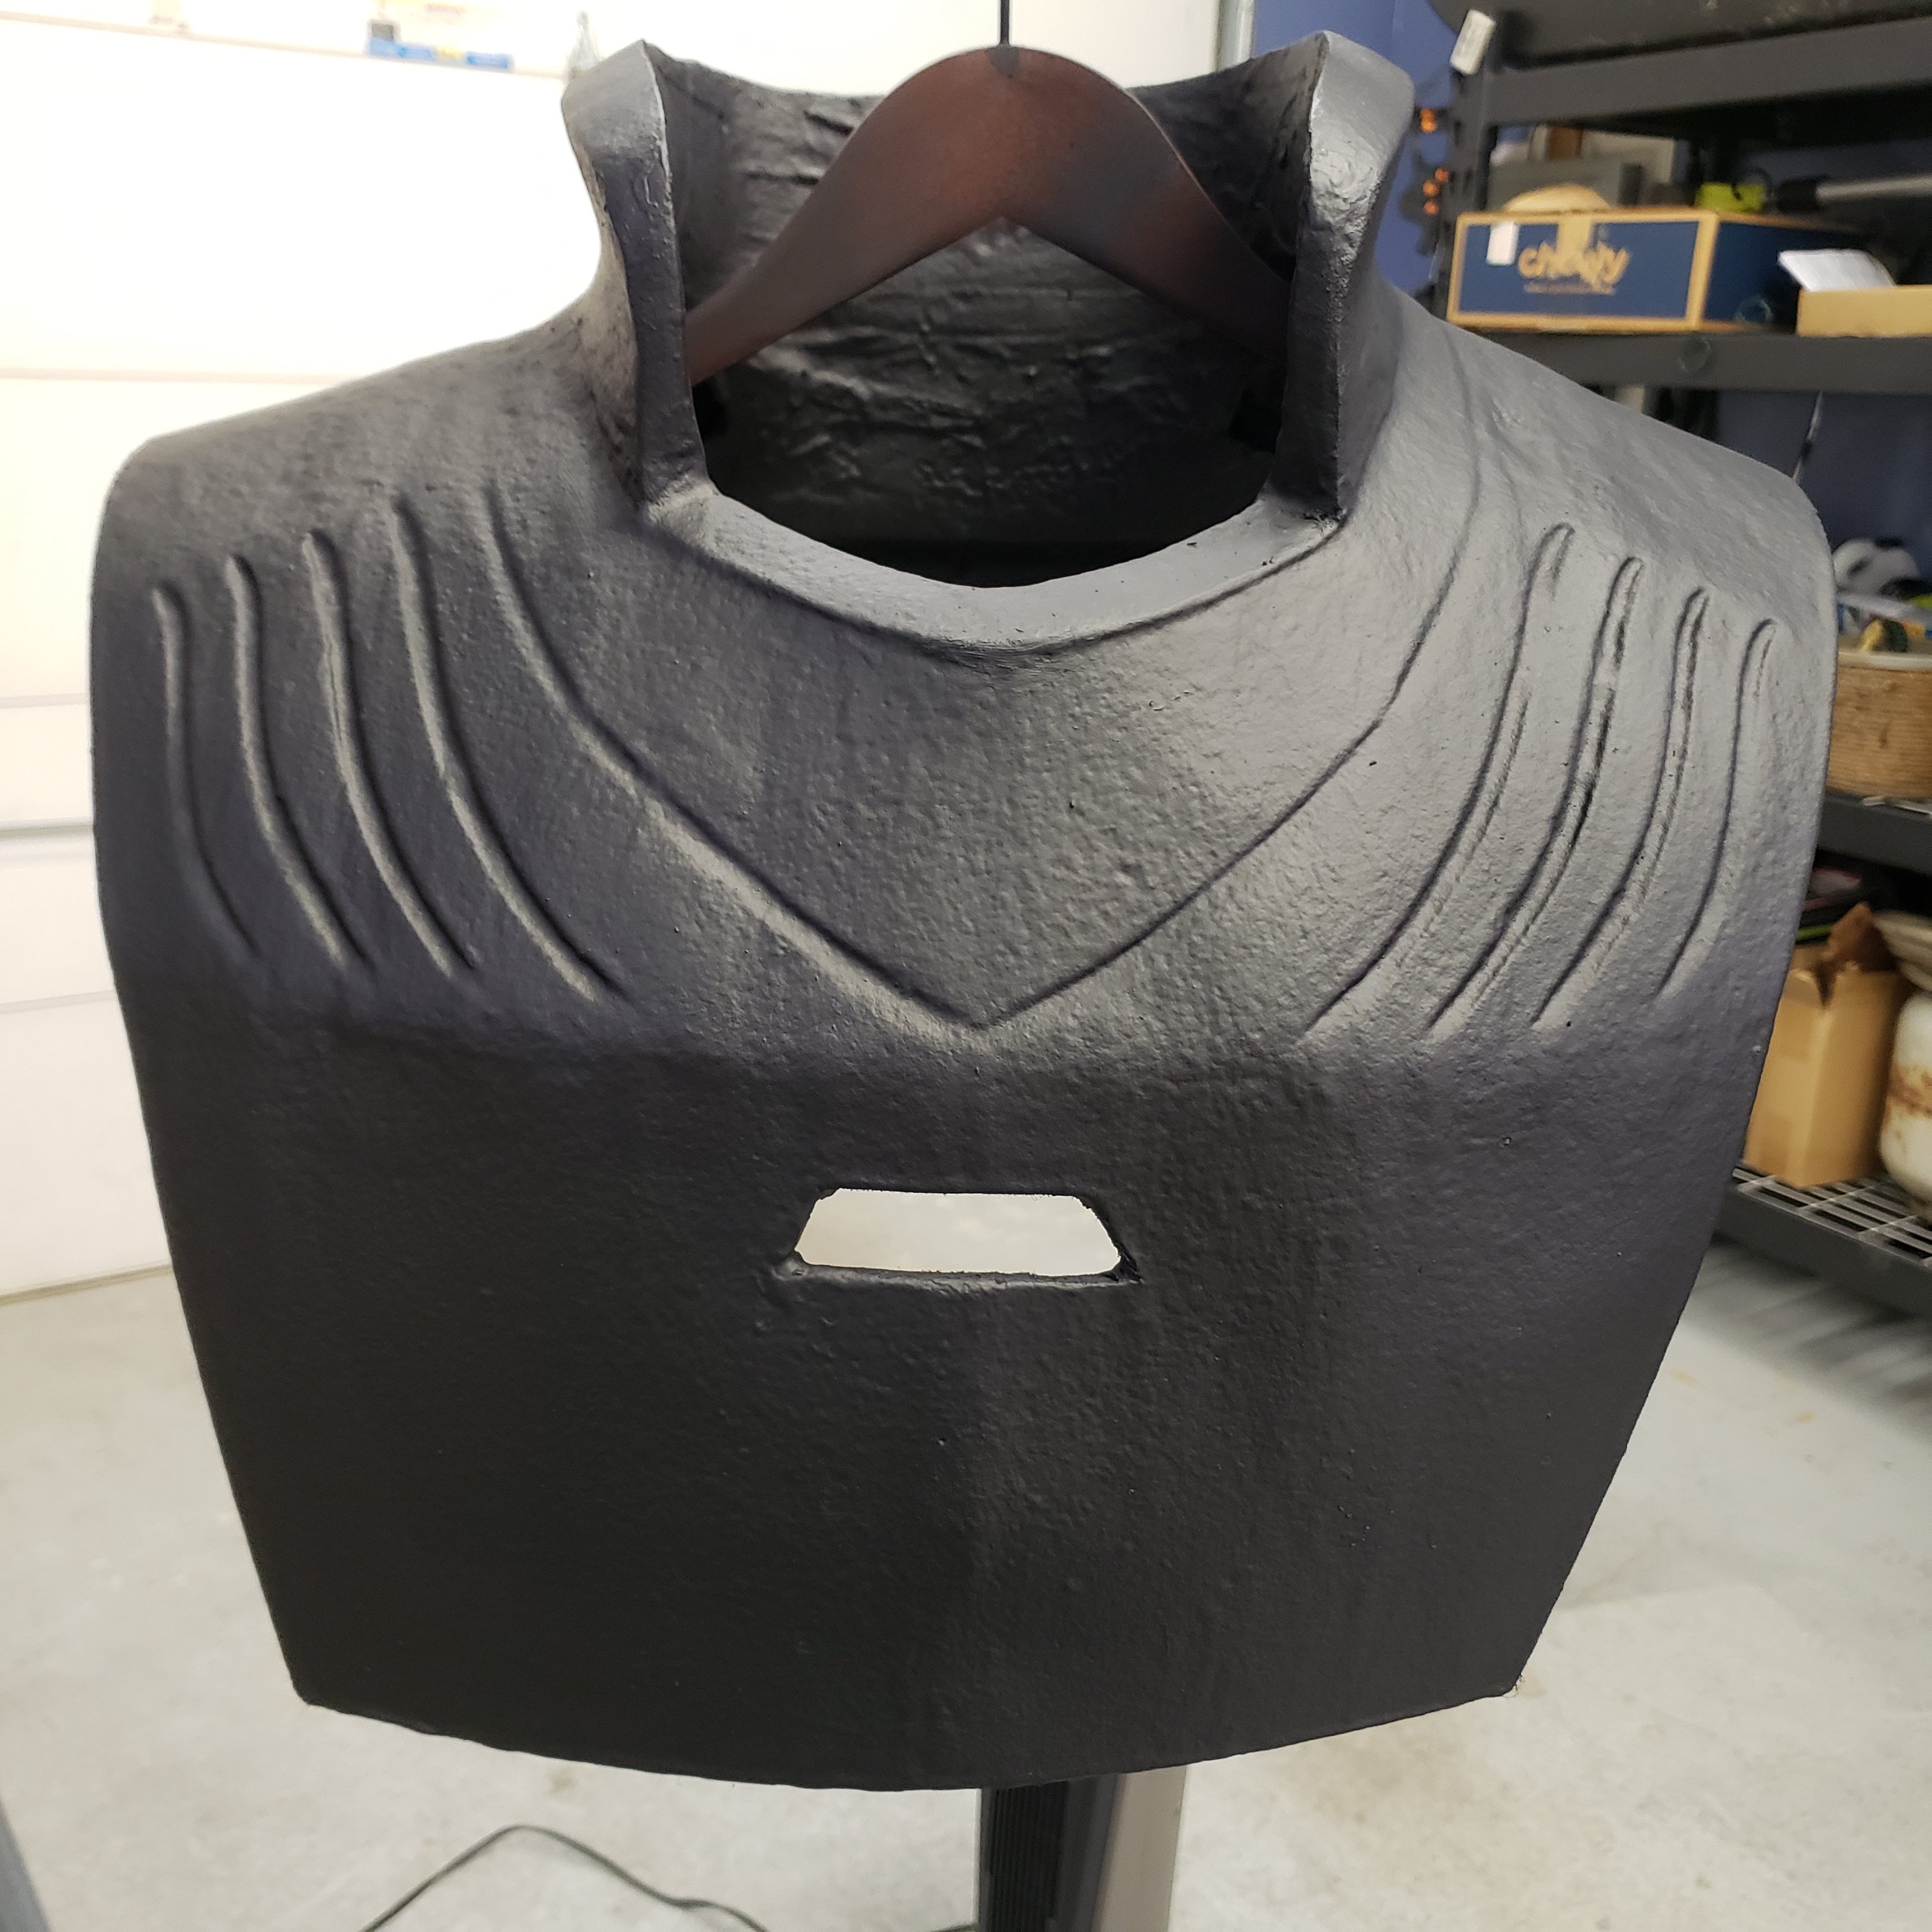
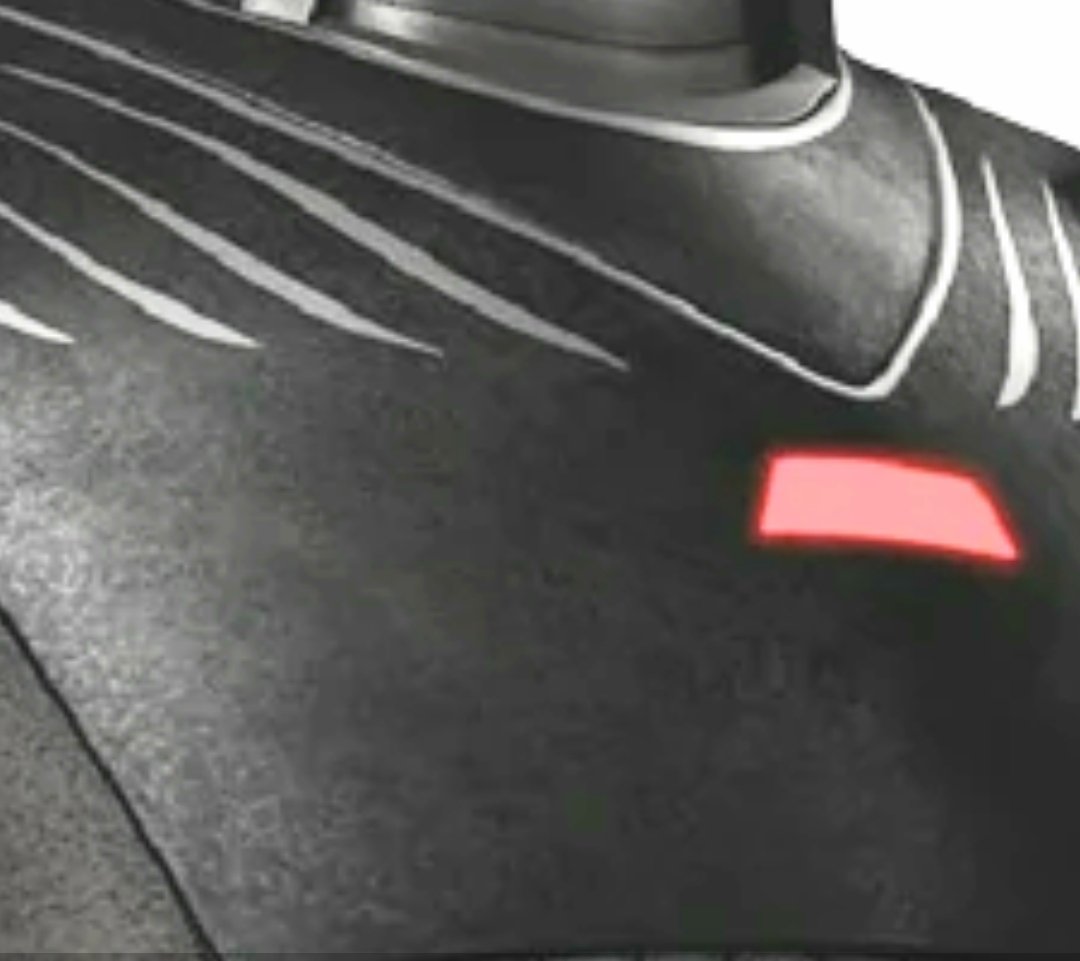
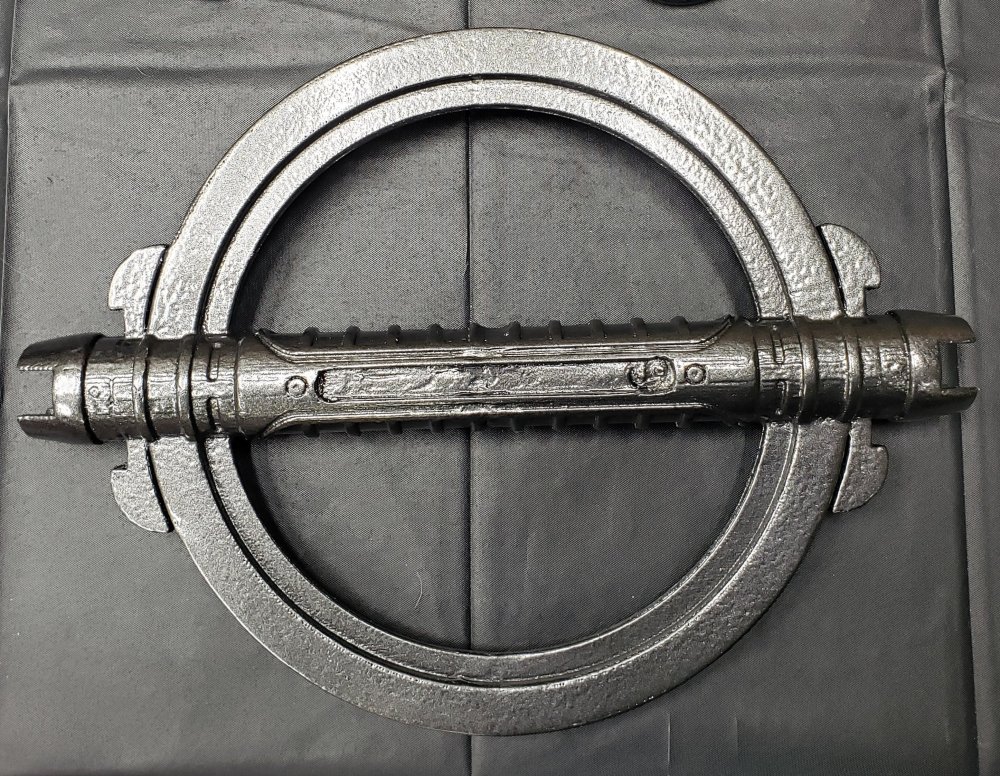
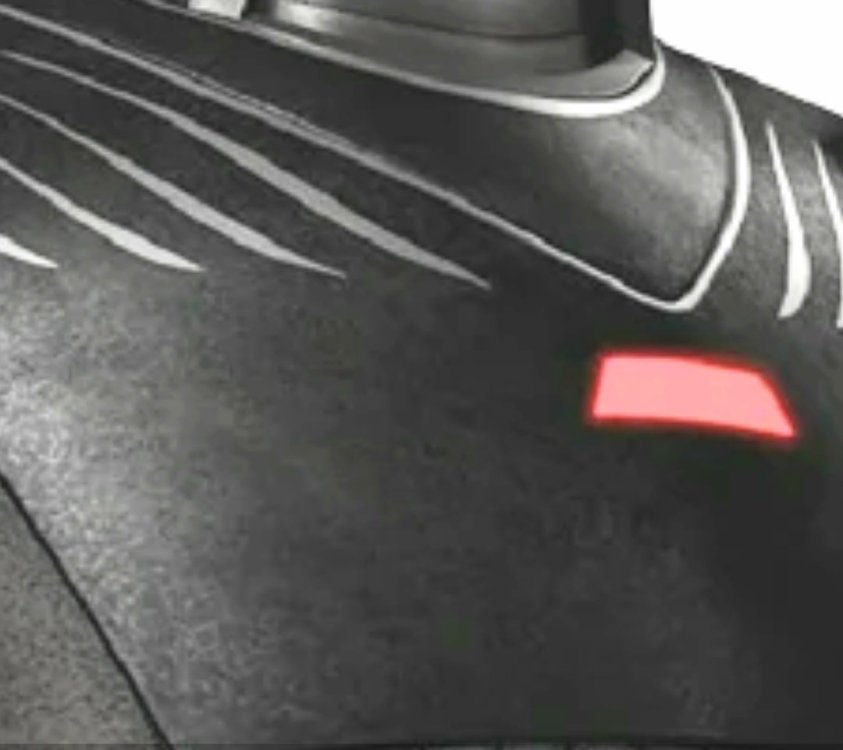
Finished the chestpiece and added a AAA powered LED strip behind the red lens. I used on of the LED strips they use for backlighting eyes in masks like Iron Man and just rewired it to be one like instead of two in parallel. Finally got everything done 🎉
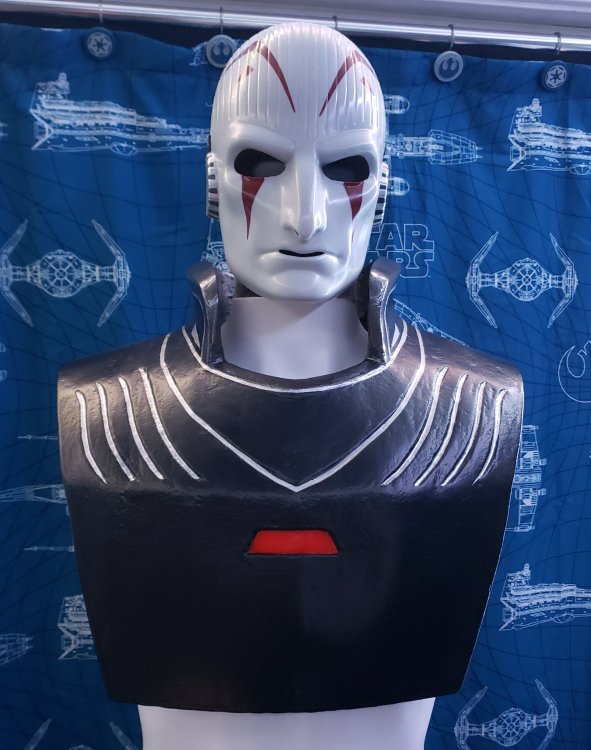
 2 points
 -
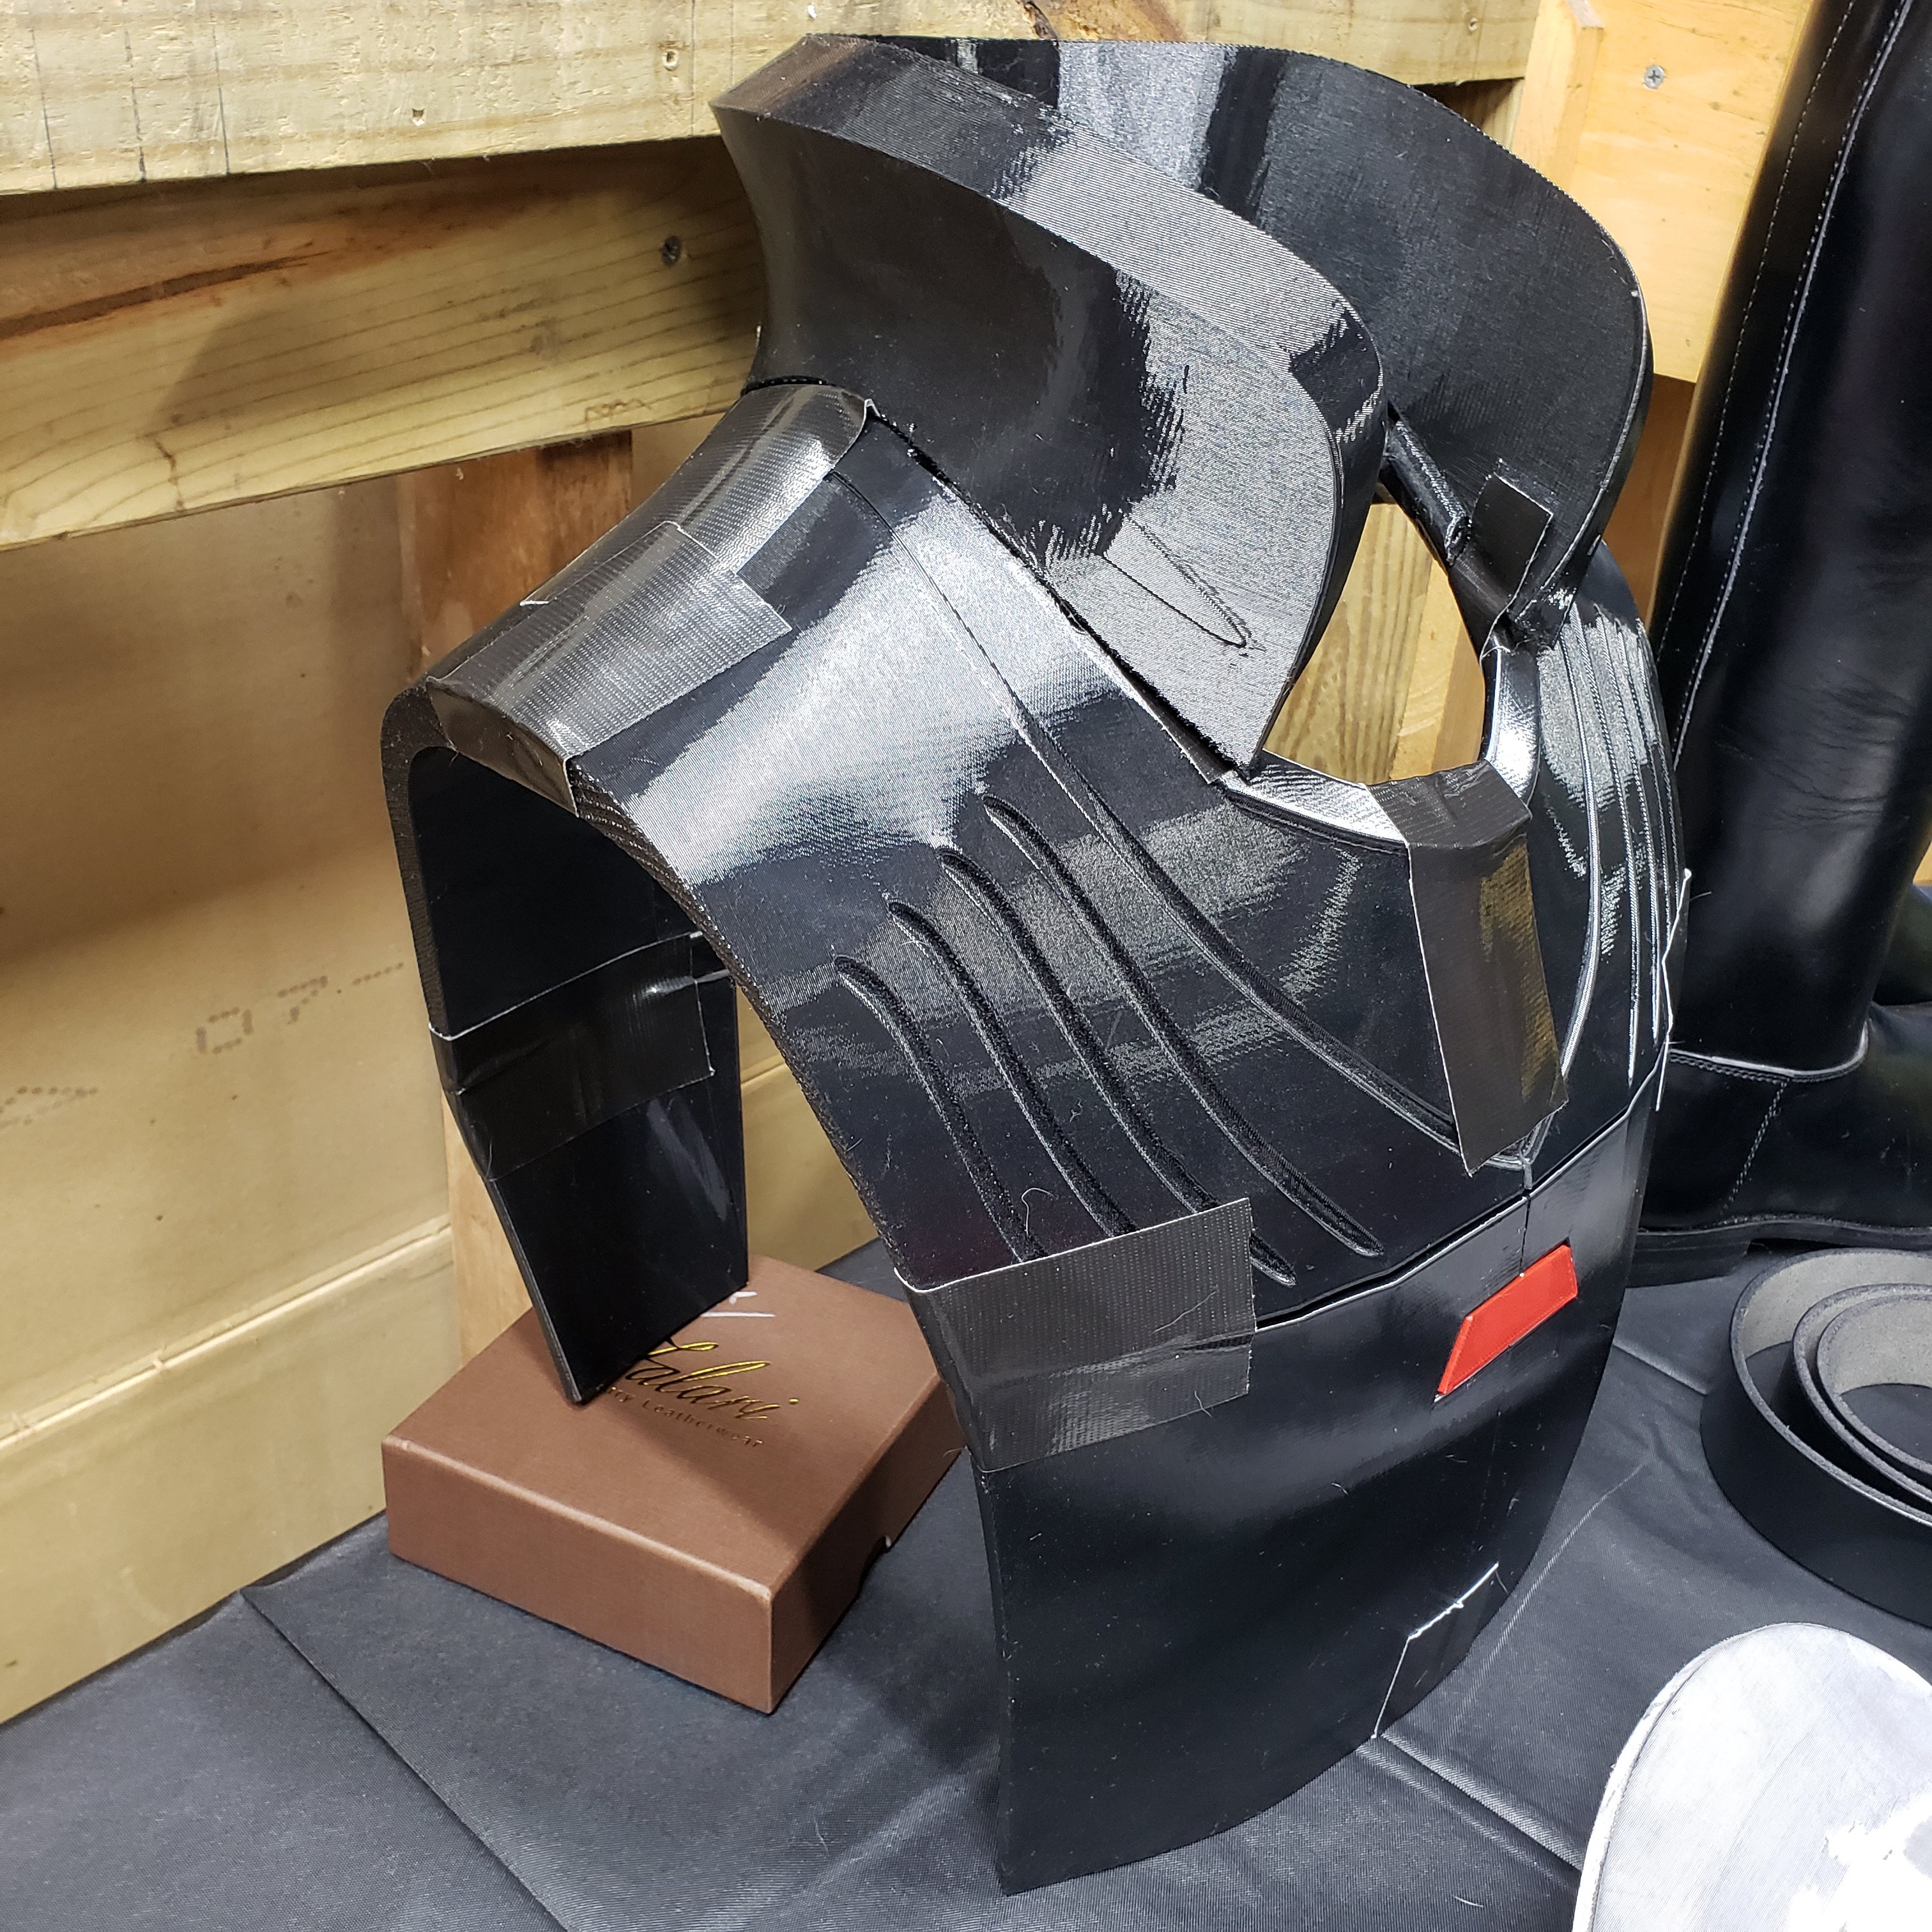
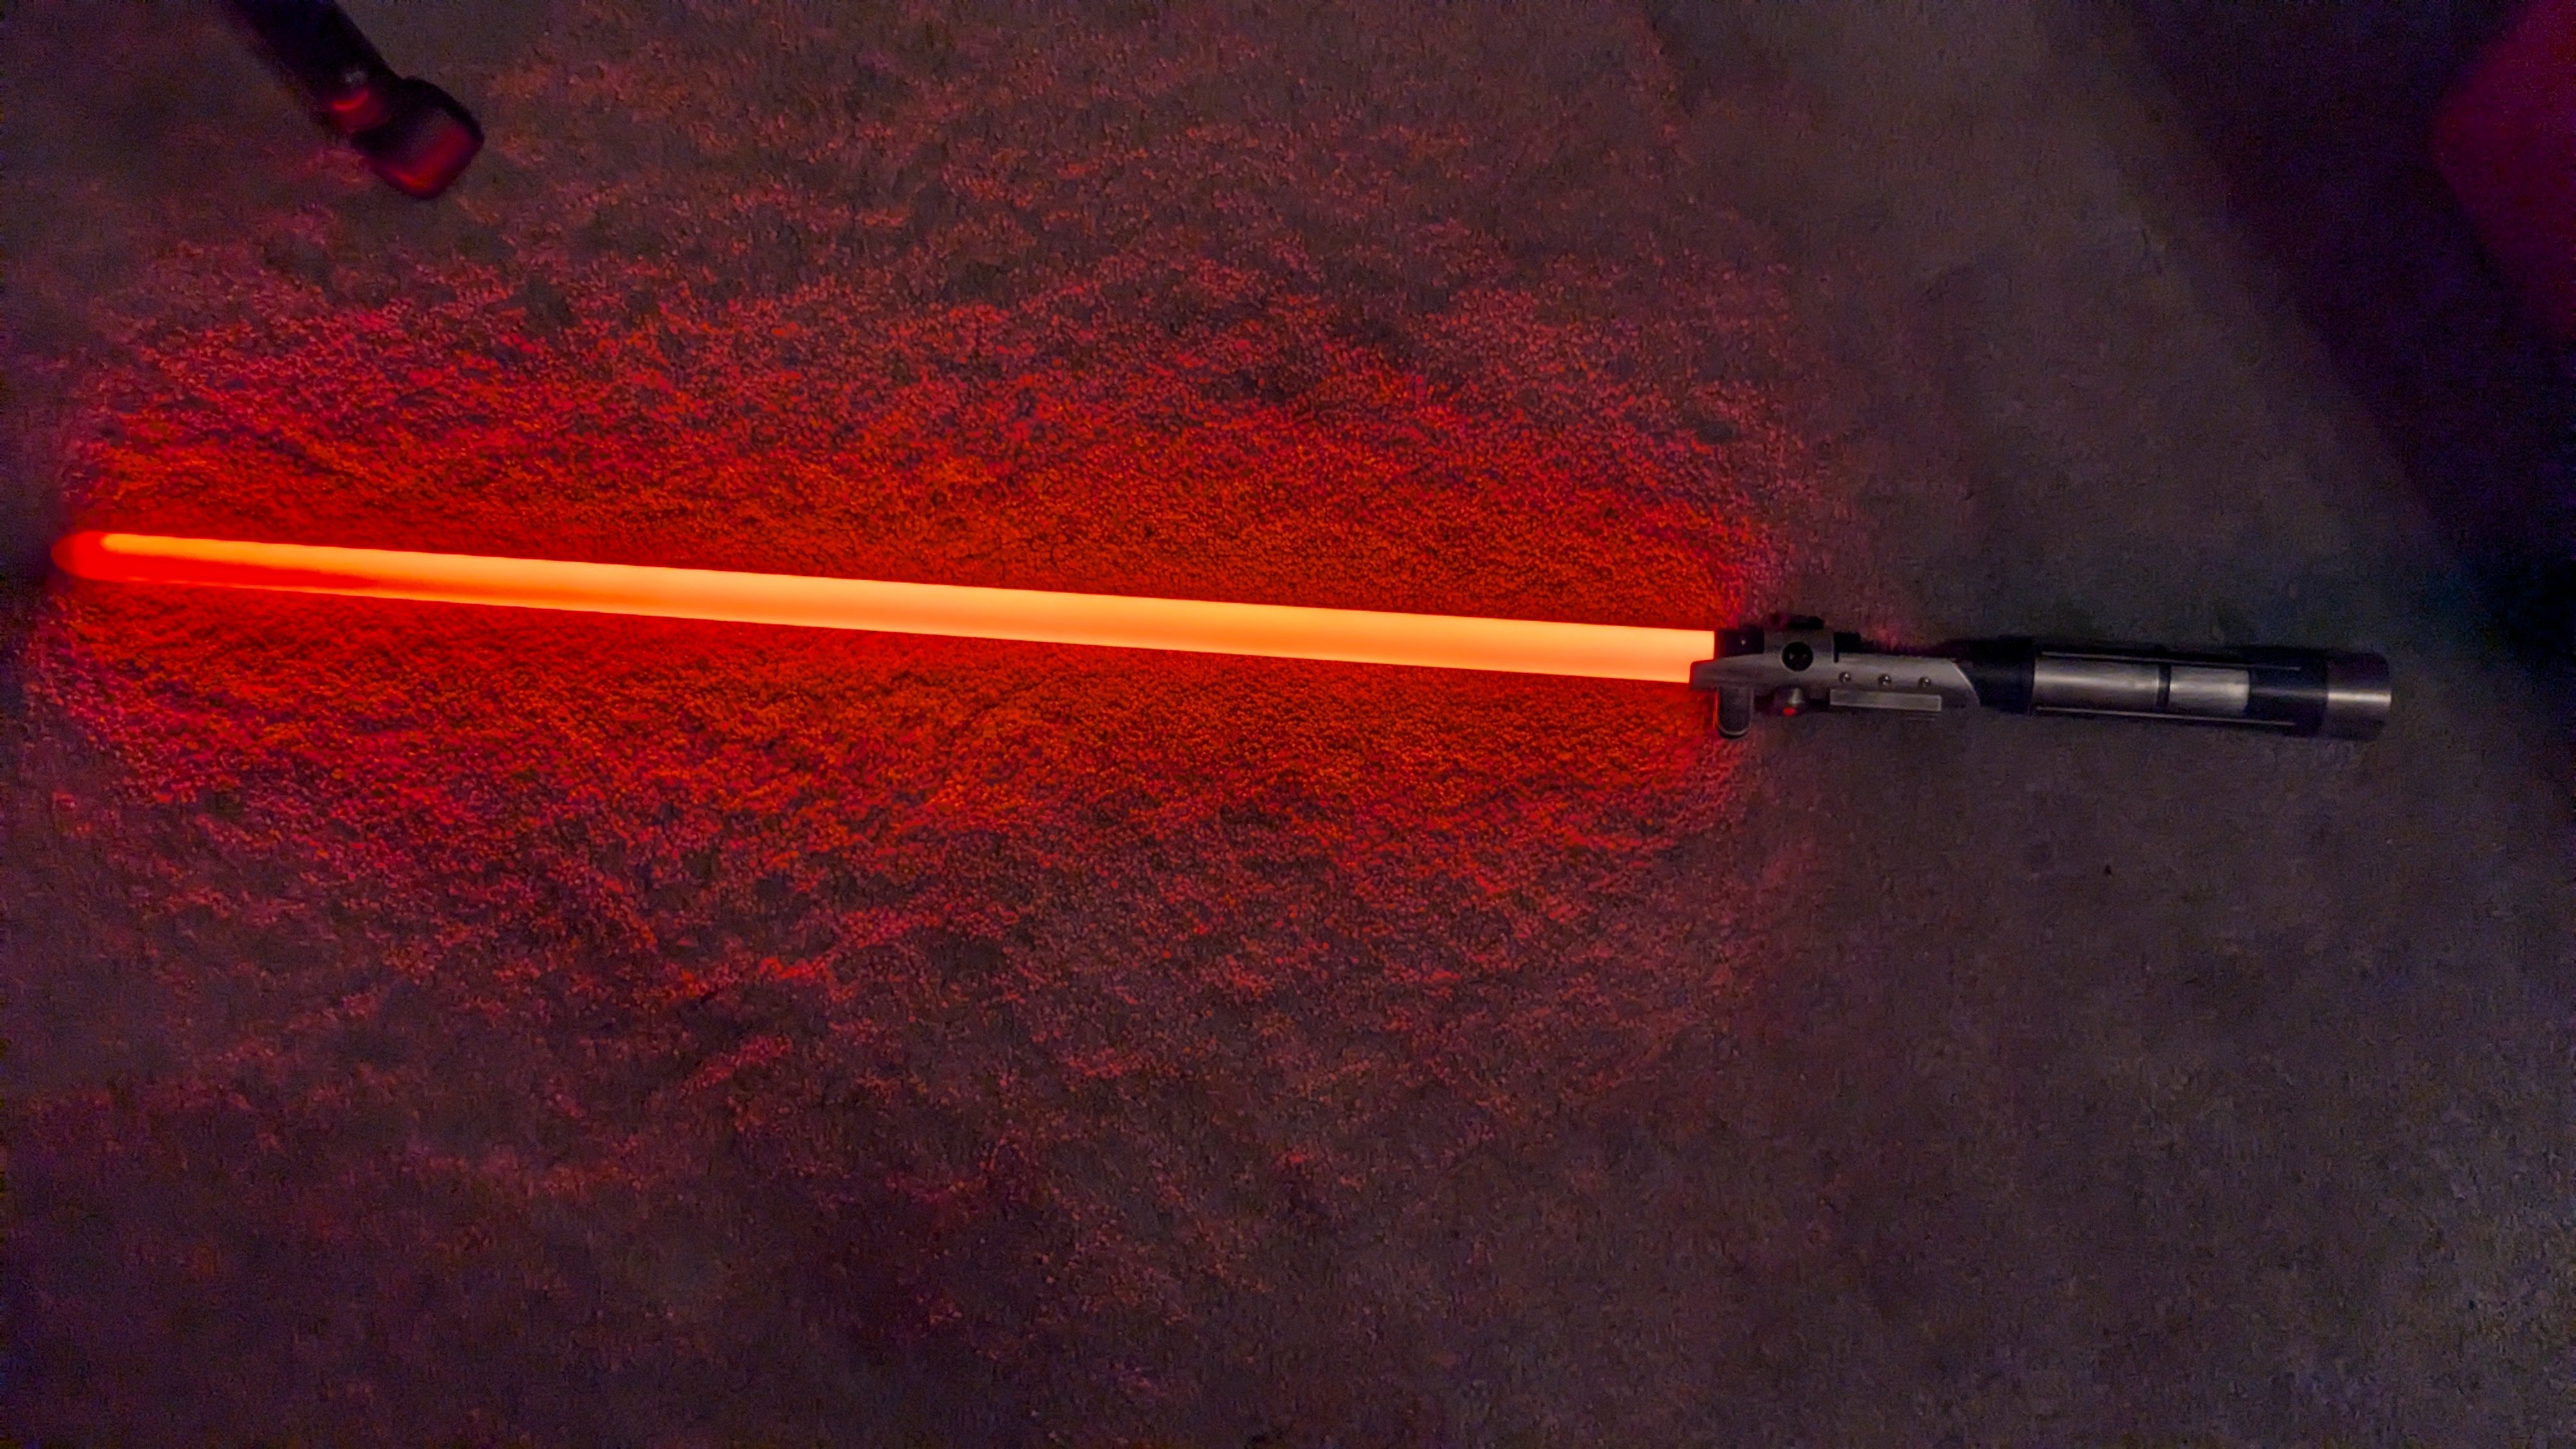
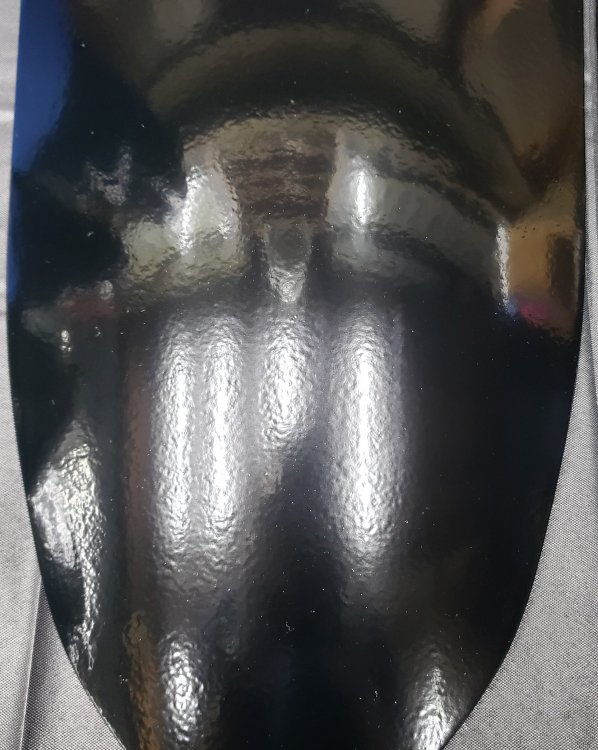
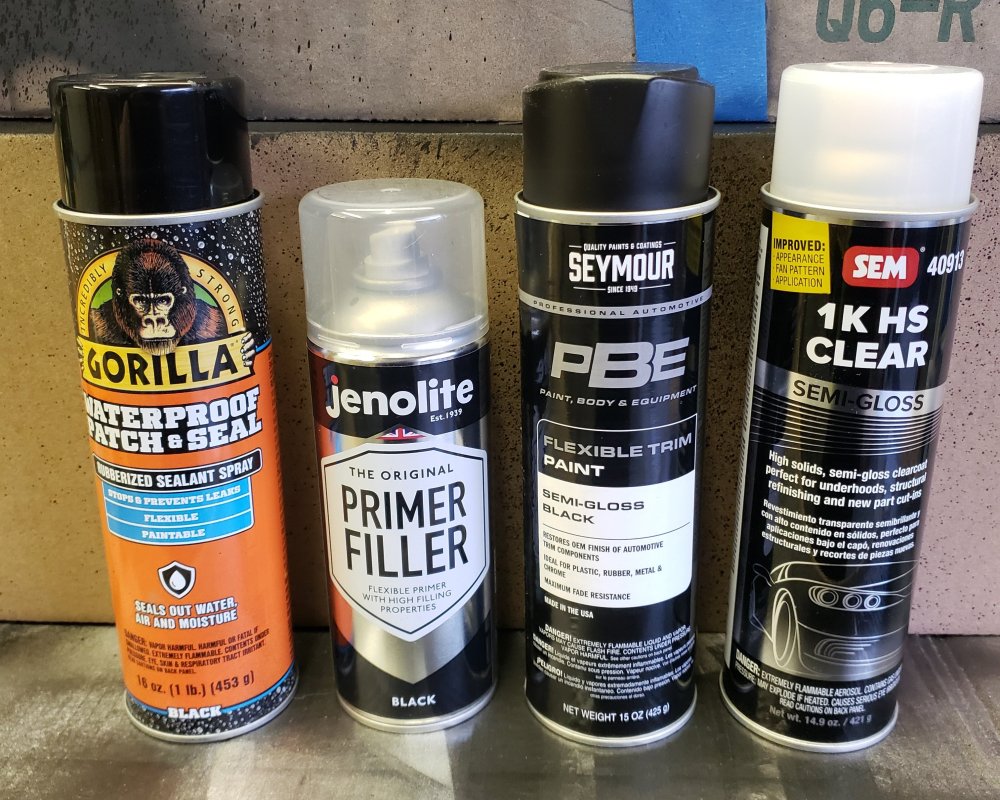
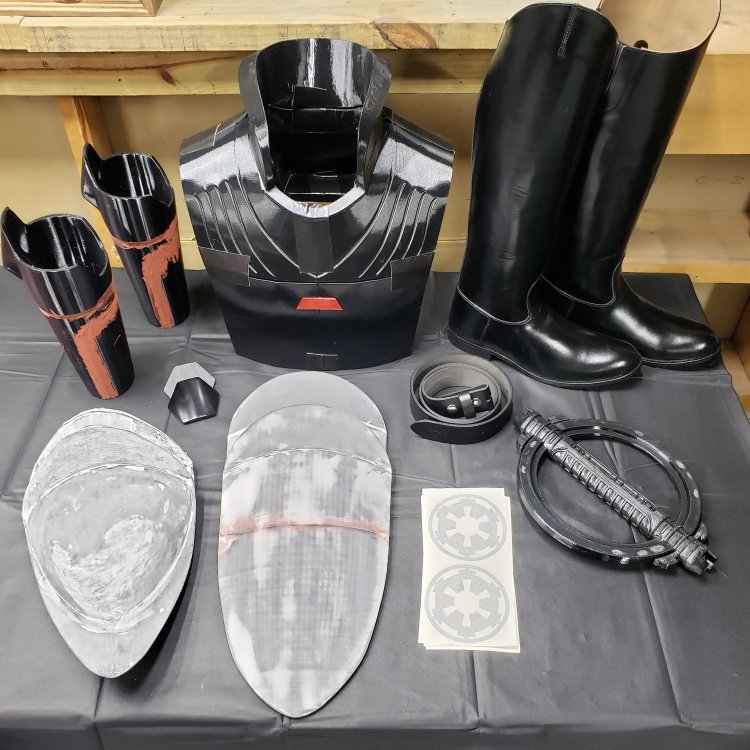
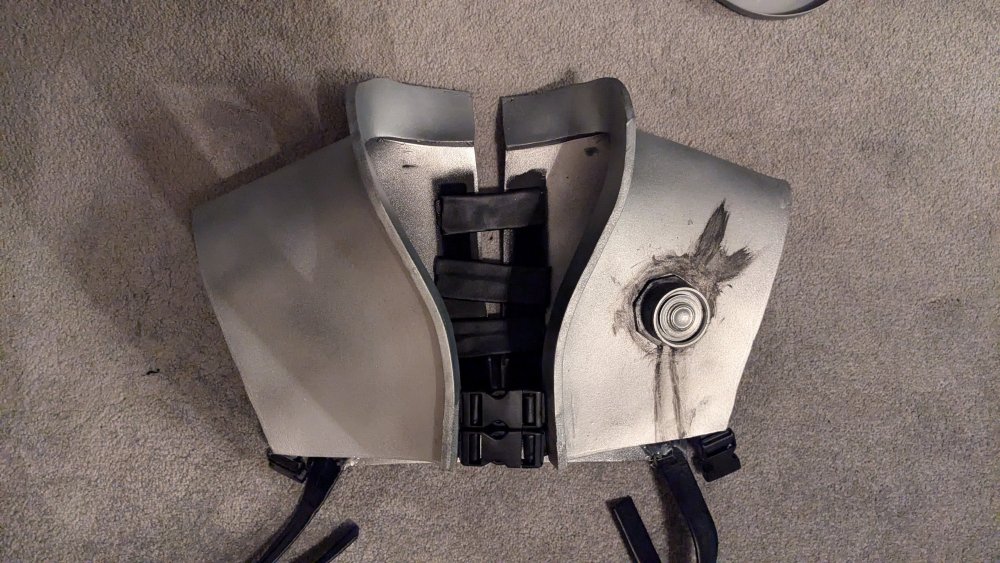
Here's the final versions of the updated armor that were painted and clear coated in semi-gloss today. From a distance everything just looks nice and shiny, but up close you can see everything has that nice uniform ballistic metal/SAPI plate look. I think it looks more believable as actual armor than the smooth finish did. So I definitely like the look much better, and I'm finally satisfied with the end result. Only thing left for these parts is just to add a couple spots of weathering on the bracers and hand guards, and then add the lights to panel on the left bracer. Here's the lineup I used for the armor pieces, used in order from left to right: The chest piece was sanded and primed today, so it will get some more sanding tomorrow and if all goes well, then I'll start applying the black semi-gloss trim paint. And again, this is the look I'm trying to create by adding texture to the armor: Also got the base layer paint on the lightsaber. It's metallic black stainless, but it reflects a lot of light so it looks lighter in the photo than it actually is. I'll be hand-painting the rest of the details such as the grip and emitters, and then I'll be adding in the red lights/magnet inserts into the center trays on each side. Then it will just be an ornament on the back of the chest armor like in the show.


 2 points
 -
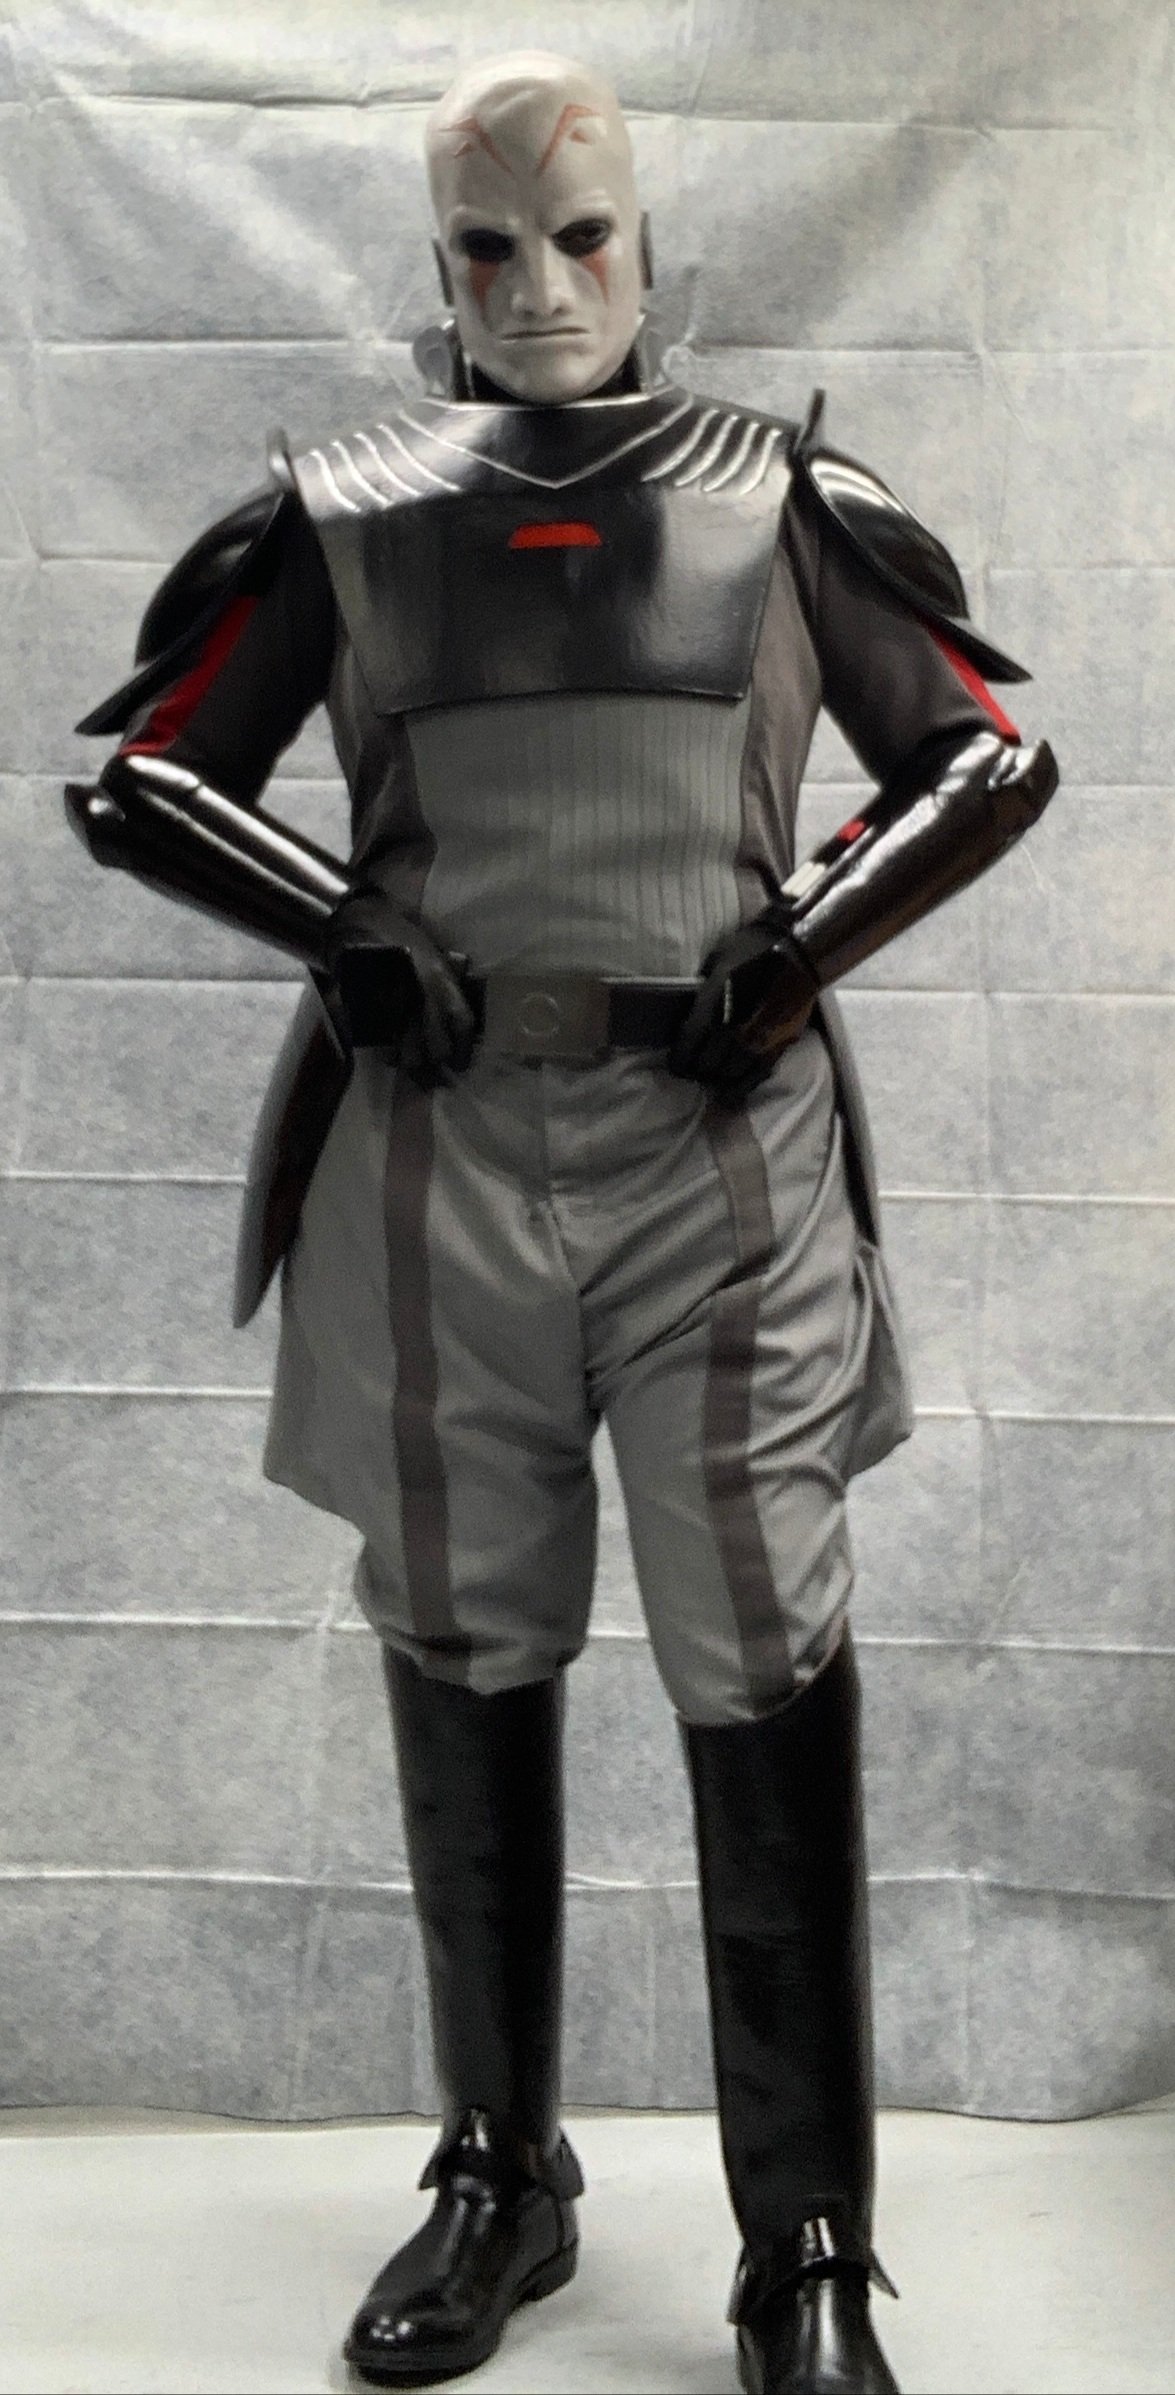
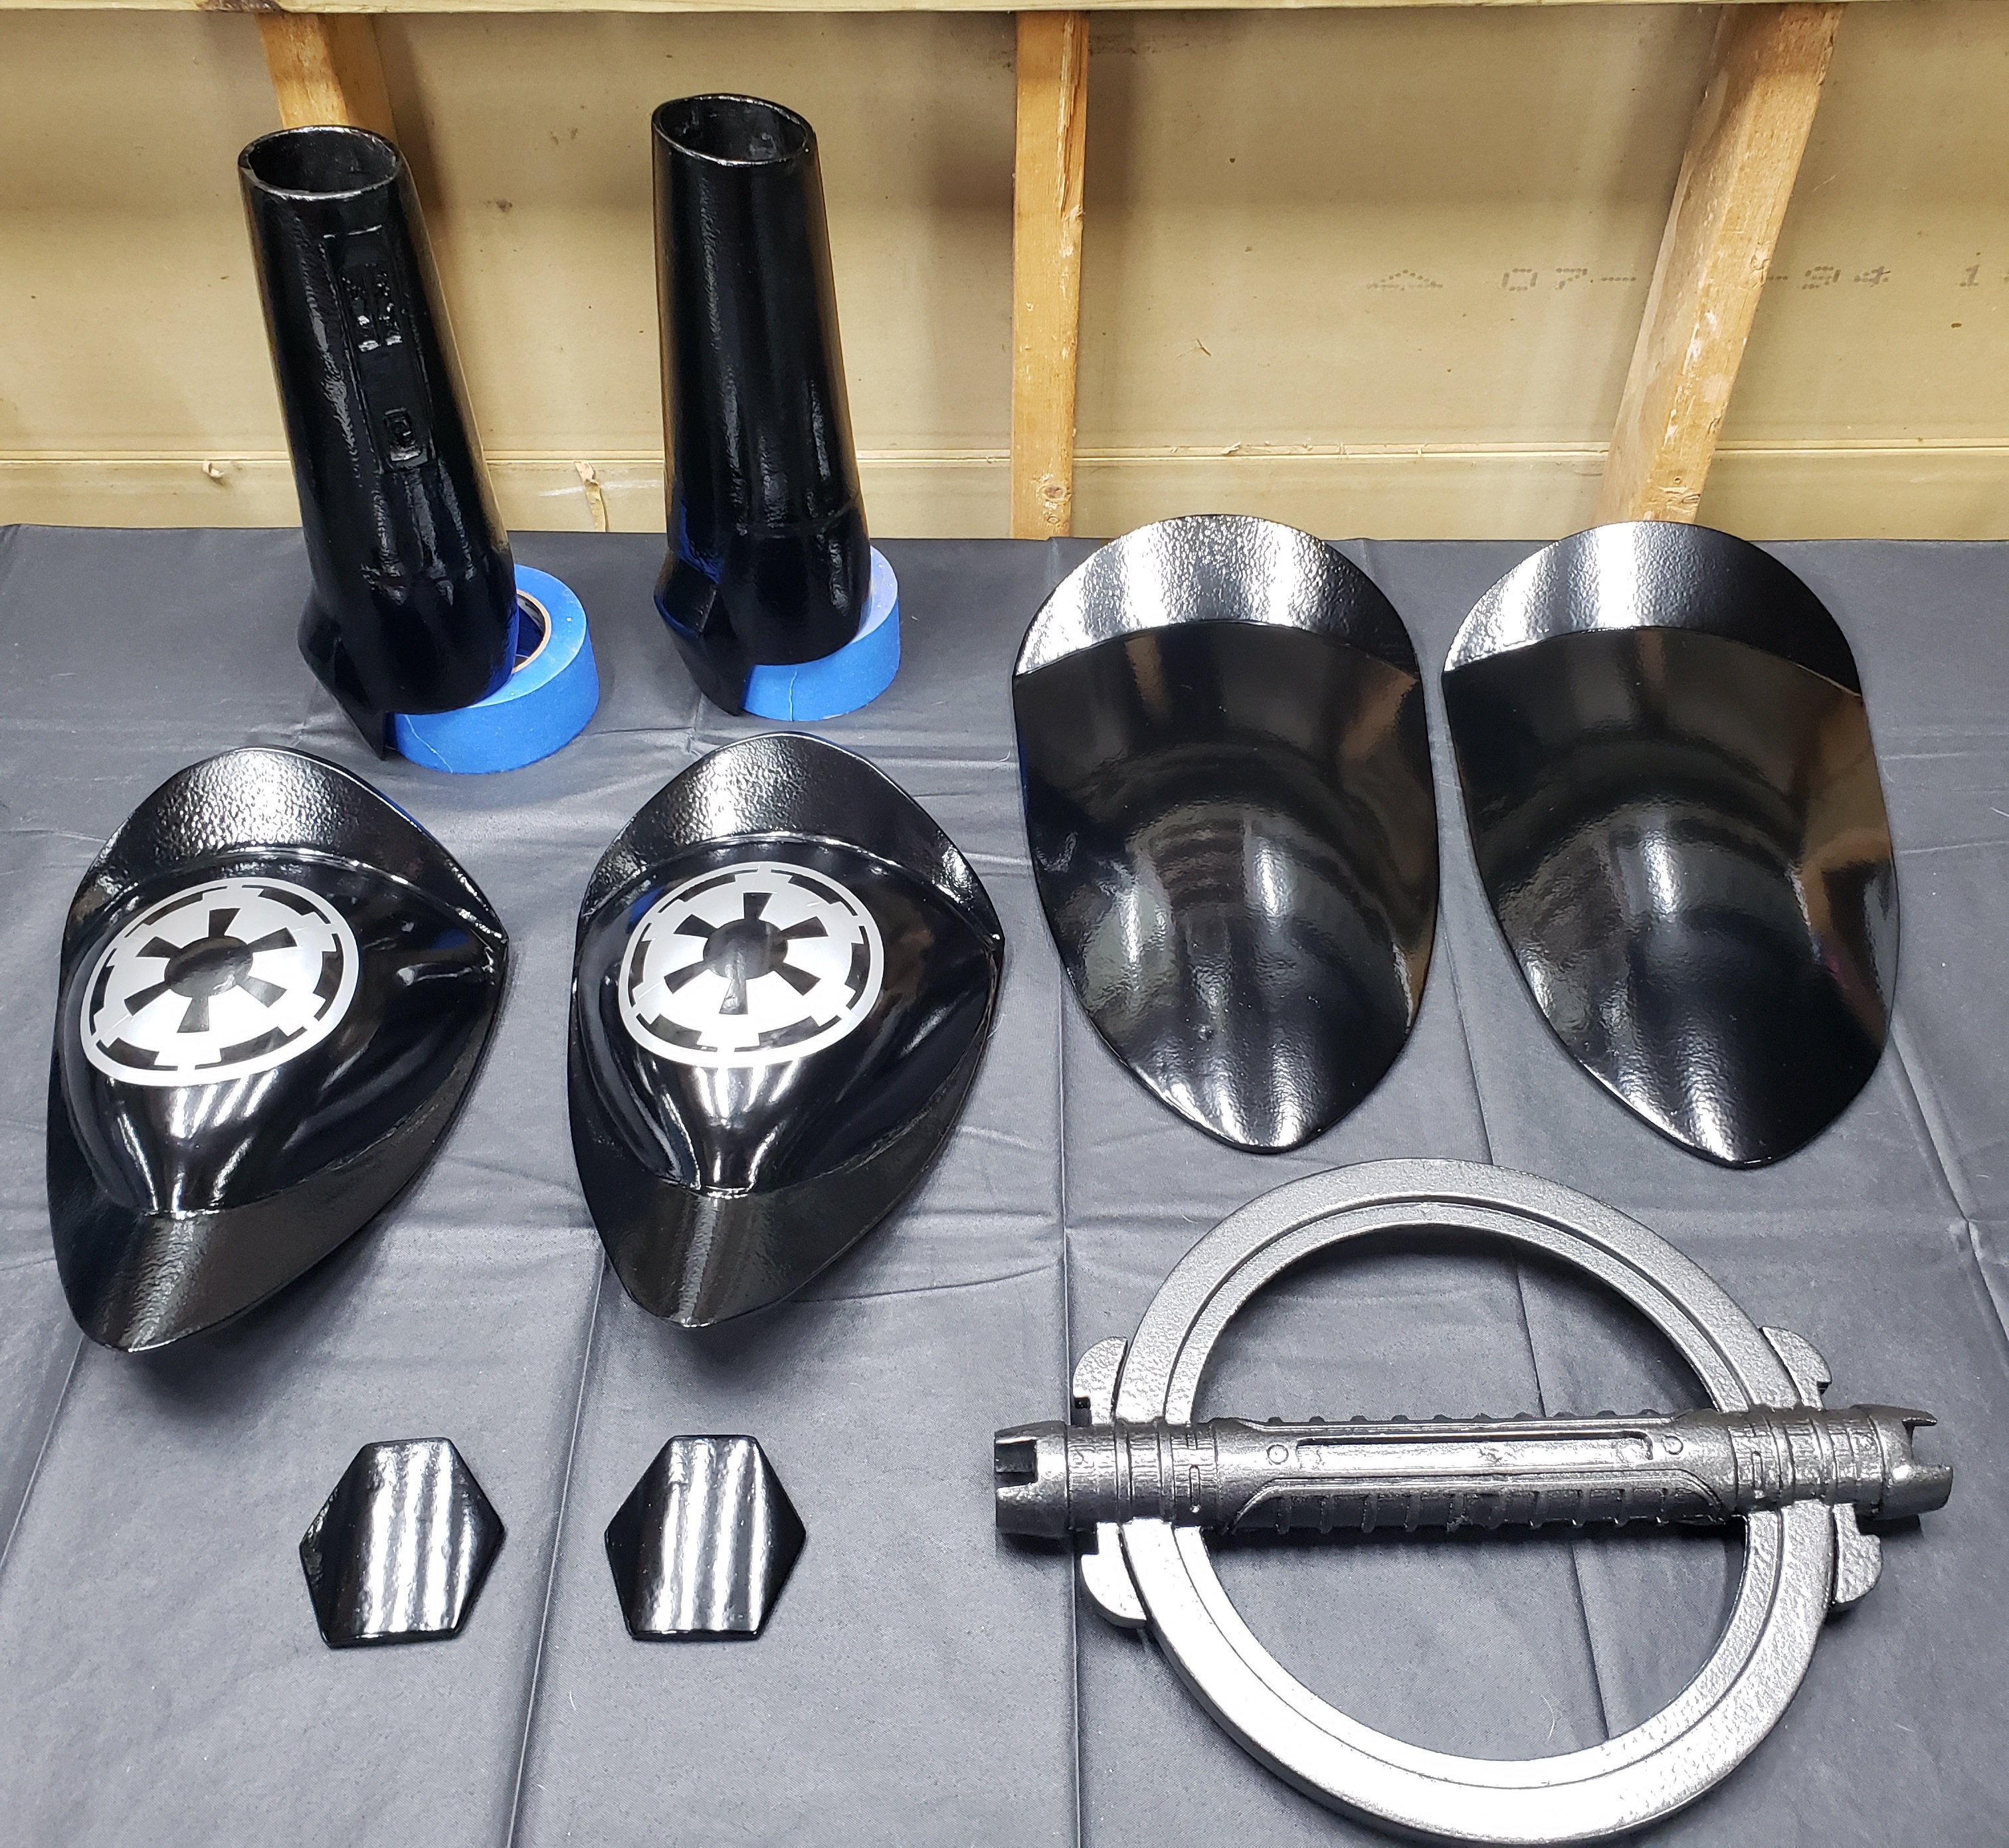
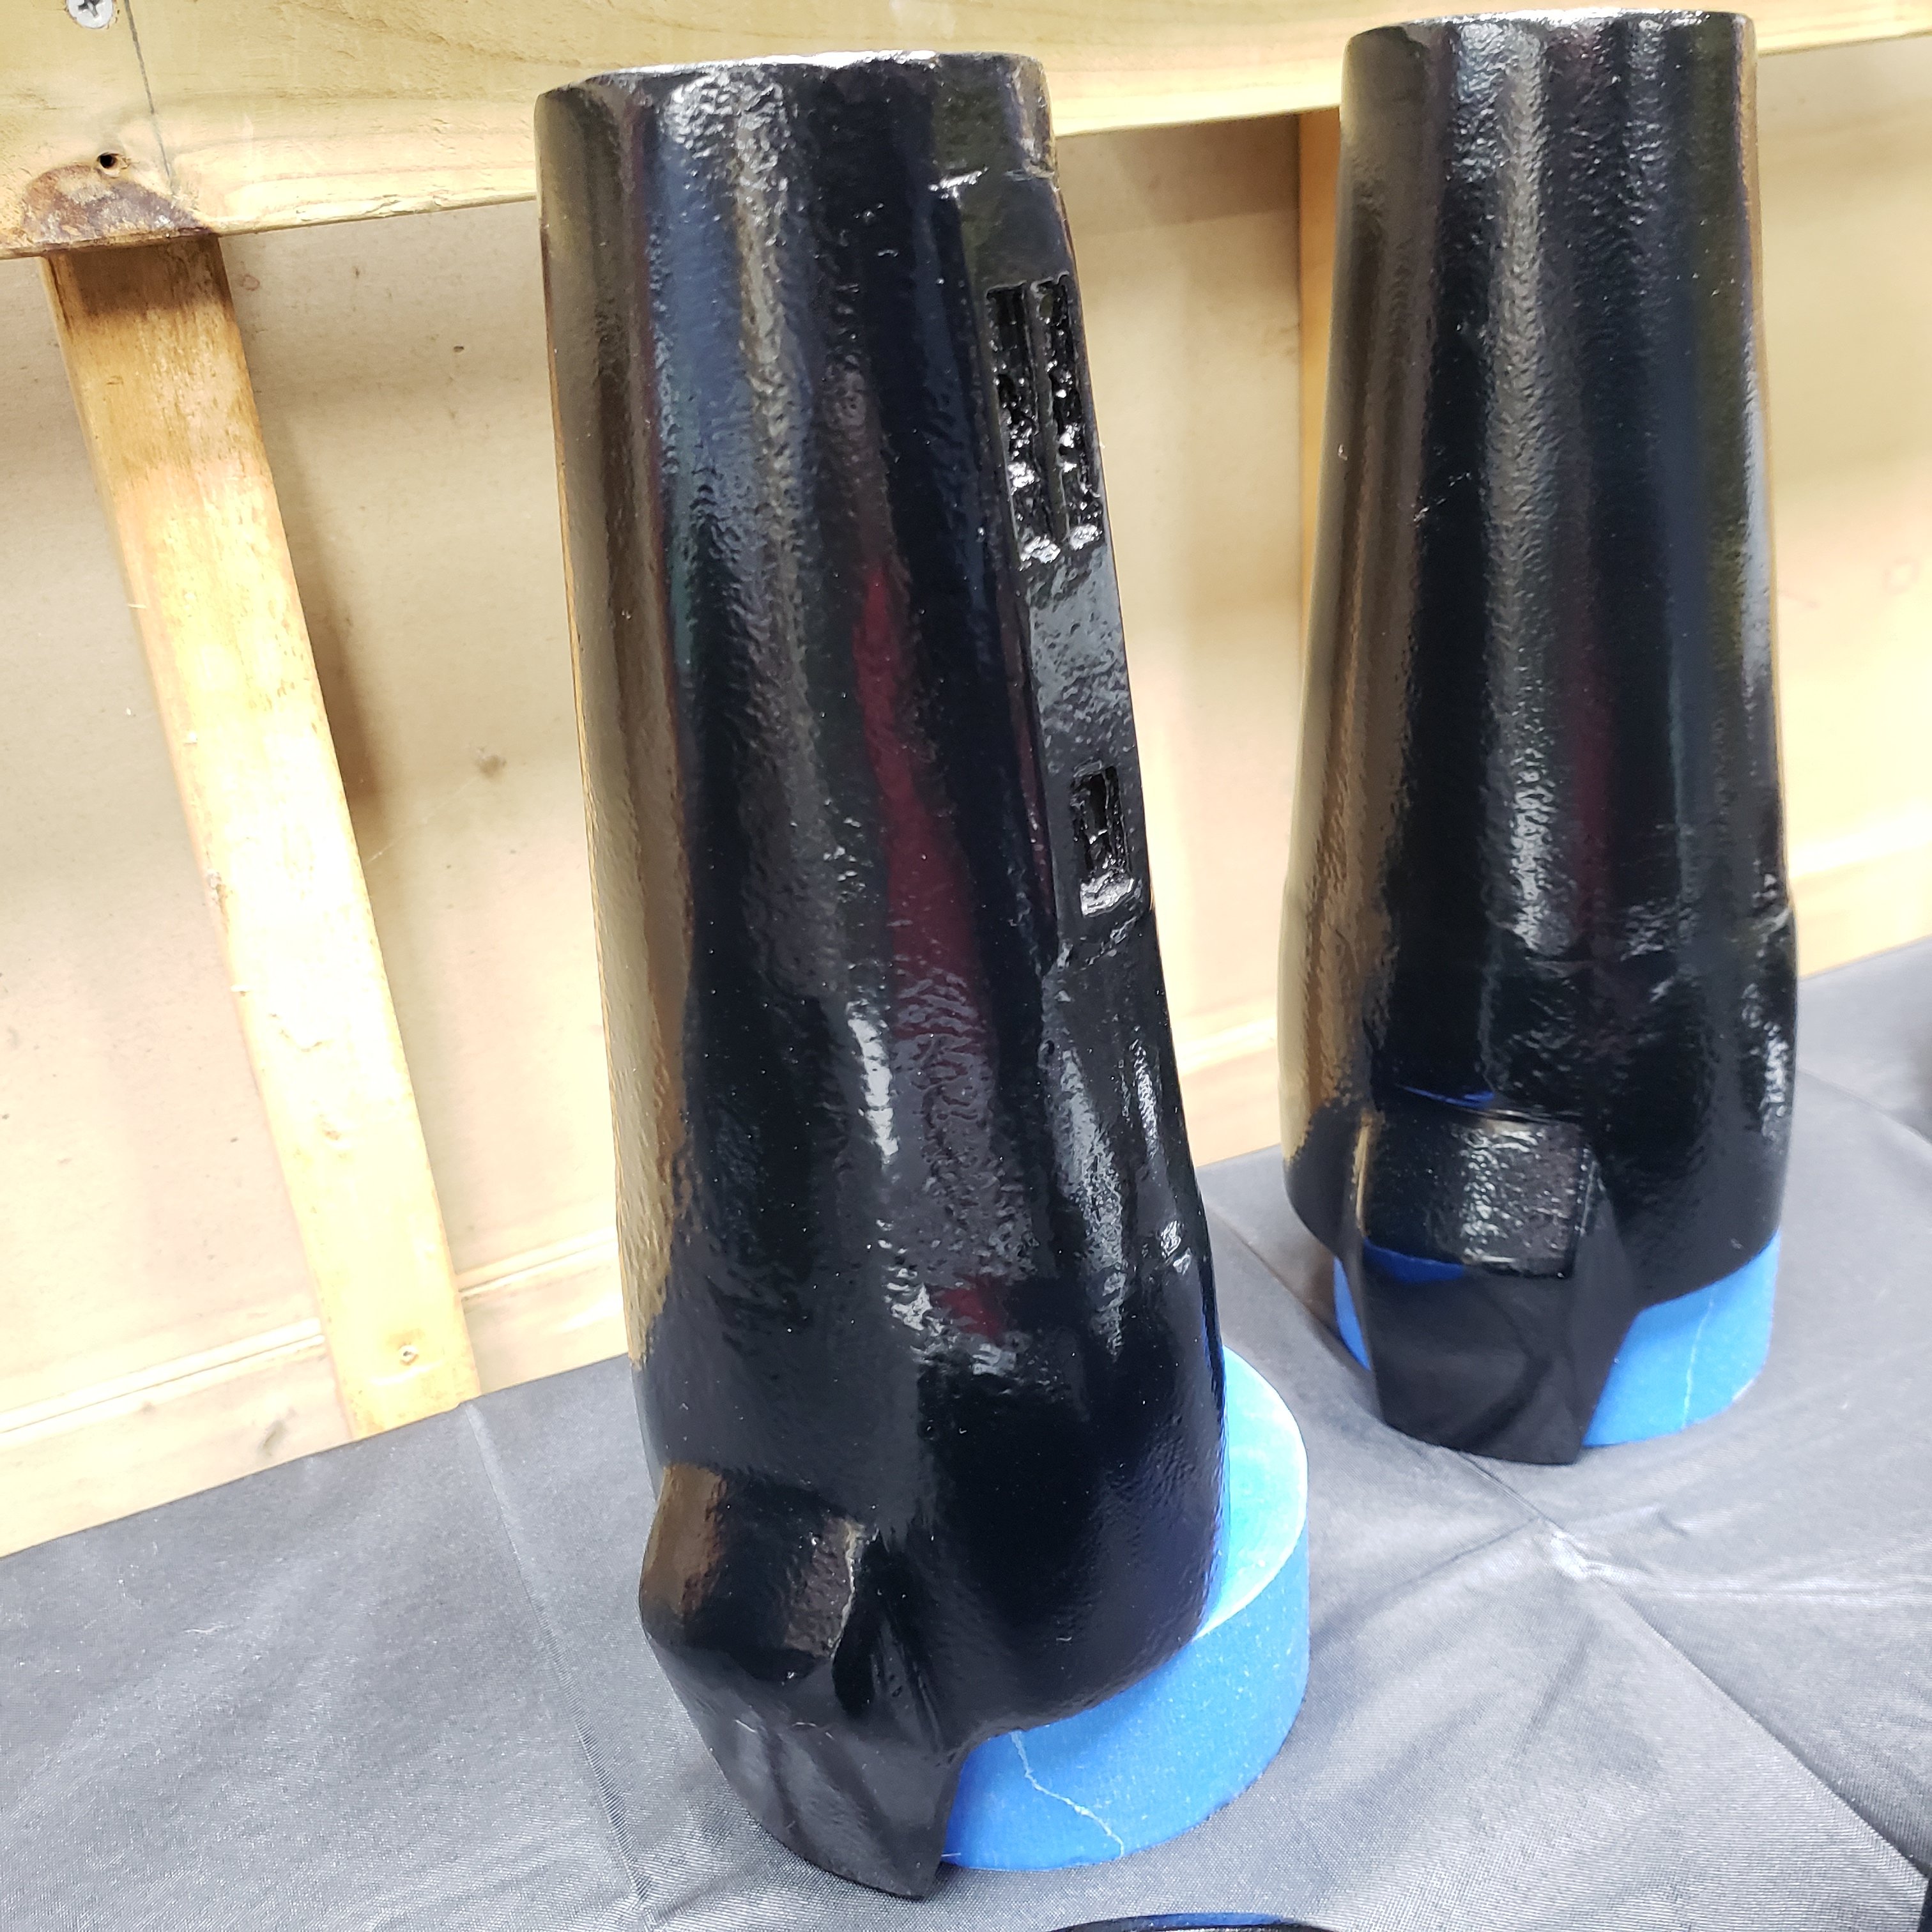
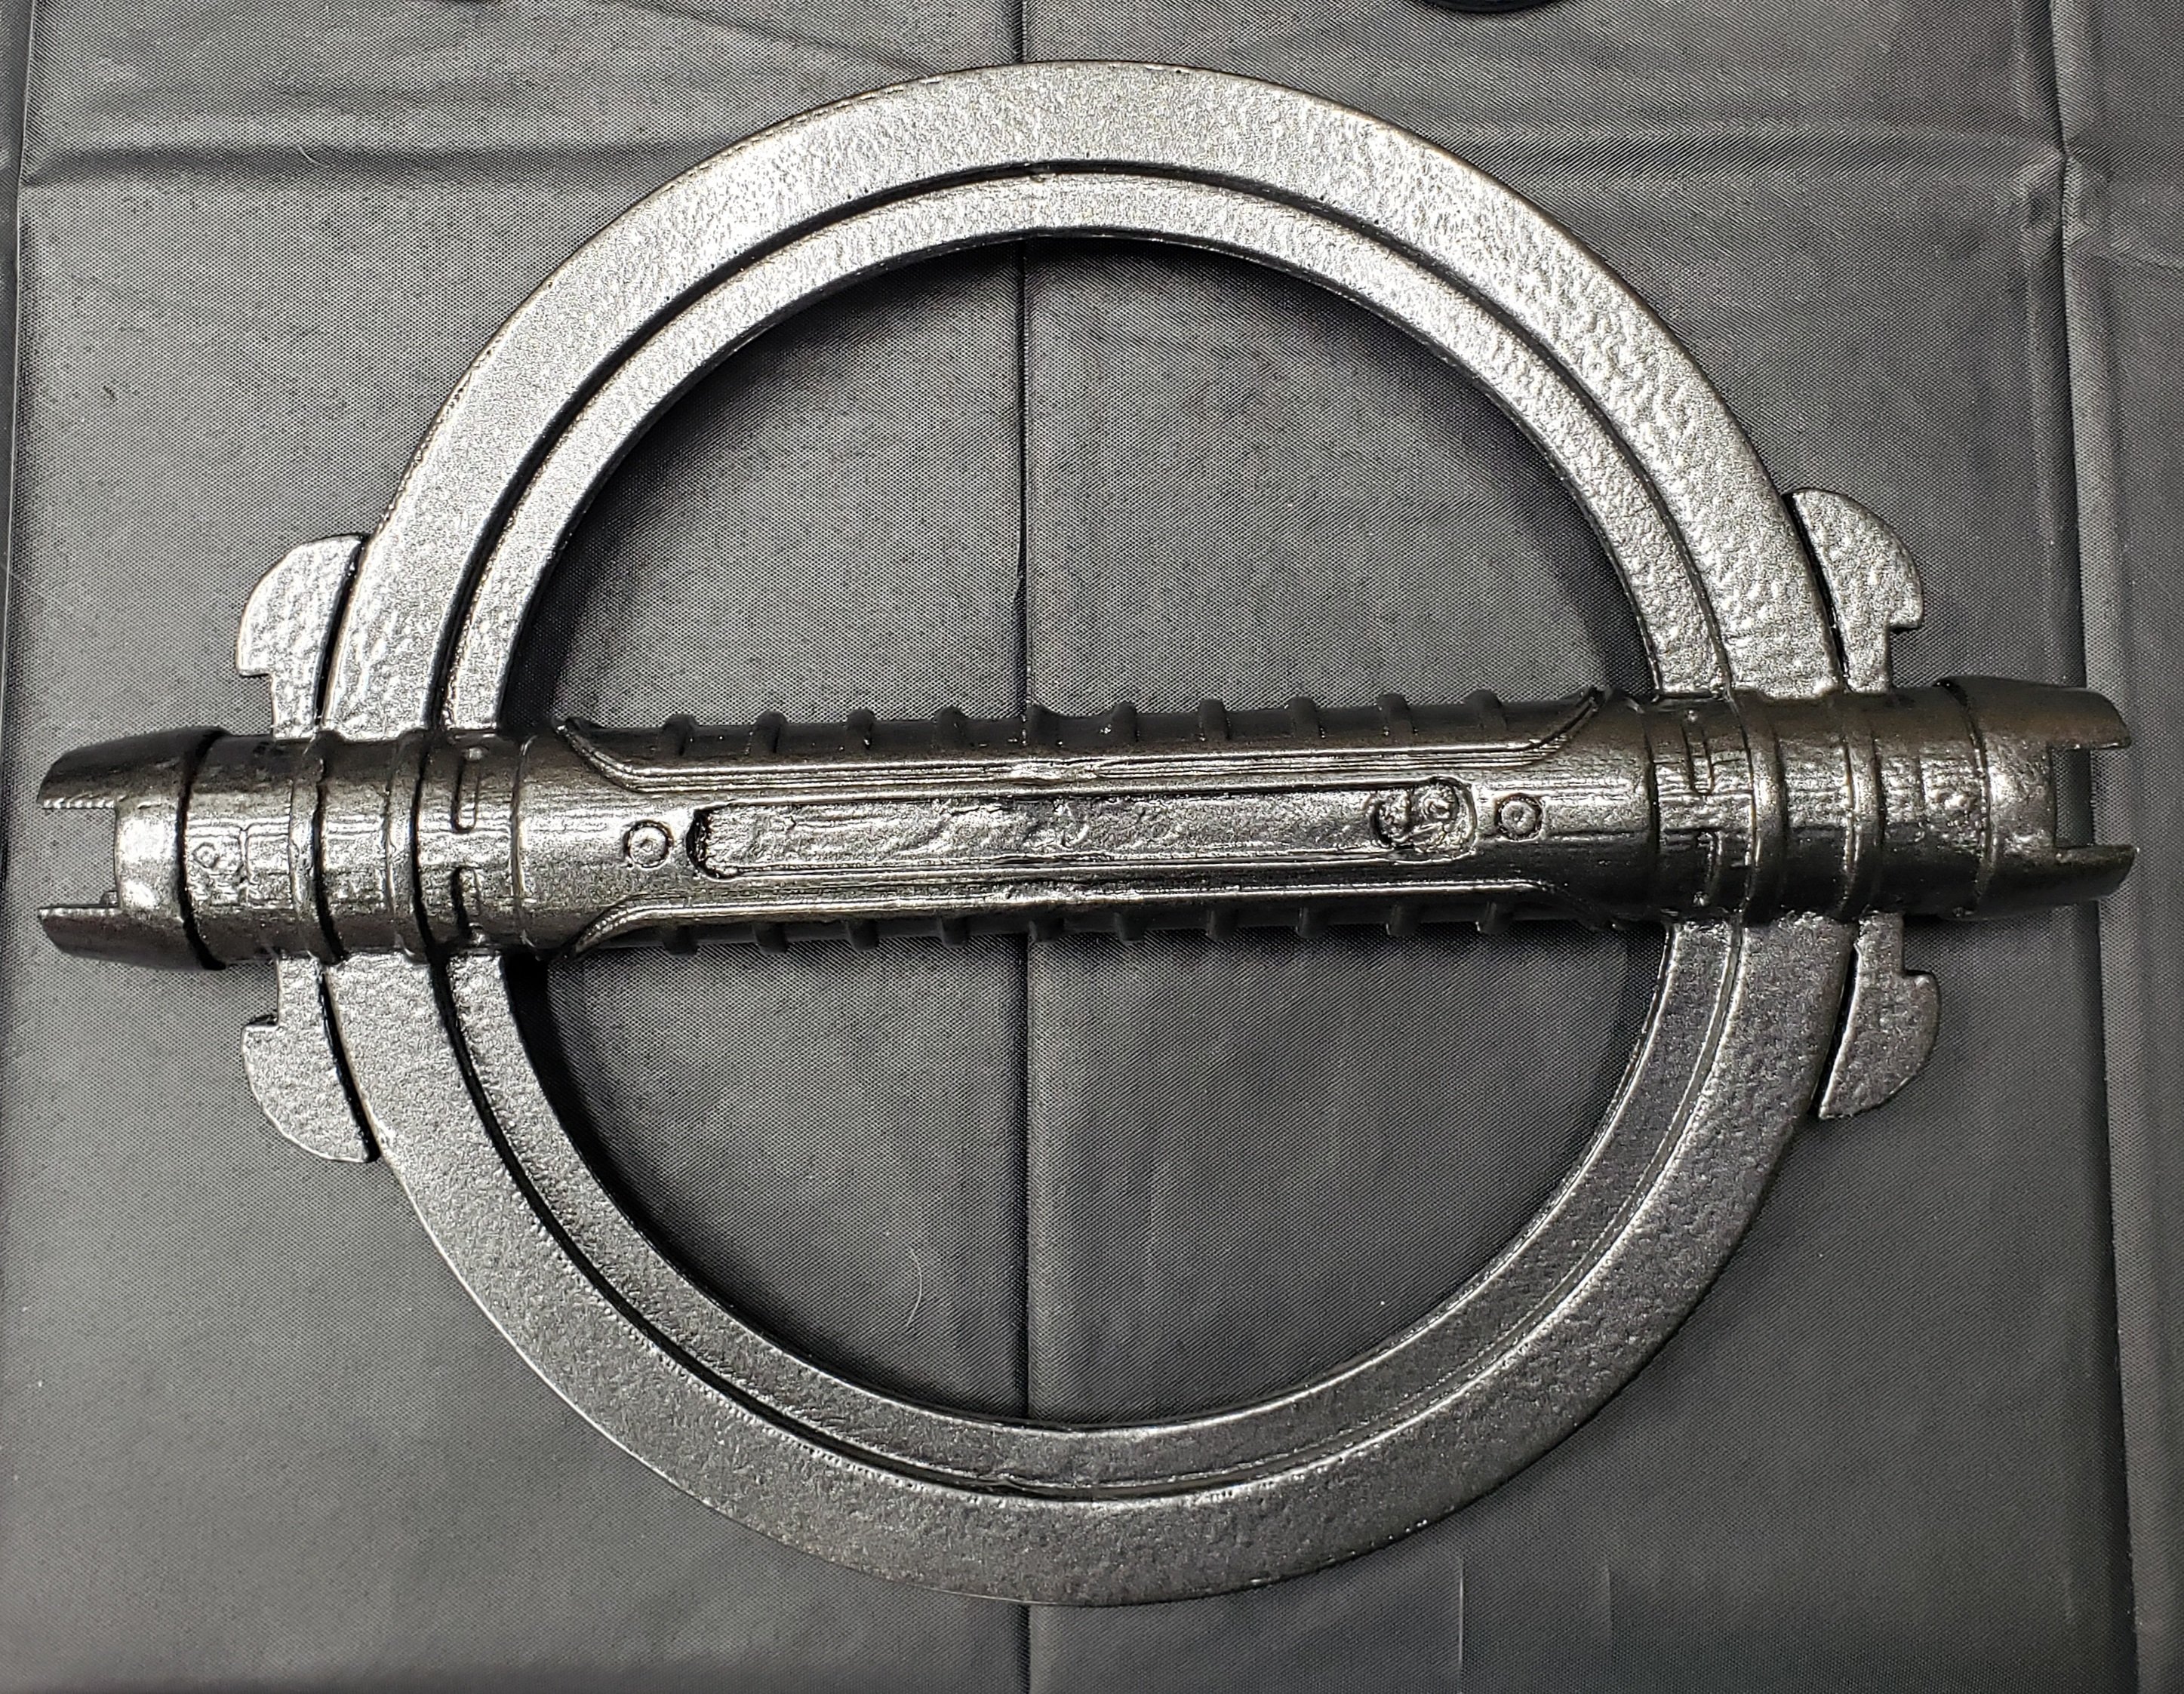
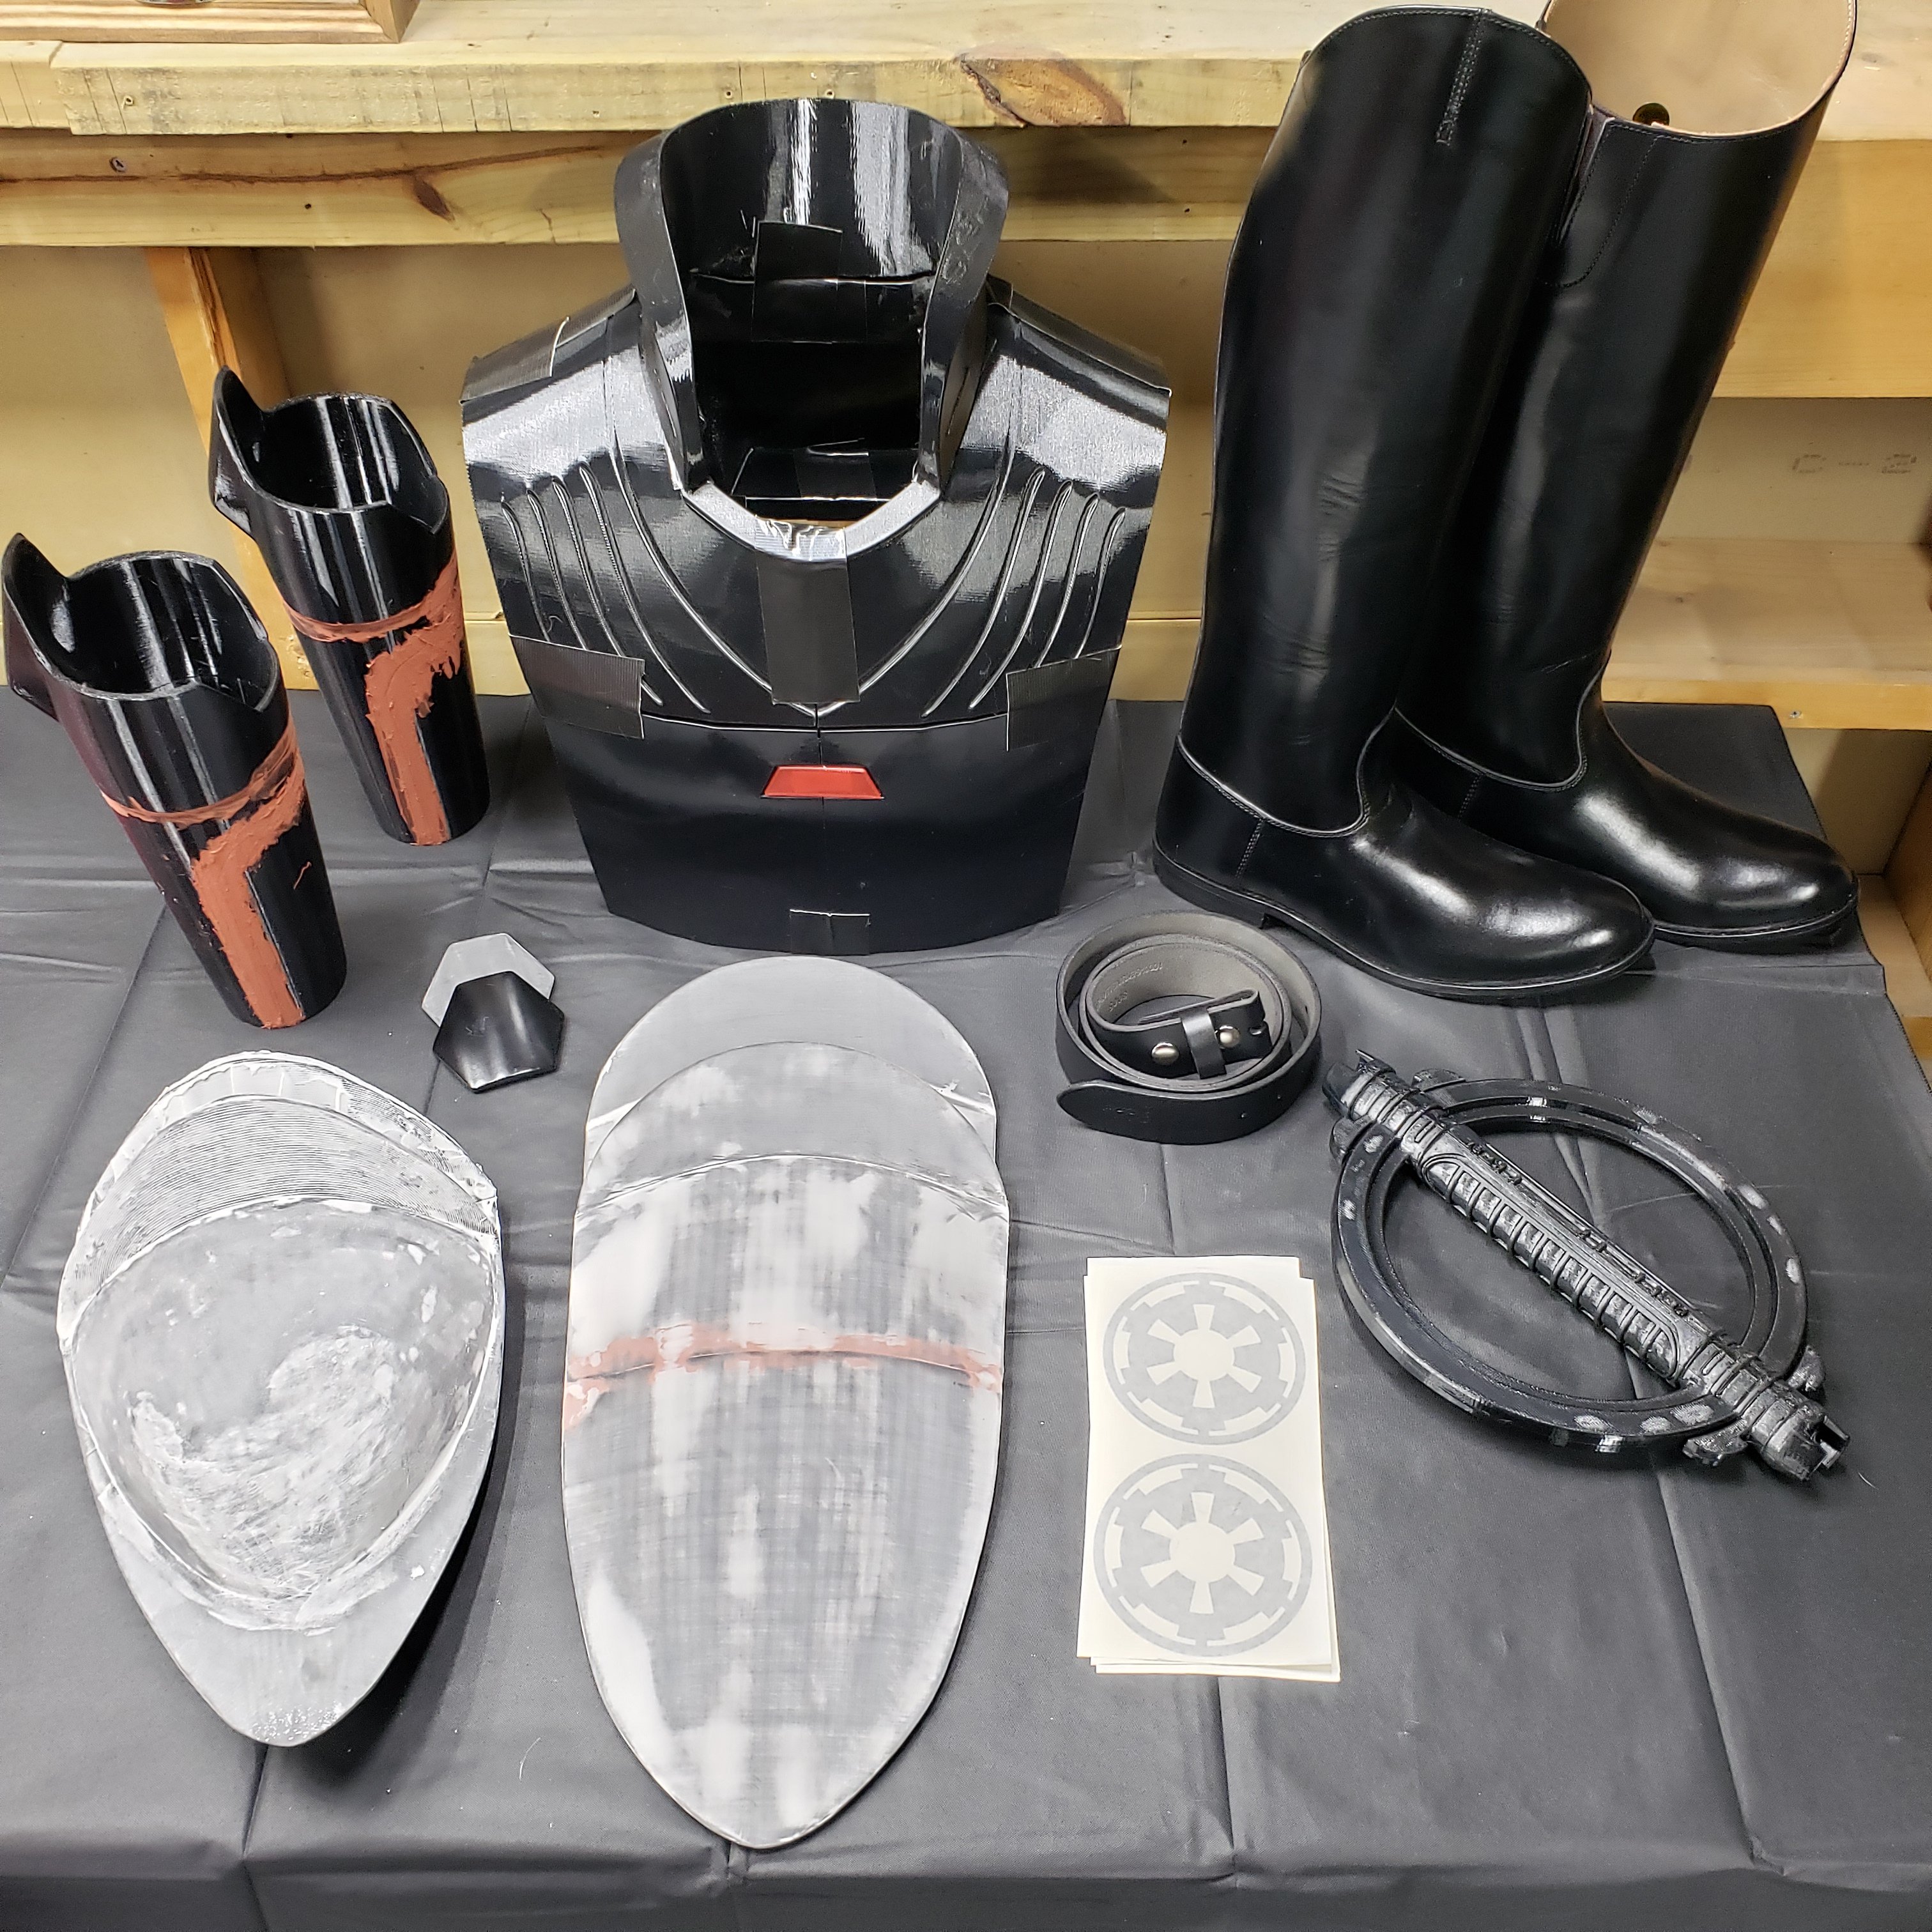
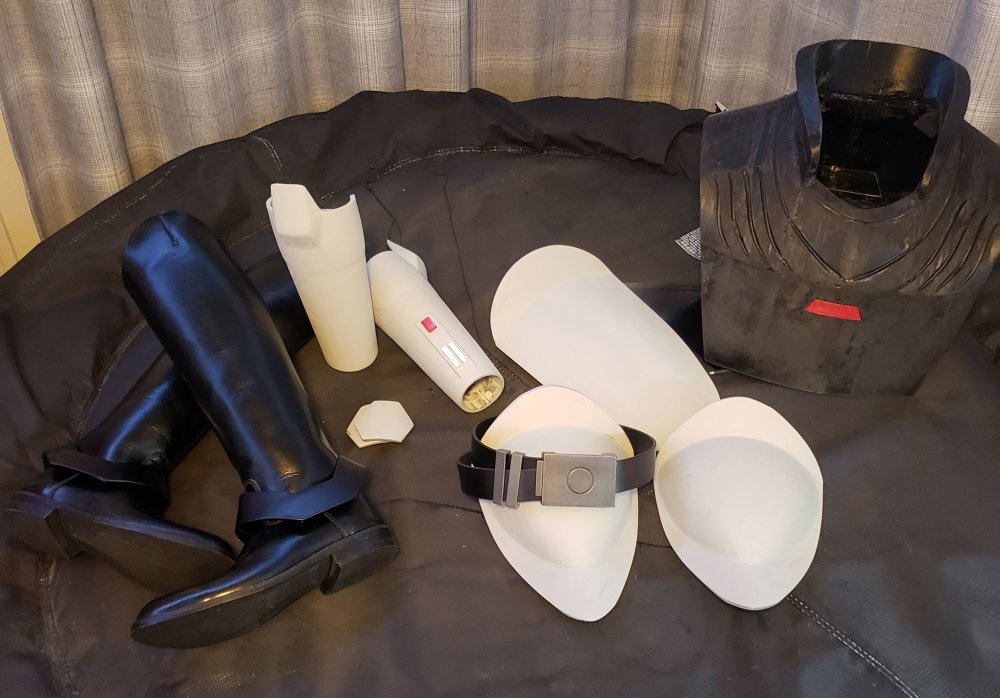
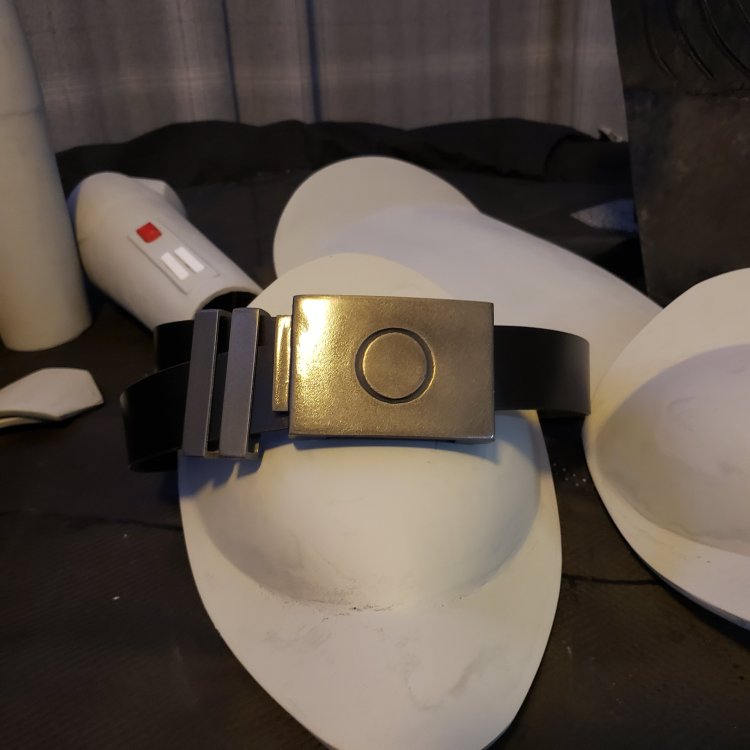
Happy New Year! Had a warmer day yesterday, so I was able to get most of the armor primed for final painting once the weather breaks. The colder air is causing the semi gloss to cloud a bit, so I need to wait a little longer to finish them unfortunately. I also setup the LED wiring that will light up the chest armor and the buttons on the left forearm bracer. Did some redesigns on the belt buckle and boot rings to increase their accuracy, but I did finally get those finished today. Designed these parts myself, so happy to share with anyone that might want the STL files I made. Chest armor and collar are finally printed and assembled with a rough first sand. I'll be using a flexible filler (for bumper repair) to smooth it and fill any cracks and gaps. I ended up reworking the original design and reprinted the entire assembly out of flex PLA (minus the top back piece which is TPU so it's more sturdy to hold the lightsaber). The print and assembly was quite a task, but the end result should be pretty great. It captures the look of rigid armor, but it's flexible enough that I'll be able to velcro the bottom chest and back pieces to the uniform so that when I twist and move, the armor will move with me just like in the show. The forearm bracers are a reworked design as well, which I formed to be one solid price that slips on so that I don't have to worry about trying to hide any seams. They're also printed in flex PLA, as are the hand guards. The boot rings are flex PLA wrapped in faux leather to match the leather appearance of the boots. The shoulder and thigh armor are printed in 65D TPU, so they are super light, but more rigid than the flex PLA in order to give a plate armor appearance. The belt buckle and matching belt loops are printed in TPU as well. The red lights are red translucent PETG, and the white buttons are just white PLA (though I may reprint those in PETG to give a little more heat resistance since they'll have LEDs under them). Since I have to wait to finish the armor, I'm going to start in on the uniform itself now. The custom silicone headpiece I had made is on its way and should be here mid to late January. Hope to have most everything else about done by then. Just have to work on sewing and facepainting now

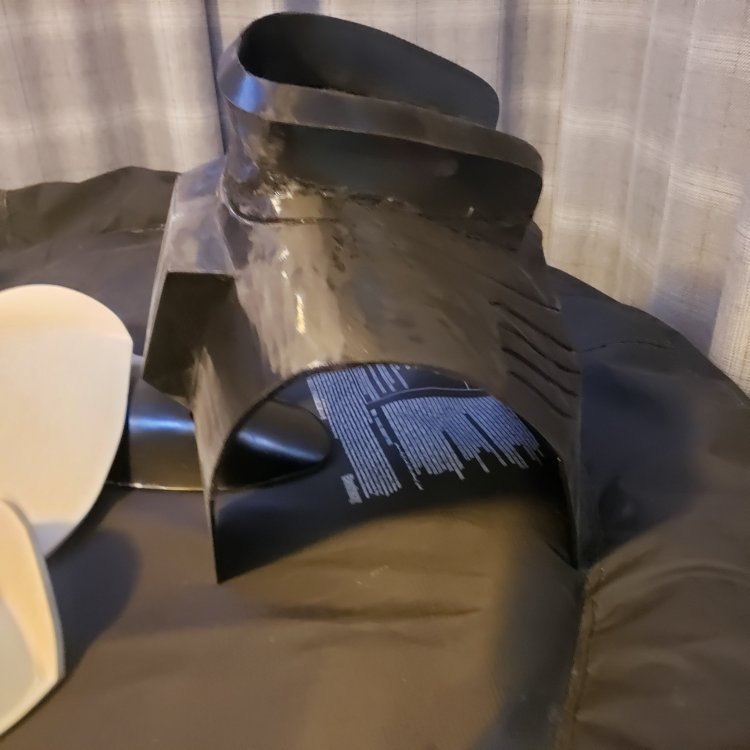 2 points
 -
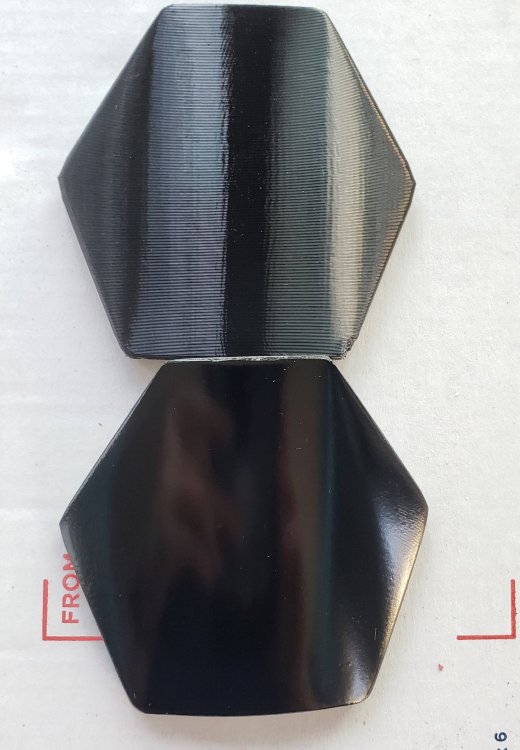
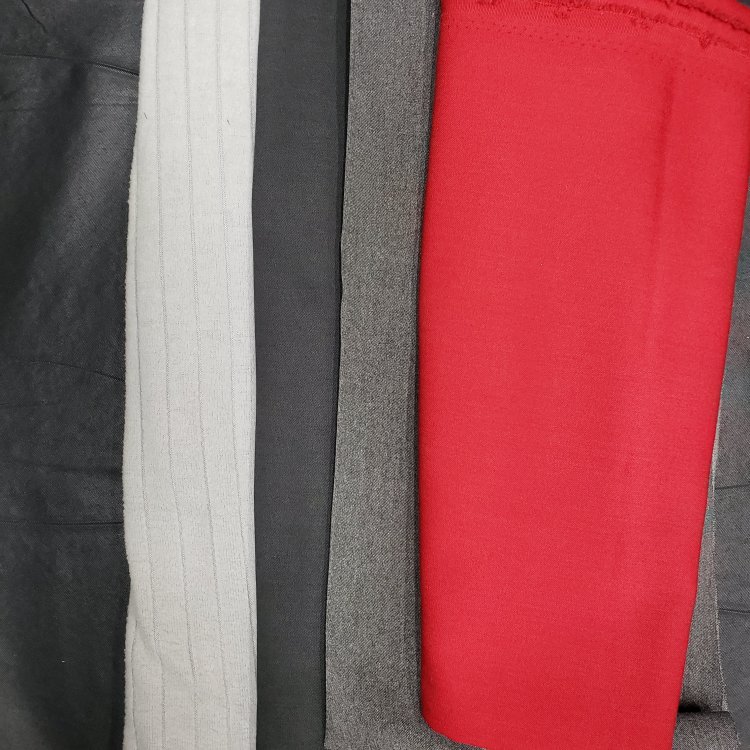
Okay, after a few design reworks and such, I finally have all the armor and lightsaber printed out (all in TPU) - shown here in various stages of post processing. I built holes in behind the red trapezoid on the chest armor so I can add in some battery powered red LEDs when it's finished. The silver imperial cogs are for the shoulder armor. I have a metal belt buckle coming soon to complete the look once I add the center to it. For post processing the armor I'm using TPU welding and Bondo for the seams, while using a flexible pasty caulk to coat over and fill the print lines. After all that dries, I sand with 180 grit to get the rough parts smooth, then hit it all with 400 grit. Then I paint it with a flexible paint primer and then a semi-gloss black flexible paint (car wrap paint) as the top coat. This has been working well so far with the TPU, and you can see a before and after of the hand guard. That was my first attempt, and I still have to do the edges and sides to finish it up, but I was pleased with how the paint turned out. I have most of the leather parts in hand now, too, so just need to build the boot rings and the neck seal to finish those up. Got some very thin leather that I'm going to cut and glue to the outside of a 1/16th inch thick piece of neoprene for the neck seal, and have some 1 inch wide thicker leather straps that I'm going to make the boot rings out of after I polish the leather up to match the finish of the boots. Soft goods-wise I found a stretch gabardine twill fabric in a medium gray, charcoal gray and red (sleeve stripes) that captures the 'medium weight suiting material' requirement but has just enough stretch to give it that tight, tailored fit I'm chasing. The light gray ribbed fabric shown I still have to dye to match, but it has the perfect size ribs to hit the magic '15' across the chest (lucky find). Now I just need to learn how to sew 😋

 2 points
 -
Always happy to see more aspiring inquisitors! I’d recommend you read through the CRL for this costume if you haven’t already: https://databank.501st.com/databank/Costuming:Grand_Inquisitor The pictures and guidelines in there are usually very helpful in planning out a costume! regarding the contact lenses, you wouldn’t necessarily have to use Sclera contacts since the Grand Inquisitor really only has a yellow eye color with some red in it, much like any other sith/dark side user. the Suit/uniform requires the use of a “medium weight suiting material” I used a cotton twill for my suit, similar to a officer uniform, just keep that in mind when deciding on fabric. prosthetics is something I’ve been wanting to do for this costume for a long time, but I haven’t really gotten around to it yet. Just let me know if there’s any questions that arises, and I’ll try my best to help you out! //Malte2 points
-
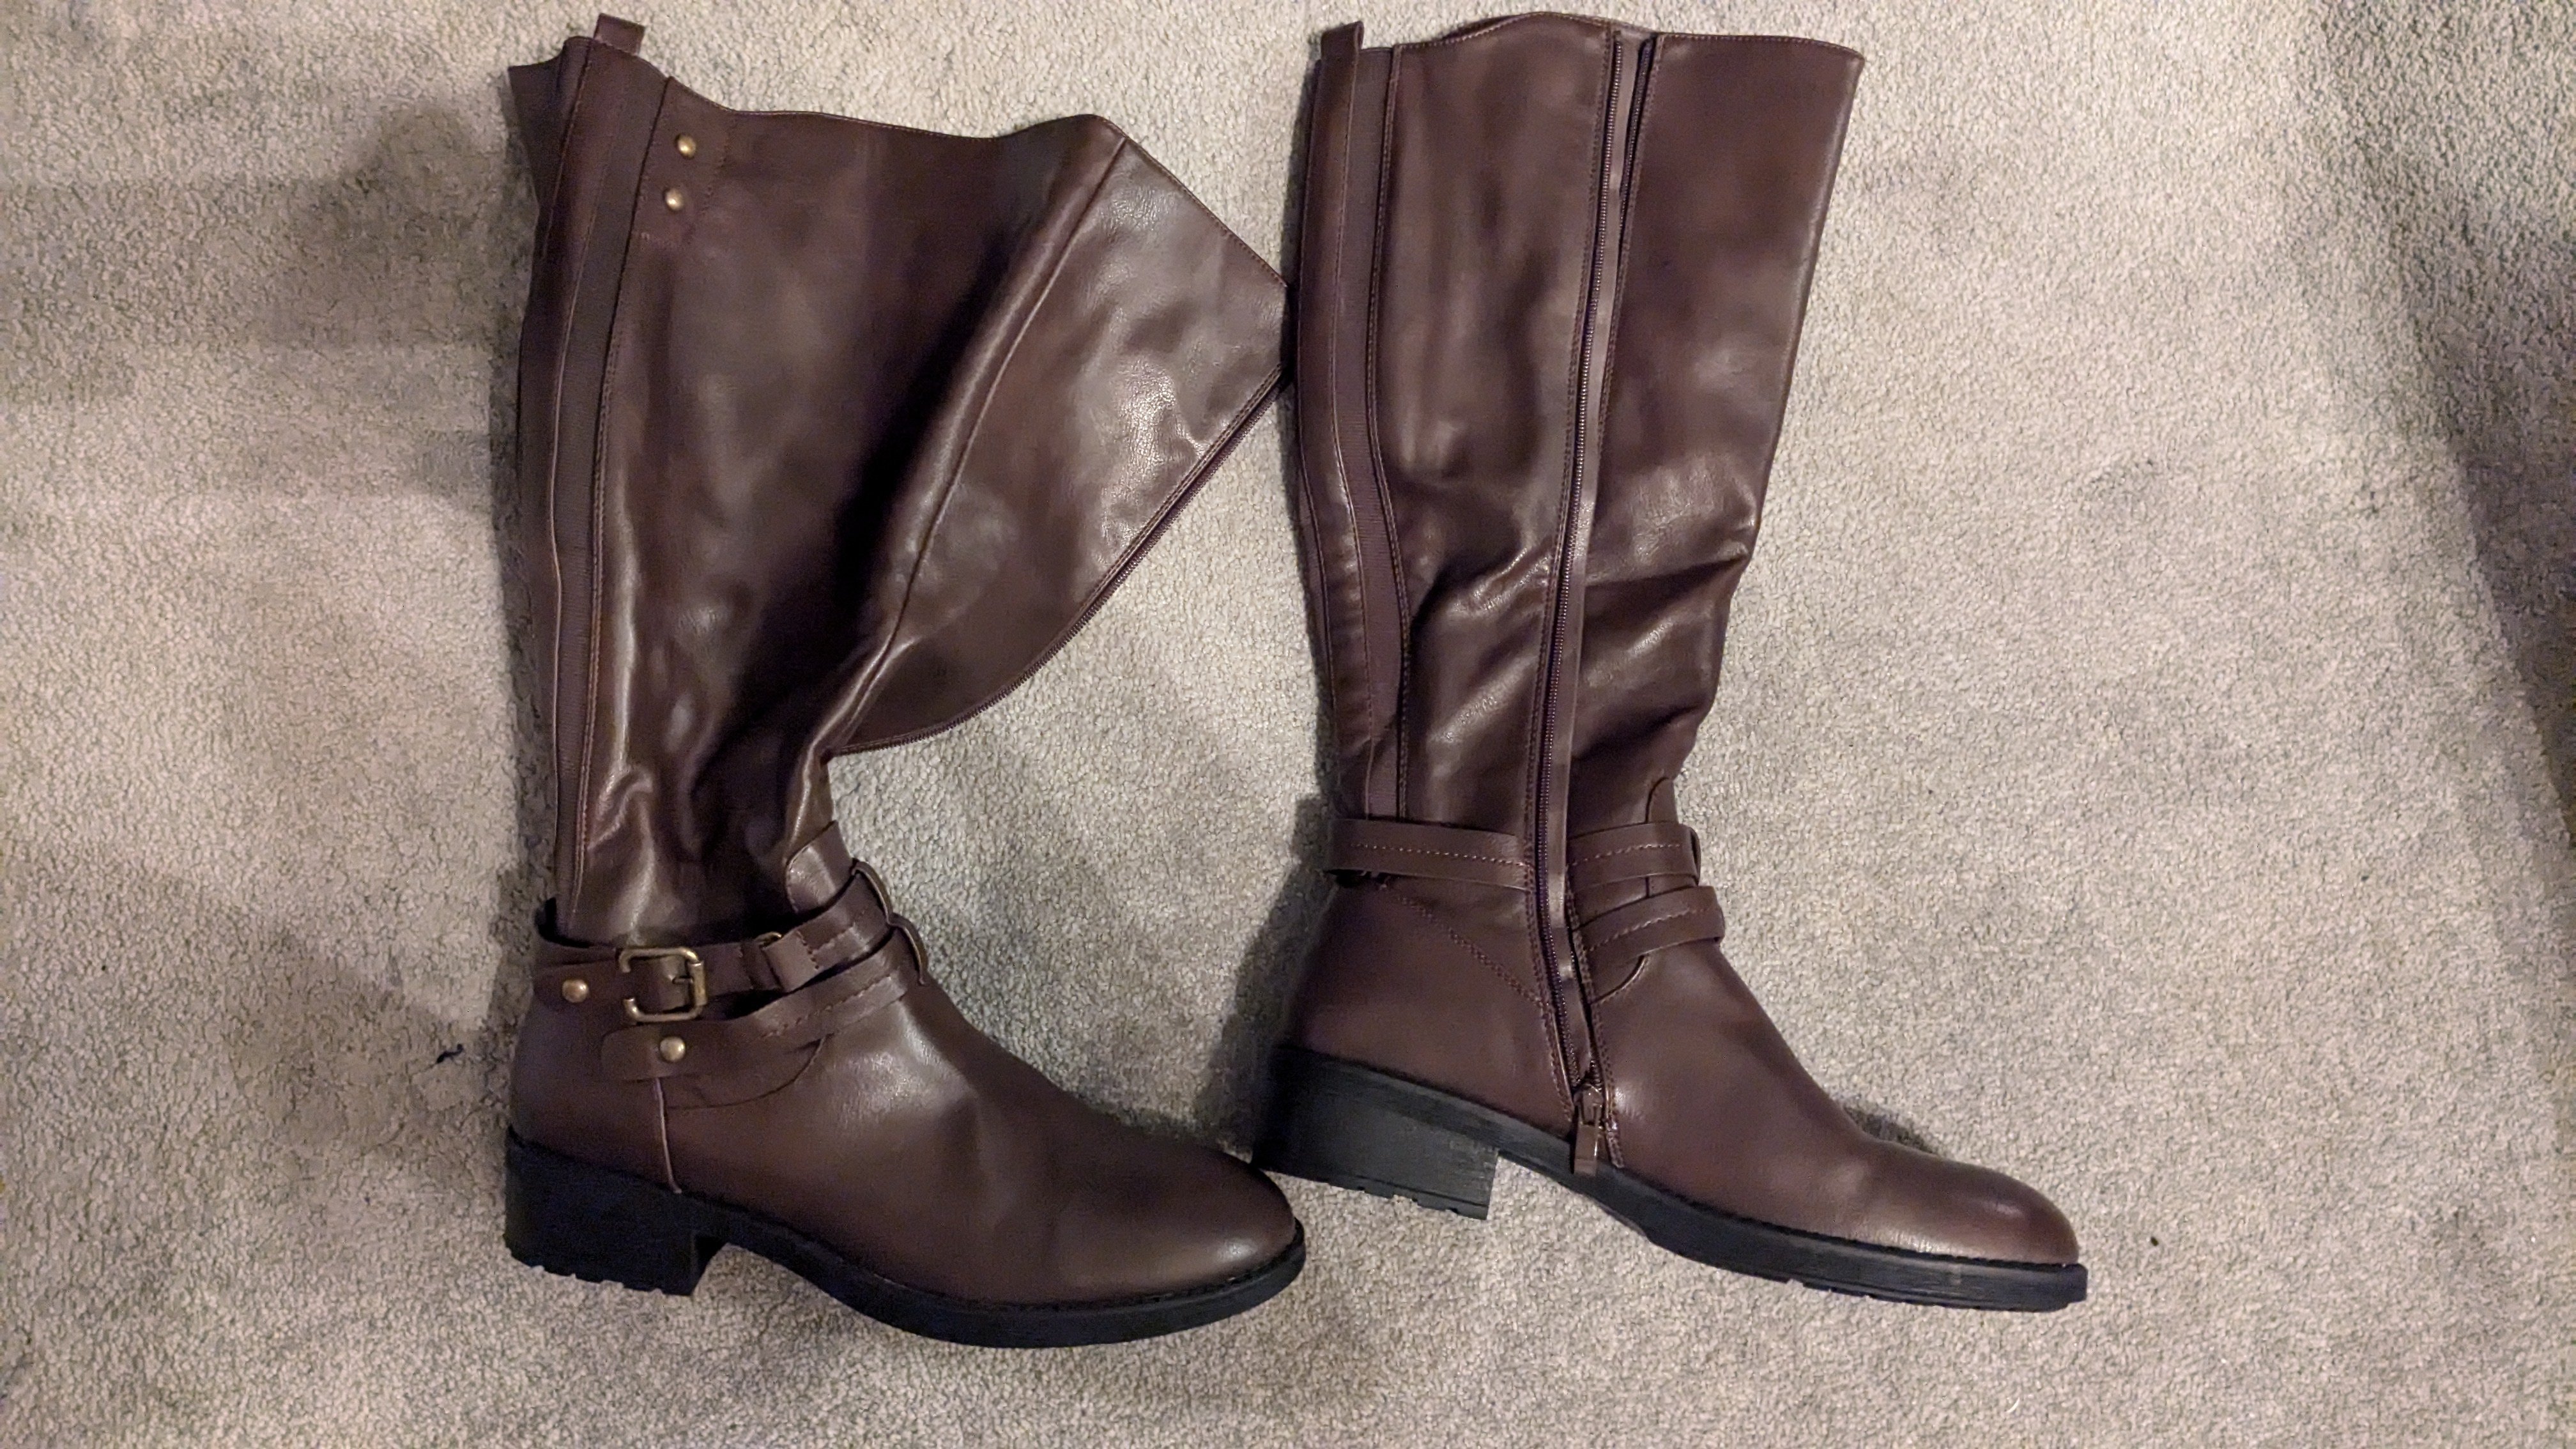
Got more done!!!! So I continued on both the upper boot and the lower boot. I needed to fill out the lower boots. I ended up using Flex Paste as you can spackle it on in thick coats (takes around 24-48 hrs to fully cure). I've included a picture of the material I used in case anyone wants to go this route. After I filled out the shoe bases I worked on the upper sections of the boots. I drew out the lines on the different sections of the boots and painted Flex Paint on them. I let it sit for around 2 1/2hrs and then rubbed the surface to dull the extreme shine it had. This gives the rubber sections a bit of a lighter color compared to the fabric. One part of the boot (the top section of the upper boot, I ended up painting the very top section then let that dry and then painted the next shape just below it, but overlapping so it would pop out just a little on top. This will get even more accentuated when I paint white sketchy lines along the edges like in the show. Hopefully when you look at the photos what I have said will make sense. When all of the sections were dry I glued them together with Flex Glue (there's a theme going on with the materials as you can see). Once that was done, I worked on the raised edges that go around the boot base on the outer lower part (again, refer to images to understand what I am saying). I cut out the shapes from thin sheets of rubber and glued them together with the Flex glue. I traced the shape onto the boot so I had a reference for where the glue would be applied to the boot base. I applied the Flex Glue to the boot itself and roughly smoothed it out all over the area I had traced on the boot and then put the shapes into place. To keep the shapes pressed to the boot while the glue dries I used a trick I learned when putting my TK (Stormtrooper) kit together, magnets! It definitely helps when some areas are too hard to get a clamp in the area. At this point I am currently letting them dry. Tomorrow I plan on continuing the process. Who knows? Maybe if I'm lucky I might actually get most of the boot done by the end of this coming weekend! *knocks on wood*2 points
-
Hey Todd, I see what you mean about the eye shape and nose vents. Just a suggestion from Ryan, since I was asking him about the feasibility of modifying .stl files, if you bring up the discrepancies to GA, they may be willing to modify their file, especially if you tell them that you want to use it for the CRL. Ryan brought up something in a Bad Batch build group about an inaccuracy in their Wrecker armor, and the GA guy saw it and fixed the file a couple days later.2 points
-
My costume so far

 2 points
 -
Hey so I was looking for a full head Revan helmet because I'm not a fan of the typical half mask people usually sell and wanted to get y'all's opinion on if you think this helmet would be accepted. I know people tend to say avoid Etsy but I haven't found any full ones from the typical sellers and the mask from Walt's trooper factory isn't even accurate according to here. https://www.etsy.com/listing/875936525/darth-sith-knighs-mask-helmet-complete1 point
-
Helmets are entirely fine for the CRL. When we asked the creator of the character model, they noted that it was a mask and not a helmet at the time, as the helmet reference hadn't been released yet in the comic. Hence why the mask is still listed specifically for the game model version.1 point
-
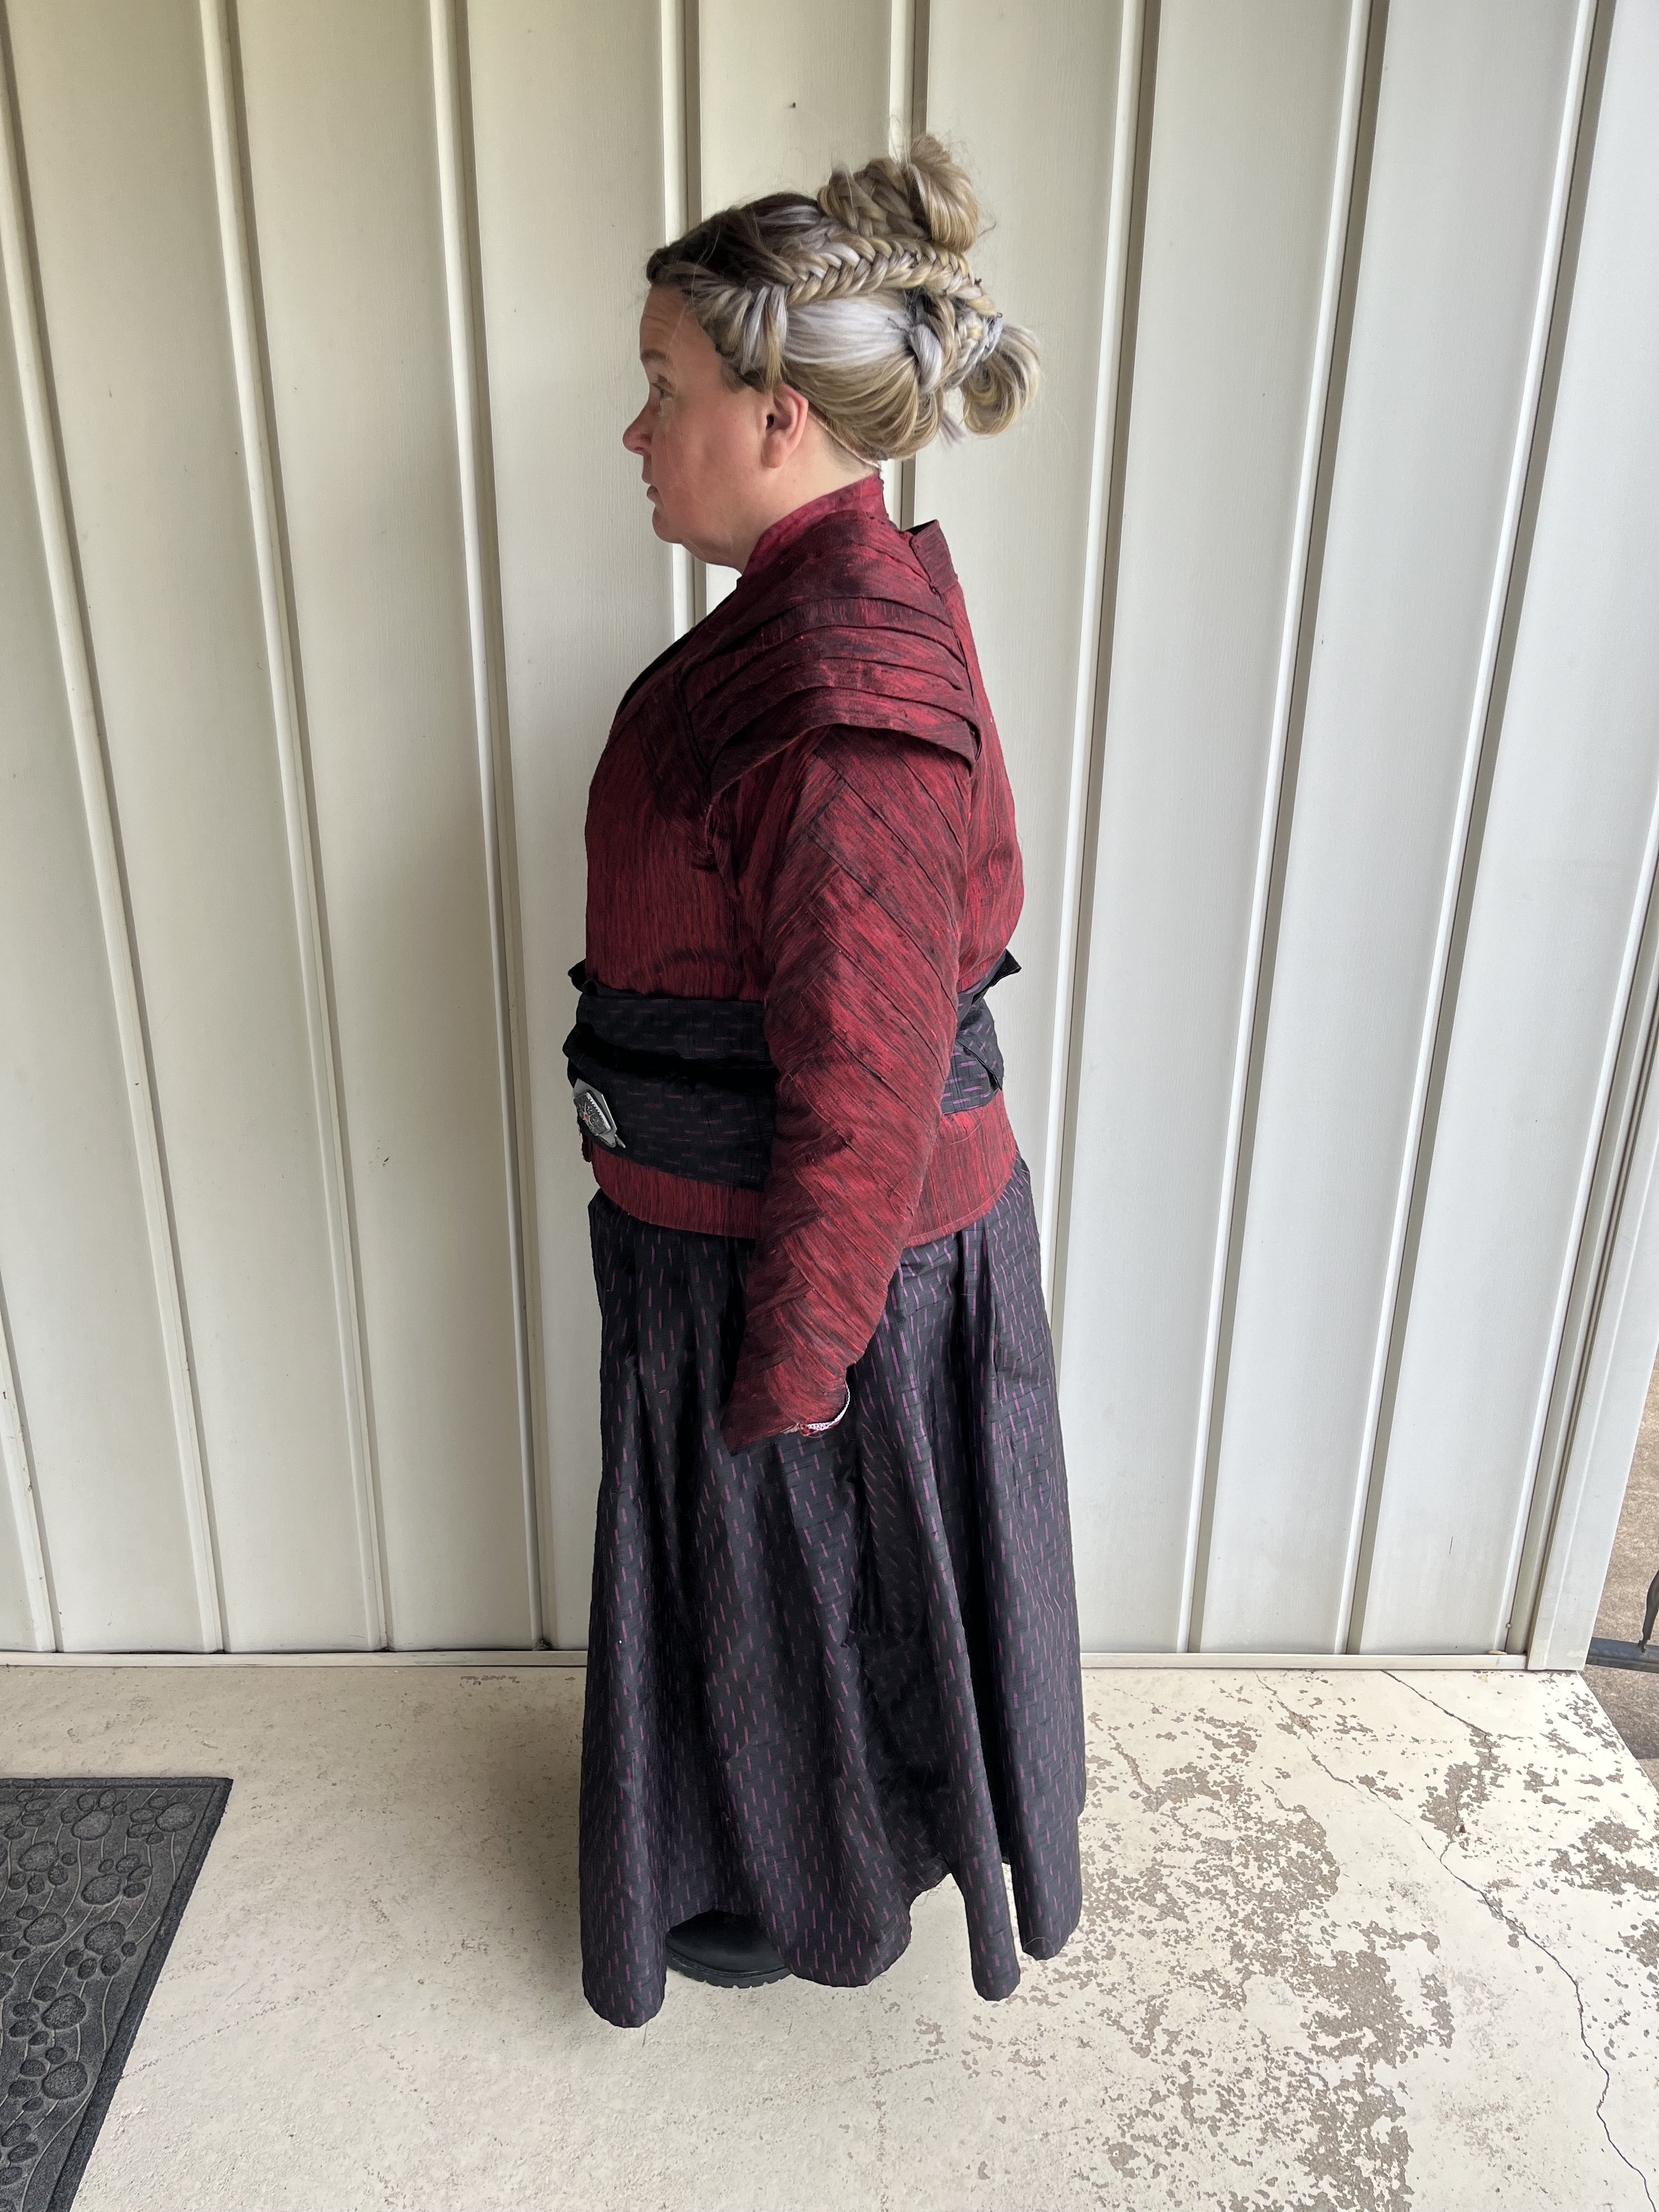
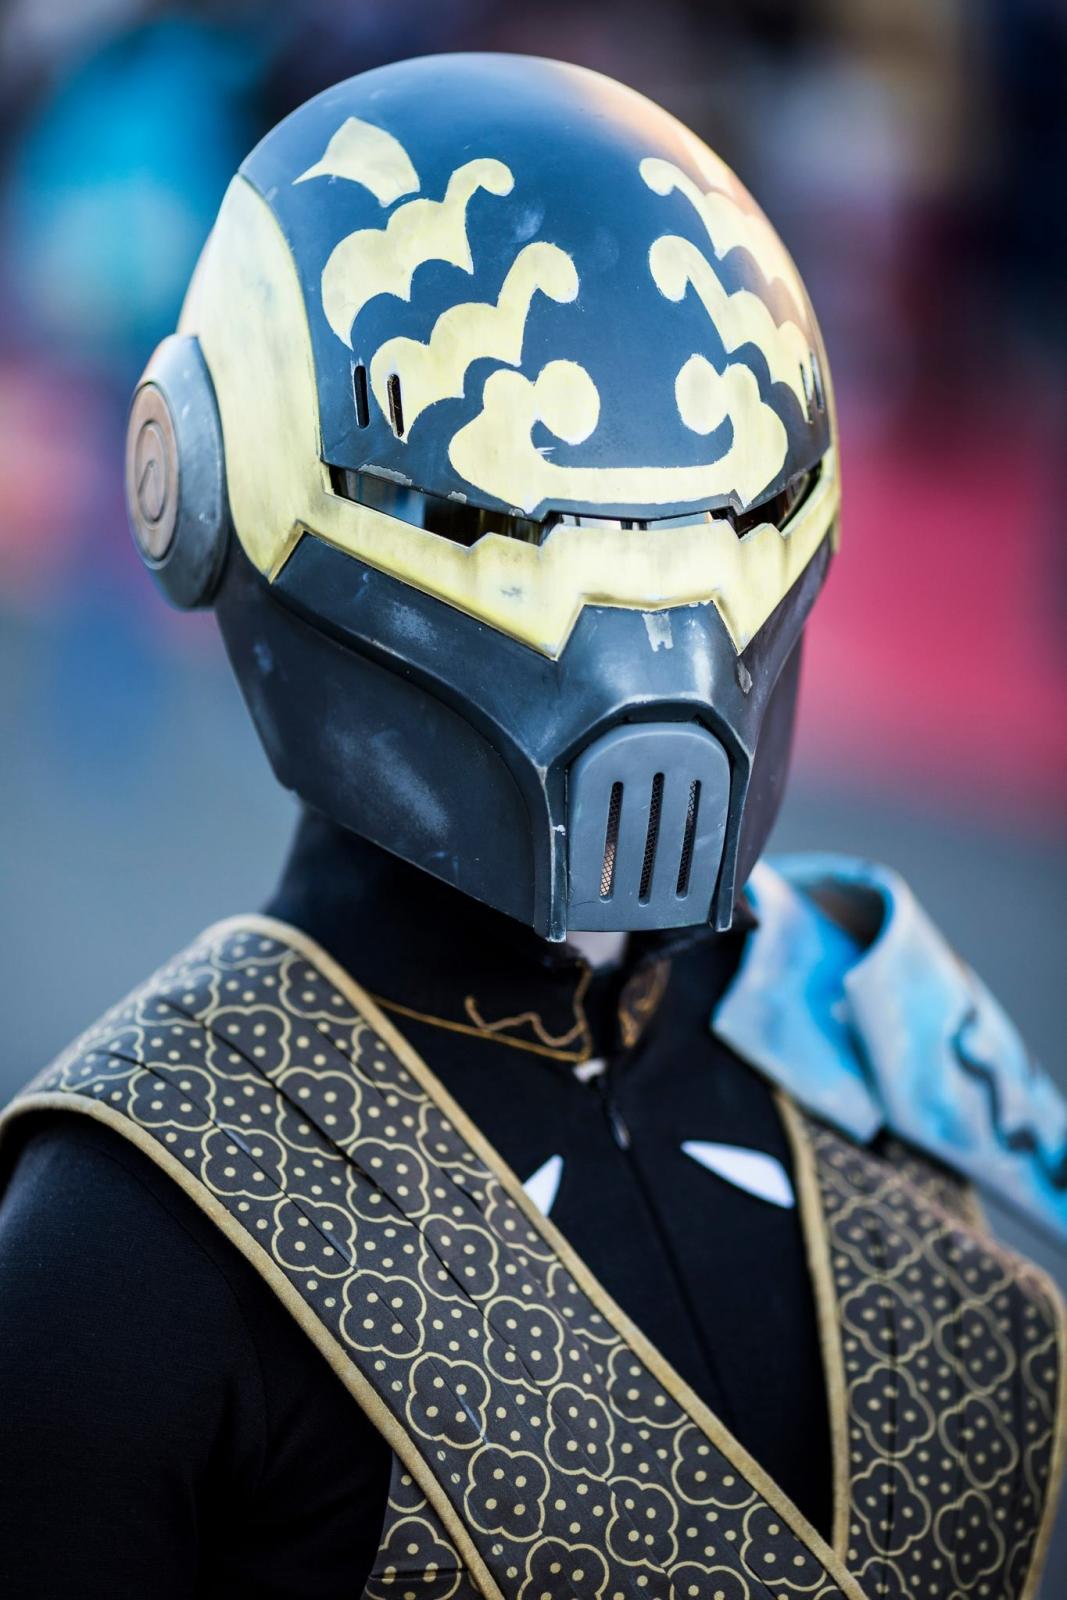
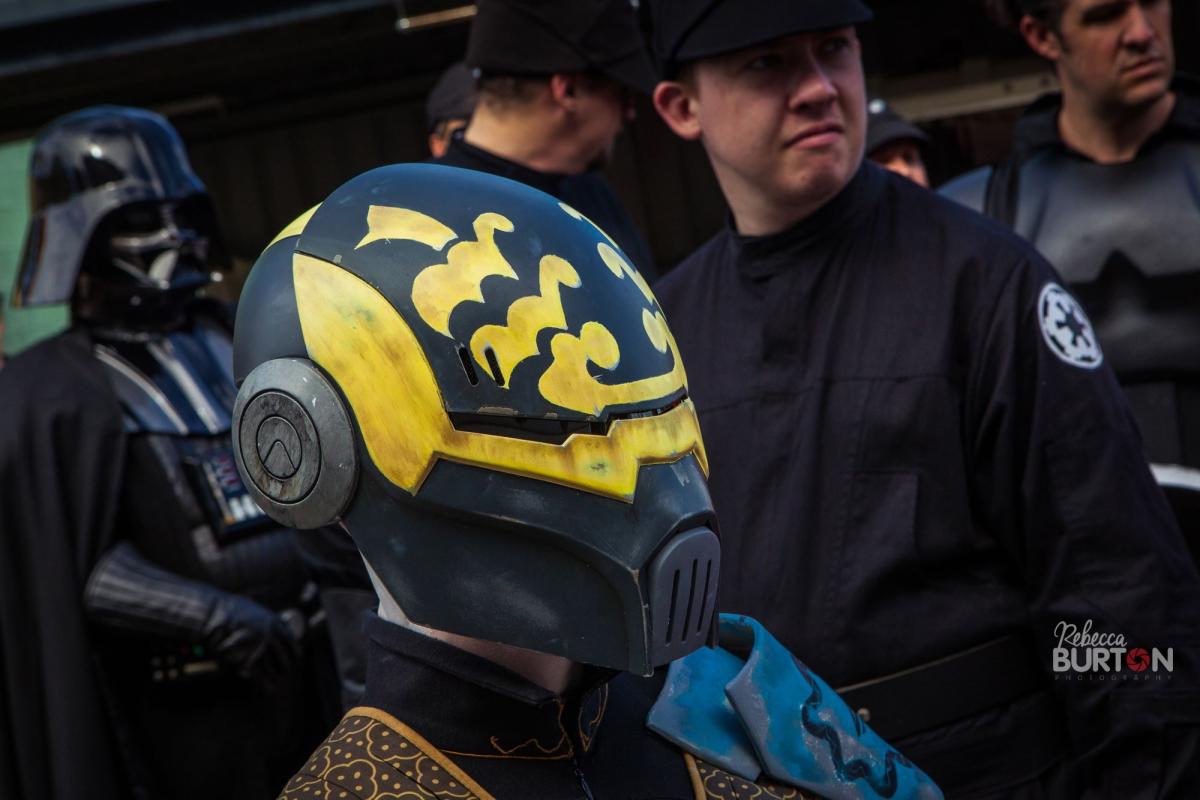
Pictures! Some things got a little frumpy and such (the tunic slid up when I was sitting down when checking out some photos we took inside and I didn’t notice till after taking off the kit). Hopefully one of my fellow Garrison members, who has a fantastic eye for details, is coming over on Wednesday to take full kit pictures. I have a background and lights for taking higher quality photos. I will be getting more detailed photos as well. Right now I wanted to get feedback from the heads here as to anything they feel should be changed? Anyways! Here’s my build…1 point
-
Those are some really good ideas, thanks. I will look around for some tall black boots and if I can manage a relatively cheap one I will maybe attach it with glue, else I think I'll go the route you're describing. Indeed if I create the sabatons with a sole I should probably use sintra and not print it for extra durability. Maybe even add a thin rubber sole to the bottom of them. Alternatively I could forego the sole of the sabaton and have it wrap around the boots like you say. Magnets sound good either way though and probably the easiest way to make the boots modular.1 point
-
Lightsaber For the saber I have looked all over the internet, unfortunately it is not for sale as-is anywhere. I will have to go the 3D printing route for it since I have no idea on lightsaber construction. Luckily, I have found Hord's lightsaber modeled on Thingiverse. Accuracy looks good to me when comparing to the reference images. Just wondering if I can add a blade into this?
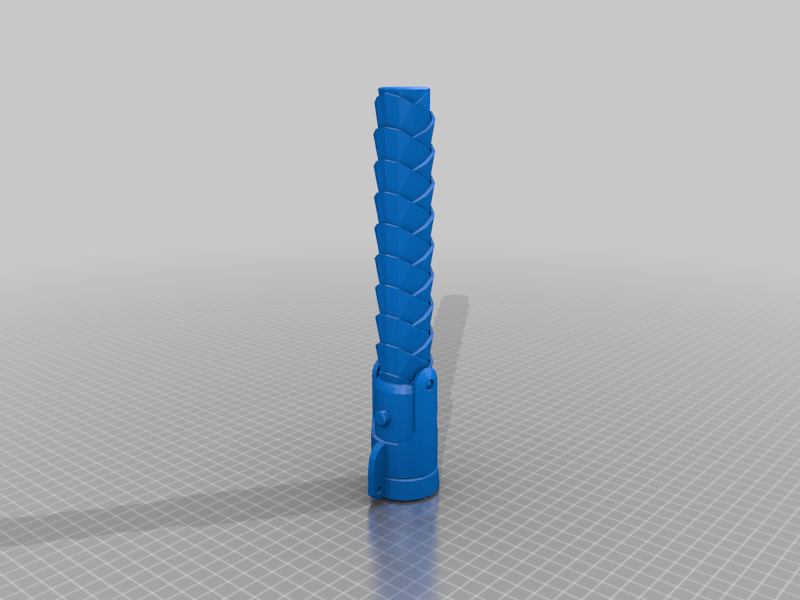
 1 point
 -
Amazing work and I admire the attention to detail. Definitely will look for more details once you are done. Much appreciated!1 point
-
Thank you. I'm not sure what you mean by "How do we get this fabric?" - This build isn't finished yet or even approved. If and/or when it is, I will be posting files for the patterns.1 point
-
Lookin good! I would recommend additional weathering on the soft parts...your head, dickey and boots are pretty heavily weathered, but there is almost nothing on the other soft parts.1 point
-
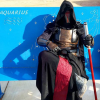
(Palpatine here) Love this pic of you kneeling before me! Was cool seeing a Desert Starkiller IRL1 point
-
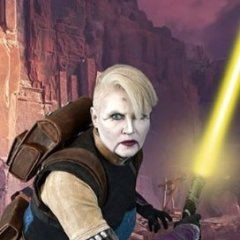
Welcome, I'm working on my first costume for trying to join the 501st and am working on Grand Inquisitor (and Second Sister) - hopefully one of them will pass muster for membership. I've been reading through all the other GI builds on here (quite impressive), and those builds, along with a member of my local garrison, have been what inspired me to give it a go. For GI, I found a way to do makeup instead of the mask, which makes me think I might have a chance at pulling off a decent version. Found a lady on YT that does a walk through on how to do the face paint, so this is what I'm looking to do. Figured if she can paint herself up enough to look like him, so can I (right..??). Everything in the below screenshot from her video, including the neck and armor, is all body paint amazingly. I just need to figure out how to build and seamlessly incorporate an elongated head piece, bald cap style, that would tie in right around the brow. I'd like a permanent version that I could keep painted with the ear covers attached, but not sure how I should go about that part (silicone, maybe?). I think it could look pretty sweet if I could pull it off. I also picked up some polymorph beads today to start building his teeth. Once I get closer, I'll be getting some yellow with black scelera GI contacts if I can confirm they're actually safe. I wear regular contacts now for vision, but I've never had any experience with the scalera ones. They sure look amazing though. For the uniform, I'm going for a tailored compression type look, think polyester-spandex blend top (like the stretchy material used in modern day dress pants/golf pants) with equestrian-style riding pants. Hoping that'll look true to his tight and pressed uniform appearance in Rebels. It's a great motivator to tone up the ol' triceps, too. Admittedly, this is my first attempt at a costume build, but GI (Rebels) is my favorite character from the IP, so I figured it's worth a shot (plus I'm working on Second Sister at the same time as a backup, lol). I'll be making the uniform, armor and lightsaber myself... so any critiques, criticism, or words of wisdom for a newbie attempting this build are welcomed and appreciated.

 1 point
 -
Nice! That looks great, appreciate you sharing!1 point
-
Hey folks, So I got approved back in the fall, but its taken me this long to actually get this all written up. Finally put up the bodysuit article on my blog today, and I'm hoping it will help others as I found that the pattern for the bodysuit was by far the hardest part of getting it right. It wasn't really the construction for me, but finding a good pattern that I liked for my body and its larger than average boobs. After trying Pam's suggestions and a couple of other pattern options, I eventually tried Yaya Han's bodysuit pattern made by McCalls and it worked so perfectly the first time. I was so relieved. There are still some changes that have to be made, and that's what I detailed in my blog post that is specifically about the bodysuit complete with diagrams. The rest I made mostly out of Worbla and leather. Happy to clarify anything if you're reading it and something doesn't make sense, but I HIGHLY recommend using this pattern over the previous patterns suggested. It just fits so much better, especially if you have a big difference between bust and waist. Mara's bits and pieces (harness, belt, etc) http://withoutastitchon.blogspot.ie/2016/04/mara-jade-bits-and-bobs.html [2025- defunct link, check new blog] Mara's shinguards & knee pads http://withoutastitchon.blogspot.ie/2016/04/mara-jade-knees-and-shin-guards.html [2025- defunct link, check new blog] Mara's bodysuit https://kainko.wordpress.com/2025/01/22/how-to-create-a-perfect-mara-jade-bodysuit/1 point
-
A little update, the armor is coming along. I’m tired of sanding already but so far the finishes have been coming out decent. I also had to fill in a detail on the shoulders because it was not present in the game. Soon I should have everything gloss black and ready for buffing and fine detail painting!1 point
-
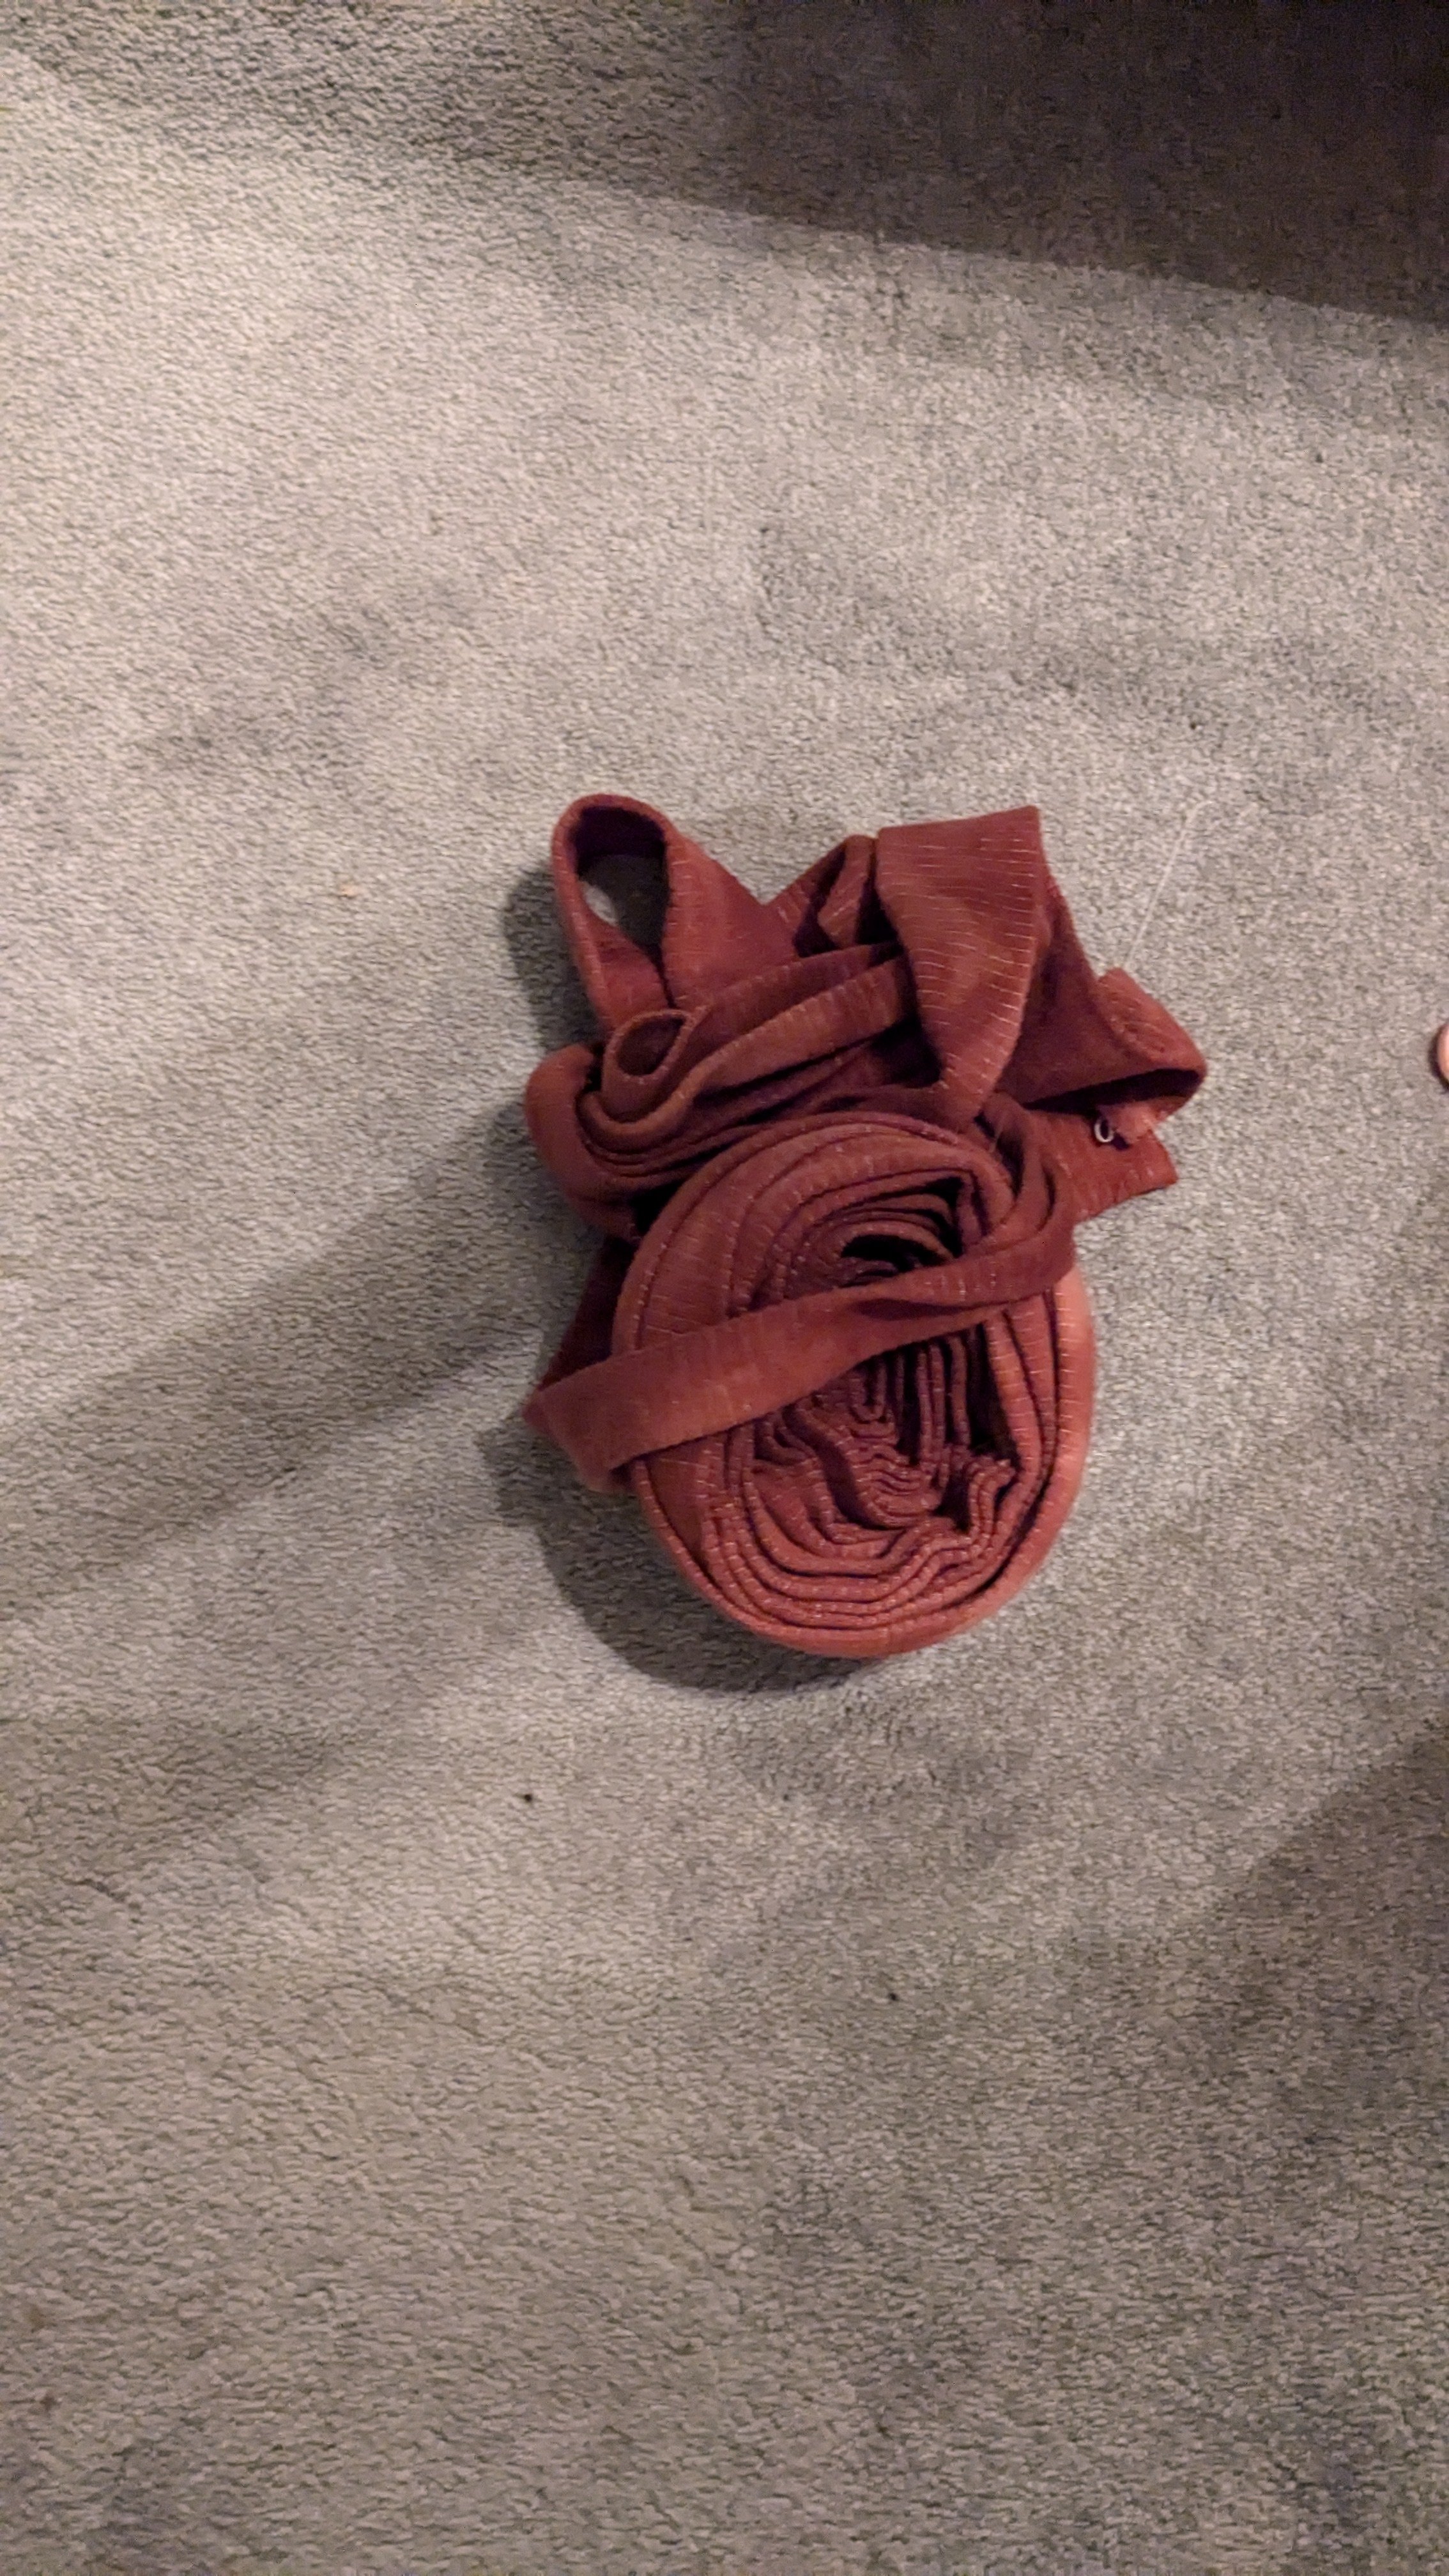
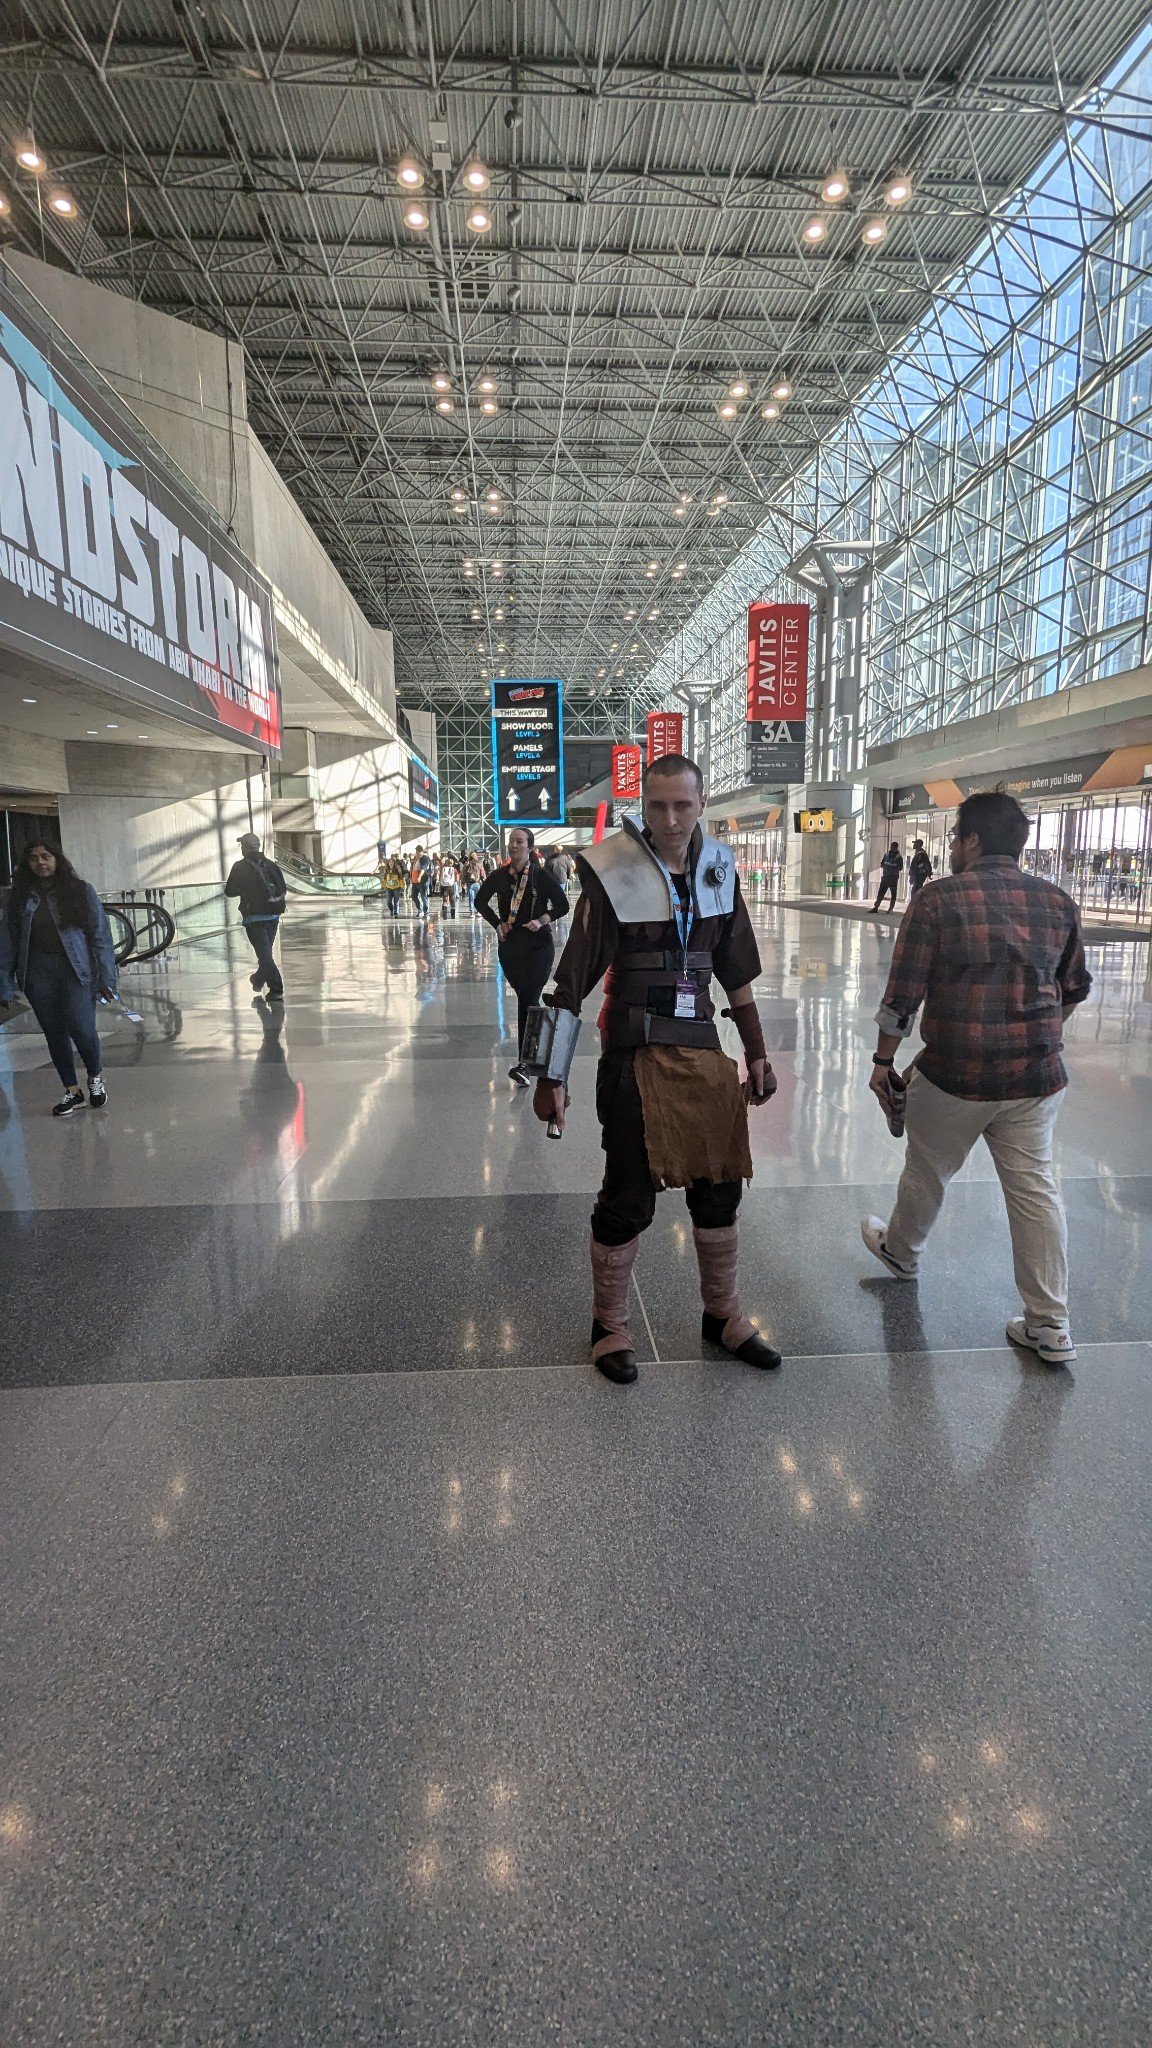
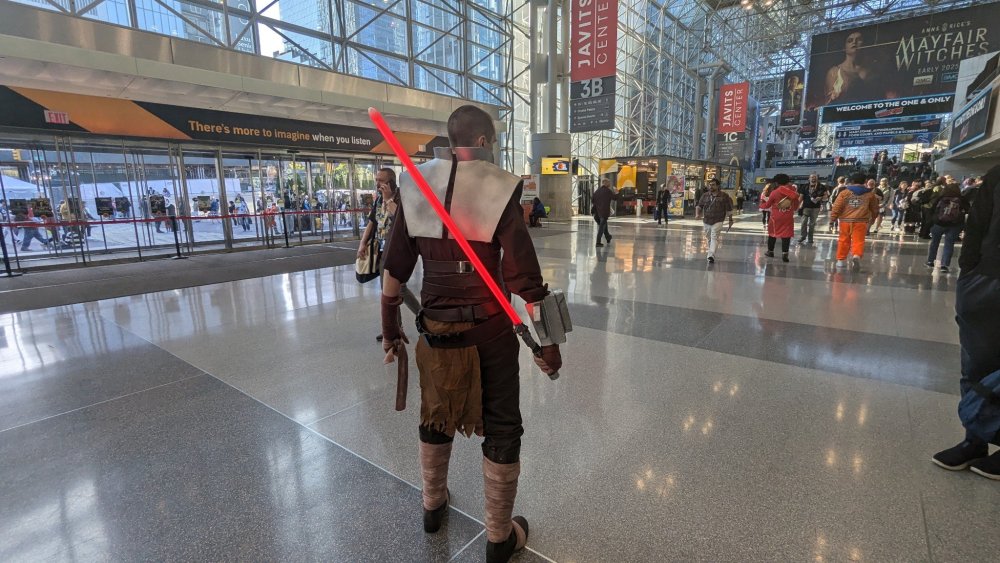
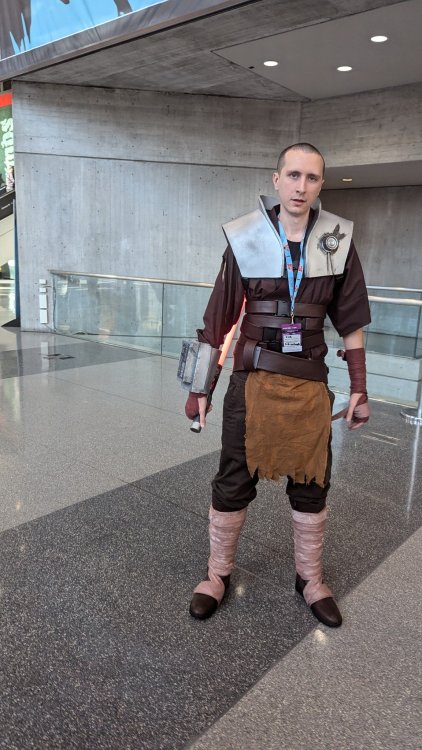
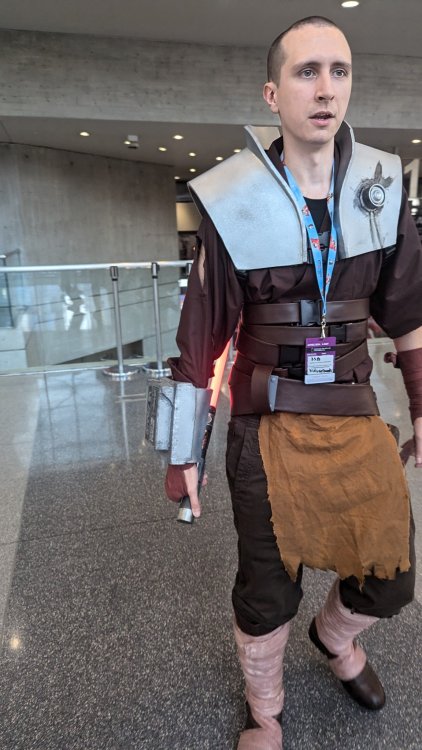
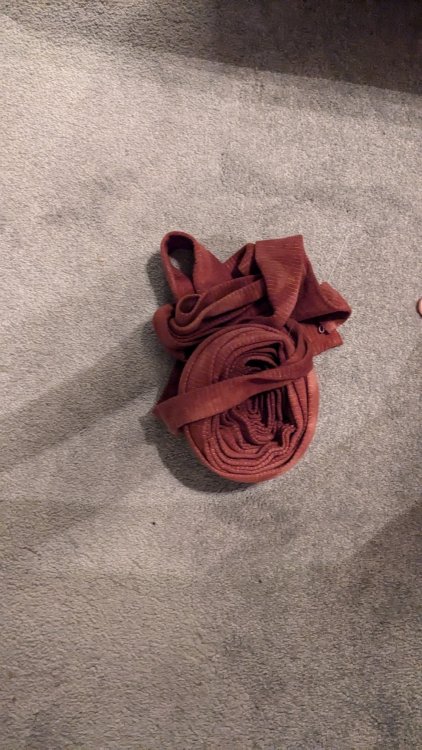
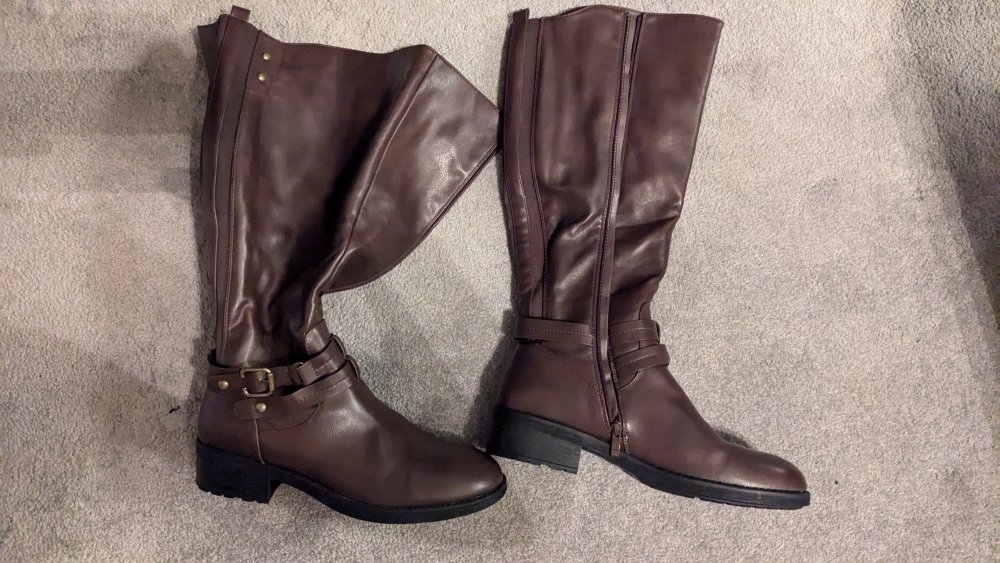
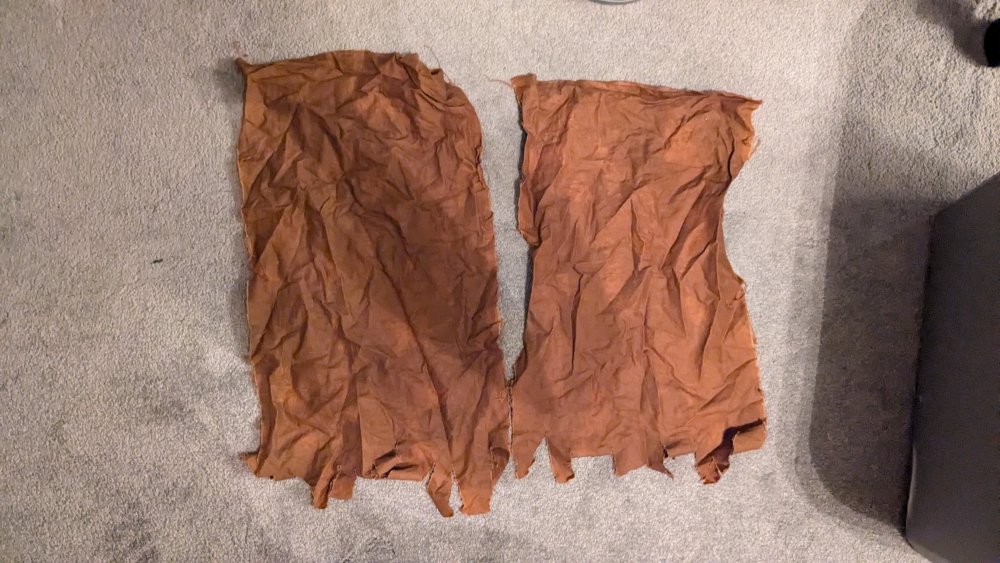
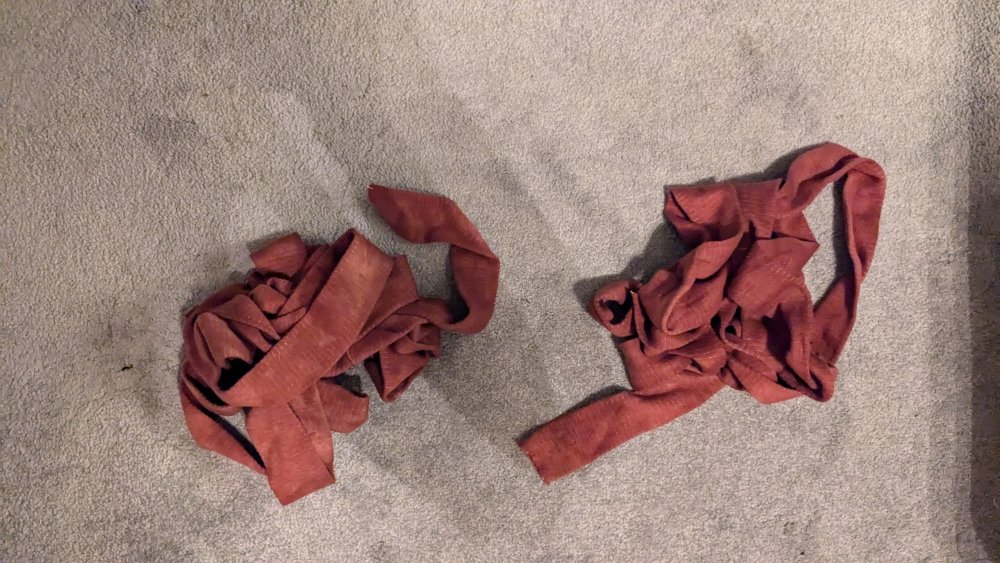
Hello there! So, for New York Comic Con this year I figured I would try to cosplay as Starkiller from Star Wars: The Force Unleashed and document the build process for the costume. For this build I tried to follow the Starkiller: TIE Training Gear CRL here https://databank.501st.com/databank/Costuming:SL_starkiller_tie_training I'll try to go in the same order as the CRL to be as thorough as possible. I only gave myself 30 days to complete the costume so some items might be incomplete, but I'll try to update this in the future and provide some suggestions to get it closer to the CRL. Safety Precautions: When doing any sanding, gluing, spray painting, or dremeling In this project you should always wear some protective eye equipment, a respirator, and gloves. The chemicals used in this build can be very toxic so it's best to not touch or inhale any of them. Short Hair: This one is pretty straightforward simply go to the barber and ask for a buzz cut with a #2 guard. If you are feeling adventurous you can get yourself a pair of clippers and do it yourself. See the pair of clippers I use regularly below. Wahl 5 Star Legend Wired Clippers: https://www.amazon.com/Wahl-Professional-5-Star-Legend-Clipper/dp/B00II2MSHU Shoulder Armor: For the armor I used a great EVA foam template I found on etsy which you can see below. The template is a little large compared to the one in the CRL but I found it looks mostly like it, and it comes with a stl file for the restraining bolt which is really cool. Also keep in mind you may want to build the gauntlet at the same time as the armor since they follow a very similar process. To start off you need to print out the template, cut it out, and trace it onto your EVA foam (I used 8mm Cosplay Pros High Density Black) using a white paint marker. Then you cut out the shapes using a craft knife with a fresh blade (make sure to follow the instructions that came with the template). Next you take a heat gun and shape the eva foam so the armor bends around the shoulders. It would help if you had a mannequin or partner you can use to shape the foam to. After that you glue the parts together using Weldwood contact cement. This stuff is really awesome and bonds instantly, you just need to know how to use it right. Apply the contact cement to both sides you want to glue together and let them dry for around 10 minutes. I noticed that the thin guard that extends around the neck and over the shoulders did not exactly reach so I cut out two small pieces of foam and extended them after gluing. Lastly you can heat up some large metal ball bearings and push them into the sides of the armor to get that rivet hole affect mentioned in the CRL. After shaping and gluing your eva foam you probably want to remove some of the rough edges and get rid of the seam lines. To do this, I first used a dremel with a medium grit sandpaper head on any really sharp edges or uneven surfaces. I also leveled out the two small pieces of foam I added to extend the neck guards. Lastly I used some DAS air dry modelling clay to fill in the seam lines. Simply use a very tiny bit of clay to make tiny worms by rubbing your hands together and shove them into the seam lines. Then wet your fingertips with some water and rub the clay into the seam lines. Do this a couple of times and it should look pretty level and clean. The next step is to 3D print the restraining bolt using the given stl file. I combined all three of the stl files into a single component using Cura so I didnt have to glue the PLA parts together (This is usually a massive pain). I was even able to print it without any supports and it still seemed pretty sturdy (The 3D printer I use Is the monoprice mini 3d v2). I also used a glass bed and if anyone is interested I could provide the print settings I used. 3D printing is pretty difficult to get the hang of so you may want to look for 3d printing services or see if your local makerspace can help you out. After 3d printing the restraining bolt you need to sand it down using some sandpaper then prime it using a filler primer (this type of primer will help make the print lines less noticeable). Lastly you want to glue the restraining bolt onto the armor using the Weldwood Contact Cement. Same process as before, just apply the cement to both sides, let dry for about 10 minutes, and push the pieces together. At this point it's probably a good Idea to glue the leather straps onto the armor (see the leather belts section below on how to create them). In total you should have six straps, two to hold the armor together in the back (I used two more for the back) and 4 for the front that wrap under your arms. To glue the straps on I would just recommend using hot glue. I did this by scoring the eva foam in the spots where you need to add the belts, then applying some hot glue, placing the strap on the hot glue, and letting them dry. After This you can then apply some more hot glue over the tops and edges of the piece of the strap you just glued to form a better seal. Lastly you should tape up these straps with some painters tape. The final step for the armor is to prime, paint and seal it. Since you used the heat gun on pretty much every portion of the foam already you shouldn't have to heat seal it. The first step is to prime or seal the foam itself using plastidip (you could also just cover it in white Elmer’s glue mixed with water). You will probably need at least two cans of each spray paint to do both the armor and the gauntlet. Start by spraying a thin layer of plastidip on the armor keeping the can about 10 inches away from it and moving the can back and forth. After this you can probably do about three more slightly thicker coats (waiting 30 mins between coats). After the armor dries for about a day you should be ready to paint. For this I used Silver metallic Krylon fusion spray paint, but you may want to look for the nickel finish one since that is what is recommended in the CRL. I would do at least 2 coats or until there is even coverage and let dry for another day. Next I took some black acrylic paint and created the grease stains on the restraining bolt. I rubbed it on using some newspaper to get the uneven fading effect. after this I put a single coat of matte varnish on the armor to seal it. Lastly I created a wash using black acrylic paint and isopropyl alcohol which I covered the armor in using a paint brush. Starkiller EVA foam template: https://www.etsy.com/listing/697498272 Inner Shirt: This one is pretty simple I just bought one of the below muscle shirts Fruit of the Loom Muscle shirt: https://www.amazon.com/dp/B0C1T736VK Tunic: Since I spent a lot of time on the armor/belts and I don't know how to sew or have a sewing machine, I decided to just buy something that most closely resembled the CRL. For the Tunic I chose a shaolin monk robe. I usually wear a medium (5’’10’ 140 lbs) but the small one fit me fine. I then cut one sleeve to elbow length and the other I cut holes matching the CRL. When wearing the costume I just tuck the remaining portion of the robe into my pants. You can also weather the robe using some fake blood, but I did not have enough time. Shaolin Monk Robe: https://www.amazon.com/dp/B07V6FW5X6 Special Effects Makeup: I didnt do this part due to some time constraints but I think this is a pretty cool tutorial that should do the trick Scar Tutorial: https://www.youtube.com/watch?v=baXjKHL_Odw Fabric Wraps: The fabric wraps are not too difficult to pull off. I bought these really great tube bandages that look and feel pretty good. You will probably need about four of these three dyed the grayish tan color (boots and gauntlet) and one dyed blackish brown color (hand wraps). You can dye them using the below Rit dyes. I used Taupe for the grayish tan and Chocolate for the blackish brown. When dying the wraps make sure to unravel and straighten them otherwise you will end up with a tie dye effect. After you dye the brown wraps you can measure out how much you will need for your hands and cut them accordingly. You will need pretty much an entire roll for each boot so those you can leave those as is. To secure the wraps you could use those metal latches that come with ace bandages but even better would be to sew on some velcro strips so they look more seamless. You could also just tie them off but they might come loose while you are walking around. RIt Dye (Chocolate) https://www.amazon.com/Rit-Dye-Liquid-Fabric-8-Ounce/dp/B000B7Q9KM Rit Dye (Taupe) https://www.amazon.com/Rit-Dye-Liquid-Fabric-8-Ounce/dp/B00AQ75RAA Tubular Stockinette Gauze Rolls https://www.amazon.com/dp/B09WVGGH1M Gauntlet: I don't think I got the gauntlet to look perfectly like the CRL but I believe it is pretty close. Hopefully from my version you could refine it to make it a little closer. For this I used the remaining 8mm eva foam from the shoulder armor. For the template I used a free gauntlet template from The Foam Cave (I would choose a slightly larger one than your wrists since you will wear bandages underneath) and my own custom template for the upper portion of the gauntlet and the side portion that juts out. Basically this “custom template” is just two rectangular boxes that run the forearm length of the gauntlet. The first box that acts as the housing for the display is made up of 2 (14.5cm x 2.5cm) long edges and 2 (6.5cm x 2.5cm) short edges that will sit on top of the second box. The second box is made up of 2 (16.5cm x 3.5cm) long edges, 2 (9.5cm x 3.5cm) short edges, and a (16.5 x 9.5cm) lid that acts as the base for the previous box. On both sides of the smaller enclosure on top there are two small slide shapes that you will also need to template. For the portion that juts out of the side of the gauntlet the dimensions were (13cm x 5cm) see the pictures for the odd looking shape. I made 3 of these shapes and glued them together to make the piece thicker. It's not clear to me whether or not there were one or two of these pieces on either side of the gauntlet so I just went with the one. After you have the templates for the gauntlet trace them onto the EVA foam with your white pen and cut them out with a craft knife. Next you can glue the box pieces together using the contact cement which shouldn't be too difficult. Once these pieces are glued separately you can stack them and glue them together forming the enclosure for the display. After this you want to heat shape the foam you cut out for the gauntlet template around your wrist. This will create the base for the entire enclosure to sit on. The gauntlet portion should now slide into the large bottom open end of the box display enclosure you glued previously. Once you have tested this out, glue the two portions together. Lastly you can glue together the 3 pieces that jut out from the side of the gauntlet and then glue the whole thing onto the side of the gauntlet. Now that you have the basic shape of the gauntlet it's time to do some aggressive dremeling. Draw two half circles on the front and back of the display enclosure boxes making sure to follow the curvature of the gauntlet trapped inside. The idea here is to make this portion less boxy and look more rounded. Once you have this outline, shave out the portion underneath the curve you just drew using a dremel with heavy grit sandpaper head. While you're at it you should level out any uneven portions on the gauntlet and remove any sharp edges (like the ones on the display enclosure boxes). Lastly it's probably a good idea to shave down that little portion that juts out on the side (for my build I think I made that portion a little too big). Once you are done dremeling the gauntlet follow the exact same process used for removing seam lines and painting as the armor above. The next portion of the gauntlet is actually building the display. I didn't quite finish the lighting for this portion due to some time constraints but I have a pretty good idea how it can be accomplished. To do this first cut out some clear plastic (I used some blister pack plastic packaging) to the dimensions of the display enclosure. Next you can cover the plastic in some red brake light tape. This should give the display that red filter. Next I designed a template for the "Order 67, Search, Destroy, Kota" wording which you can find below. You may need to mess with the scaling a little but you should be able to print this out onto some sticker paper. Then using an exacto knife I cut out all the white portions in the Arubesh lettering. Alternatively you could use a Cricut cutting machine for this portion if you have one. After this simply peel back the sticker and apply it to the red tinted plastic. You can probably then buy a short usb powered red led strip (using a small power bank to power it) and throw it into the open enclosure to make the gauntlet light up. Lastly I just secured the display to the enclosure using some clear packing tape. The entire gauntlet is covered in brown wraps so none of your mistakes should really be all that visible. Gauntlet Template: https://www.thefoamcave.com/wp-content/uploads/2014/11/Gauntlet-Base-Template.pdf Belts: To make the belts I used some faux leather I found on amazon along with some cheaper 2mm eva foam and a variety of belt buckles. To do this I started by measuring out the belts on the eva foam following the specs in the CRL. I now realize the belts are a little too big after adding the leather, so I recommend subtracting 1 mm from the widths mentioned in the CRL. Be careful with some of these belts, as you will have to do most in two parts in order to satisfy the buckle requirements (ensure you provide enough extra length for each portion to wrap around your body). I then applied these measurements to the leather, increasing the width by about 1.5x. Next I cut out the foam and leather strips using a scissor and heat sealed the foam using a heat gun. To apply the leather to the foam I used a spray adhesive. I tried various different adhesives and the one I found that worked best was the guerrilla spray adhesive in the small bottle that sprays on clear. Even though this worked the best I still had to apply some hot glue later on (belts are hard). Next I attached the belt buckles to the belts using super glue, clamping them down for about 30 mins. The Slide release buckles can be attached by hammer so those don't need super glue. As for the larger belt I actually designed the buckle in free cad and printed 2 of them (I will provide the stl file below). For this belt I used velcro strips as the buckling mechanism. One thing that wasn't clear immediately from the CRL was that the swivel clips mentioned for the larger belt are actually lightsaber swivel clips. I only figured this out by looking at the action figure for Starkiller which allows you to attach various lightsabers to this portion of the belt. I did not manage to add any tails or miscellaneous hardware to the belts, even if I did the belts are so large I'm not sure they would have been visible. I will probably add them on in the future but I was pretty satisfied with what I had done so far. The straps for the armor were made in the same exact way as the above belts just using smaller side release buckles. Faux Leather Brown: https://www.amazon.com/dp/B0CJLVVSFC Faux Leather Black: https://www.amazon.com/dp/B09ZB26K19 2mm EVA Foam: https://www.amazon.com/dp/B082FPBMQP Lightsaber Swivel Clips: https://www.amazon.com/dp/B00J4JMAYM Slide Release Belt Buckle: https://www.amazon.com/dp/B0826JZ693 Side Release Belt Buckle Small: https://www.amazon.com/dp/B0B4W26K8N Side Release Belt Buckle Large: https://www.amazon.com/dp/B07N6B4CR5 Guerilla spray adhesive: https://www.michaels.com/product/gorilla-heavy-duty-spray-adhesive-10678561 Pants: For the pants I just bought this pair of hollister mens straight pull on pants. These were super comfortable and have really deep pockets so you can hold pretty much a whole water bottle in each. It also looks pretty close to the pants in the CRL and matches the tunic I bought. I ordered a medium which was a little large but after tucking the tunic into it felt fine. Hollister Brown Pants https://www.hollisterco.com/shop/us/p/straight-pull-on-pants-56898691 Loincloth: The loincloths are also not very difficult to pull off. For these I used this brown cotton fabric I found on amazon. First you have to cut it to the specifications mentioned in the CRL (You may want to cut it slightly longer since you want to tuck them into your pants). I then used that same wash that I used on both the gauntlet and armor to stain the fabric and let it dry. Brown Cotton Fabric https://www.amazon.com/dp/B0B9HJ3HSZ Wrapped Boots: Depending on your shoe size this might be a tough one. I am size 10.5-11 mens but I have found womens riding boots to be the best option for affordable tall cosplay boots. I found the first pair below (size 12) which fit pretty comfortably and really gave me no issues walking around for a couple of hours. Make sure to wrap them tightly and be careful not to get sucked into any escalators. If you're lucky enough to fit into a womens size 11 you might wanna go with the second pair as they look a little closer to the CRL. womens brown riding boots: https://www.amazon.com/dp/B0D3V5PX64?ref=ppx_yo2ov_dt_b_fed_asin_title womens brown riding boots: https://www.lifestride.com/product/womens-xtrovert-riding-boot-5261291/dark-tan-81776 Lightsaber: This is probably the single most expensive component for the cosplay, but it is optional. For the lightsaber I went with the Starkiller1 Weathered Ver Neopixel Saber from CC sabers (36 inch blade, SN-Pixel V4 Pro). I believe this is just a TXQ saber that is drop shipped from china, but after reading through the buyers guide in the lightsabers reddit, CC sabers seem to be a pretty reputable seller. You could also probably find the same exact saber cheaper on AliExpress. Starkiller1 Weathered Ver Neopixel Saber (36 inch blade, SN-Pixel V4 Pro): https://www.ccsabers.com/products/txq-sk1?variant=43255529504936 Closing Remarks: This build was a lot of fun to work on but also kind of difficult and my first time working with eva foam. I think what some people might underestimate is the amount of tools you either need to have on hand, buy, or rent in order to actually do something like this. My dad had a lot of these tools already so I was able to get away with not having to buy a whole lot. Overall I think it was a good experience and I learned a lot about making costumes from doing this. If you do decide to attempt this build or any other costume I highly recommend you document the process so others can learn from and attempt them. It was not perfect but I hope to improve on the costume in the future, and I’ll make sure to update this document as I do. Thanks for reading! EVA Foam Materials: 8mm Cosplay Pros High Density Black EVA Foam https://thecosplaypros.com/collections/frontpage/products/eva-foam-sheets?variant=20494372667503 White Paint Marker: https://www.michaels.com/product/sharpie-medium-point-oil-based-paint-marker-10288103 Weldwood Contact Cement: https://www.amazon.com/Weldwood-Contact-Cement-3oz-00107/dp/B000CD7QWK Dremmel 3000: https://www.amazon.com/Dremel-3000-1-25-Attachment-Accessories/dp/B00LUJONH6 DAS Air Dry Modelling Clay: https://www.michaels.com/product/das-modeling-clay-M10130210 Black Plastidip: https://www.amazon.com/PLASTI-Mulit-Purpose-Rubber-Coating-Spray/dp/B0093B541M Krylon Silver Metallic Spray Paint: https://www.michaels.com/product/krylon-colormaxx-metallic-paint-primer-10658941 Matte Spray Varnish: https://www.michaels.com/product/krylon-matte-finish-10520205 3D Printing: Monoprice Mini V2: https://www.monoprice.com/product?p_id=34620&srsltid=AfmBOoqV_-z074Ztdr6uh00eaAxYCgQbLKkgX_j0LpKriOjX9RNVwxeR Inland Black PLA 3D Printer Filament: https://www.amazon.com/gp/product/B00YQB85PG Monoprice Mini Glass Bed: https://www.amazon.com/gp/product/B07FRK6TZX Rustoleum Black Primer: https://www.amazon.com/Rust-Oleum-249127-Painters-Touch-Ultra/dp/B0CGM319Z9 Misc Links I Received Inspiration From: https://databank.501st.com/databank/Costuming:SL_starkiller_tie_training https://2storyprops.blogspot.com/2010/11/starkiller-armor-and-gauntlet.html?m=1 https://www.thedentedhelmet.com/forums/threads/starkiller-armor-and-gauntlet.11011/ https://www.alanmolina.co.uk/projects/stakiller https://www.theflagshipeclipse.com/forums/index.php?/topic/1629-dutch-starkiller-tie-training-gear-wip/#comment-18493 https://www.theflagshipeclipse.com/forums/index.php?/topic/4626-wip-starkiller-tie-training-gear/#comment-40251 starkiller-belt-buckle.20241010-205820.FCBak starkiller-belt-buckle.FCStd starkiller-belt-buckle.stl starkiller-gauntlet.xcf


 1 point
 -
This was my build thread but I am happy to do a discussion thread. I need to finish the sleeves and makeup.1 point
-
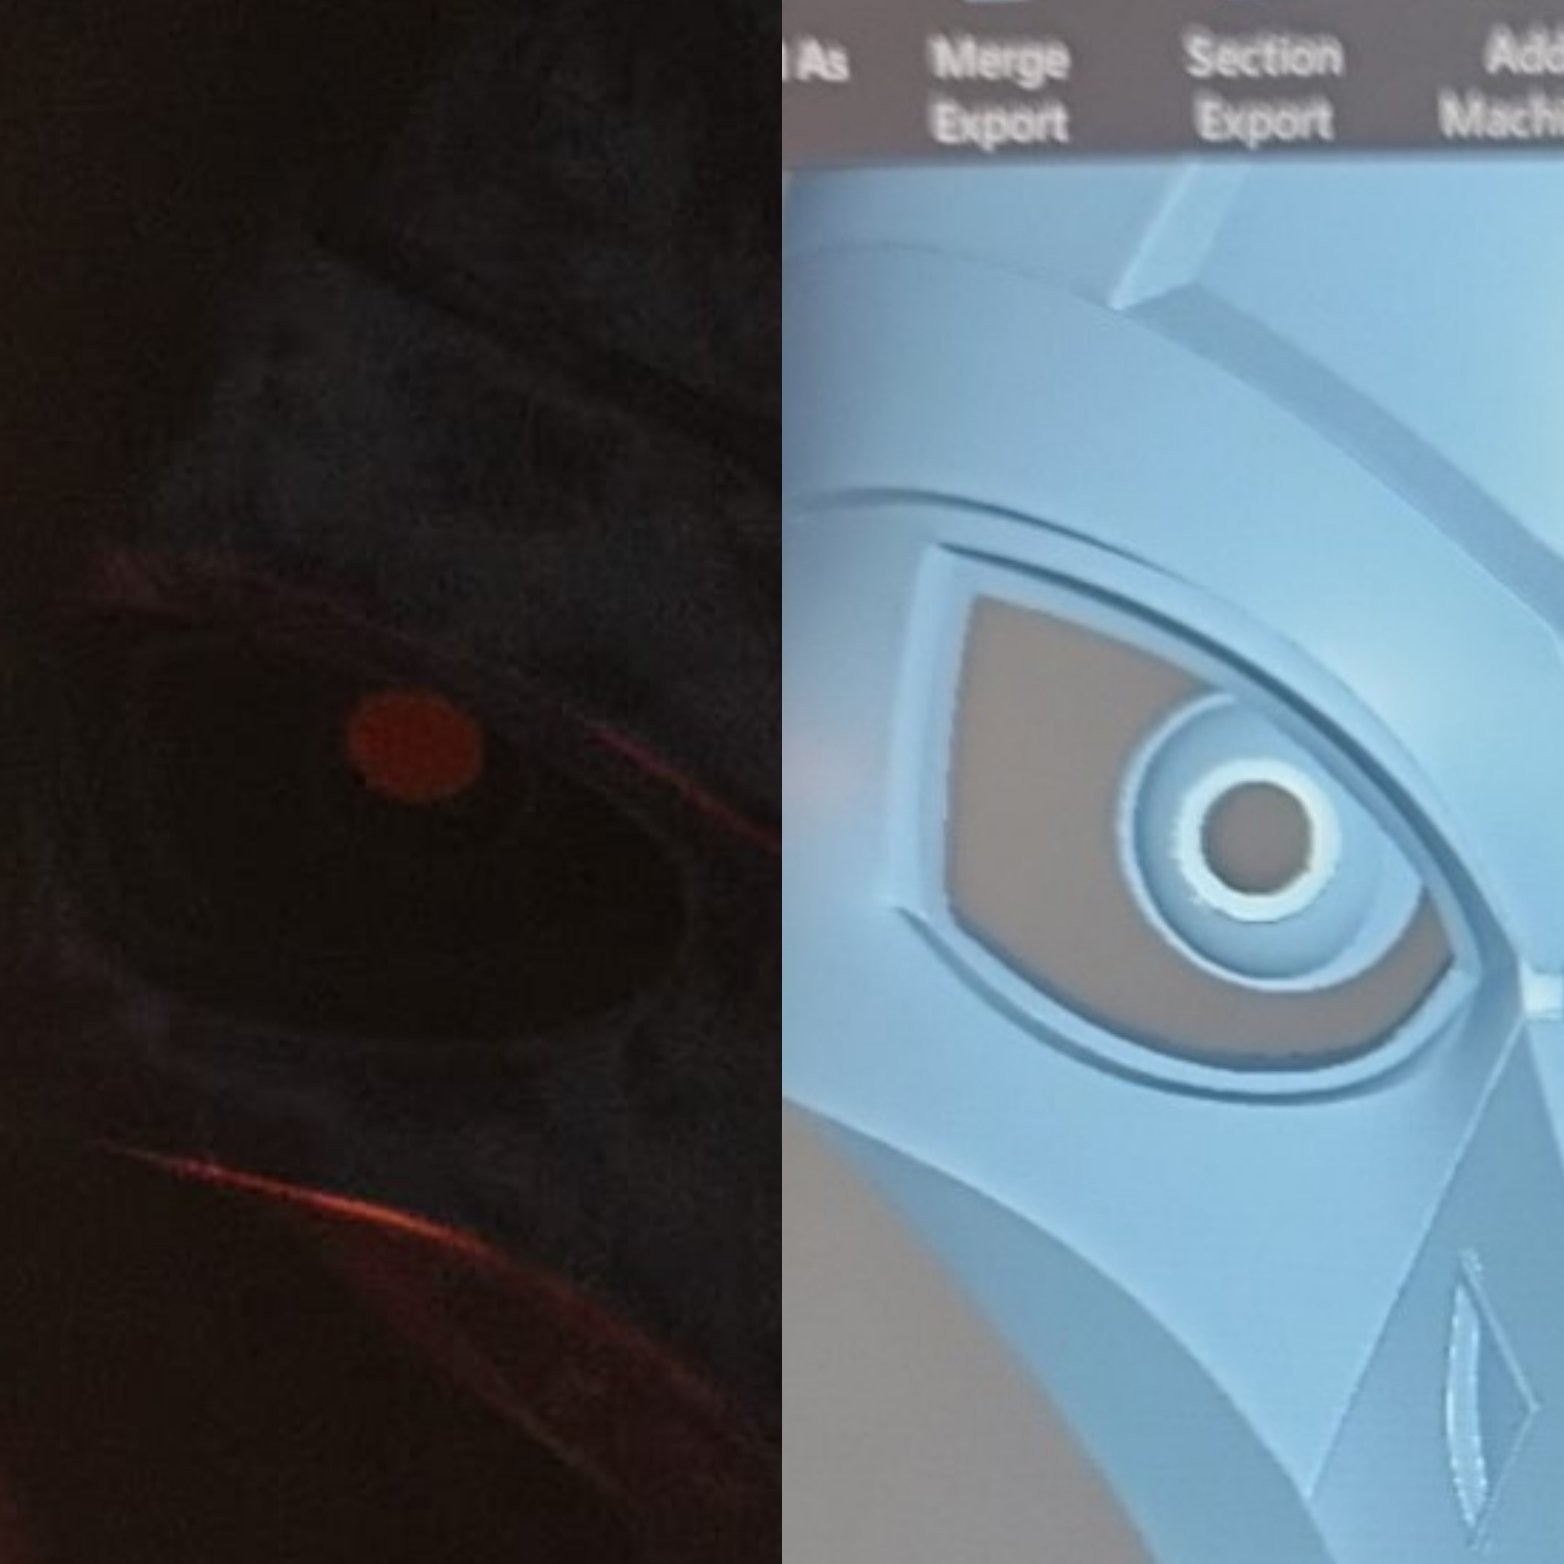
There is an additional interior layer of the eye sockets that is missing from the 3D file. That also seems to be what allows the, "eyeball" to look more deep set than the shallowness of the current depth of the print. The outline of the eye is also more rounded in the inner eye and not as sharp as the 3D currently has. There also seems to be additional depth necessary on the, "beak" areas that isn't in the 3D file. Otherwise seems fine.

 1 point
 -
Greetings, I know this is an old thread and I'm not sure if I will get a response here, but I wanted to try here first before creating a duplicate thread. I noticed on the Lord Starkiller armor he uses Carabiners to attach the sabers to his belt. I am trying to figure out how a carabiner would work with sabers that have Covertech Wheels instead of a D or V ring. For example the Maul hilt and the Starkiller hilt both have covertech wheels and I'm stumped. Should I just use a Covertech clip instead of the Carabiner? I am wanting to get this costume approved for 501st standards and want to make sure I stay within the requirements. Any thoughts on this I would greatly appreciate. Thank you!1 point
-
Congratulations once again! Velcro dots are totally the way to go for keeping the poncho in place on the suit. That's the only modification I've made since developing the CRL, and it helps a ton!1 point
-
Looks absolutely gorgeous!1 point
-
Hello everyone, I’m Daisy from the Dutch Garrison and together with Rikki I have been assigned as your LMO team for this term. About Me: My name is Daisy van Rijn, and this is my second term as a 501st Legion Membership Officer. I have eight approved 501st costumes, four in the Rebel Legion and I have a Seventh Sister costume that I'm hoping to finish this year. I have been sewing since I was 19 and love sharing that acquired knowledge with others. I'm excited to be able to assist you this year with the TFE Detachment as I have a large love for the Old Republic Era. What is an LMO? The Legion Membership Team is responsible for reviewing and processing applications for membership, and maintaining and updating member information in the Legion database. The Legion Membership Officers drives costume policies, including acceptable costume types for membership and setting standards for costume submissions, and are the final arbiter of member costume issues and approvals. The Legion Membership Officer supervises and advises Detachments, Garrison Membership Liaisons, and Garrison Web Liaisons on any questions or issues they may have with member’s costumes. Have a question about membership these are the folks to talk to! There are LMOs you can contact at any time at Legion Officers however Rikki and I are the ones who are assigned to the Imperial Gunnery Corps this term. Thinking of starting a NTTL (New to the Legion) Costume? Please message the Detachment and me here as well as send a link to your build thread. I love researching new costumes and helping. Worried a costume may or may not be eligible for the Legion approval? https://databank.501st.com/databank/Costuming:CRLGuide See Character Approval and New to the Legion Costumes (NTTL) sections for details. For “New to the Legion” costumes please also have a look here: Costuming Standards Have a question? Do not hesitate to message me. Get your references together and sent to LMO (at) 501st (dot) com.1 point
-
My project has stopped and stalled several times but when I bought all the armor files about 3-4 years ago I got the full greaves and printed them and of course the would not fit over the boots. The CRL talked about full size boots, not short boots. Even short boots didn't work and when I resized them large enough to go over either long or short boots it was ridiculous. They made my lower legs look as big as my thighs. I'm a tad muscle-less and skinny anyway. So, I put the 3D files back into Meshmixer and cut away the tops. I then measured my nice riding boots and cut out just the flares at the bottom. I am still playing with my build and having to reprint the upper armor around the neck as my first attempt at putting it all together just didn't go well as it was too high and I could not move my head at all. I felt like I was being stretched the whole time I wore it.1 point
-
Hi from the Redback garrison Australia! My name is Gabbi and I was approved last month in time to troop the biggest troop in the Southern Hemisphere At Dreamworld

 1 point
 -
It's looking fantastic!1 point