-
Announcement
Welcome to the forums!
If you are a newly-approved member, make sure you check out the New Member Checklist!
If you are a Detachment member and can't see the member-only area, post here for access.
-DV


NVSE
-
Posts
13 -
Joined
-
Last visited
Recent Profile Visitors
189 profile views
NVSE's Achievements
0
Reputation
-
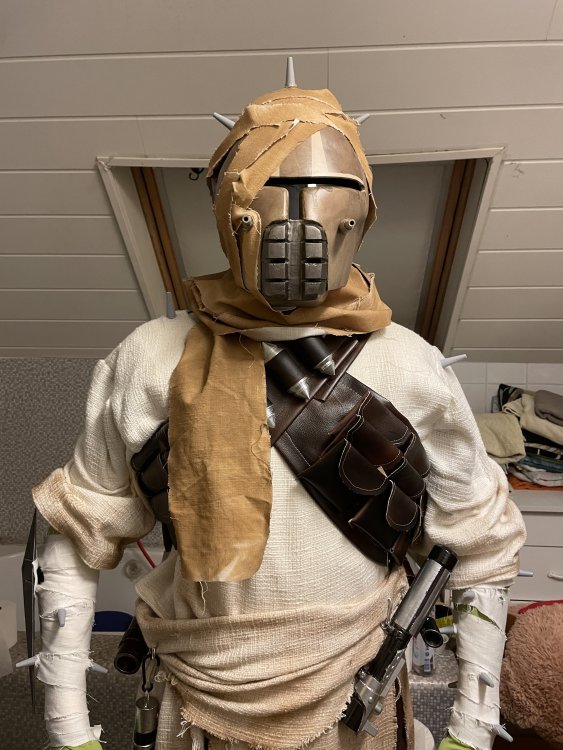
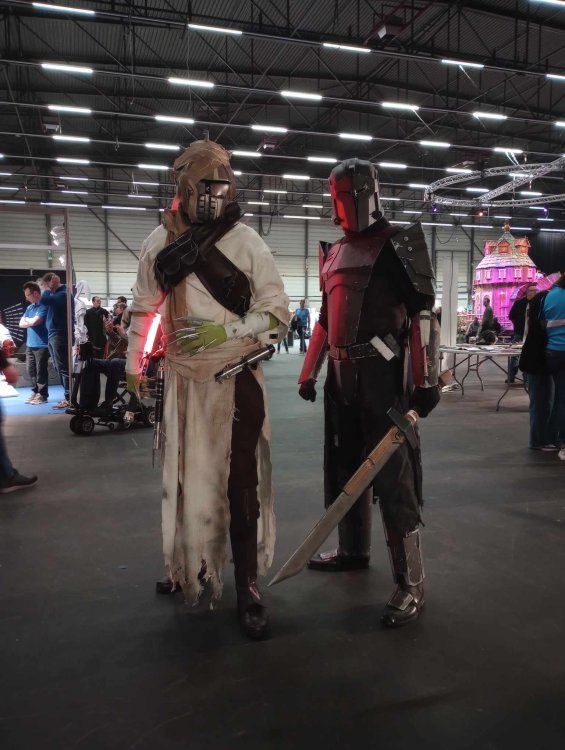
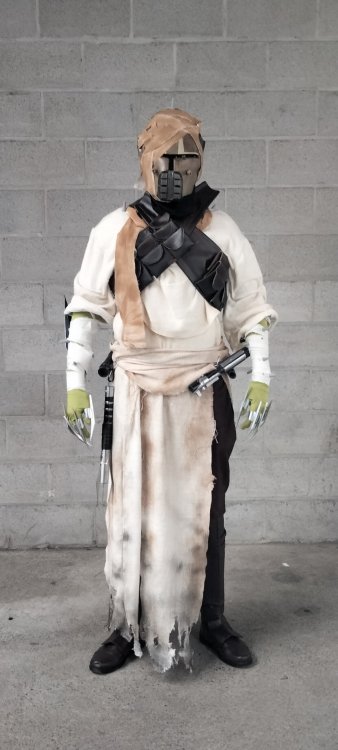
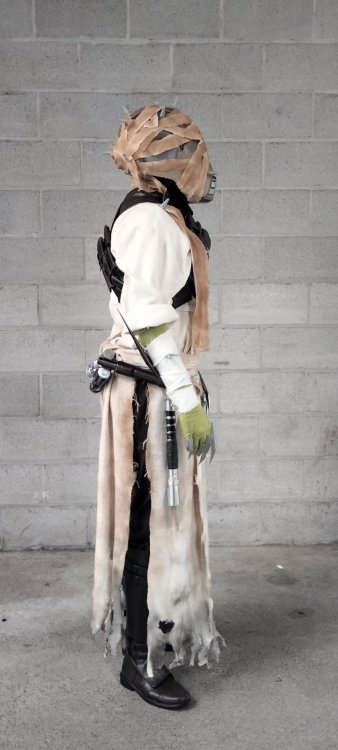
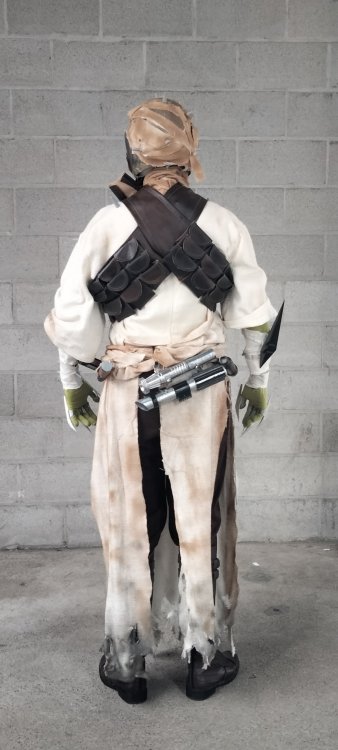
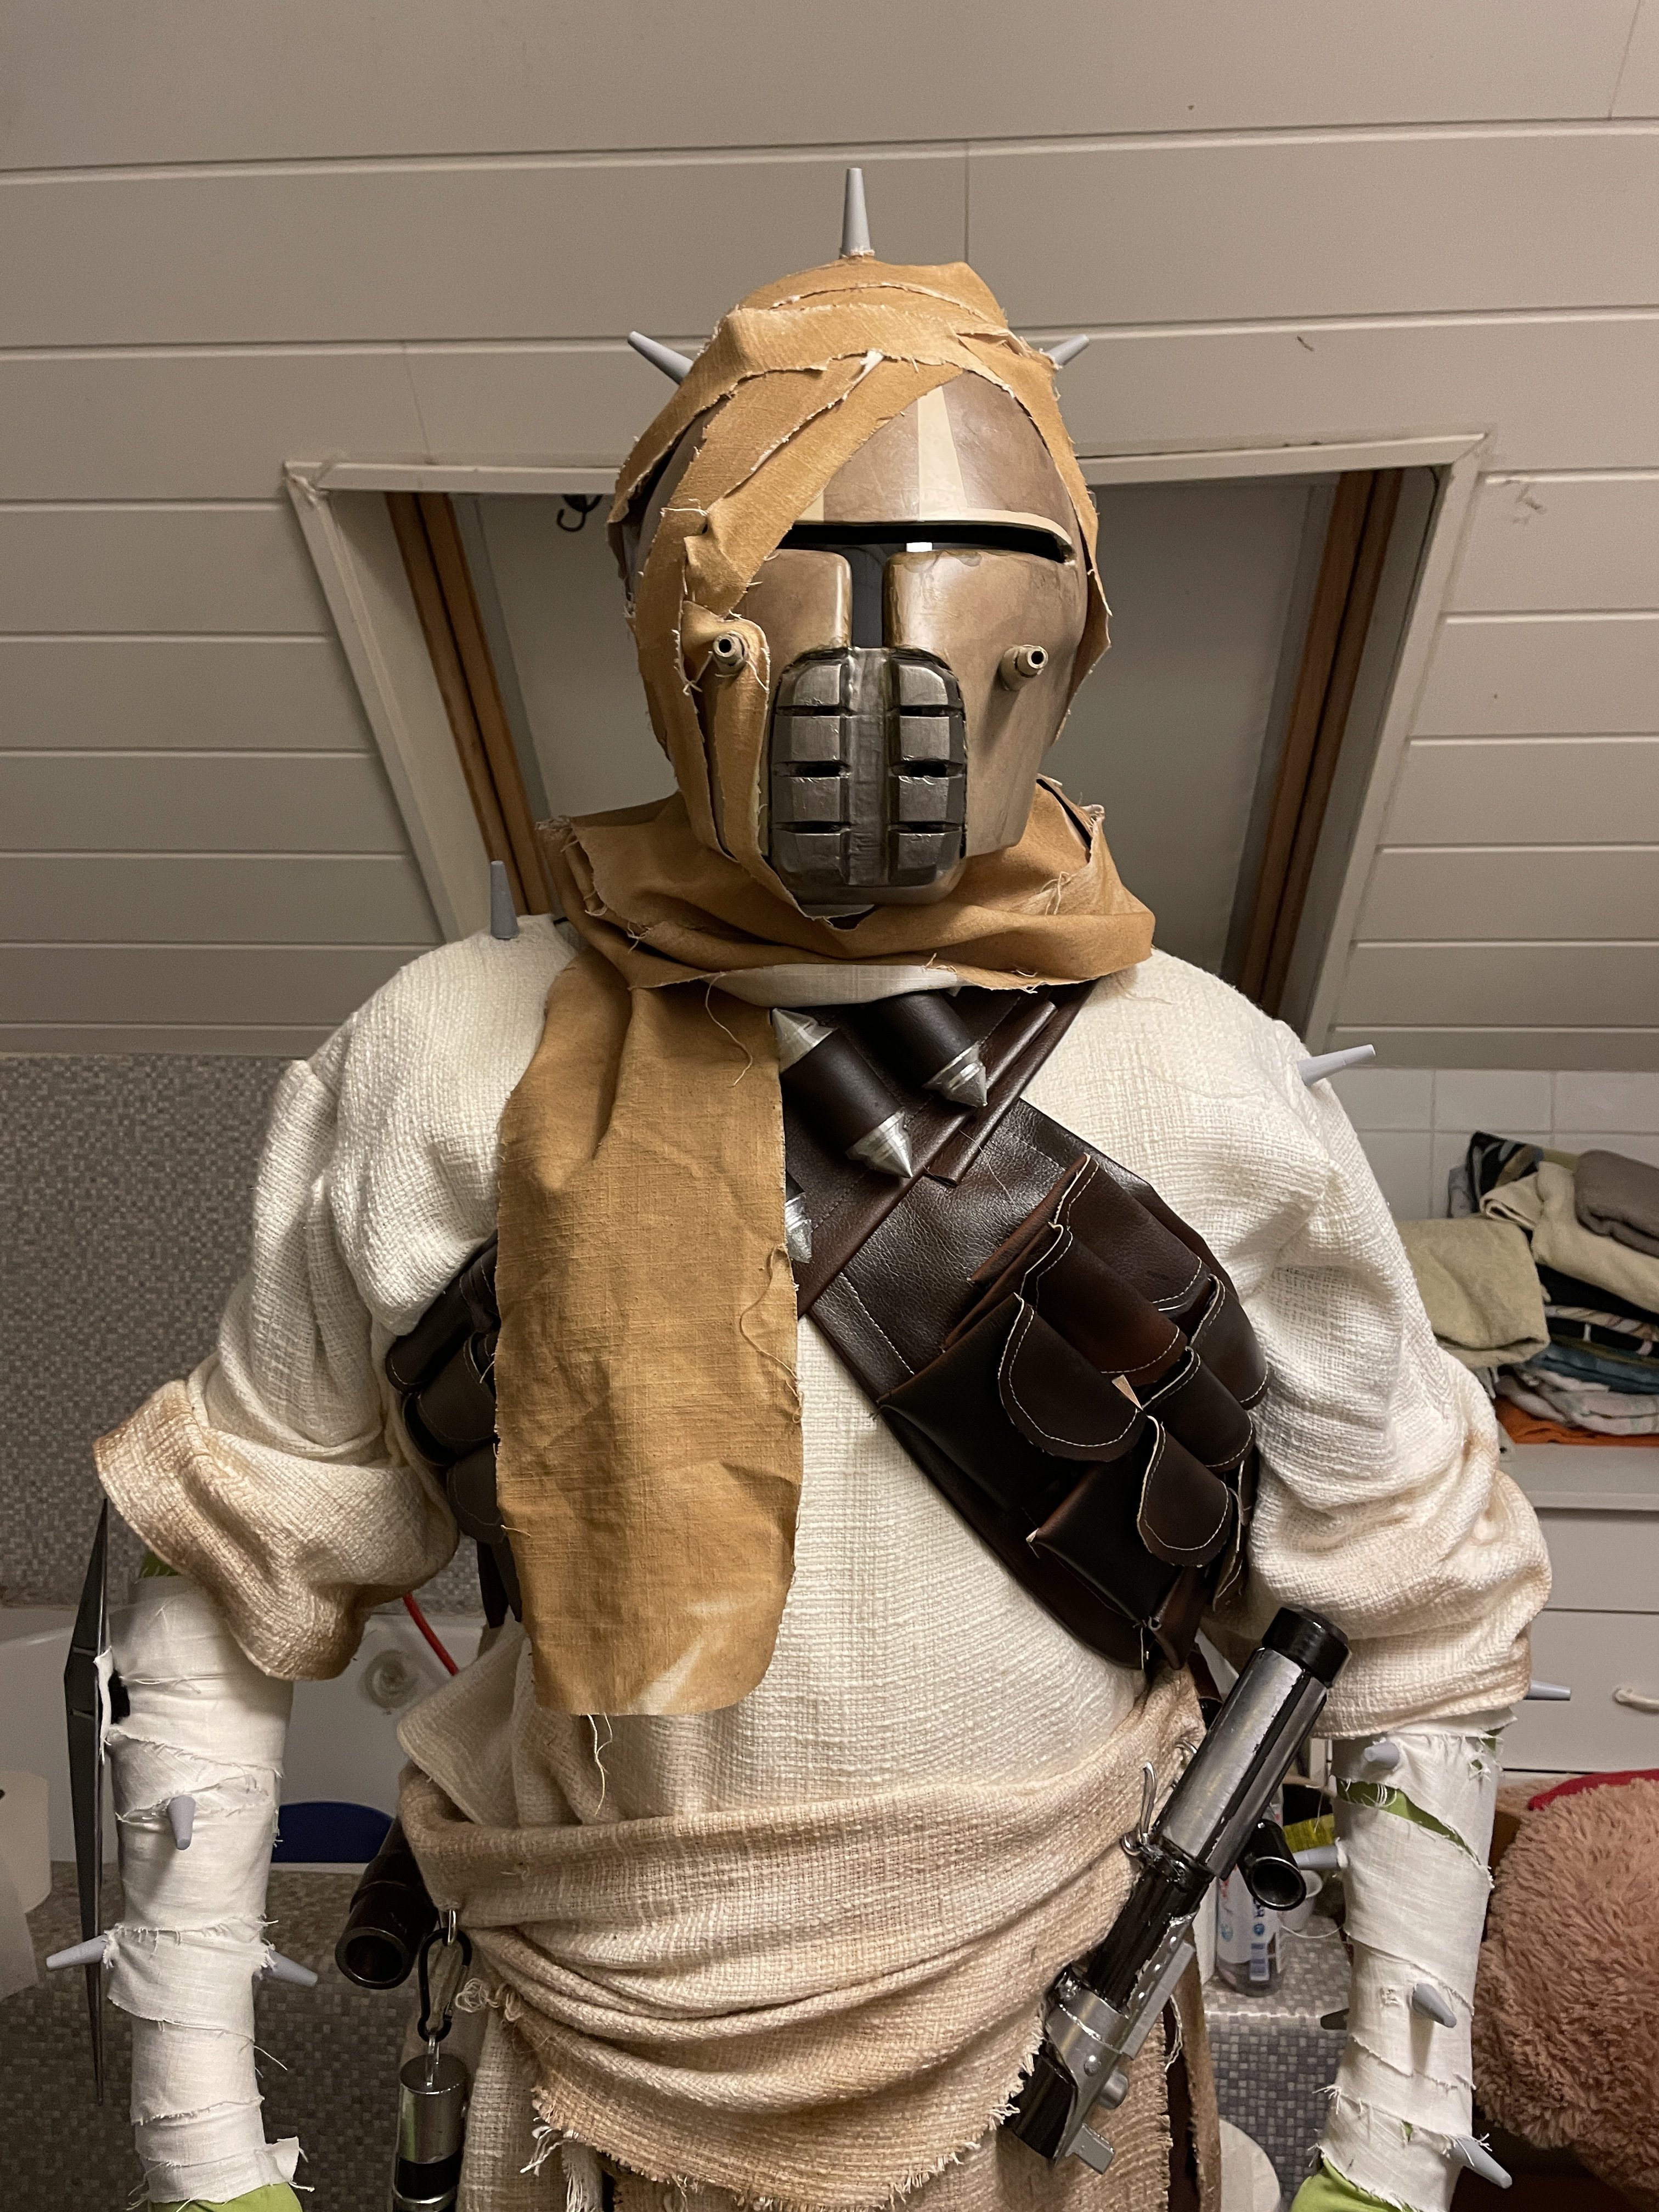
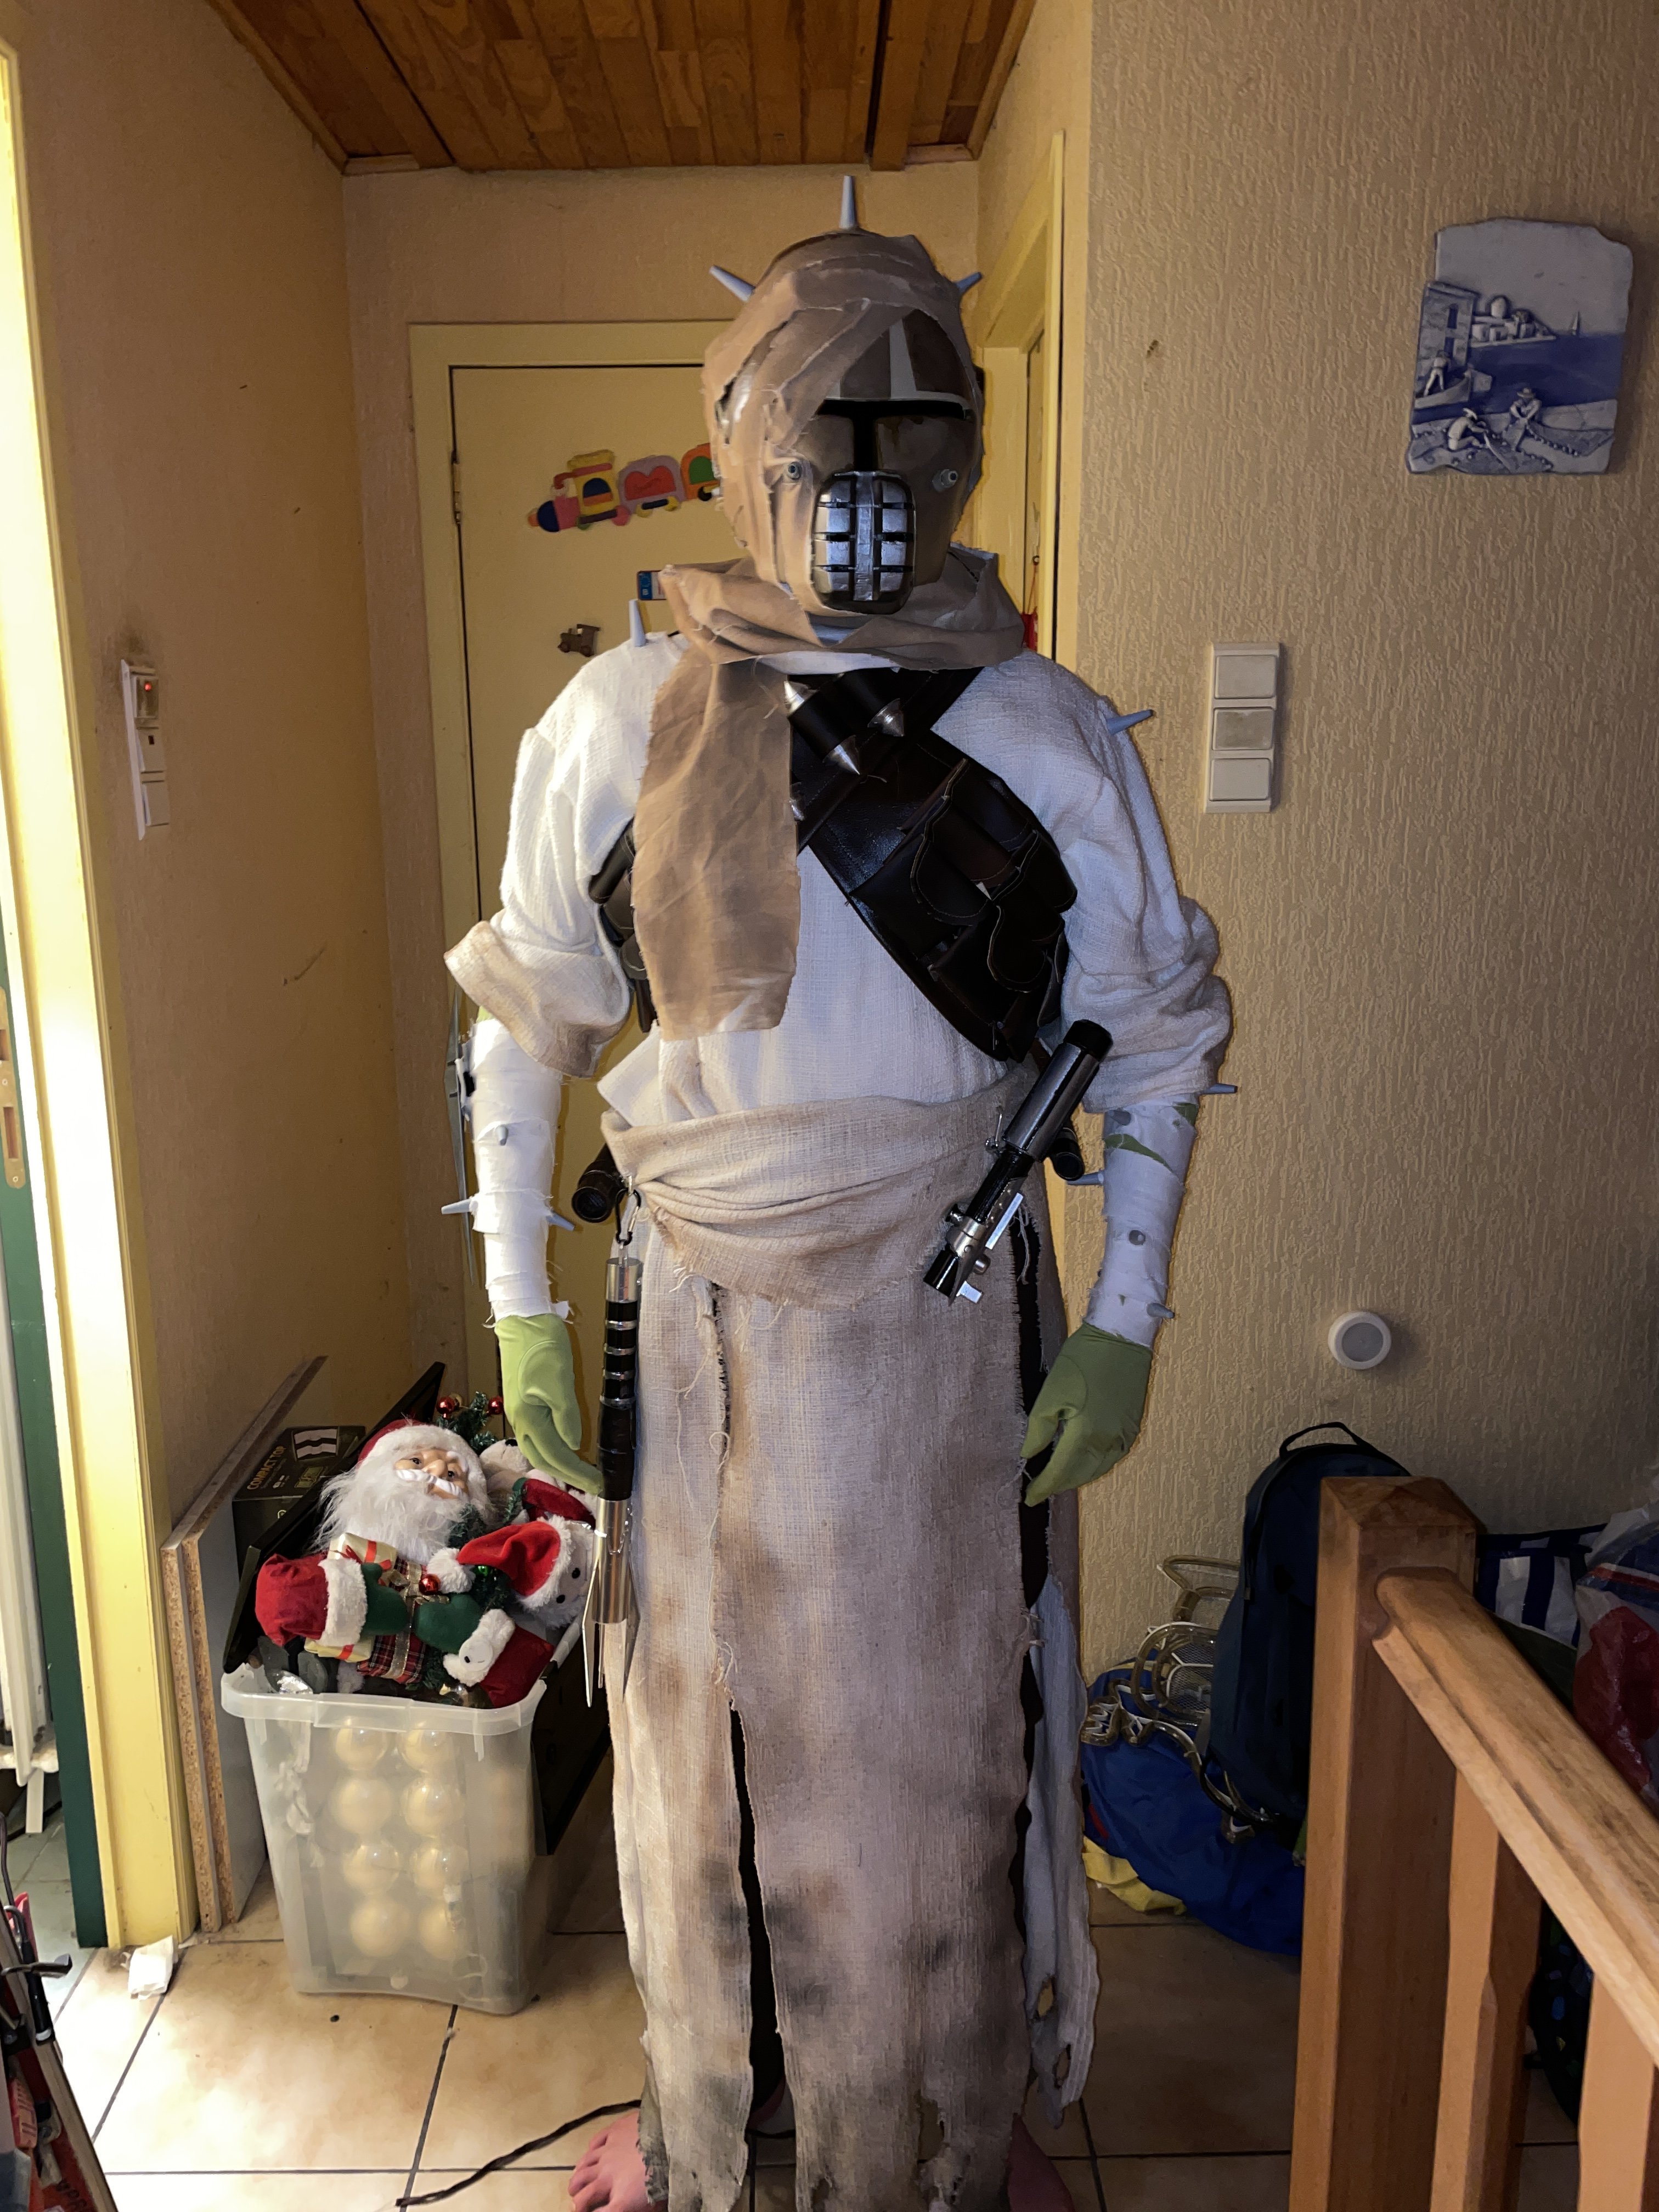
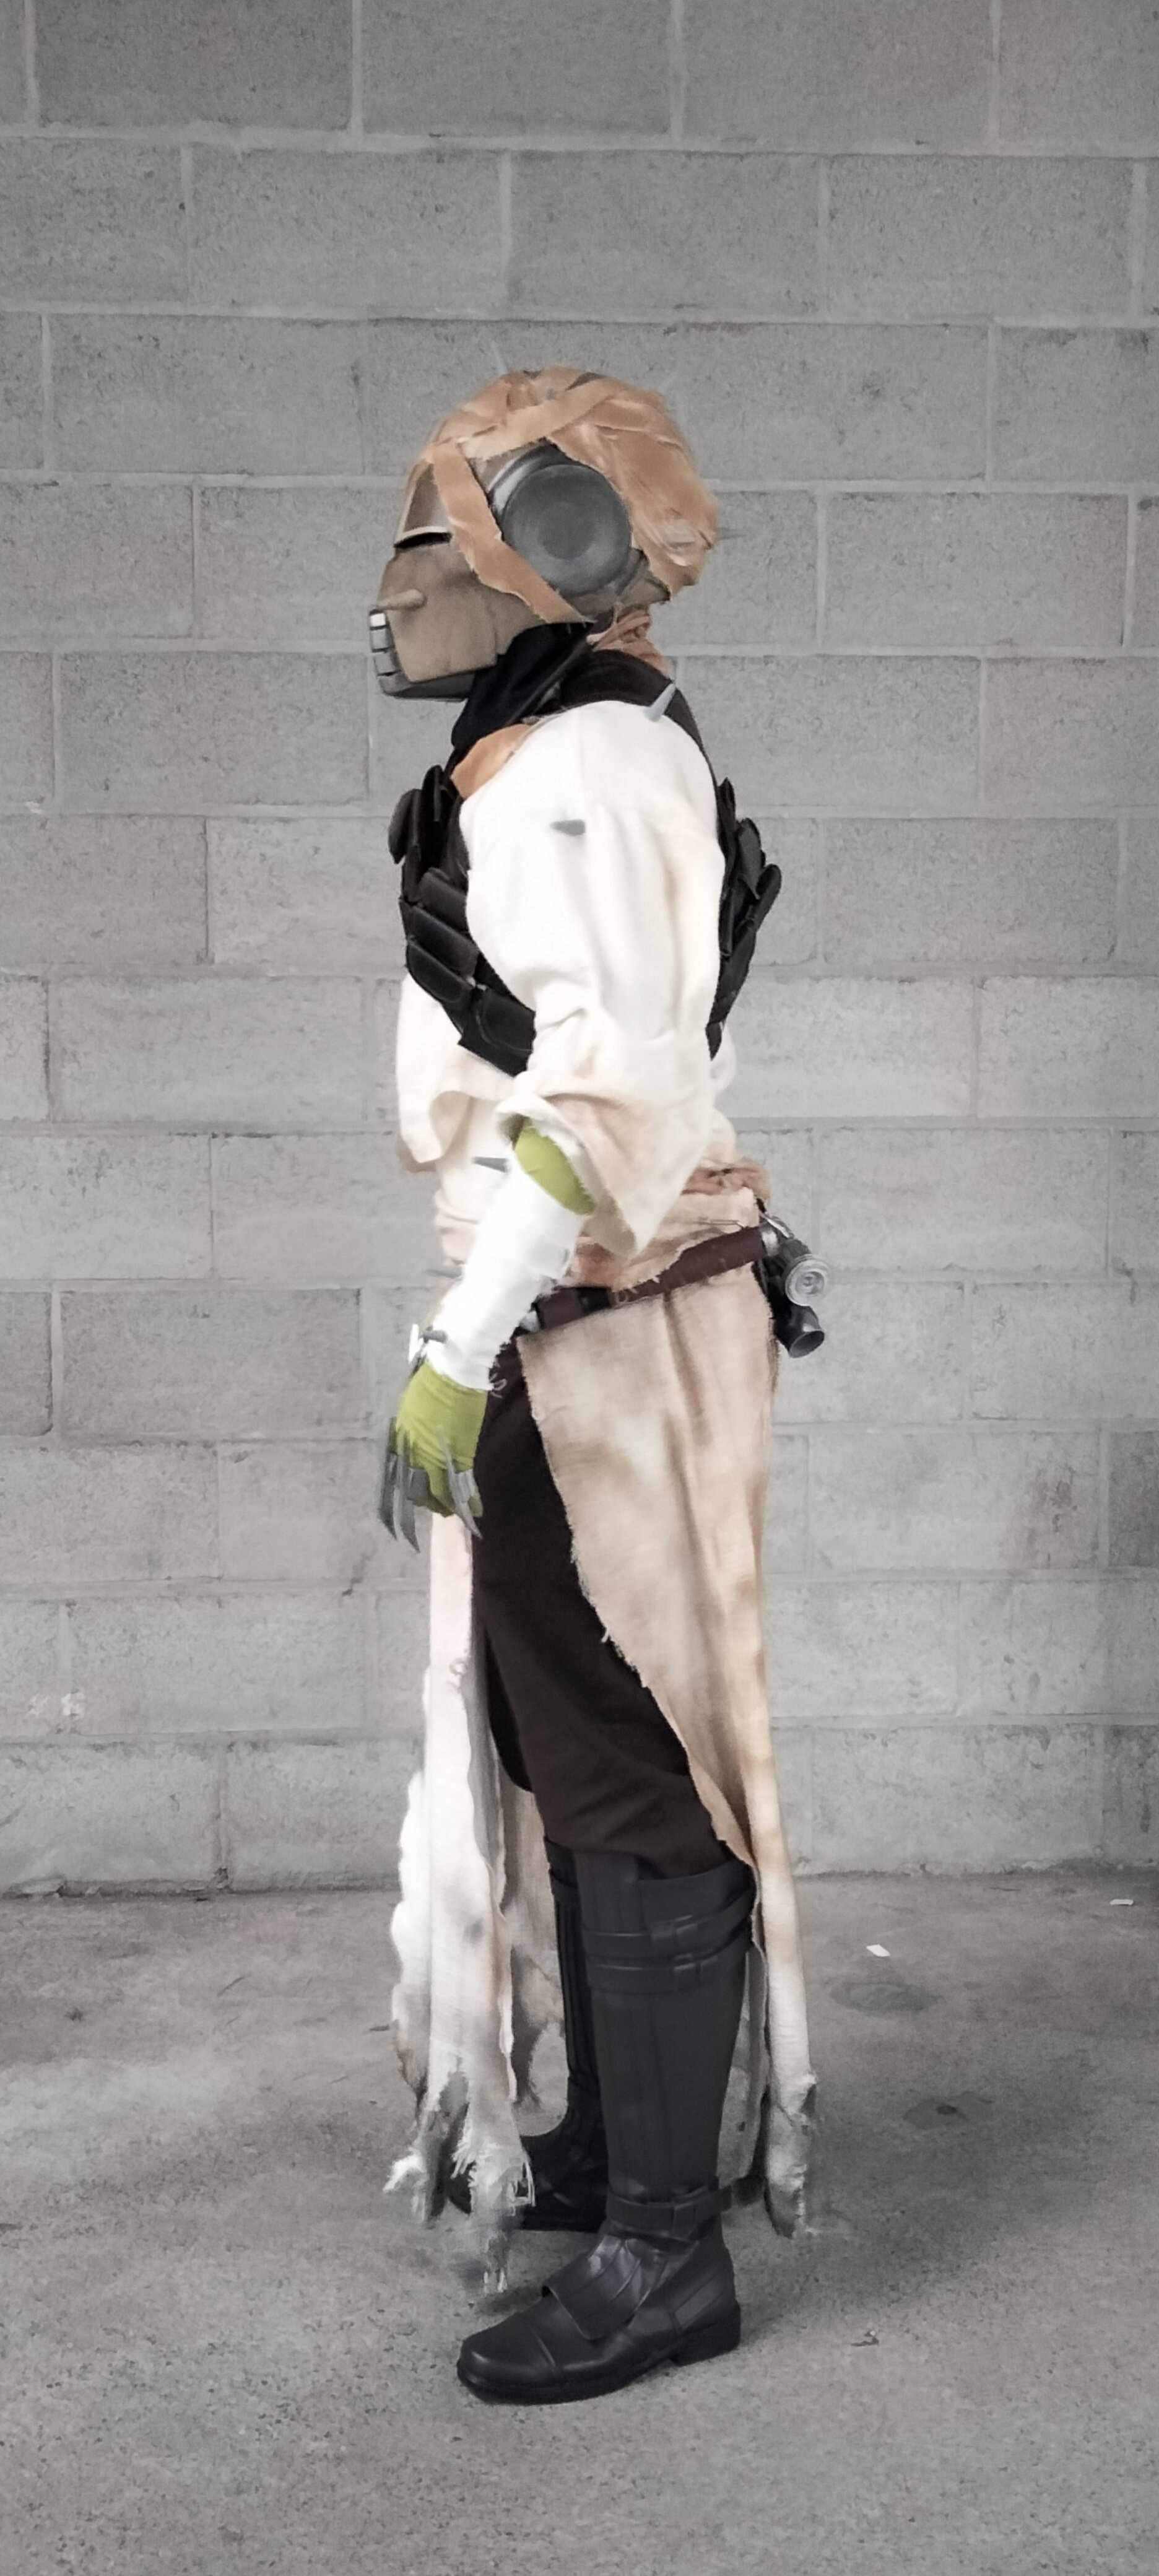
Hey all. went to my local con on Saturday. The kit held fairly well together. Couple of headspikes snapped off, thermal detonators fell off and bandolier velcro came loose. The rest held up great. Spoke with the 501st leather worker and discussed getting a proper bandolier. Other than that got some good pictures of it. The scarf on the pictures are underneath it, its supposed to be on top so the bandolier attachment methods are hidden; definitely going to use some velcro or something to keep it in place in the future. Tunic sleeves will definitely have to be more up, arm spike will need a better attachment method to keep it in place. Might also just attach the waist sash to the tunic. I'll also definitely look into adding some sintra or something to my shoulders to get them wider. Tunic definitely also needs some weathering. Will also redo the dried up blood on the helmet with a darker paint. Missing the arm tubes and hand robotics still, will be one of the first things I'll add. Any other changes that you guys see that'll need to happen that I haven't summed up? Still a lot of work ahead! Will also try posting more info on helmet paints and such this week or next week for anyone trying to get the same finish as myself. Thanks for reading and thanks in advance!


-
Updated my progression list, going to my local comic con tomorrow with this costume and hoping to get some proper pictures there, will also meet up with the local 501st garrison for feedback. I'll post all of the progress what and hows tomorrow after the con or the day after if I'm exhausted tomorrow! A little sneakpeak:
-
Looks amazing!
-
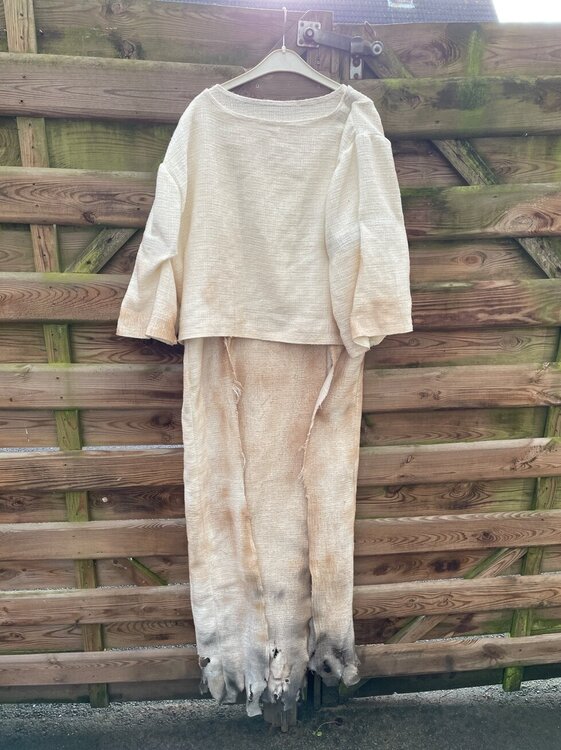
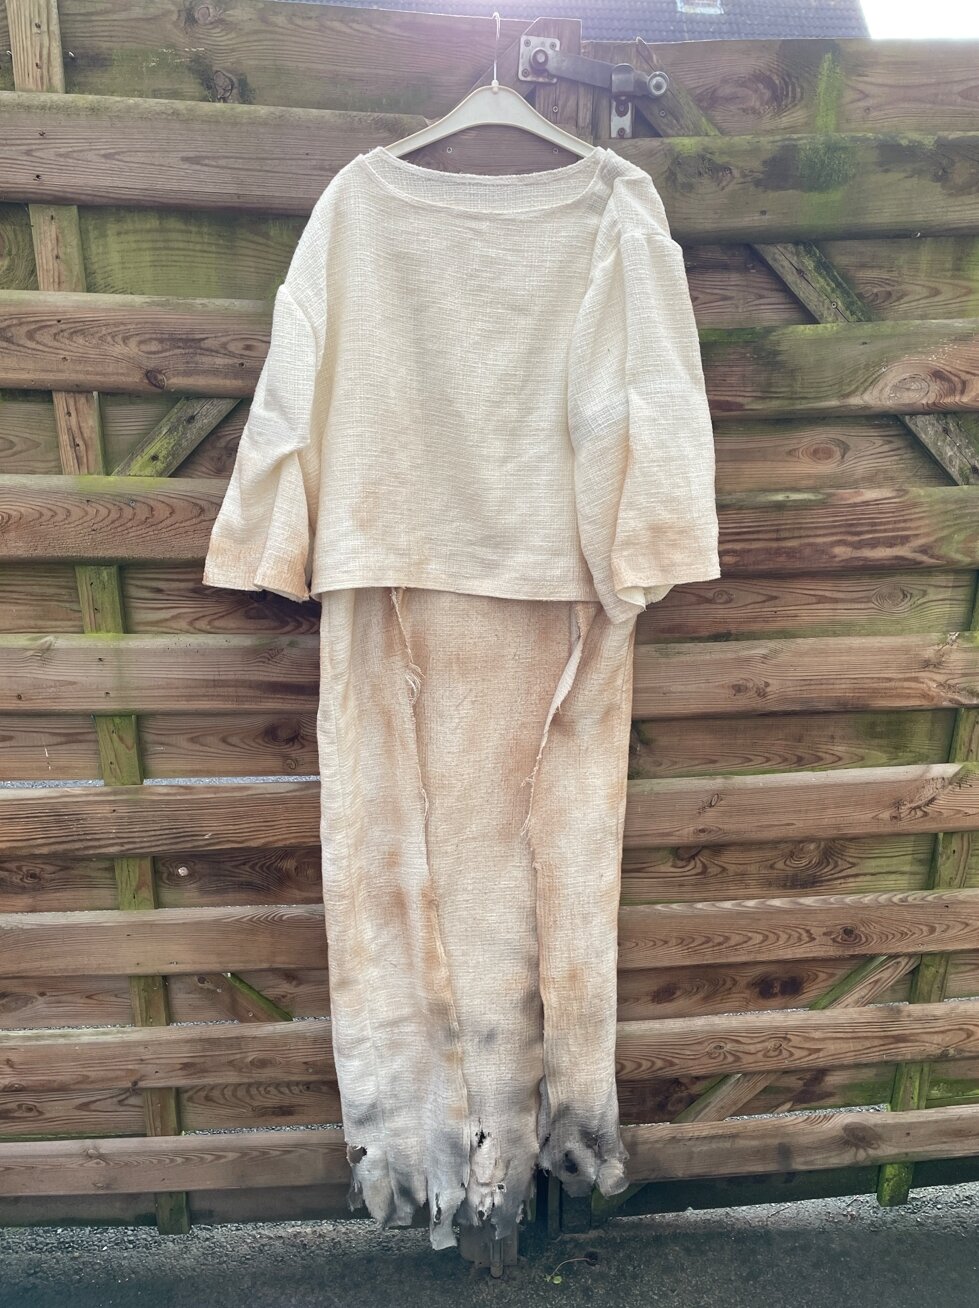
Tunic & skirt weathered, just needs the tusken spikes on it. Will most likely make it darker at the part where the tunic and skirt meet, will see how dark the sash gets. Might also add a bit more weathering on the tunic.
-
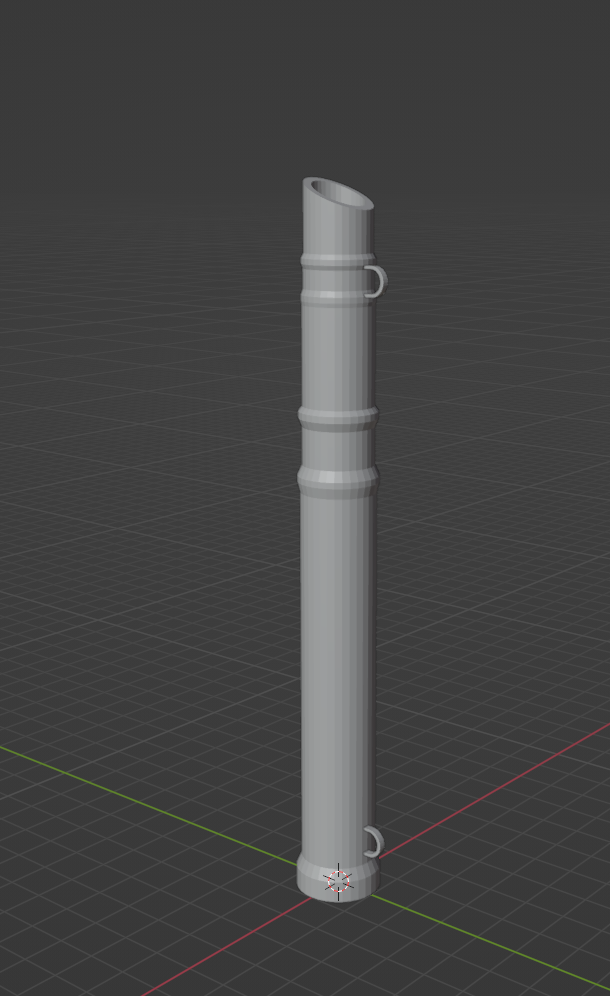
Lightsaber printed and ready to be sanded and filled. Depending on what will look best, will most likely change the position of the piece it'll hang from from the waist sash. In the CRL it states that it needs to be attached via a covertec wheel, but the way my sash is built it wont be possible to. I'll most likely have to attach it via a tiny hook or a small carabiner.
.thumb.jpg.25c3c47d3ff684f86420b8d2a74f1af4.jpg)
.thumb.jpg.33b3be2c8797bd45c7692597fe1f9473.jpg)
-
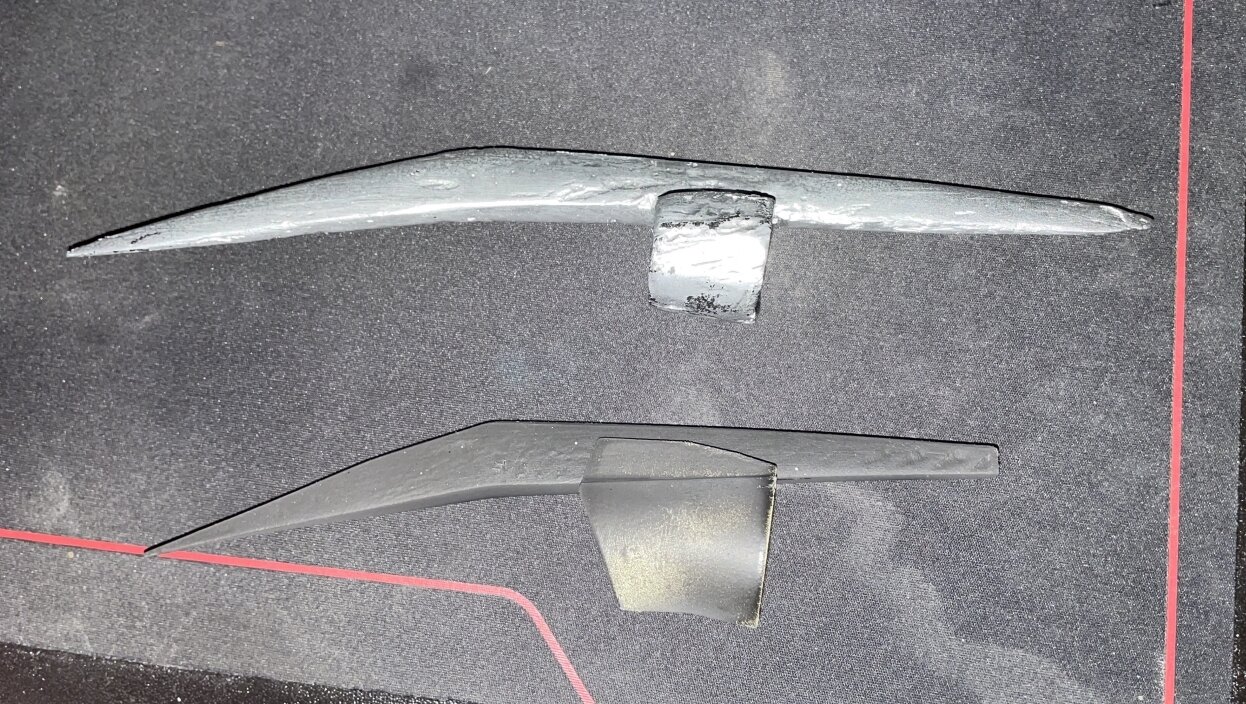
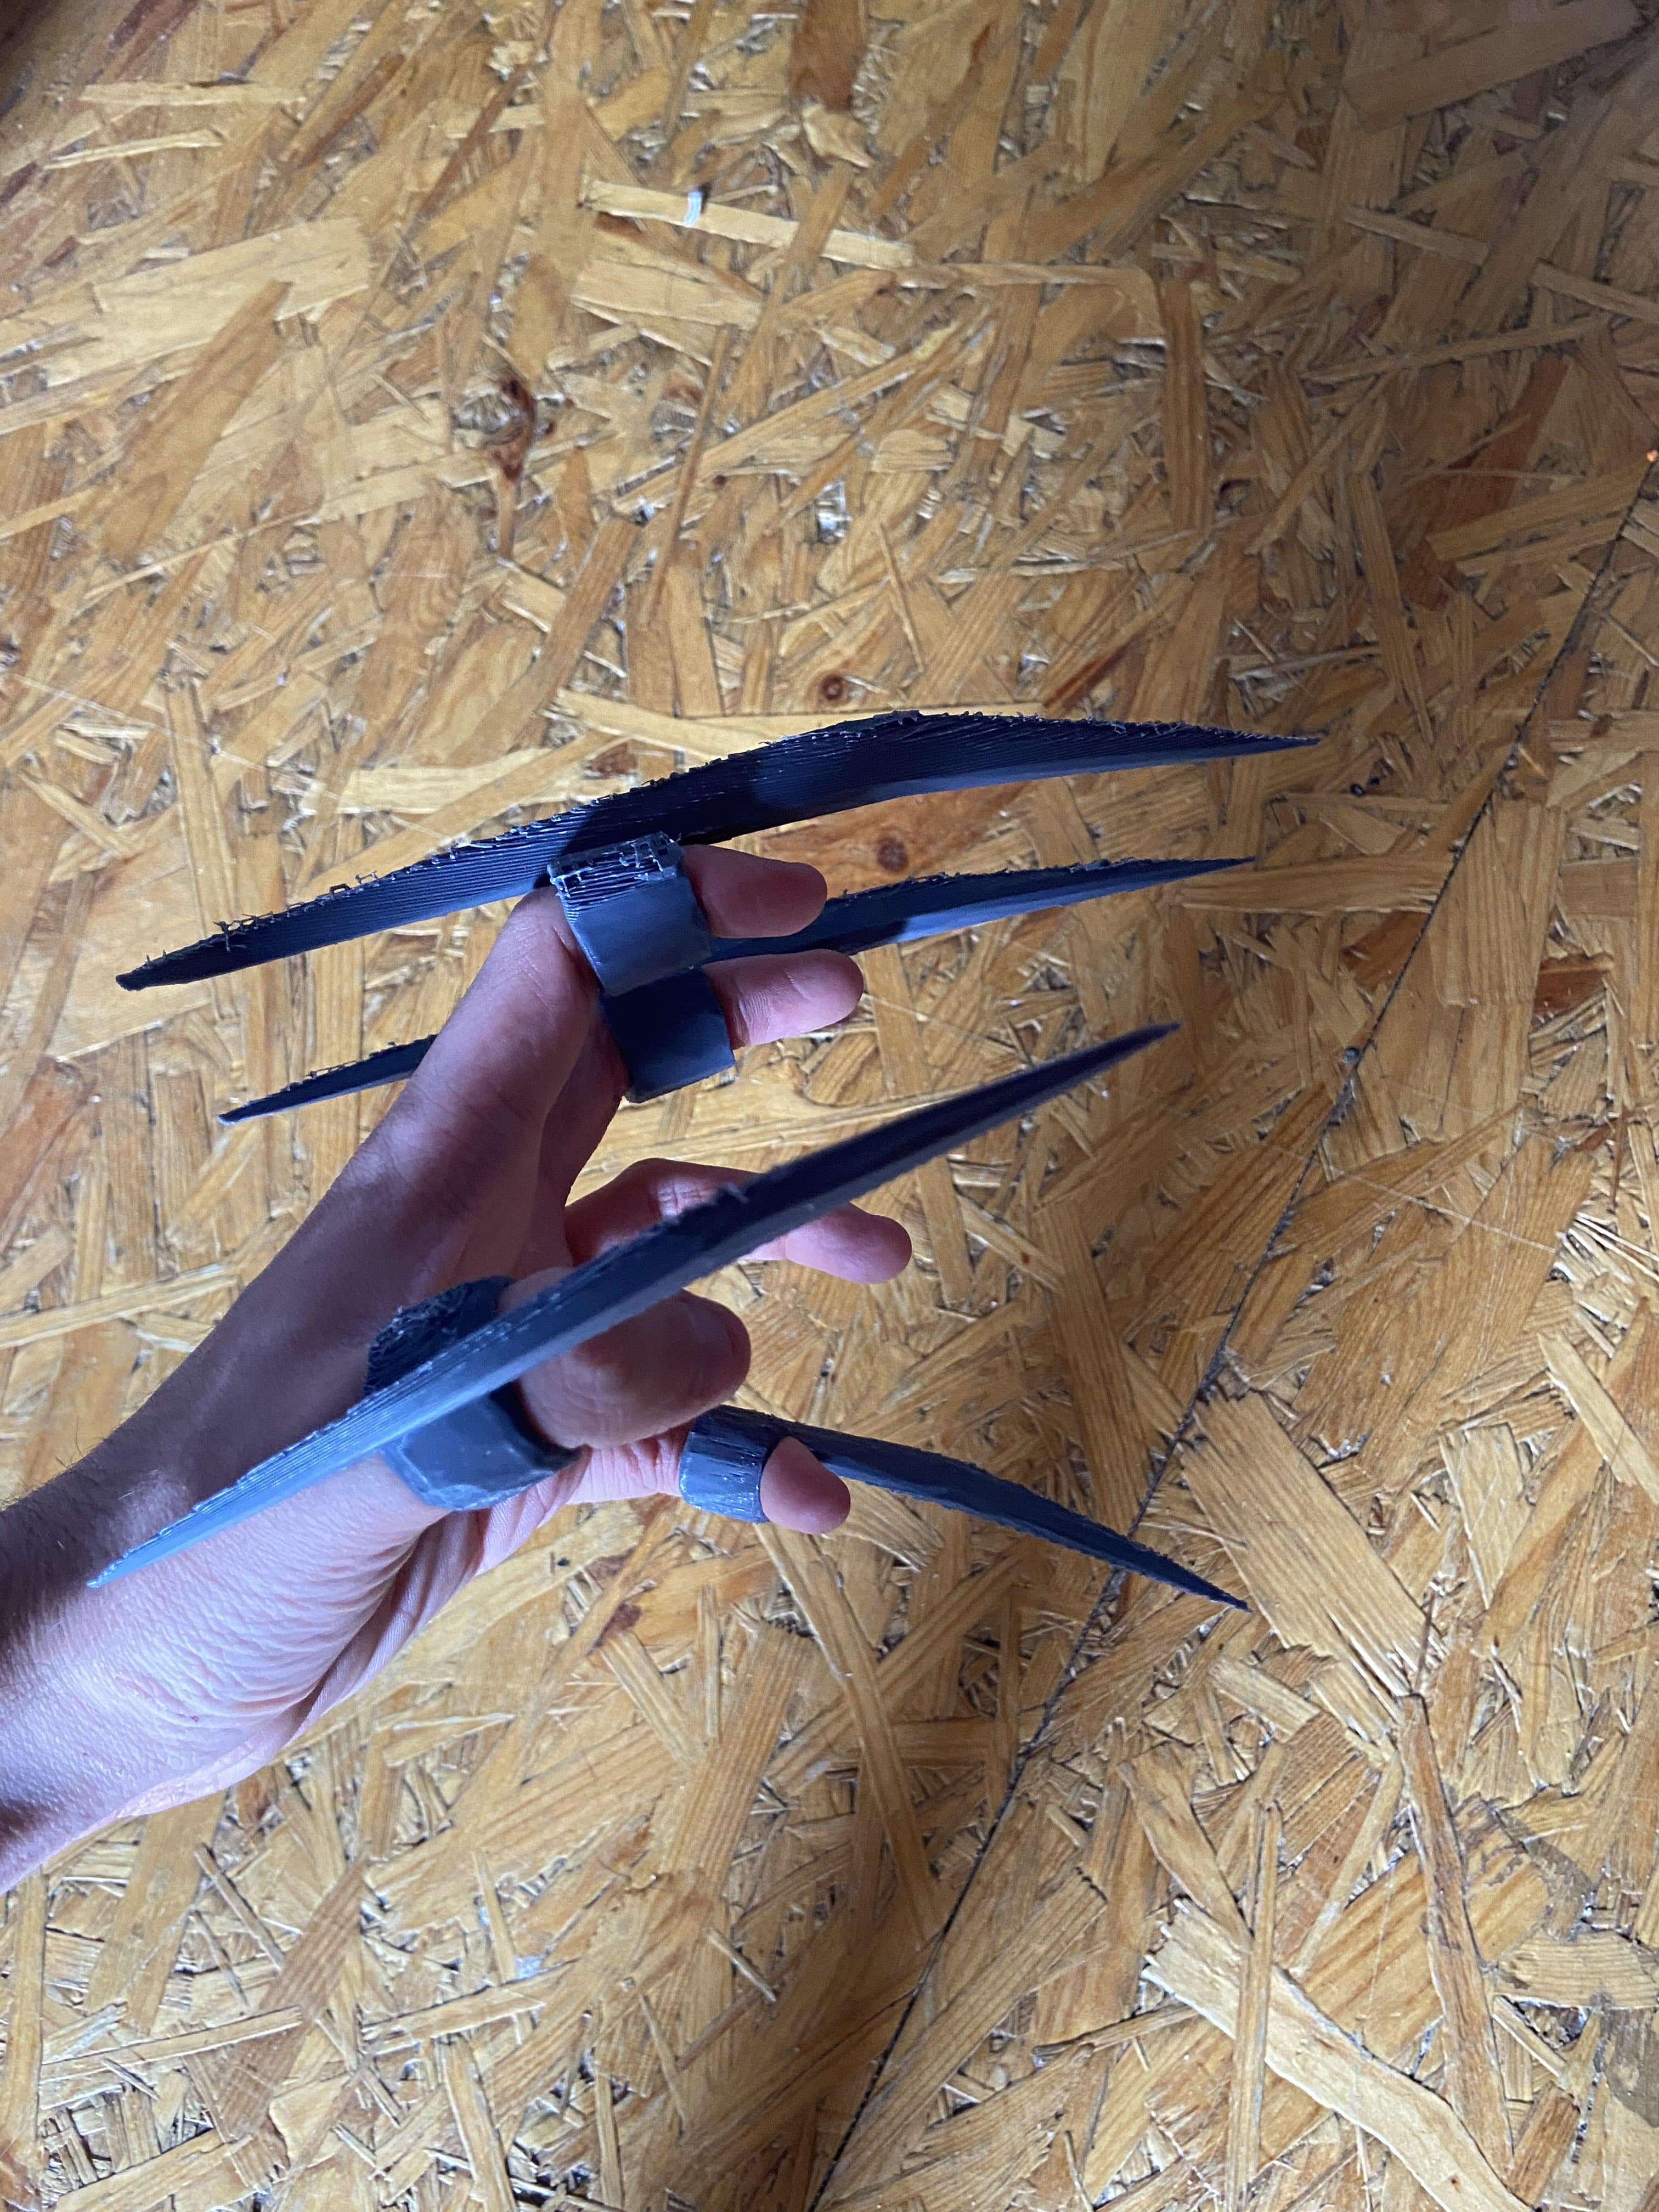
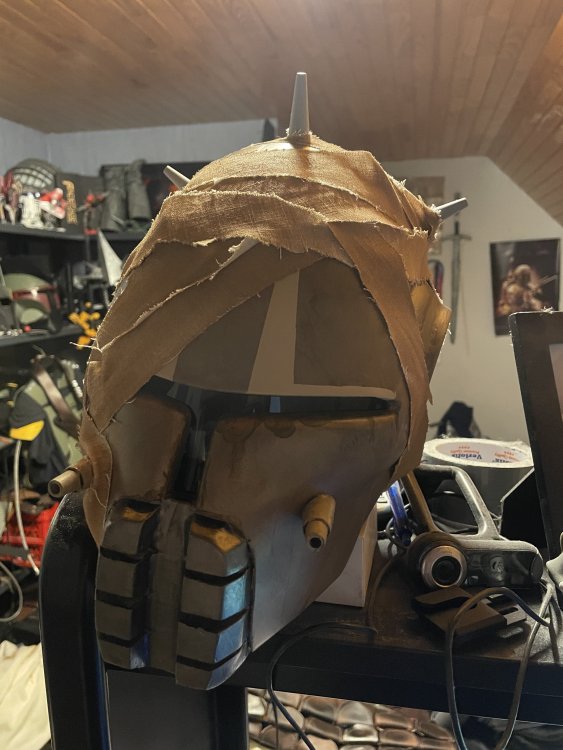
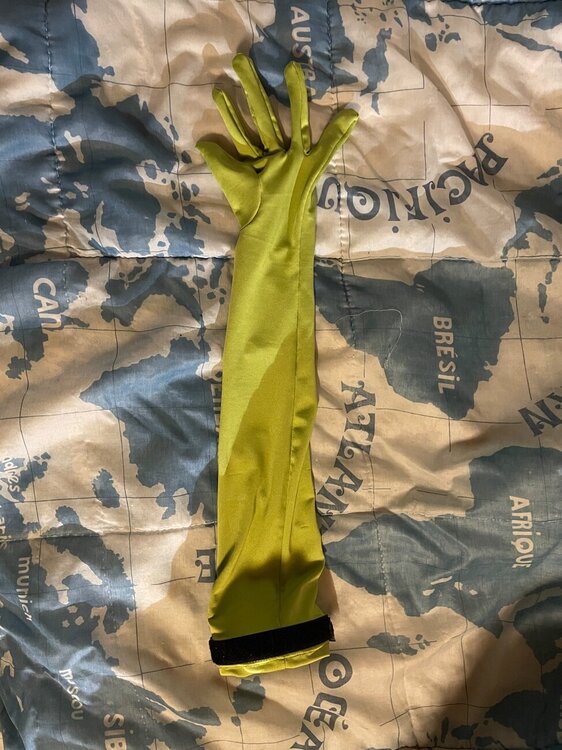
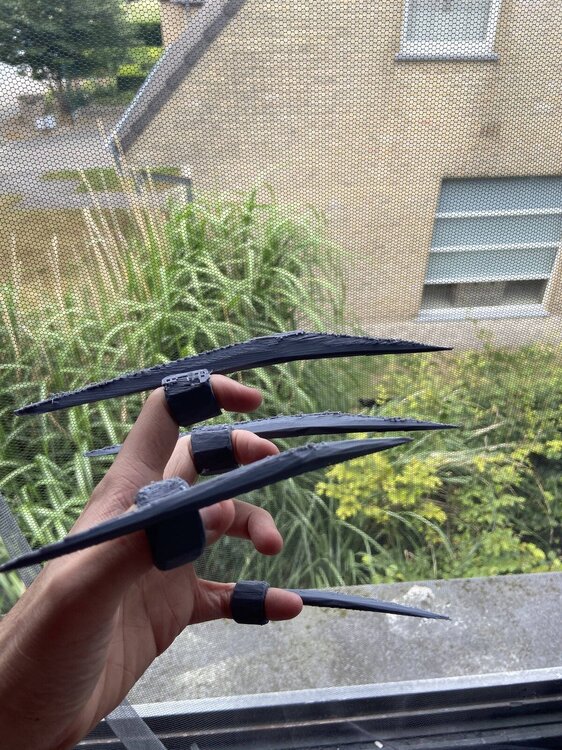
Hey all, I've got a little bit of progress to share. Back in December I've gotten new finger blade files from MysteryMaker, it's a pretty big difference quality wise compared to my old ones, so I've printed them and am in the progress of sanding and filling. (Top old, bottom new.) There has also been helmet progress. Still a lot of sanding and filling ahead, but it's getting there! For the gloves I've decided to go with thin long elastic satin ones, my hands are on the smaller side so rubber gloves would just look too big. They came in a lighter color than I wished for but I can make it darker. I wrapped around a piece of velcro at the top and sewed a couple pieces on on the inside of my tunic to keep them up. I also picked up black fabric that I'll sew on in certain spots so I can cut out parts of the green glove to reveal the robotic hand with. As for the tunic, I've lost some weight in the time that I've made it and now: so I'll have to make some adjustments to make it fit better. I've also been making minor adjustments to the sash so it looks like the positioning in-game, and I've been working on the saber trophies. Managed to snap my Kato saber in half while I was going over it with a handpalm sander, so I've decided to model another one without the flaws of other one & printed it with a lot higher infill percentage. Going to be working on all of it a lot more since there's a local comic con coming up next month that I want to wear this to.


-
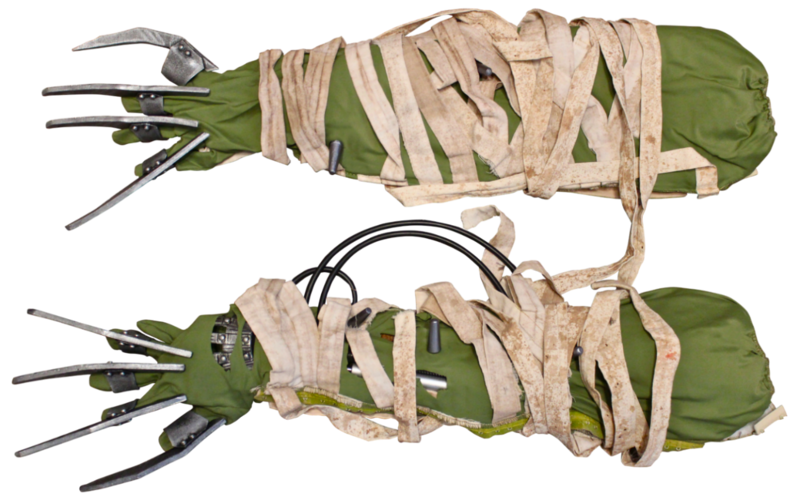
Hey all, I've been looking around for glove alternatives but am unable to find ones that look remotely like the ones on the CRL. I originally went for olive satin gloves but they dont really look like the ones on there. Does anyone know which ones are used, or something that can point me in the right direction? On a more positive note, I've recently gotten game accurate finger blades files that'll replace my current ones.
-
Hey guys, happy New Year and Christmas in advance! Placed the project aside for a little bit but slowly getting back on it. Updated the list! Currently working on the finishing up the claws. Heard a lot of good things about wood filler + acetone mixture to make it smooth, tried it and it honestly works wonders. I'll get some pictures of the finished product whenever they're done. I also figured out the correct saber placement on the belt, but the Kazdan Paratus saber accidentally snapped in half somehow during a test fit. Also received my XenoPixel board to put into the saber!
-
Would love to the see setup once you got it figured out & installed! Looking great so far!
-
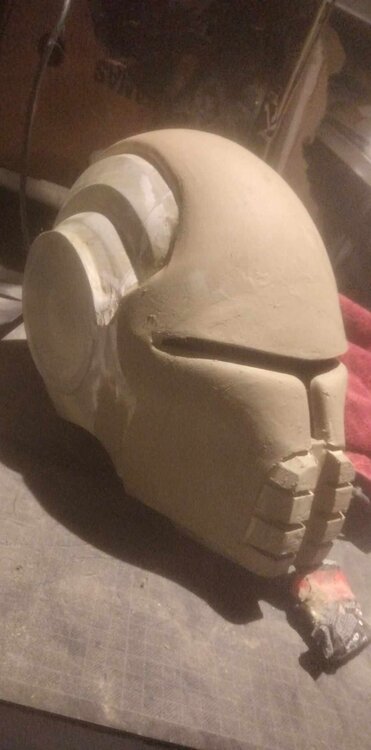
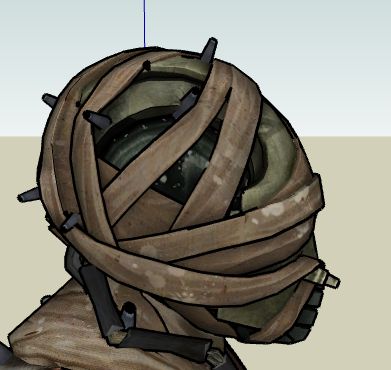
No, I didn't and it wasn't in 1 piece. I took a Sith Stalker helmet off of Thingiverse for free and made some changes to it to look more accurate then sliced it into 4 pieces and printed them one by one. I'll be happy to post the helmet file with the changes made to it if it's possible on here when I'm home!
-
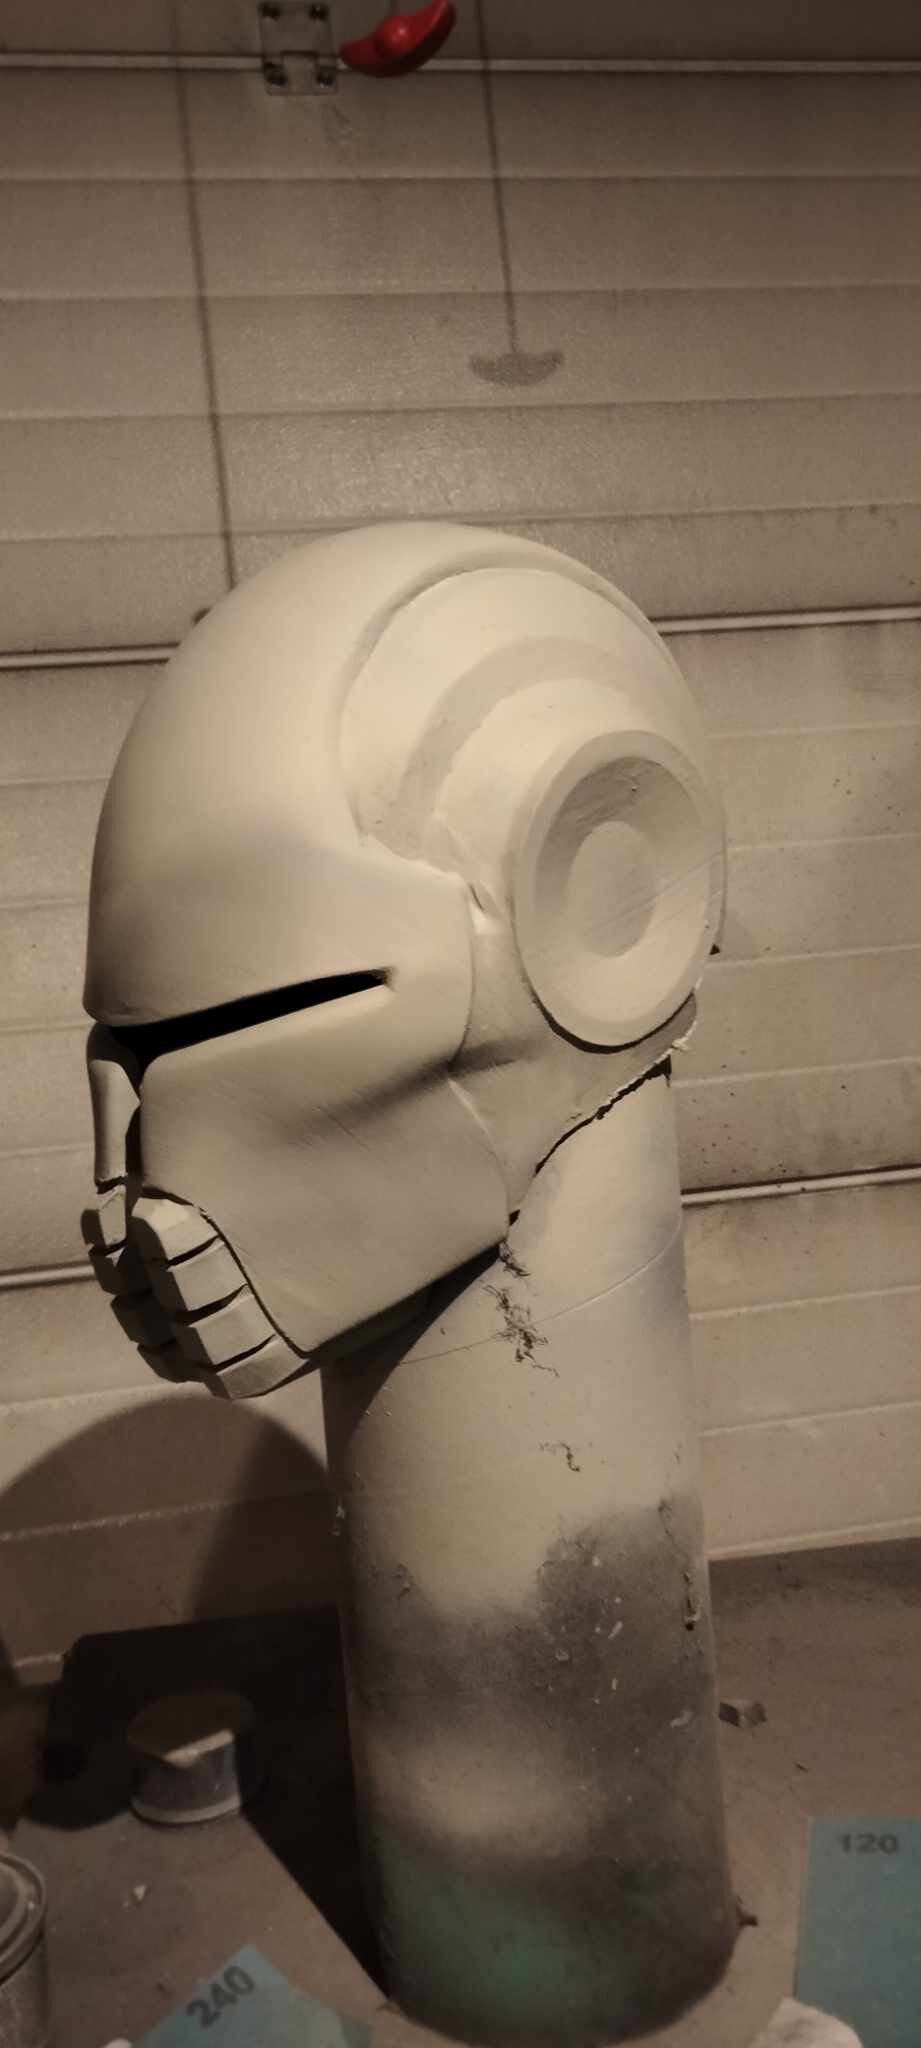
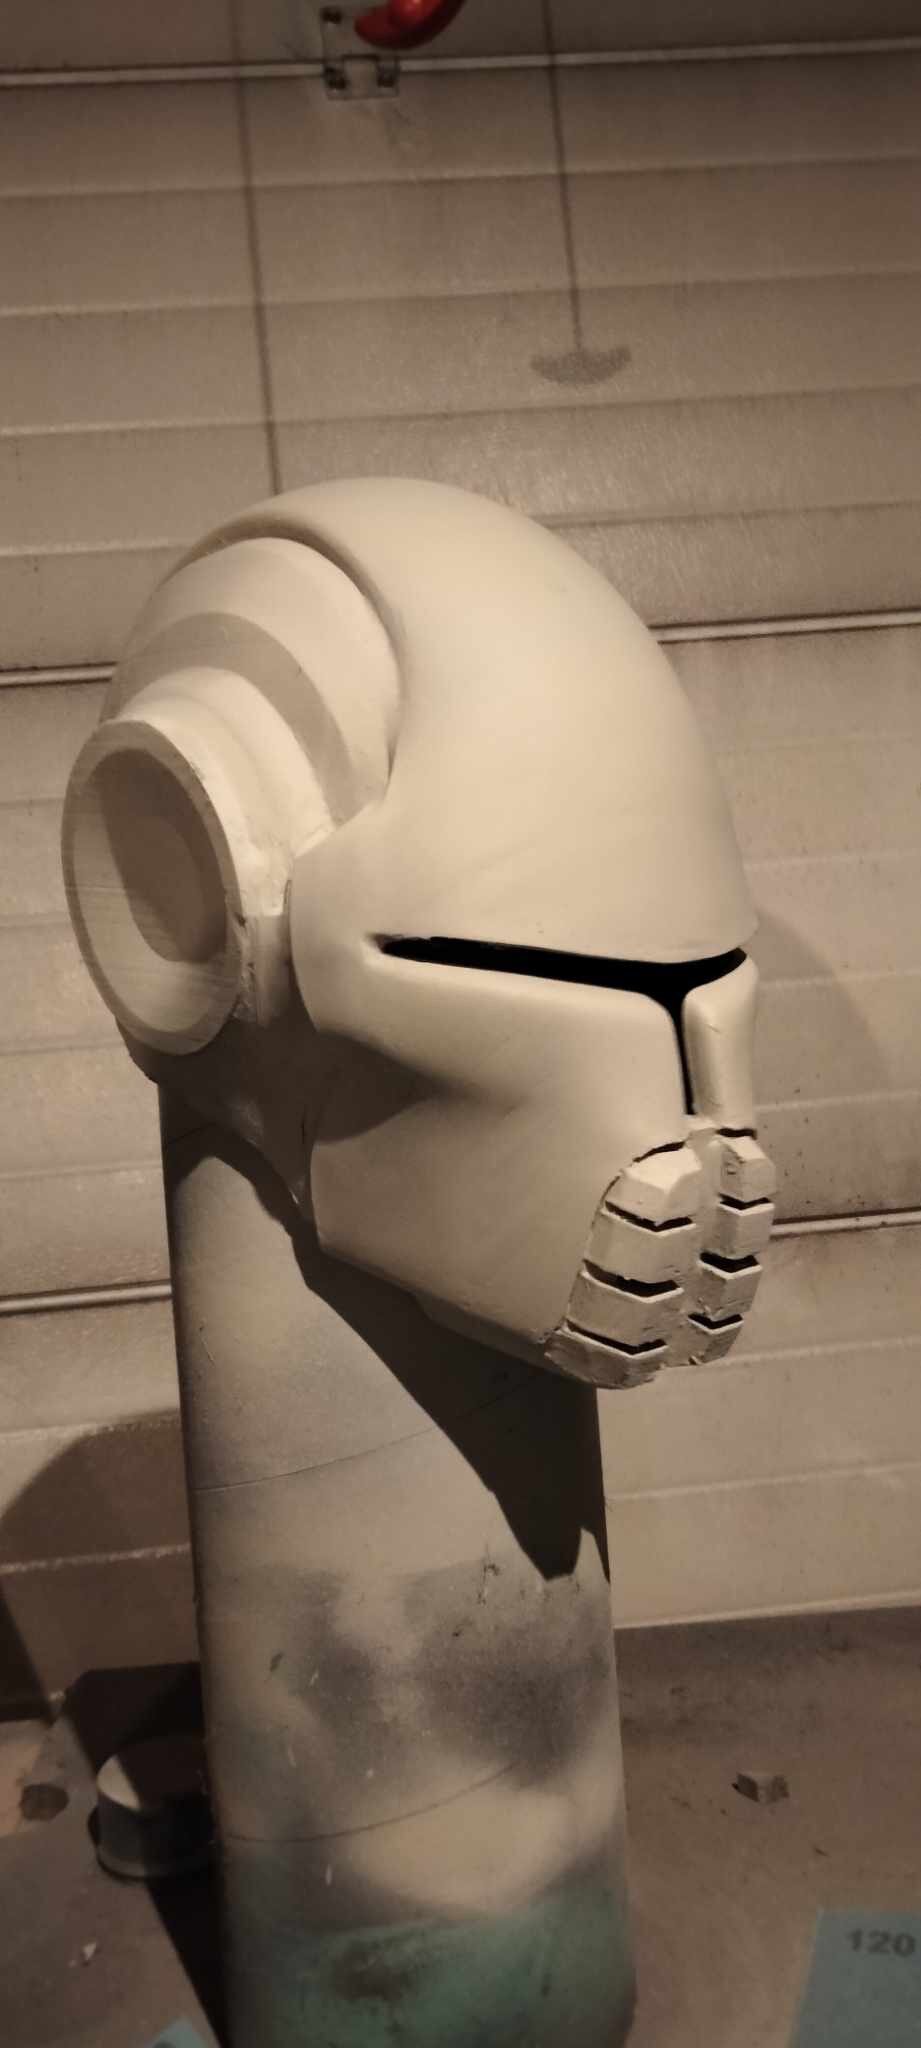
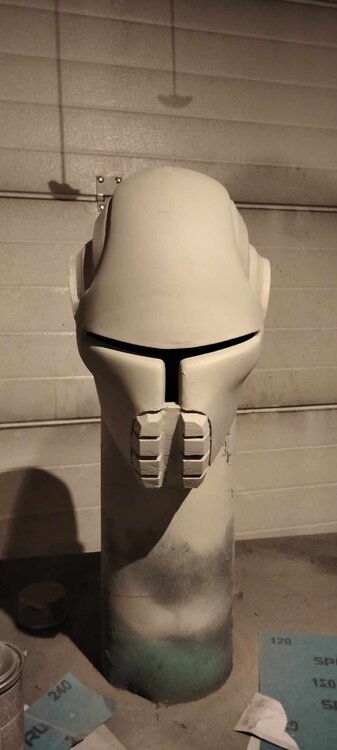
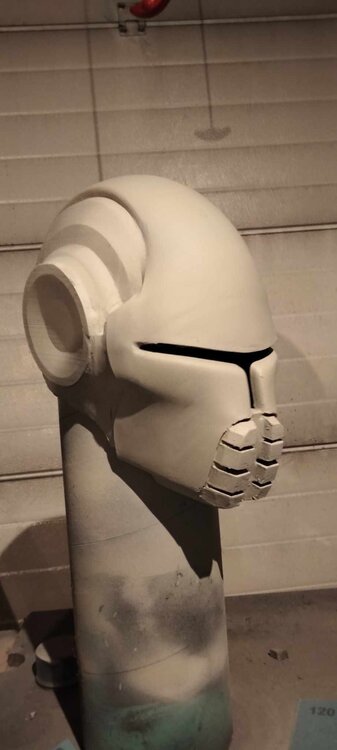
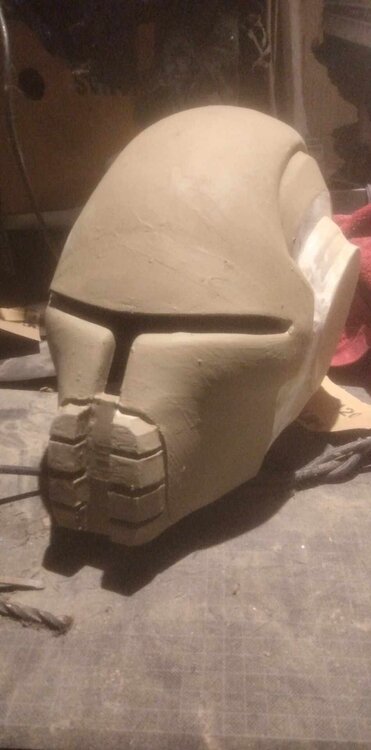
Helmet progress so far, sorry for the horrible camera quality: Claws, lots of sanding and filling ahead: I'll get some proper pictures of everything I have as soon as I'm back home!

-
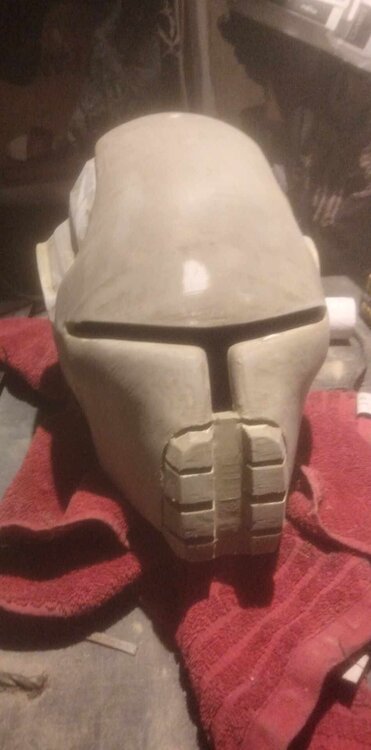
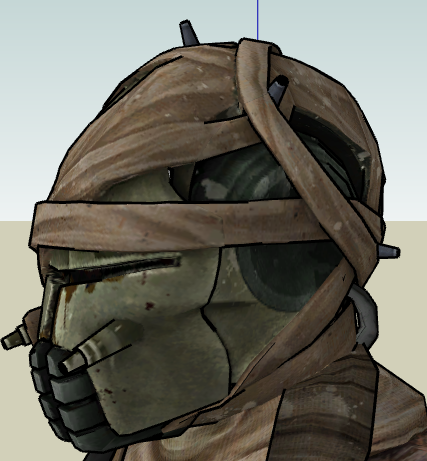
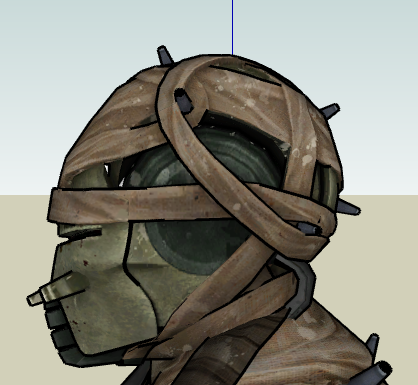
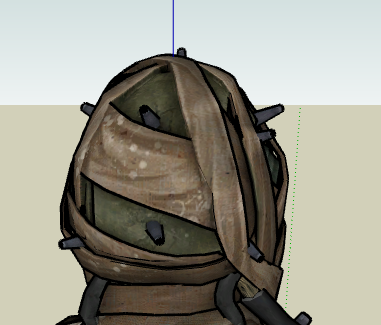
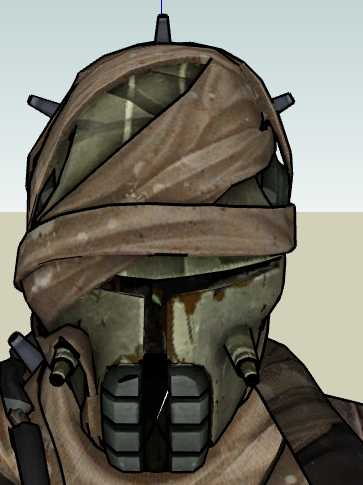
Hi all, I've been working on this one on and off since July. Just making this post to document the journey, and get advice where needed and help people with their own DSG kit. Will also add my reference pictures for anyone needing them. Uploading whatever I model for this to my Thingiverse DSG Starkiller 3D Model You'll need to make an account to view it in 3D. List of items: Helmet: Done! Will redo the dried up blood with a darker paint. Braid: Done! Scarf/Neck Wrap: Done! Tunic, Skirt: Done! Will weather the tunic. Gloves & Arm Wrappings: 3/4th done, due to me wanting to wear this costume to a local con, I've completed one side entirely, the other is missing the hand electronics and the wires. On my list to Claws: Done! Arm Spike: Done! Bandoliers: Pouches still need rivets and little rectangles need to be placed on the bottom ones. I am however not entirely happy with how I built it; Spoke with a leather worker in local 501st garrison to commission the bandoliers. Waist Sash with accessories: Done! I will however most likely attach it to my tunic. Pants: Done! Will add leg wrappings in the future. Boots: Done! But will possibly make changes in the future. Lightsaber: 3D printed lightsaber done! I'm planning on getting a full metal version soon, since it's fairly heavy I'm going to use a 3d printed one to attach to my waist sash so it doesn't sag down the whole waist sash. References for paint & alignment. I can post them full size if anyone needs them. Resized them so it wouldn't take up a whole page. References Helmet: References Waist Sash: References Boots: There's another strap at the top. I'll add more if I do get some more reference pictures. Thanks for reading!
.png.94b6e1c038dca5ec8a09e2488f37acbe.png)
.png.3ee65d72b6cb6c2ab0a40654753e781b.png)
.png.3ad9ee63e95de730fe8655899bc6d775.png)
.png.f24f314e19a4dfa058d765b82a5d87d6.png)
.png.0bf5e4e5428166daeb8cc8a569319983.png)
.png.7ef6daaa425181449d11186a7f182912.png)
.png.f30bc4cdc236128b61c1fa042f27356d.png)
.png.810d04da5567e335b65f2b2f013232a9.png)
-Copy.png.475c696396532a7ea8fc8f234118ccb3.png)
-Copy.png.9666e0955f518e16db34dec8bcd97c88.png)
-Copy.png.d977e502afbd14289eeadf35bfabf543.png)
-Copy.png.58d18157bad0ad401f468bcd9e7c08f7.png)
-Copy.png.b427c26362075b2a905ab1237f0a9fb7.png)
.png.65bd256756fa510f10842360c8431362.png)
.png.b5a6f3ace010ae6e25037f9f370cf7af.png)
.png.91cddf00d16f1b8b09f48c3abcdb2748.png)
.png.e304535b3b5d58803d7690429791b6a8.png)
.png.b1fd939226d12a1dee1bb075072661e7.png)
.png.7d89cf0e70f23d8422eb87f067a02e5c.png)
.png.e91a73ef809c7446d5e7eec68f6854e6.png)
.png.a224cd394a124931ed75199c26063f2a.png)
.png.1766c0bb8a9a0266bdba0d2917fa83d6.png)
-
Looks absolutely gorgeous!


.jpg.c4b1e1f272d313c1262a7940c985e950.jpg)
.jpg.2f56db2e400ab8ed32b2a2a17838ef21.jpg)