
-
Announcement
Welcome to the forums!
If you are a newly-approved member, make sure you check out the New Member Checklist!
If you are a Detachment member and can't see the member-only area, post here for access.
-DV

Allfather
-
Posts
81 -
Joined
-
Last visited
-
Days Won
2
Content Type
Profiles
Forums
Gallery
Events
Everything posted by Allfather
-
Greetings, all. A local guy is wanting to do an IK (actually...a couple are) and I was helping them with the parts when armor came up. I saw a post in a thread last year about Walt's Trooper Factory doing a run of the IK armor and reached out for this guy. Just wanted to drop a line to let you all know that WTF is currently doing IK armor. Some of the parts like the cape "cap" plate seem a bit elongated to me (although I gotta admit, I like that look). But, as it is a costume from a comic that has many, many variations in the drawings, I don't really see an issue with that. One really good thing about his kit is that the shoulders look to be the correct proportions. My first set was ginormous and the current set seem a bit small to me. I may be ordering a set of his shoulders to update my kit. Anyhow, shoot WTF a message if you are in the market for IK armor. He has, as he put it, normal man size, big mad size, and women's size. I have only seen pics of the raw, unpainted pulls of what I assume is the "normal man size", so I don't know if his female armor is shaped differently. His price isn't bad and he offers group discounts if you have a squad of IKs in the making (that would look soooo cool, by the way).
-
 These sabers are really nice. I need to figure out a way to add the D-ring to the pommel to be a bit more accurate, but otherwise a really nice build. Never had a saber with a real board in it before, so it's taking some trial and error to get the blade and sounds just right.
 -
Got the house stuff under control in time to order one of these. Supposed to be here this week
-
Hopefully, they will still be available in a couple of weeks. With all these house issues, I'm so broke I can't pay attention. No AC and no water really sucks
-
Nice. Been wanting to upgrade my home made one for a long time now.
-
Hope he gets the sizing good. Would love to see more avenues to get good armor that isn't ginormous.
-
New member trying to figure out how this works
Allfather replied to GrayHawk's topic in Welcome Area and Forum Help
Like Chris said, soft parts are tough to find. I wound up making mine, myself. But, the easiest way to meet the CRLs is, as Chris said, using a Vader undersuit and adding the tabbards (most I have seen go this route just attach them to the back of the belt). I'm not 100% on how the Vader top is made, but you may have to add the ribbed collar to fit the bill based on the images available. -
At the holiday parade last Saturday, I was dubbed "Darth Santa" while in my Imperial Knight. Kids all along the parade route were yelling out "Santa" as we walked by and one guy said he always knew Santa was a dark sider :P
-
In the Imperial Knight, I have been called "Santa Jedi", "Viking Jedi", and a Royal Guard. In my old green Jedi gear (my daughter has it now), I was called just about every Jedi name in the movies. I tend to just answer to whatever anymore
-
Kevin sells a few different sizes and each has it's own look. From the look of Avatar's shoulders, I would guess he got the normal (large) kit. Mine is the medium (the large was ginormous on me) and the chest has a different shape to it...but it fits my frame much better :).
-
Silly question: what's wrong with your pants? Any leather/leather-like pants should work since both Vader-ribbed and smooth leather have been seen in the comics. I find the old leather pants I use are quite comfortable and not hot at all. As for the sleeves, you may have luck with adding zippers to the cuffs. I wanted mine as tight as possible, so I added some 6 or 7 inch (not sure what I wound up with) zippers to the sleeve seam at the wrist. Allows it to go over my hands then tighten up around the wrist. Zippers are covered by the glove cuff, so not a problem there. Also, not sure if we ever discussed this part, but I wound up using some leather thread and just tied the cap plate to the shoulders. Two small holes and run the thread through and tie inside the hollow of the shoulder. Removes all signs of a connection and can't feel the thread. I like the padding the shoulders idea. Thinking of padding mine as well as some padding in the upper chest to keep the armor forward a bit more (helps camouflage my gut ). I think you nailed it pretty good, man
-
I get my CA glue from the guys at Eternal Armory. But they are close by for me, so works out. Shipping might cost as much as the glue, though
-
Thanks all. Hope to get to troop with a bunch of you at some point. A sea of white is cool and all...but a sea of red would be cooler
-
Sorry, all. I had to break this up into a few posts due to how many pics I used
-
Saber: I can't afford to drop $800 plus on a saber that I will use with a costume a few times a year. Besides...I like making things . So I took an old Ultrasabers stunt saber with a white LED and added some black o-rings, a sink tube sleeve, an electrical box knockout plug, and a d-ring mounted into a hex cap screw. Some paint and some more hex cap screws and I managed to get the same silhouette as one of the 3d renders I found long ago. Not the prettiest IK saber out there, but I spent less than $100 and got to do most of the work myself. So I'm happy with it And the final product: And protecting Vader (I know...not really canon...but a cool pic none the less ): Once again, hope any of this helps at least one of you guys and gals out in your IK builds. Feel free to contact me if you have any questions on anything I may have skipped over or not explained well.
-
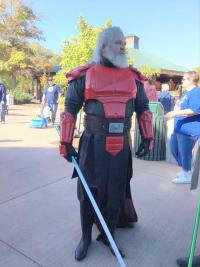
Belt: I made the belt by following the design and measurements Thomas had posted years ago. Layered leather with all the parts that pass through each other beveled to make it lay better and then riveted together. The buckle is made out of a piece of old street sign I got out of our scrap bin at work (I work in a traffic signals and sign shop, so we always have scrap aluminum laying around) that I cut, shaped, and added the disc to. It is held on by...wait for it...velcro . I used the standard Jedi belt means of fastening the back, but I turned the studs backwards so the belt "tail" actually lays beneath the belt. This eliminates the extra belt sticking out of the keeper but still allows me to adjust the size depending on how fat I get (my gut tends to change size quite a bit on any given day due to some gastro-intestinal issues ). I also added a simple pouch (sized to hold my cell phone and a small money clip or aluminum wallet thingy) and a saber hook (the kind Luke has to hang his D-ring saber from). The whole thing is dyed with chocolate brown. Cape: My cape is a simple trapezoid of warm brown ultrasuede that is hemmed all the way around and pleated at the top where it narrows to go under the cap plate. I based the way it hangs off Jan's drawings rather than the comic pics so mine does not come out as far on the sides as most people's do. It does extend out slightly farther than the pics shows, but I had not explained what I was after to the photographer (my wife), so she did not adjust it before taking the pics. Boots: Simple riding boots I got off e-bay. My feet are small enough I can usually find women's boots and they tend to run much cheaper than men's. Real leather, Kenneth Cole riding boots for like $60 shipped. Gloves: Black swordsman gloves I picked up years and years ago at a leather clothing store that I never even knew the name of. Pants: I HATE sewing the quilting in leather. So I went the smooth leather pants route and picked up a pair of leather pants from e-bay. They had a broken zipper, but I added a set of snaps and I like the look better. The tunic and below the belt armor hides them on the IK, but they look nice on some of my other costumes that I wear them with.
-
Tunic: For my tunic, I tried very hard to get it as close to Jan's drawings as I could. I did not make it quite the same due to actually finding a piece of motorcycle jacket weight, black leather for a VERY reasonable price (I think it was $160 or so for a FULL hide). It was big enough that I could make the entire front, including the tabbards, from a single piece and the back from two, half size pieces (and I still have quite a bit of the leather left over for other projects ). For the pattern, I used a pirate shirt pattern I had laying around and modified it. I tested the pattern on some linen by making a gambeson for my Witcher 3 costume. It was not as long as the IK tunic and did not have the back zipper, but it is basically the same design, so it made a much cheaper way of testing it. The pattern uses a single piece for the front and another for the back, so the front was easy to make into a solid piece with the zipper in the back. I used the largest size of the pattern and trimmed the sleeves to be more form-fitting. I then quilted the sleeves with 1 inch lines using a cotton linen for the backing and a cotton batting for the "poofiness" of a Vader suit. I also added zippers to the wrists to allow it to have an even more form-fitting look to the arms and fit into the gloves better. Next, I made the front but added enough length to reach to about my knees. This results in what look like will be a dress or something, but works for the length of the tabbards. I then made a "pleat" down the middle of the front and another half way to the underarm seam of each side. This sectioned the front into 4, equal sized sections. The same went for the back except that the center pleat is replaced with a simple cut down the middle (zipper will be added here later). As I had already used this process to make the Witcher shirt, I knew how much to take in for each pleat to make the tunic fit snuggly so it didn't look baggy. I then made the collar by folding a piece of the leather over with some cotton batting inside and quilting it using the same, 1 inch lines. It was measured to come all the way up and completely cover my neck as seen in the comics. After the collar was added, the zipper could be added so that it zips all the way up to the top of the collar. Attach the sleeves and sew up the sides and the main body is done, snug, and has tails hanging to my knees. I put it on and found where the belt would ride, marked that and then hemmed the tails to form the 8 tabbards (shortening the side 4 by a few inches as seen in Jan's drawings). Now I have a full length tunic with Vader style sleeves and collar, the proper 8 panels on the chest and back, and 8 tabbards. Note that, with the leather, I did not have to use any batting or backer material on the chest or back. This lets it breath very well and I did not even sweat much at an outdoor troop at the Zoo when it was mid 70s. Inside showing the sleeve backing and non-backed main body/tabbards: Collar: Tabbard separation and full tunic laid out: Tunic on without the armor:
-
Greetings, all. As I have had several people ask how I finished my IK costume, I thought I would drop a thread where I would try to explain the various steps I took to finally get mine done. Easier to drop this in here than retype it several times...and hopefully it will help some folks out with their builds. I am HORRIBLE at WIP threads as I tend to get to working and forget to stop and take pics. So this one is kind of an after action review of my build. Again...hope it helps. Armor: As I don't have access to a place and materials to do my own casting of armor, I just bought a set from a guy advertising on the Rebel Legion forums (I hate to admit this, but I can't remember his name since I bought the armor a few years ago...but he has a TK ID number as his RL screen name...perhaps someone can add that later so he gets credit). I wound up ordering the "medium" size as the normal one I had bought previously had swallowed me. I also got the "female" size forearms and hand plates as they fit me much better. The back plate was a simple, plain plate with no details. So, trying to better match the drawings by Jan, I modified mine with a heat gun and various tools to get some detail. It is still not perfect, but it does at least show some of the details from the drawing (I know it is covered, but I liked the details, so I added them ). Unlike most others I have seen, I permanently attached my chest and back plate together at the shoulders. The plastic has enough "flex" to allow me to open it up and slip it over my head and shoulders. The sides are connected with velcro for a fairly smooth joint that is relatively easy to put on (with help). All the various parts like shoulders and other plates are held on with velcro strips for ease of adjusting. The ab and below the belt plate are on a strip of black leather attached to the chest with velcro. The cape cap plate is actually laced onto the back plate with some leather stitching thread and the cape is velcroed to the back of it. The hand plates are held on with velcro and the forearms are held on with strips of 3mm sintra with, you guessed it, velcro to hold the ends inside.
-
Telesis is the company that makes several products, including Super solv. Their adhesive is called Beta Bond. It works great...just don't order it during any months the shipment would have to pass through a cold region. Most places that sell it have a warning about this, but some do not. If it gets too cold, the entire bottle will turn into a solid, rubbery foam and become unusable. Found this out from a freak cold snap a few years ago and mine traveled through some sub-freezing weather on the way to me
-
Anyone happen to have the link to that huge thread on IKs from when this was all being discussed? If I remember, it was fairly massive and may help answer some of Yankee71's questions without derailing a thread on finalizing the CRLs after they have been accepted. It's been far too long for my old mind to remember where it was even at
-
Thanks for the link for the Super Solv gel. I love Super Solv, but it was always messy (even after putting it in a spray bottle that does a mist rather than a stream). Gonna have to grab a bottle and try it out next time I wear the Odin.
-
I used all the pics Thomas posted above when working on mine. I hope they are left in as having diagrams from the creator herself is nice . There is also a great diagram of the belt with measurements done by Thomas and another person whose name I can't remember that was a great help to me. If that could be added to show the belt design, that could be a big help in explaining the belt. The RL CRL still says the pants have to be quilted like the sleeves. But, after chatting with Thomas and showing images of plain leather pants on several of the IKs, mine was allowed with the plain pants. So I believe both should be an option.
-
I have some stuff at home that I have used to remove makeup and appliance adhesives (prosaide and beta bond) from my face/body. I used it once to remove makeup from a costume...but it was not such a drastic color difference like you have (it was a blue-black mix from a light brown shirt). It worked fine on that, but not sure it would help getting a blue out of white. It is called super solv by Telesis ( http://www.fxwarehouse.info/product/21055.html ). It is really for removing adhesives, but it is fantastic at removing makeup. Does not burn my skin (they also have one for sensitive skin, but I have never had a need to try it) and leaves a slightly "oily" feel after you use it. The pump spray they send with the smaller bottles is not very good, though. It sprays in a stream. I usually buy the refill bottle and use a cheap spray bottle from wal-mart so it mists out. Makeup just sort of dissolves on contact...so be ready with a towel. Wash with soap after using and you are clean and makeup free in no time
-
As membership officer for The Dark Empire, I can definitely confirm Thomas' comments. In my area (Kansas/Missouri), all the major Star Wars groups get along great and we always troop together.
-
501st/SLD and/or TFE Detachment Access Requests
Allfather replied to DarthBrute's topic in Welcome Area and Forum Help
Requesting 501st and Detatchment access. TR-33313. Thanks http://501st.com/members/displaymemberdetails.php?userID=23627
