
-
Announcement
Welcome to the forums!
If you are a newly-approved member, make sure you check out the New Member Checklist!
If you are a Detachment member and can't see the member-only area, post here for access.
-DV
NightSister
-
Posts
32 -
Joined
-
Last visited
-
Days Won
2
Content Type
Profiles
Forums
Gallery
Events
Everything posted by NightSister
-
You look amazing, both in the costume and with the makeup. Can't wait to see you with both together!!! Personally I don't spend that much time trying to cover the eyebrows. I just put a bit of glue on them to flatten them/protect them, and then they're painted over along with the rest of my face.
-
Awesome!!! Looking forward to seeing your Ventress! Don't hesitate if you have any question, we'll do our best to help! I made a Clone Wars Ventress myself
-
Hello! It's so cool to see new Ventress cosplayers!!! I am not a judge, so any advice I give is just my personal opinion. I think your wraps look nice though the purple is maybe too pale? ? I would dye them a little more so the purple color is more visible and contrats a little more with the white color :) For the blue top, that's an interesting choice of fabric. I went with lycra myself and I think most Asajj Ventress I've seen used lycra or something similar? But maybe this works too, I don't know! I think it would be a great fabric for the skirt though :) Good luck on the costume, I hope you'll get approved!
-
I use alcohol-based body paint, a mix of white and grey. It's pricey but it stays put, I've been to 2-days cons with it (sleeping with the paint on, and I was good to go the next day). I have a friend who uses a much cheaper option though, the water-based paint from Majama (color grey 022). Water-based paint stays nicely put on the face, but if the fabric rubs against your skin it will go away faster than alcohol paint (from my experience). So if you plan on putting the mask on your lower face on and off often, be careful about not removing too much paint in the process~
-
Like this: I can move a bit the belts when they're unattached. Once they're attached around my waist though they stay nicely in place. I'm afraid he doesn't take commissions! :/ i've never seen him take any commission, or doing twice the same item. He made my lightsaber hilts because he wanted to make lightsabers hilts and I bumped into him on a forum at the right moment it seems. He did them for free (even though I tried to pay him ^^), and the belt buckle along with them because he's that nice I could always ask him whether he wants to make another one but I make no promises! I think he likes to work on his own projects.
-
I've never tried to print directly from Illustrator or Photoshop actually so I don't know. But since it a pdf file there should be other, simpler softwares you can use to open the file and print it, like Preview or Acrobat Reader or something~ Tell me if your problem persists. I could also send it to you in .jpg file if that's more convenient? For the belt buckle you should check the other Ventress topics. Mine was 3D-printed, but other cosplayers have tried different things.
-
1. I don't know... the CRL says golden fabric painted with red, and some gold can be seen through the red on withered areas, so I don't know if the opposite would be ok. You could ask the higher ups. Is there any strong reason why you'd prefer to do it gold on red instead of red on gold? The amount of work to do would be pretty similar in both cases... 2. Sure attaching the tabard to the belt seems equally good than attaching it to the skirt. I found that it was easier to sew it on the skirt, but you could probably attach it with glue or something to the belt, and no one would see a difference anyway ^^ 3. There isn't really a fixed diameter, as it would depend on your own size too. If you're tall and large, you might want a bigger buckle than if you're small and thin. Try it on yourself with pieces of paper of something, and take what looks best My buckle was 3D-printed by a friend, and I think other people used foam or other materials (check the other topics here, I think people were talking about it but I don't remember the details). The design on the buckle doesn't represent anything, it's just a weird shape — just try to reproduce it at best from the image in the CRL The rectangle is recessed, and the triangle within is raised (embossed? not sure of the correct english word). Good luck with your costume, and don't hesitate if you have more questions!!!!
-
Awesome, good luck! Don't hesitate if you have any question!!
-
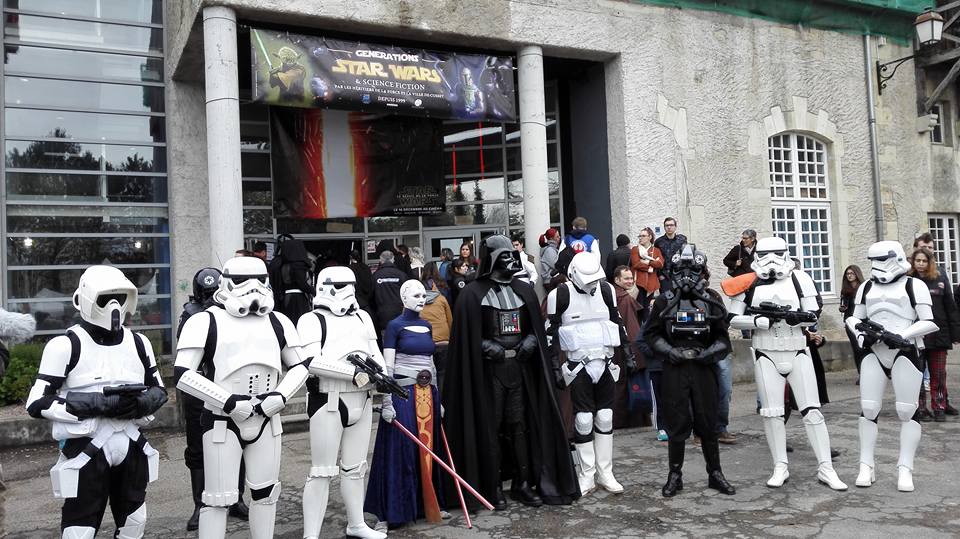
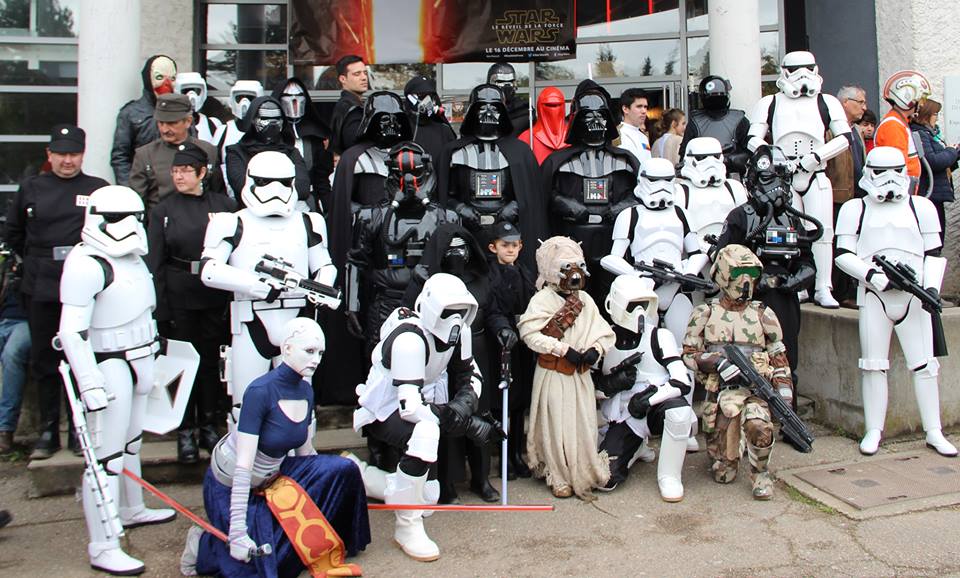
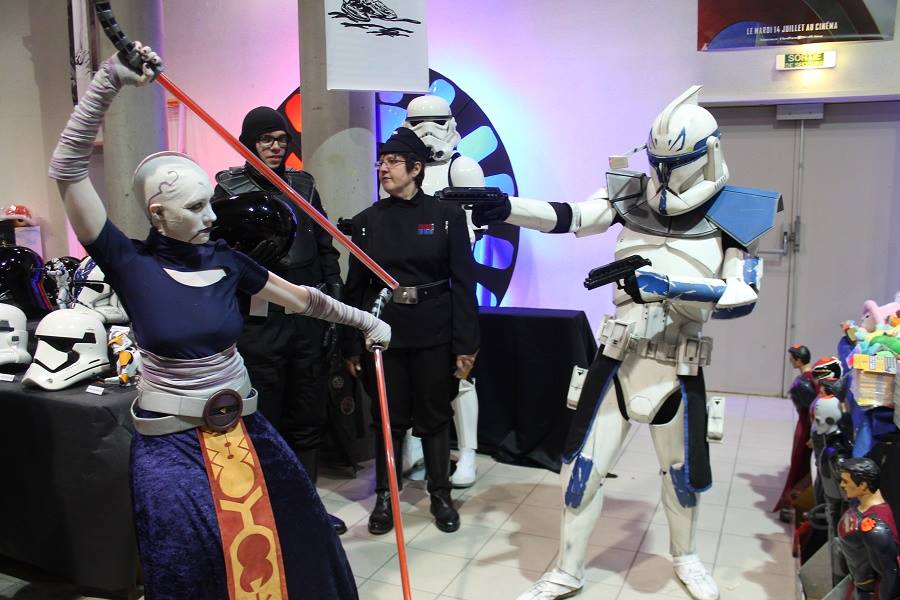
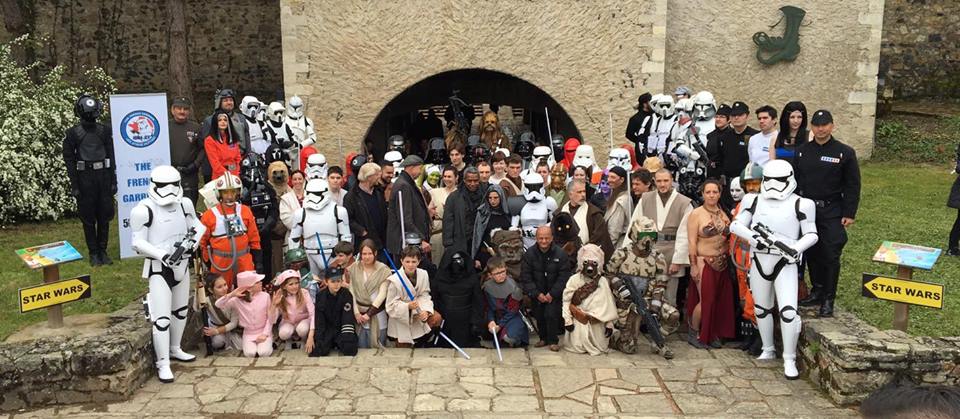
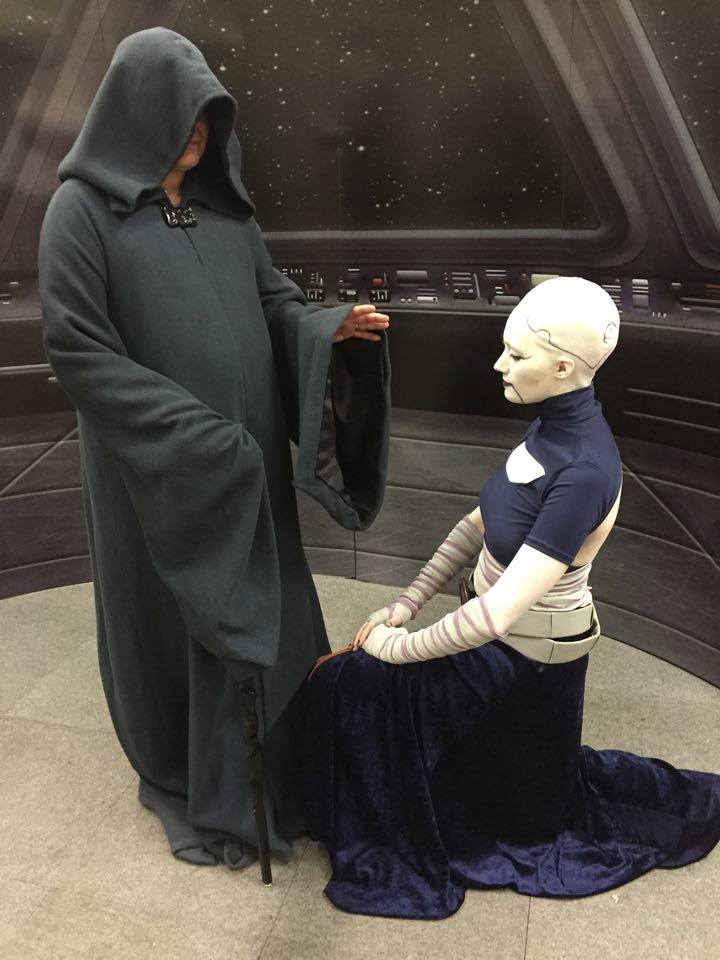
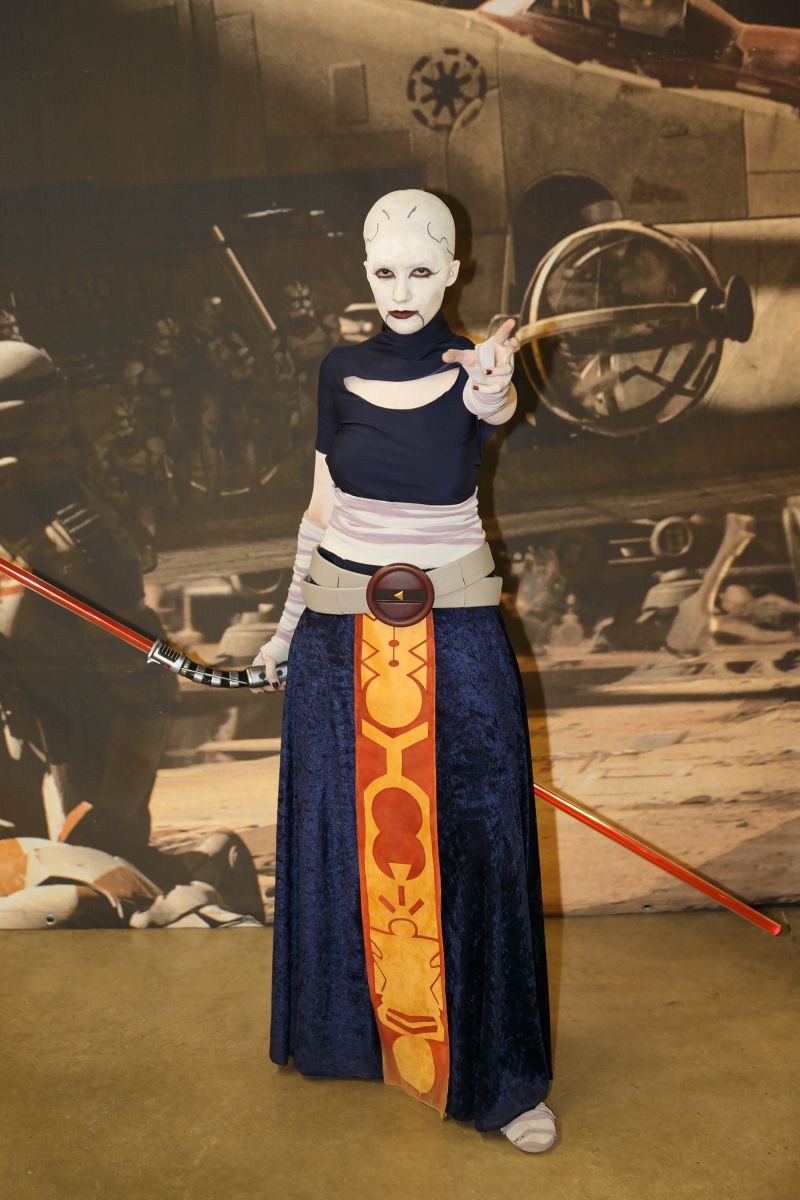
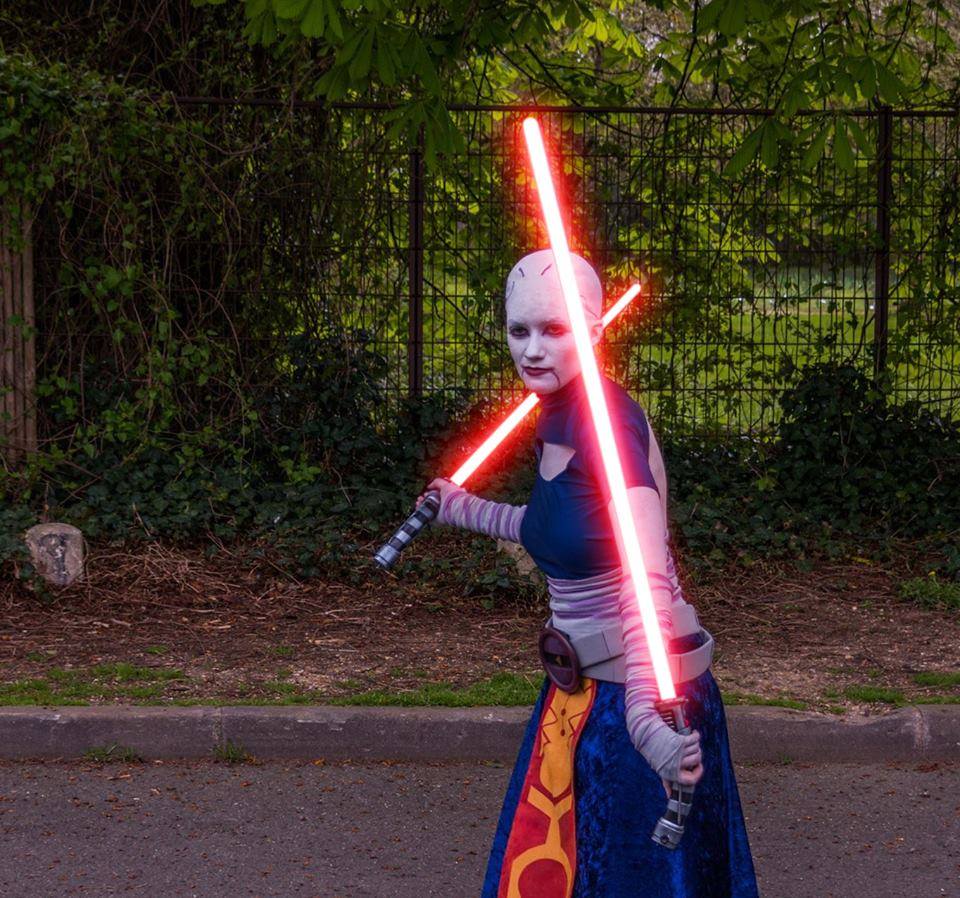
Asajj Ventress - PCE and Cusset 2016
Images added to a gallery album owned by NightSister in Troop Photos
Photos of me and the French Garrison at Paris Comics Expo and Generations Star Wars at Cusset (2016)!! -
-
From the album: Asajj Ventress - PCE and Cusset 2016
Generation Star Wars - Cusset 2016 -
From the album: Asajj Ventress - PCE and Cusset 2016
Generation Star Wars - Cusset 2016 -
From the album: Asajj Ventress - PCE and Cusset 2016
Generation Star Wars - Cusset 2016 -
From the album: Asajj Ventress - PCE and Cusset 2016
Generation Star Wars - Cusset 2016 -
From the album: Asajj Ventress - PCE and Cusset 2016
Paris Comics Expo 2016 -
From the album: Asajj Ventress - PCE and Cusset 2016
Paris Comics Expo 2016 -

From the album: Asajj Ventress - PCE and Cusset 2016
Paris Comics Expo 2016 -

From the album: Asajj Ventress - PCE and Cusset 2016
Paris Comics Expo 2016 -

From the album: Asajj Ventress - PCE and Cusset 2016
Paris Comics Expo 2016 -
From the album: Asajj Ventress - PCE and Cusset 2016
Paris Comics Expo 2016 -

From the album: Asajj Ventress - PCE and Cusset 2016
Paris Comics Expo 2016 -
Thank you!!!! Glad you like it! I hope I will meet a Dooku cosplayer someday. To pledge my allegiance to him. (And then steal all his cookies and flee )
-
501st/SLD and/or TFE Detachment Access Requests
NightSister replied to DarthBrute's topic in Welcome Area and Forum Help
Hello!! =) I'm DS 36629 from the French Garrison! Here is my 501st profile: http://www.501st.com/members/displaymember.php?userID=19844&costumeID=109 Requesting Detachment Access!! Thank youu! -
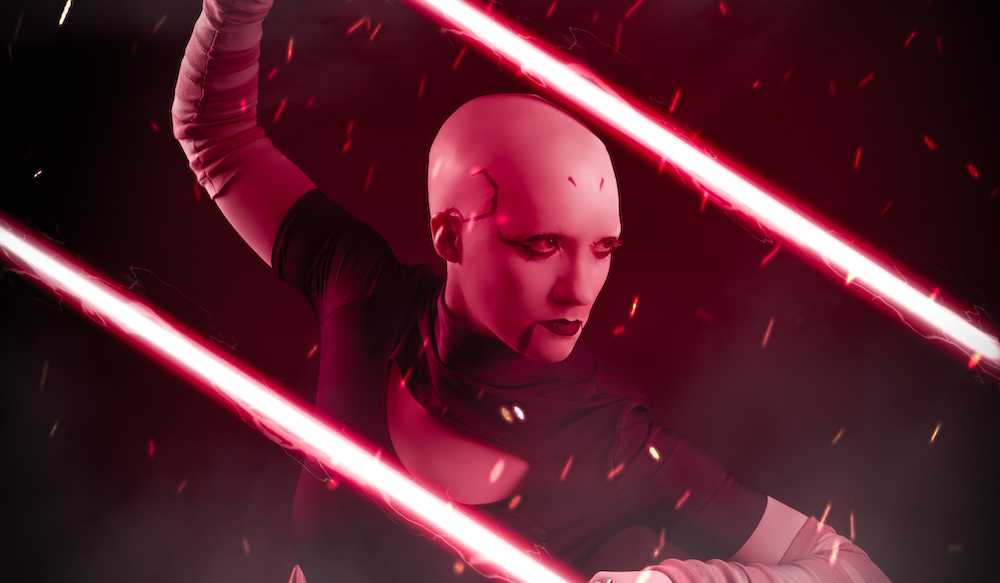
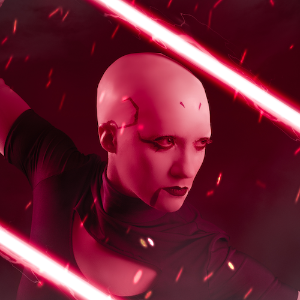
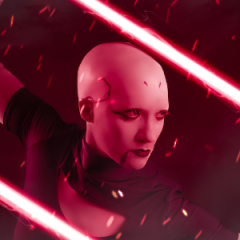
Hi everyone! It's been a while since I last posted. But since my Ventress costume is now finished and has been approved by the 501st (yaaaay!!! \o/), I thought I'd make a tutorial, describing very precisely how I made my costume. I hope it will help!! I was a total beginner in both sewing and make-up when I started, so this is kind of a guide for people who have no clue where to start, like I was ^^ 1. Head and body What you'll need: HEAD: - latex bald caps. Since I wanted to wear my costume several times, and each cap can only be used once, I bought Charlie Short's pack of 8 caps. Cheapest option, very good quality, I'm super happy with their look! - Pros-Aide (sort of glue for the edges of your cap) - Pros-Aide remover - liquid latex (to make the edges of the cap "invisible", as if it's the continuity of your skin) - a sponge to apply the latex. NB: It will be ruined, don't use your favorite one. - flat barrettes (hair clasps). Be careful if you use hairpins, their pointy end can stick out, look ugly, and threaten to pierce your cap. - a glue stick. Putting a layer or two of that on your eyebrows will protect them from being ripped off when you remove the latex. BODY PAINT: - grey and white body paint (to mix it until you have the exact color you want). I've use alcohol-based paint because it stays put, much more than water-based paint. It's more expensive though so it's up to you. I've bought the Reel Creation liquid paint, but that's because I went to the US - it's way too expensive to ship it to Europe, so if you're in Europe, you'll have to find another brand. Anyway, this paint worked perfectly on the bald cap (no need to mix it with latex or whatever). I'm not sure if water-based paint would work on the bald cap. - paint remover if you buy alcohol-based paint. Water-based paint can be wash away with just water and soap. - airbrush or sponge to apply the paint. MAKE-UP: - lipstick (dark mulberry or maroon) - nail paint (dark lavender or gray) - eyeliner - mascara - white eyeshadow - black eyeshadow - midnight blue or purple eyeshadow creme stick or pencil - small brush - maybe grey eyeshadow if you want to try to do contouring with it... I'm just too bad at this so I don't it haha. - invisible powder to fix the make-up - a puff to apply the powder - pencil sharpener (for make-up pencils... I told you I was doing a beginner's guide! I didn't even know this kind of stuff existed lol) AND ALSO: - a friend (or family member, or lover, or just a plain slave ) to help you. Cause you can't do the back alone. WHAT TO DO WITH ALL THAT: Before the big day: - try to put a bald cap on for training. Then ask someone to draw the tattoos on it. Then remove the cap. You can redraw the tattoos a bit until you think they are perfect. Then cut this cap along the tattoos. You will use it the next time as a stencil - hence saving time, and making sure the tattoos will look perfect - I strongly recommend to paint your cap in greyish white BEFORE the day of the convention. To save time. - Also if you can paint your nails the day before, you gain time. Since it takes me about 6 hours to put the whole costume on, anything you can do in advance, do it! On the big day: - First thing I do the day of the convention is to put on my top, because the turtleneck is extremely tight and I would ruin the bald cap if I tried to put it on while wearing the bald cap. - Then I attach my hair with barrettes. Even if you have long hair it can work, ask youtube for tutos - put glue on your eyebrows - put on the bald cap like in this video Though Charlie manages to do it alone, you WILL need someone to cut the edges, around the ears, and to glue the cap on the back of your neck. - once you've made the edges of the cap disappear thanks to the liquid latex, paint your face in grey-white. - put on mascara and eyeliner - draw the tattoos around your eyes and below your mouth with a midnight blue or purple eyeshadow stick or pencil. - with the small brush, add a layer of black eyeshadow on top of it. (Well I needed that step because my pencil was in a too light purple, but if you have the exact right color you can skip this step. Though if you used a pencil, putting powder on top of it will help fix it and look nice I think... I'm not an expert haha) - with a puff, add white eyeshadow on your tattoos. That will make look like real tattoos, like they're underneath the skin - same procedure for the tattoos on the back of your head, except you'll need someone to do it for you. Make sure to give them a stencil (cut from another bald cap), they'll be more comfortable and will be able to do it fast. - you can add a layer of white eyeshadow all over your face to make it more uniform (in case the paint wasn't too uniform) - do some contouring with grey eyeshadow if you want - put on the lipstick. You now look like Ventress!! Notes: The airbrush: I bought one, it was super expensive, and I wasn't happy with it A really simple reason (maybe easily avoidable?): the diameter of the needle wasn't large enough ("0.5mm", it's the largest I could find in a local store). As a result, it takes me HOURS to paint small portions of my body. Like, 2 hours for the cap, 2 hours for the back, and then you still have you face and arms and part of your chest to paint... way too long! So if you buy an airbrush, make sure the needle is large!!! Also, my airbrush stopped working in the middle of my painting the day Star Wars VII was released... that was not fun I lost a good hour trying to fix it. It was in fact just a screw that was too tightly screwed... But I've met lots of cosplayers who told me they painted their whole body in just one hour with just a sponge. Geez. I'm gonna try the sponge next time lol. 2. The top What you'll need: - midnight blue fabric (I used lycra) - a turtleneck that fits you and that you don't care too much for. - dark blue thread (seems obvious but I ALWAYS forget to buy the thread) - a sewing machine (yeah, it really helps lol) What to do: I honestly didn't even try to draw the pattern of the shirt myself. I have absolutely no clue how to do that. So I just cut my turtleneck along the seams, and used that as a pattern Basically, just put the pieces of your shirt on the lycra, add 1-2 cm all around, and cut. You have your pieces! The only thing to change is the length of the sleeves, you want short sleeves (and the turtleneck you just cut up was probably long sleeve because it's hard to find a short sleeve turtleneck). With a sewing machine, sew the pieces together. The turtleneck and sleeves can be a bit tricky to sew but really it's not that hard. Then cut a hole on the front and on the back of your shirt. Don't make the holes too big, because if you made the shirt really tight, the holes will expand... if you see what I mean :/ They'll be bigger than what you cut due to the tension of the fabric. Note: To sew the lycra, stretch it to the maximum. If you don't, the sewing won't work (try it, you'll see). I've read on the internet that there are special needles to sew the lycra... don't bother. Just stretch it and it works! You can sew in small zigzags to make the seams stronger. 3. The skirt & tabard What you'll need: - midnight blue crushed velvet fabric, or something that looks similar. - dark blue thread - golden tan suede - yellow thread (or red... you'll paint on it anyway) - dark mulberry or burgundy paint (I mixed two kind of red paint to get the perfect color). There are paints specially made to use on fabric. - new, sharp brushes, with short stiff hair. I used a flat brush (to make straight lines) and a pointy one (for the details). What to do: For the skirt, cut 4 trapezoids and sew them together... I'm sure you'll figure it out ^^ Don't forget that the skirt opens in the front, with the right side overlapping the left. For the tabard, print the pattern (I've put a pdf of it in my second post), cut it and use it as stencil to draw the pattern on the yellow fabric (I drew it with a pencil, it was visible enough for me to see, and invisible enough to not be apparent at all once painted). Paint. If you used a paint that goes on fabric, you should be able to fix the paint with an iron, so that it stays put even if you want to wash your tabard later on. (I haven't tried to wash my tabard yet though, I hope it DOES stay put haha). Then sew the tabard to the skirt. 4. The wraps What you'll need: - white elastic adhesive wraps. A LOT of them. 2 meters/arm, at least 4m for the waist I think (don't remember that one sorry), and at least 6m/leg... so something like 26m minimum haha. - white and black paint (to make a very light grey). I used fabric paint (but maybe it works with normal paint I don't know). - lilacs paint. I mixed it with grey to get the perfect color (you don't want it to be too pink). - white fingerless long gloves - white thighs or leggings (well in theory any color is ok) - for the shoes, I used white dancer's shoes. What to do: - your wraps must be cleanly cut and not fraying. If you could only find fraying ones (like I did, at Decathlon), you "simply" need to fold one edge of all the bands. Since it's adhesive it's easy. But that's like the most tedious thing to do of the whole cosplay, so if you can find cleanly cut wraps, buy them!!! XD - paint your wraps in very light grey - paint one edge in lilacs. - put on the finger less long gloves, and ask someone to put the adhesive wraps nicely around it. You can now remove and put back your gloves at will, the bands will stay in place - put on your top, and ask someone to put the adhesive bands around your waist. You will then notice that it's impossible to remove the top with the bandages on, it's just too tight. So you have two solutions: either you remove the wraps before removing the top, and you put them back everytime to wear the cosplay. Or you cleanly cut the wraps on the back (which will make it possible for you to remove the top), and sew a scratch there to close it at will. - put on your thighs (or leggings), and ask someone to put the adhesive wraps nicely on your legs. DO NOT TRY TO REMOVE THE THIGHS WITH THE WRAPS ON!!! That was the biggest mistake I made, I ruined my wraps and lost so much time... Basically, if you remove your thighs, they will lose their tension and their shape, and retract. The wraps will then fold everywhere and since they're adhesive it will be impossible to unfold them... if you see what I mean. So, when you want to remove your costume, remove the wraps on your legs - detach the from your thighs and roll them. Unlike with the gloves (where the wraps stay on nicely), you'll have to put the wraps around your legs every time. Eventually they might lose their stickiness after you've worn them several times, and you might need to make new ones... but that's better than ruining them if you let them on the thighs, or else you'll have to redo them every f*cking time. - for your feet, cover your shoes with bits of bandages in advance. Then when you put your costume on, and put the wraps down your legs, cover also the beginning of your feet so that we don't see the separation between your leg and the shoe. Notes: Be careful that the blue fabric of the skirt may rub off on your leg wrappings, and get them all blue and dirty. Put a layer between the velvet of the skirt and your wraps so that this doesn't happen!! (something white or a fabric that won't rub off) 5. The belt What you'll need: - two black belts, about 5 cm wide (or just bands, you don't need the buckle) - light grey simili leather - glue - push buttons, and the tools to attach them: What to do: - Cut the buckles. You don't want it, it's too big. - Put pressure button instead. It's flat and nice! - Cut rectangles of grey simili leather, so that you can cover your entire belt with 8 rectangles. Glue 7 of them. The 8th piece, you'll attach with more pressure buttons, hidden in the interior of your belt. That way, you can put on and remove your belts easily, and the buttons are completely invisible!! - Result: 6. Belt buckle and lightsabers I was extremely lucky, someone 3D-printed the belt buckle and the hilts of the lightsabers for me. If you don't have a 3D-printer, check tutorial by other cosplayers for the belt buckle. For the sabers, you can maybe find them for extremely high prices on ebay (like 1200€ haha)... or else there is the Ultrasaber's Dark Mantis which looks a bit alike (curved hilts). Good luck with that!!! My friend also 3D-printed something to attach the sabers to the belts, but they broke very quickly since they weren't solid enough (plastic) compared to the weigh of the sabers. ___________ I think that's all!!!! Don't hesitate if you have questions. And if you have any tips, any suggestion to improve my tuto, please share your ideas!! Here is the result:
-
Yep thanks, I had forgotten somehow but I'll make them again and better Also my wraps were white instead of light grey, and I think the lilac should be less bright. But at least I know this way with wraps on a glove works very well!! I was wondering, did some of you managed to attach the hilts of the lightsabers to your belt without any visible support? I've discussed this with other people. We've thought of magnets (one put on the hole where you normally put the blade, the other sewed to the belt), but it's probably not enough when you walk, the magnet on the hilt moves turns, and would probably lose adherence with the one on the belt, and the saber would fall. Elastics sewed to the belt and going around the hilt would be too visible. The last idea was this one (it can be built with a 3D printer): What do you think? Do you have any other idea? My saber looks like that to give you an idea, and weighs about 250g:
-
Thanks for the advice kathgruben!! I've already bought some fabric for the top (someone recommended me lycra), even though I haven't found anything I liked for the skirt yet. Once I find the skirt, I'll see which one works better for the top between the lycra and the back of the skirt fabric I have some pictures to share!!! For the forearms I bought some wraps in a sport shop, and painted them with lilac paint. Then I put them on a long white fingerless gloves (the wraps are sticky), and here is the result: I can put and remove the wraps easily so it's nice: What do you think? Does this look good enough for 501st approval?
