-
Announcement
Welcome to the forums!
If you are a newly-approved member, make sure you check out the New Member Checklist!
If you are a Detachment member and can't see the member-only area, post here for access.
-DV

ghostred7
-
Posts
259 -
Joined
-
Last visited
-
Days Won
2
Content Type
Profiles
Forums
Gallery
Events
Everything posted by ghostred7
-
Thanks! I should of waited for Gothiclysm to get home, but I was so geeked about getting them done, i got impatient...so some things aren't wearing perfectly...but all-in-all, considering I didn't have anyone w/ me...i'm happy with the results. Basically was 3point lighting: 2 lights on the backdrop and 1 on me (total of 1500watts)....that in a 11' x 14' bedroom = baking...i felt like a Thanksgiving turkey
-
Much appreciated and will do!!
-
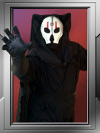
Welp I took the plunge and submitted for approval. Here are the pix:
-
Here are more from my camera....I've been hesitant in sharing these b/c either the camera was acting up or my cowl was (these were before the "pinning"). Naturally, because my camera decided to be a pain and breakdown before I got into costume on Saturday...i have no pix of when the cowl was cooperating (have since D*C started revising). Ugh...broken lens w/ no focus...i liked my stance though. Mythbusters build team I know you were paying attention to the background. Some of us "Jawja" folks Any my two faves so far off my cam and Sith the Vote 2008!!!
-
Here are the latest pics....sorry...no fans & outlets walking around D*C. Included is a better shot of how the arms were done. I didn't get any pics of me on Saturday (my better looking day) after I did some on the spot fixes w/ D's help (w00t @ D ) and the cowl part of the cape draped a lot better.
-
That's so friggin' awesome!!! Fantastic work as always....like the rest of the D*Cers, i can't wait to see this in person. Namaste
-
Funny you should say that....when I do my next photo session (and have someone other than a timer & tripod to take my pic), i'm putting a fan on the floor while i'll be doing my greenscreen pix (which this was, but i'm missing my bulbs for my other 1000watts of lights)
-
Here's the first pic of the nearly completed one....img quality is still horrid, but is what I had. Note: waiting on the gloves to come in...i had to do some photoshopping on my hands
-
Here's some pics of me in the unfinished tunics (distressing still needs to be done) + "under skirt" Disclaimer: These were taken with a cellphone, so they aren't that great of quality. I'm hoping to get more done tonight or over the weekend.
-
You should be able to get the kits from other sources, i.e. customsabershop.com.
-
Looks great! We did a stencil around the same size for my gf's Visas, but we only did one wheel instead of several (may have to switch to several, looks less time consuming). Glad to see this stencil working. Great job!
-
I digress....it's your "Radio Shack" ;-P get it & play with it....it's pretty good to mix with paper clips to make little figures...i'm going to be doing some stop-motion animation with a "Friendly Plastic" tutorial I found.
-
Yup! And hopefully me & my digital SLR will be one of them If i'm there, i certainly want some full rez photos of it.
-
Sounds like Maplins is your "Wal-Mart"
-
Thanks I appreciate it! For heavier fabrics (heavy cotton, broadcloth, etc), the cheese grater works like a champ. I just wet the material and went nuts on my cooler, grinding away. For the silk, i'll probably use a combination of a 1" wire brush and 60 grit sandpaper. It does have a different name in the UK - Polymorph and ShapeLock. When googling, I saw it being sold in a "local branch of Maplins." http://www.maplin.co.uk/Module.aspx?Mod ... =2&doy=8m1 I got mine at http://www.jewelrysupply.com (1.5" x 7" strips) and http://www.cosplaysupplies.com (beads like Polymorph/ShapeLock). There's a Wonderflex + Friendly Plastic tutorial on cosplaysupplies.com, i think it's called "Wonderflex and Friendly Plastic FAQ" or similar. I still have to figure out how to do some smoothing. It does have its drawbacks, but overall good to work with (based on what my gf has said). EDIT: After initial melting in the boiling water, having a heat gun handy works great. The one i have goes from 100F to 1100F.
-
Thomas - much kudos....it looks fantastic!
-
Here's some pics of the distressing to the inner skirt i did. This was performed with a cheese grater, then washed twice & dried once. Sorry if the images are too big. These are up in my gallery along with the mask @ http://www.madhorizons.com/costuming/in ... &Itemid=27
-
Thx. I'm getting the rest of the fabric (silk noil) by 8/15 (it's ordered, just gotta get here). I found a decent way to add distress to the material by using a cheese grater. I'm about to put what i have so far in the dryer and then i'll post that later. The gauntlet gloves only cost $40 after shipping (3day select @ UPS), so even if i *do* have to dye them, then no worries. Now all i gotta do is figure out what to do for the ribbed sleeves. I have a really ugly turtleneck shirt that has sleeves like that (only brown) and not sure even if after dyed if it'll look right. Items left: Mask repaint (to de-whiten it some) Finish tunics/skrits Finish hood/cape aka...pretty much everything is left I have mask & inner skirt done.
-
Ordered these gloves. I will need to dye them, but i like the way the look otherwise. They're deerskin too, so nothing terribly hot (as far as leather goes).
-
Oh...forgot to mention...i uploaded these to my site as well: http://www.madhorizons.com/costuming (graphics are being re-done as well).
-
Thanks for the replies all, much appreciated. New pics: Once again, feedback welcomed.
-
I've put a gallery online of all the costuming stuff we (me & my gf) are doing. Ignore the graphics, i stole them from my main site. They'll be updated later. Core page - http://www.madhorizons.com/costuming Gallery - http://www.madhorizons.com/costuming/in ... &Itemid=27 Thx...and keep the feedback comin'
-
Thanks, I appreciate it! I'm glad I was still able to maintain the skullness of it. We're going to paint it and move into phase 2....in order: 1. paint 2. add red over eyes 3. add ornamentation I will post pics when we get that far. Actually, i'll post pics after it's painted for pre-post paint difference. Keep the input/advise/suggestions comin'
-
We took the FP pellets and smoothed it out some (aka...as best we could). After we paint it, some of the blemishes and blue will go away. The clear parts (the stuff that looks like there's a bubble in it), is the clear FP that we "filled" in some of the relief with. I took Pam's & Carolyn's advice, went in the middle, and am happy with the final results. I know this thing won't be perfectly smooth. Below are the pics from the "2d run" (post-filling). Also bear in mind that part of this won't be seen b/c it's under the hood. Feedback/Thoughts?
-
I **do** find those areas curious indeed. I may fill/sand, still TBD. Debating on using the Friendly Plastic or sand/fill. If the texture map you pulled is accurate (you gotta tell me how you do that...i need to pull some out for a separate project), then up close, it looks like there's lots of unevenness as well as possible cracks. Curious indeed.