-
Announcement
Welcome to the forums!
If you are a newly-approved member, make sure you check out the New Member Checklist!
If you are a Detachment member and can't see the member-only area, post here for access.
-DV

Tlana
-
Posts
53 -
Joined
-
Last visited
-
Days Won
12
Content Type
Profiles
Forums
Gallery
Events
Everything posted by Tlana
-
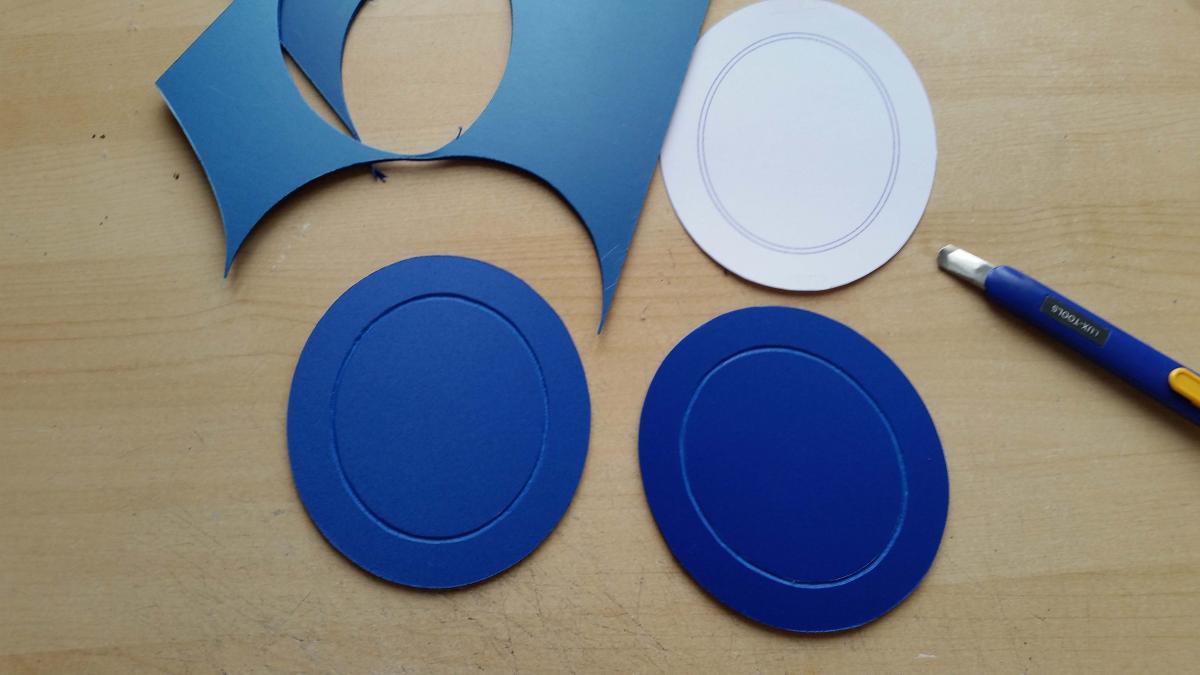
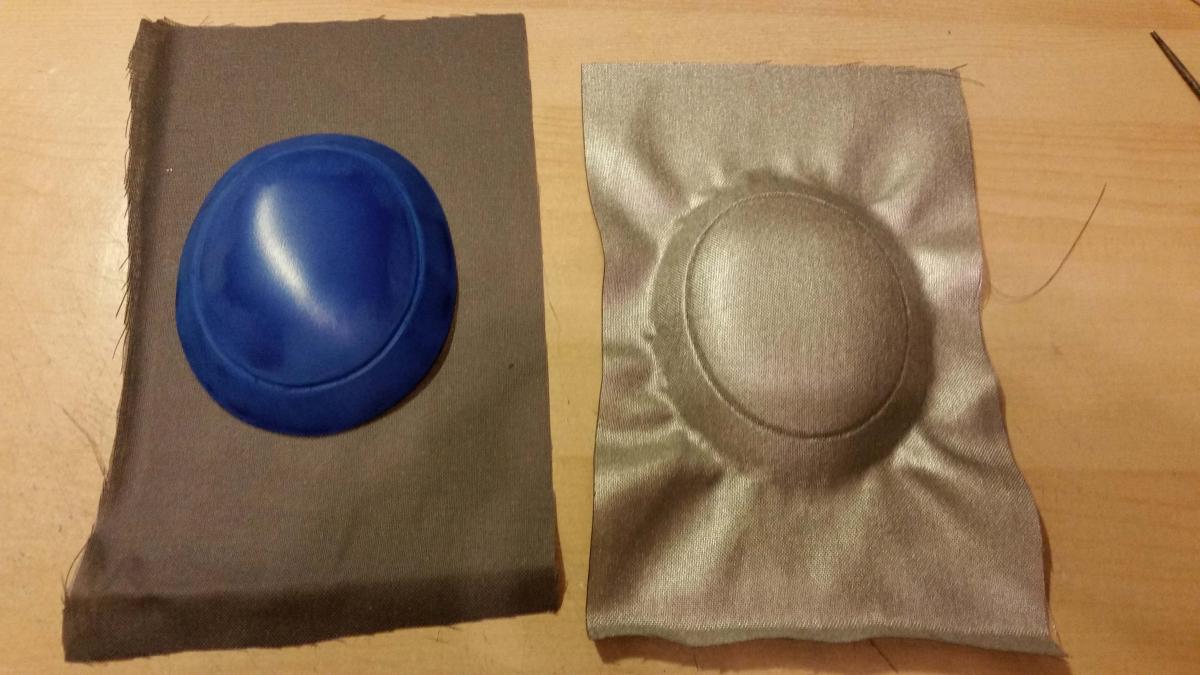
The ear parts are made of 3 mm PVC sheet. I used a hot gun to get them in shape. Silver fabric covers them.


-
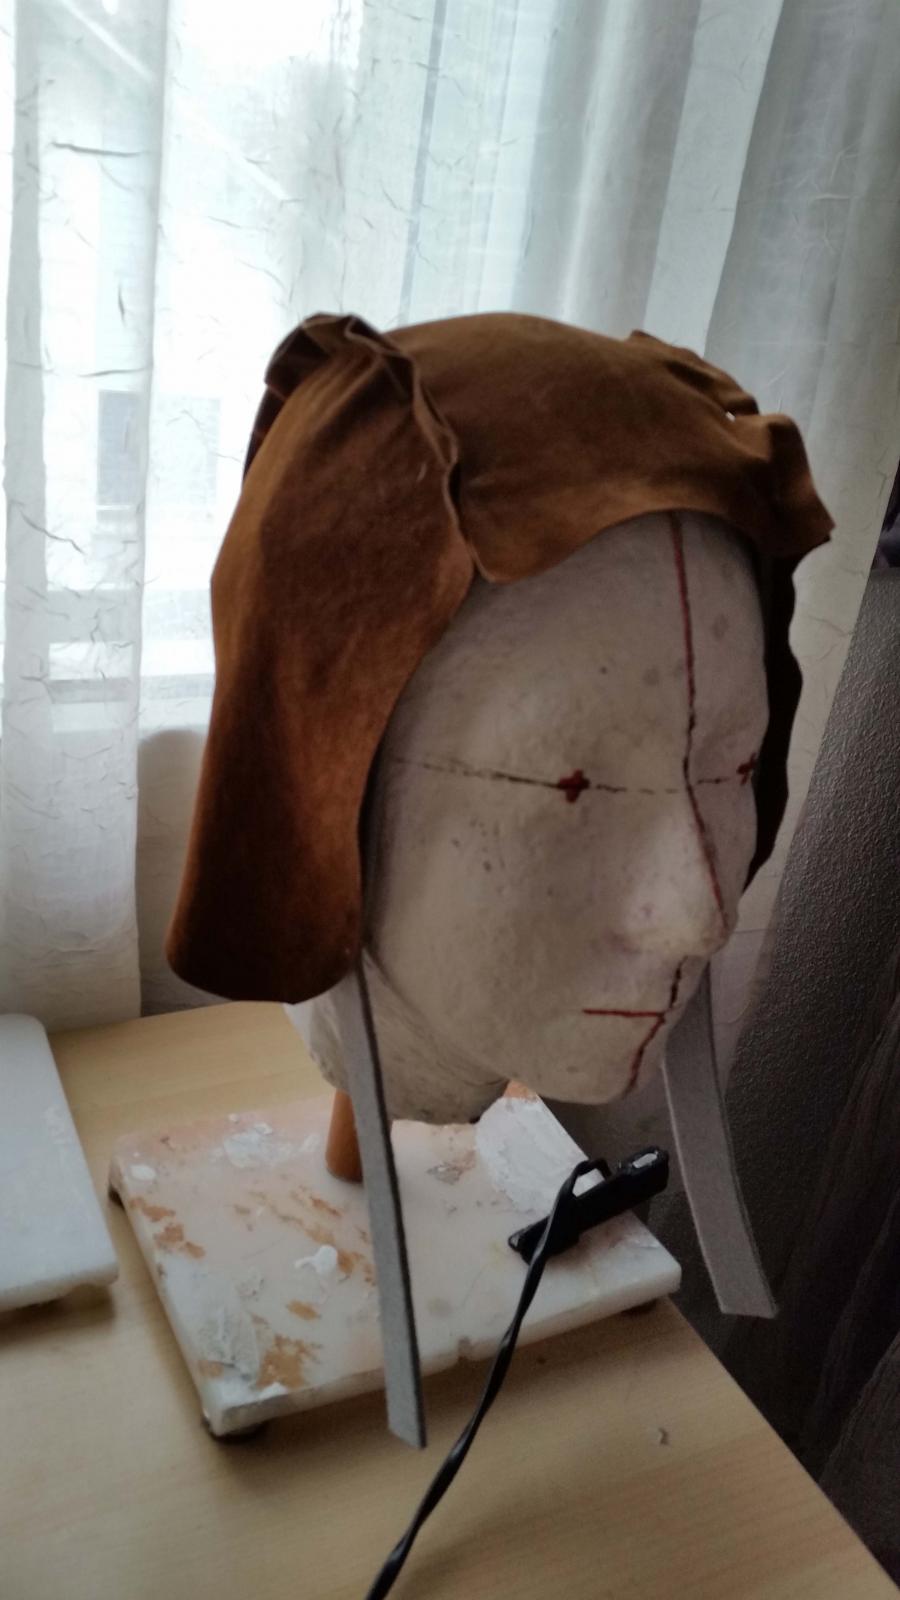
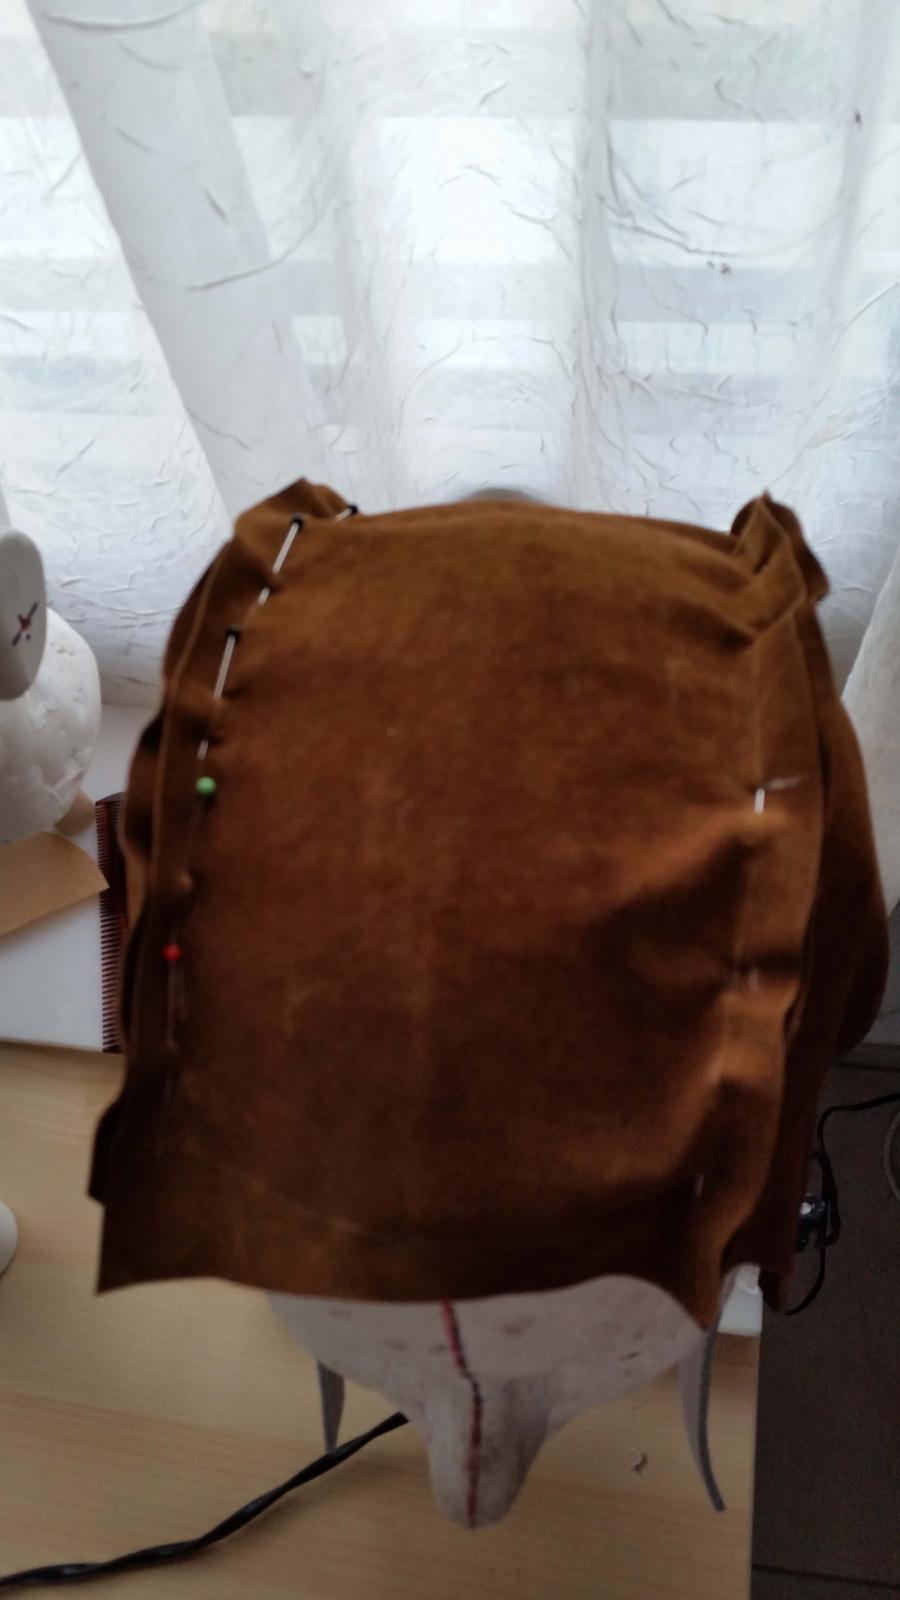
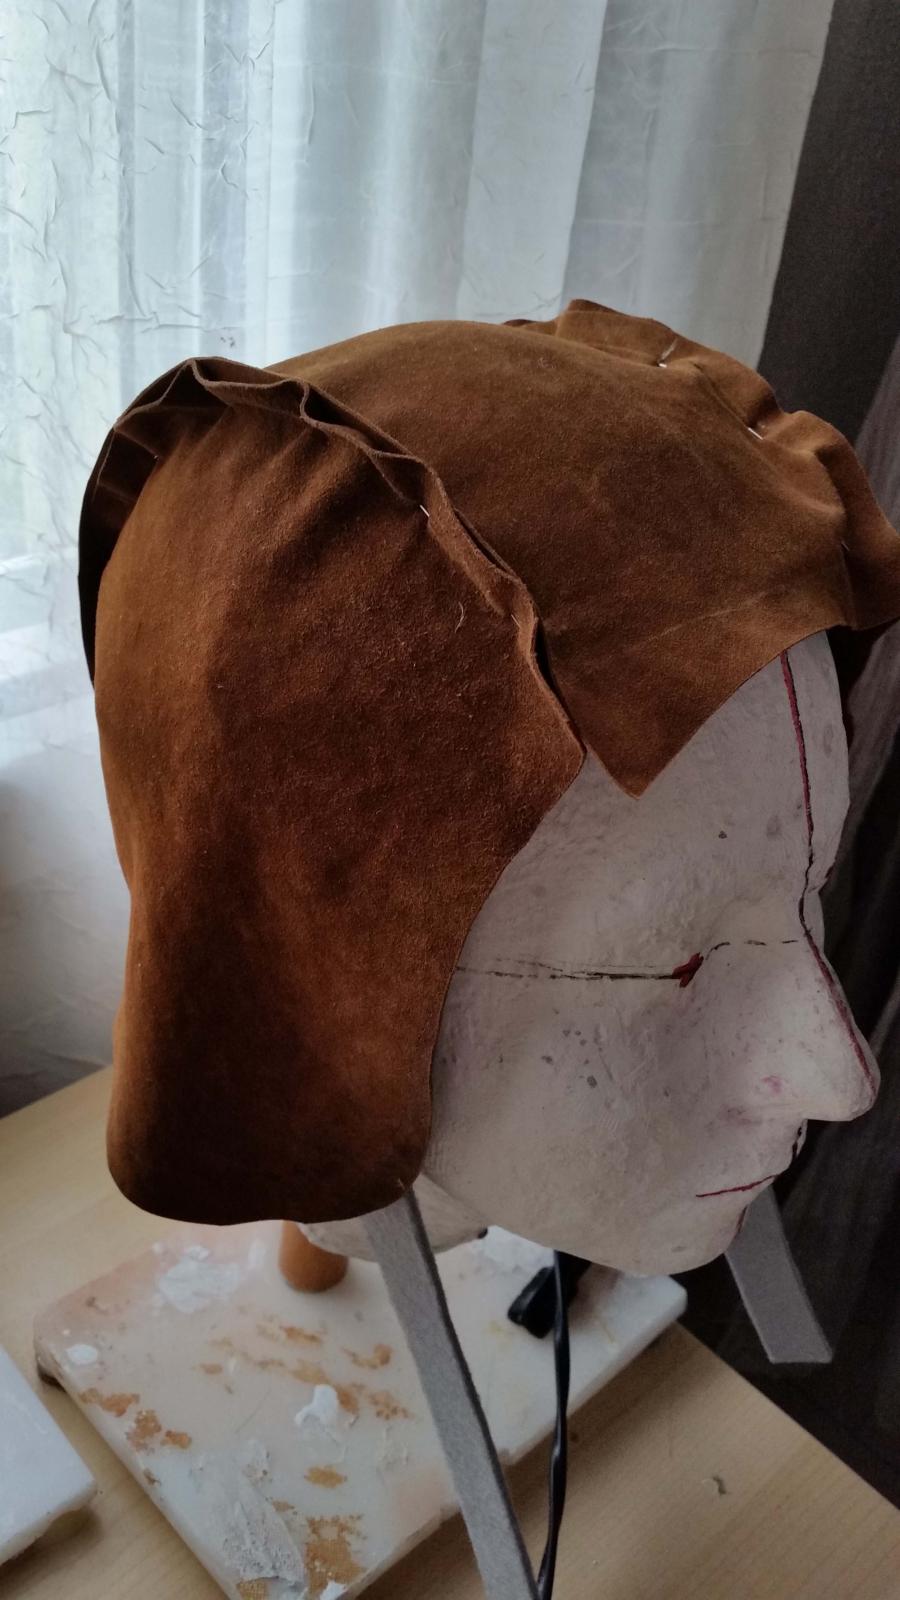
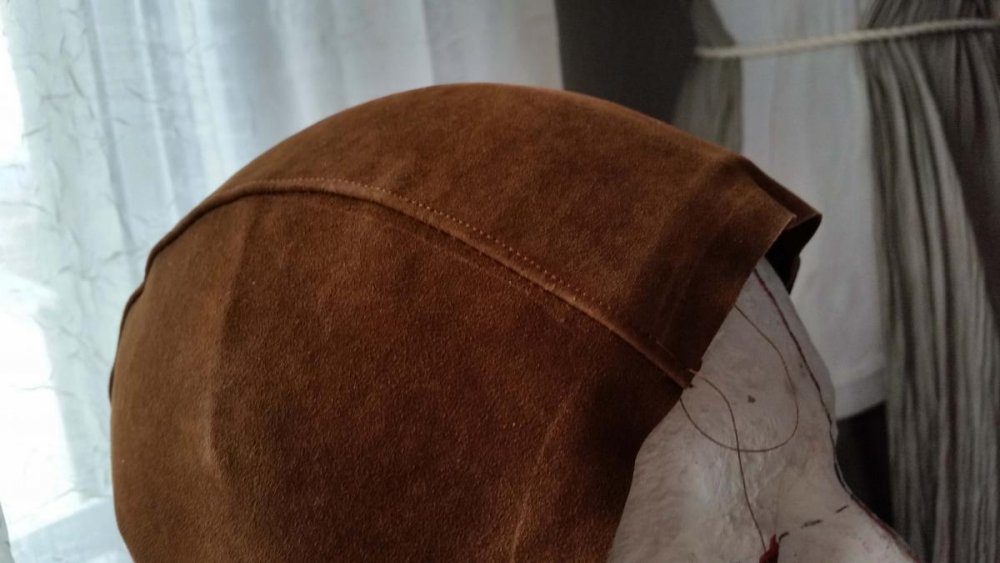
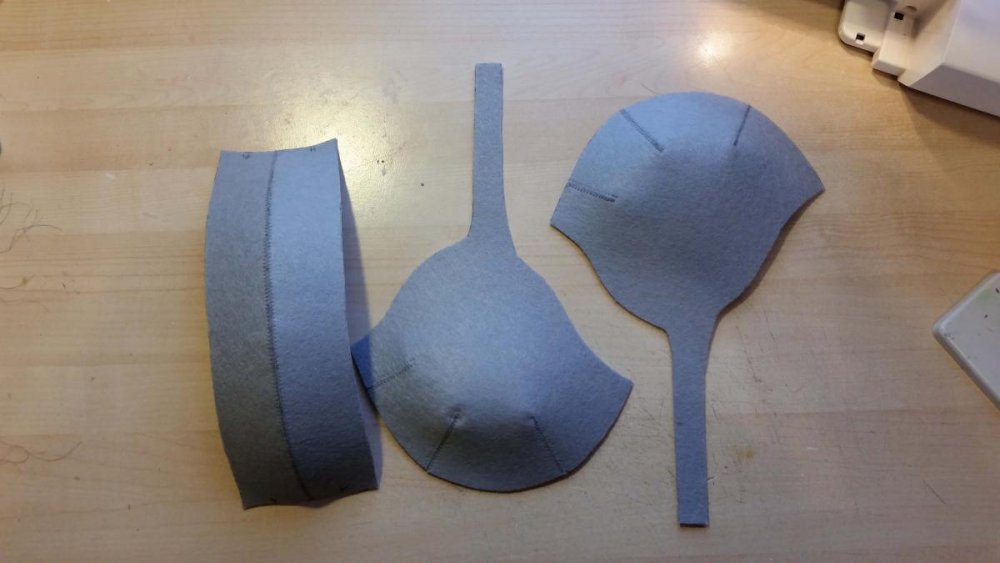
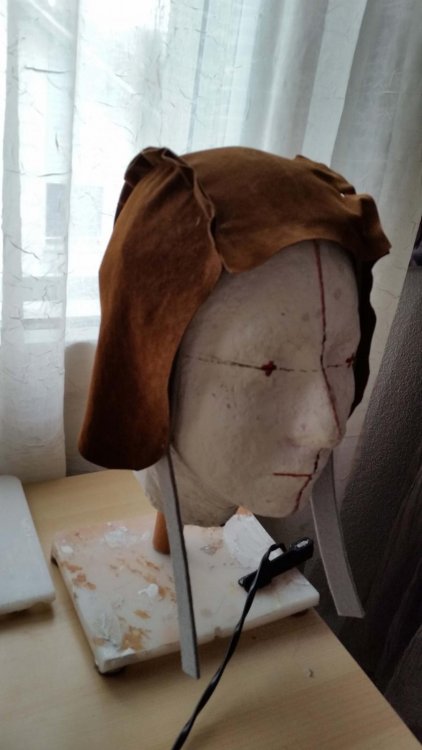
Here are the pictures of the pilot cap I did in the last days. I used a solid piece of felt to build up the shape while the outside is made of nappa buckskin (and yes, I killed an old leather jacked of my husband for it, and yes, of course he knows).


-
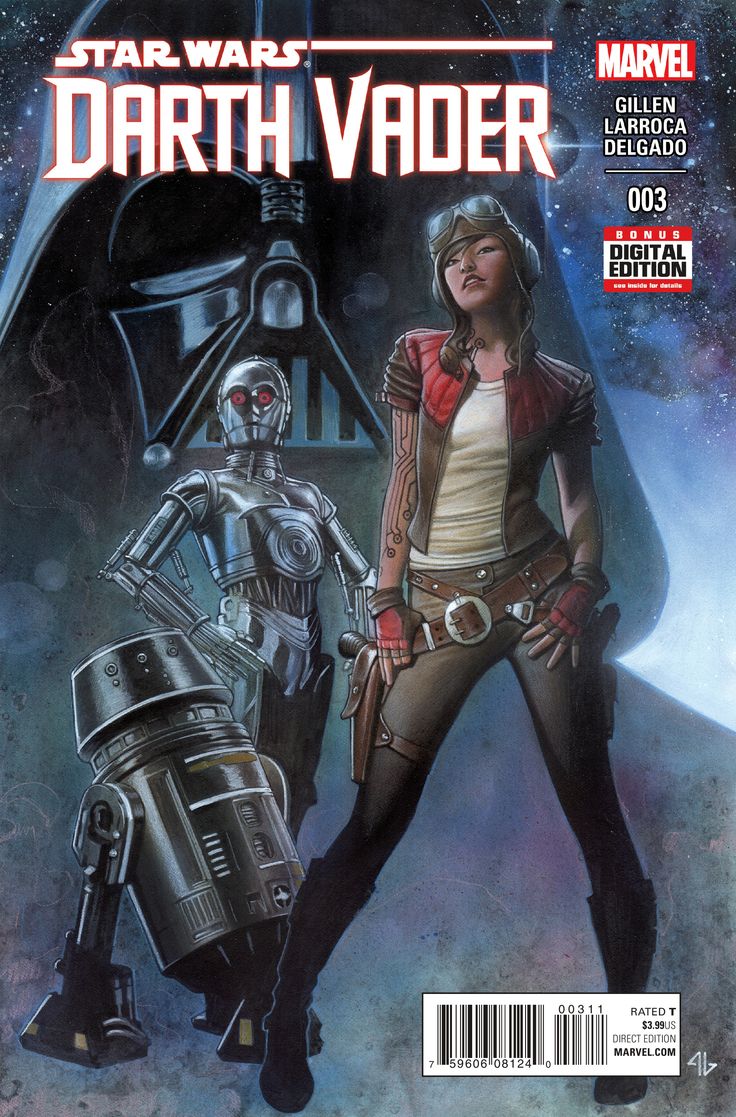
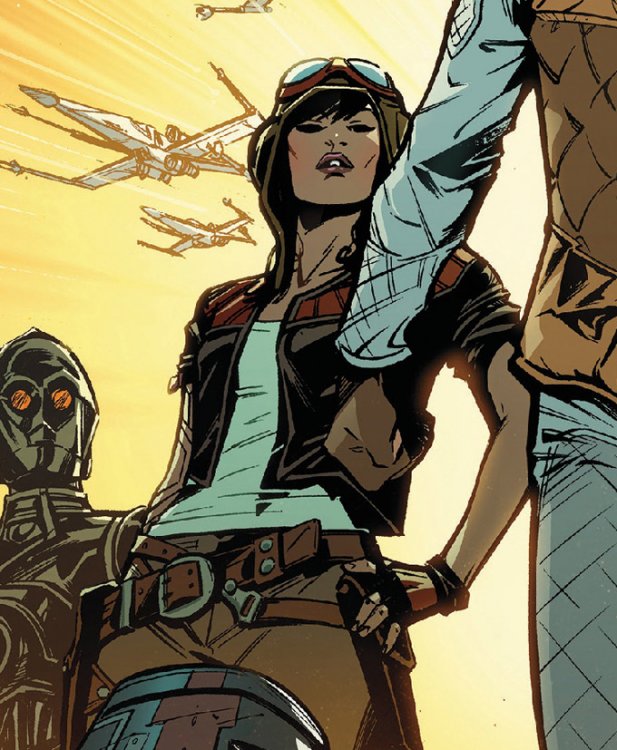
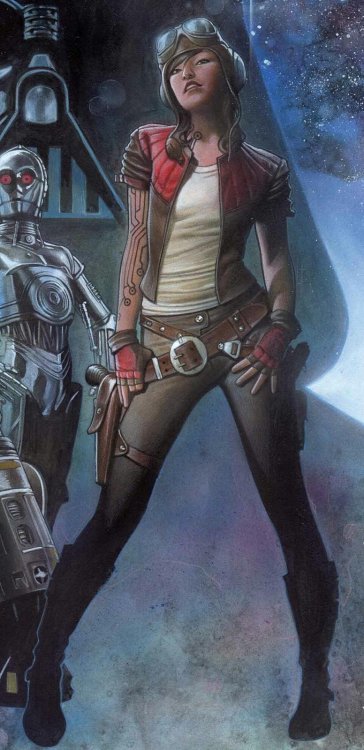
Hi! I’m currently started to work on Dr Aphra. I choose the front cover version, which is a little bit different from the version inside the comic books. - The belt buckle is round in state of square - The vest has red shoulders - The trousers are dark grey (or brown) - The shirt has a round neck without slit in the front - She’s got two blasters Maybe this version isn’t approvable, because there aren’t so many reference images, but I prefer it, because the version shown inside the books looks to me a little bit too close to Han Solo (don’t get me wrong, I adore Han Solo). So I’ll do it anyway, although it could be that it will end up as a just-for-fun-costume and I hope if I share my pictures and experiences it’ll help other costume builders.

-
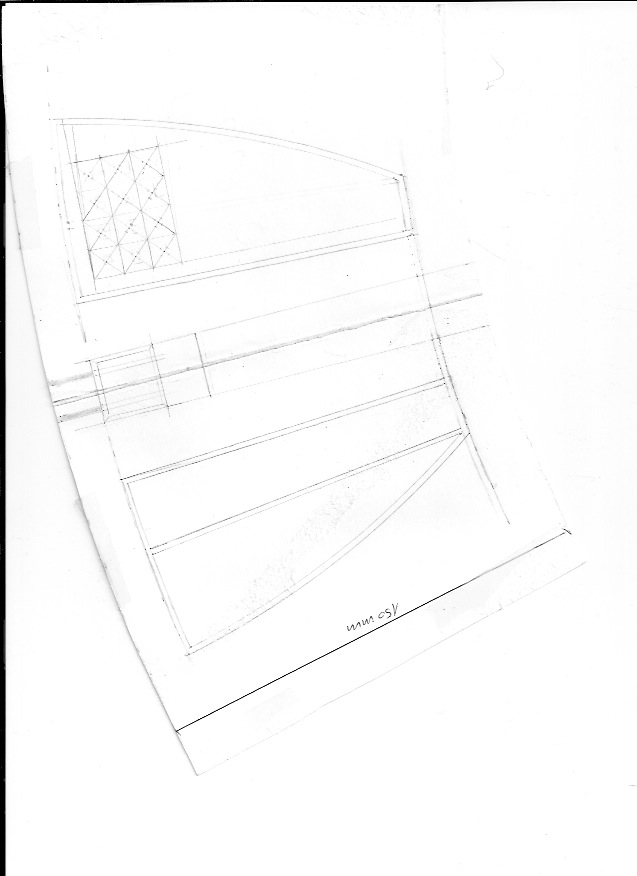
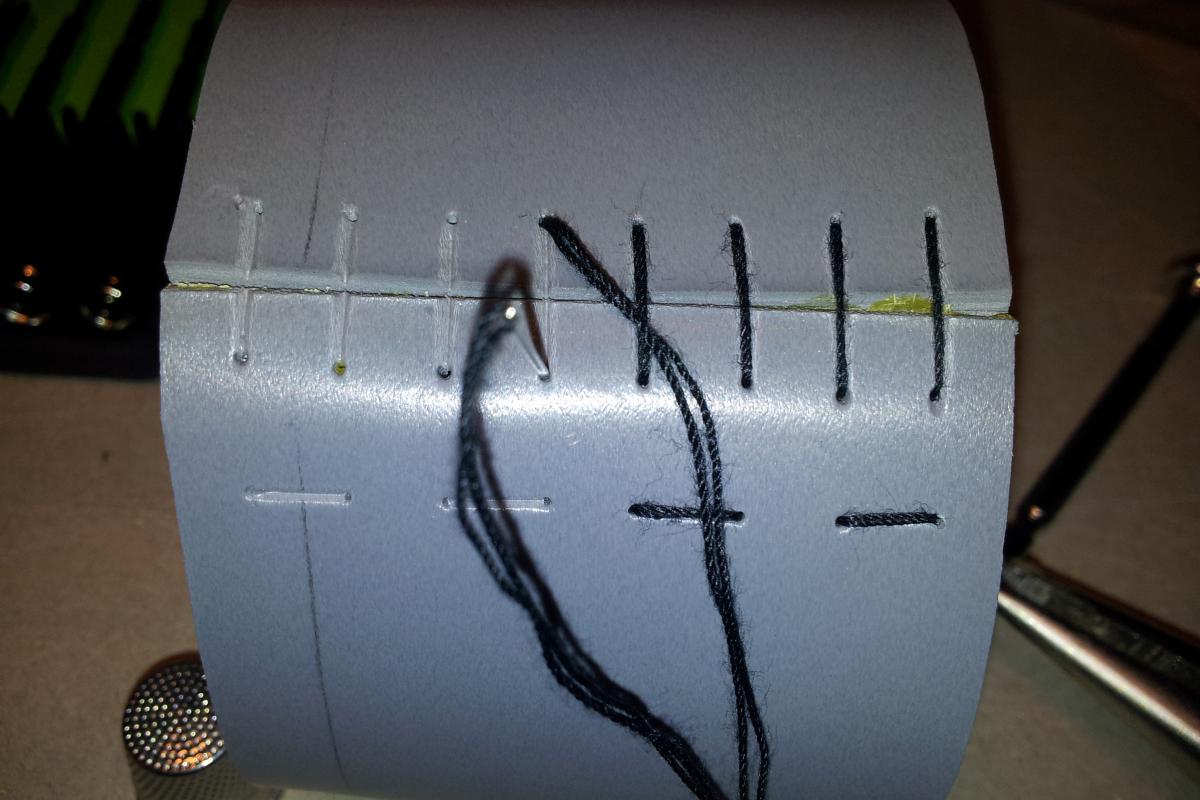
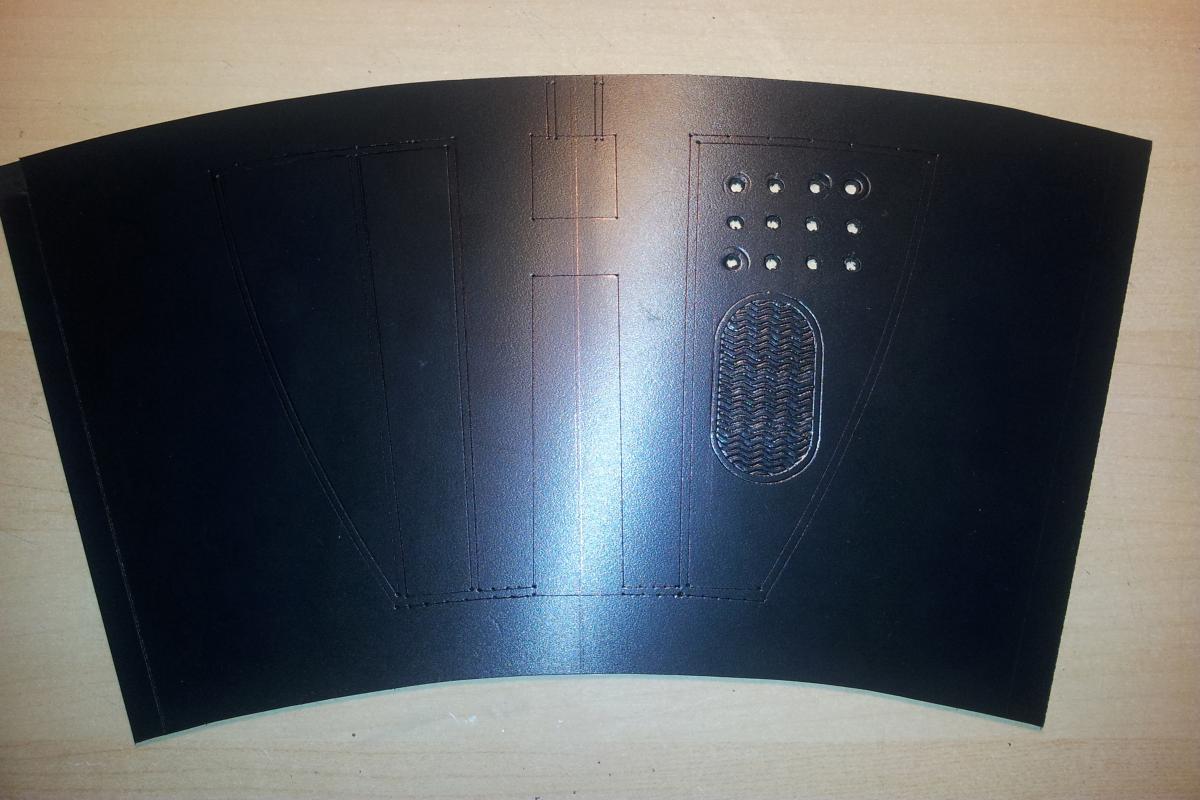
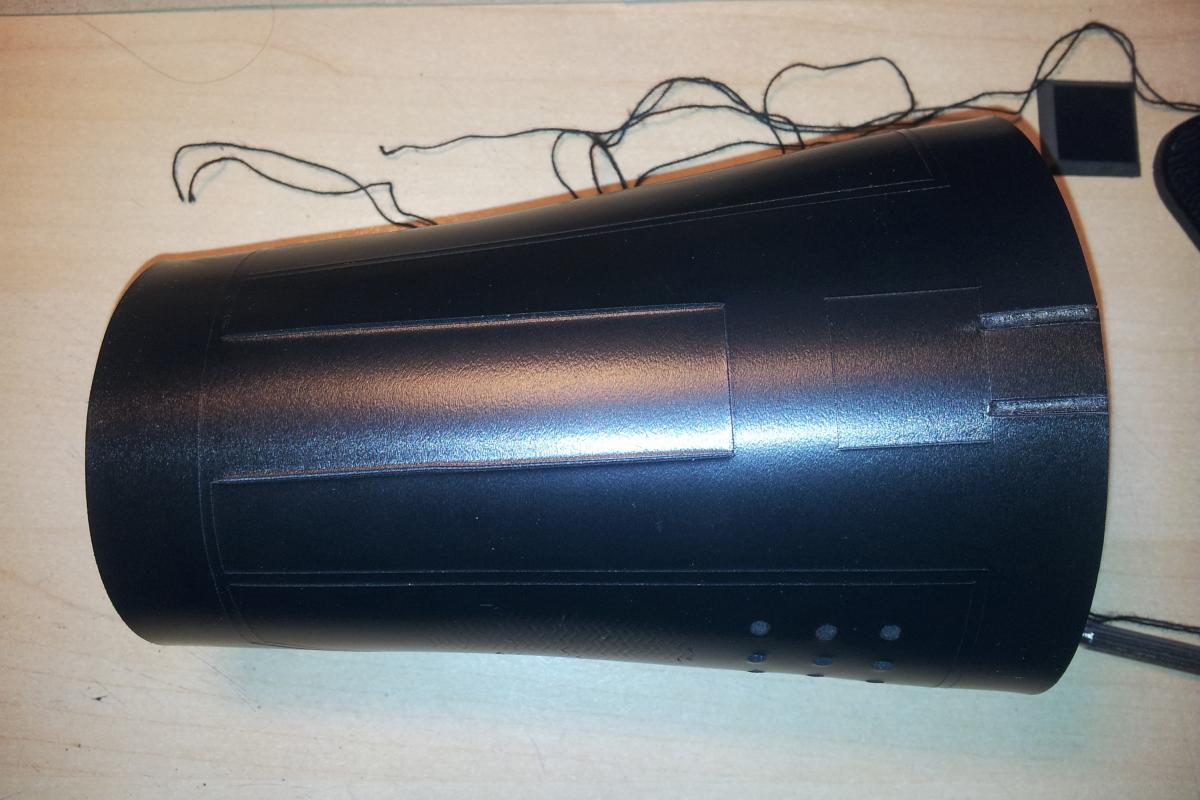
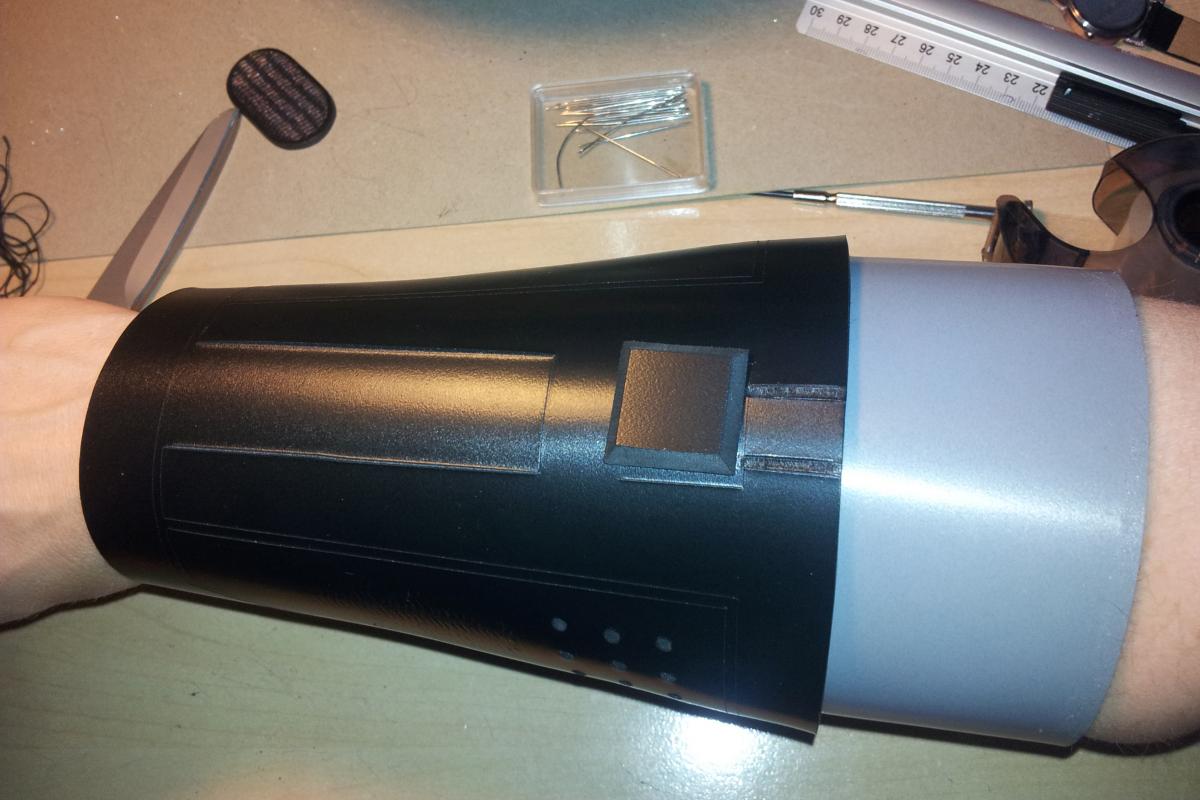
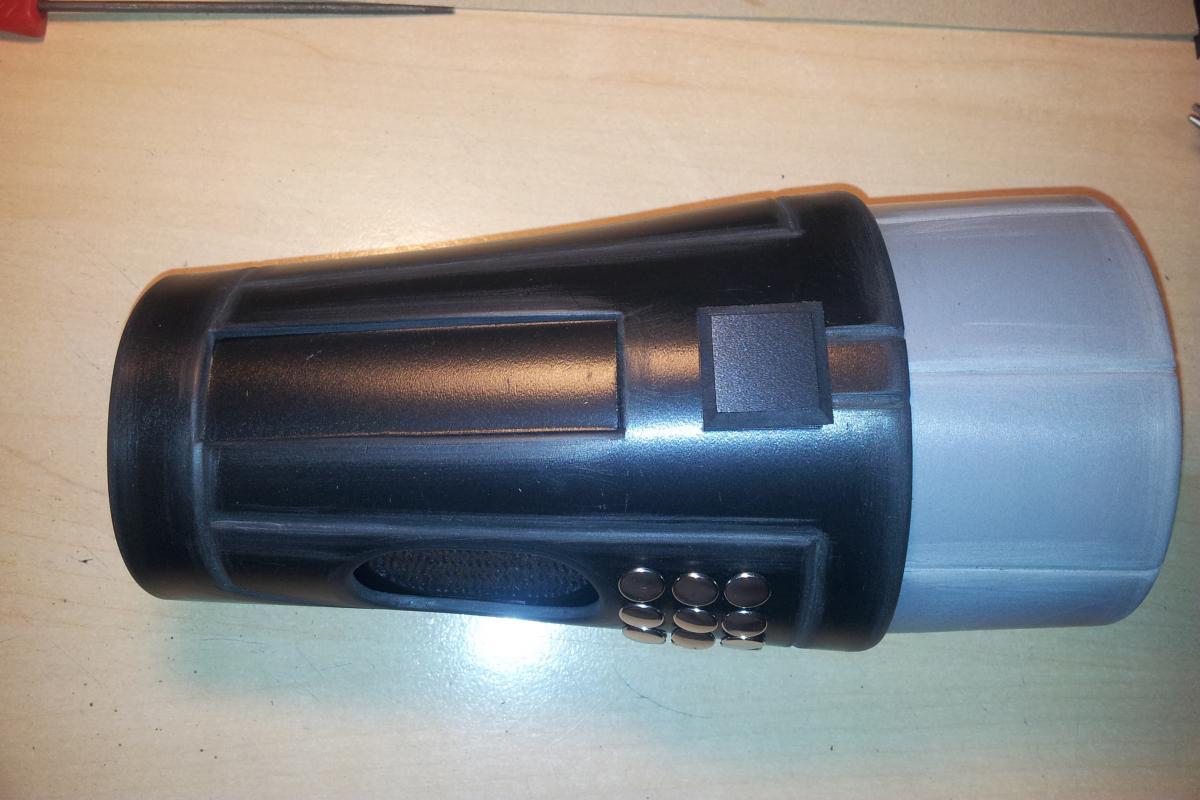
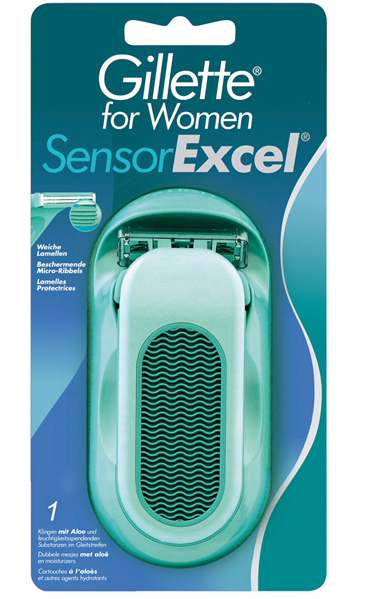
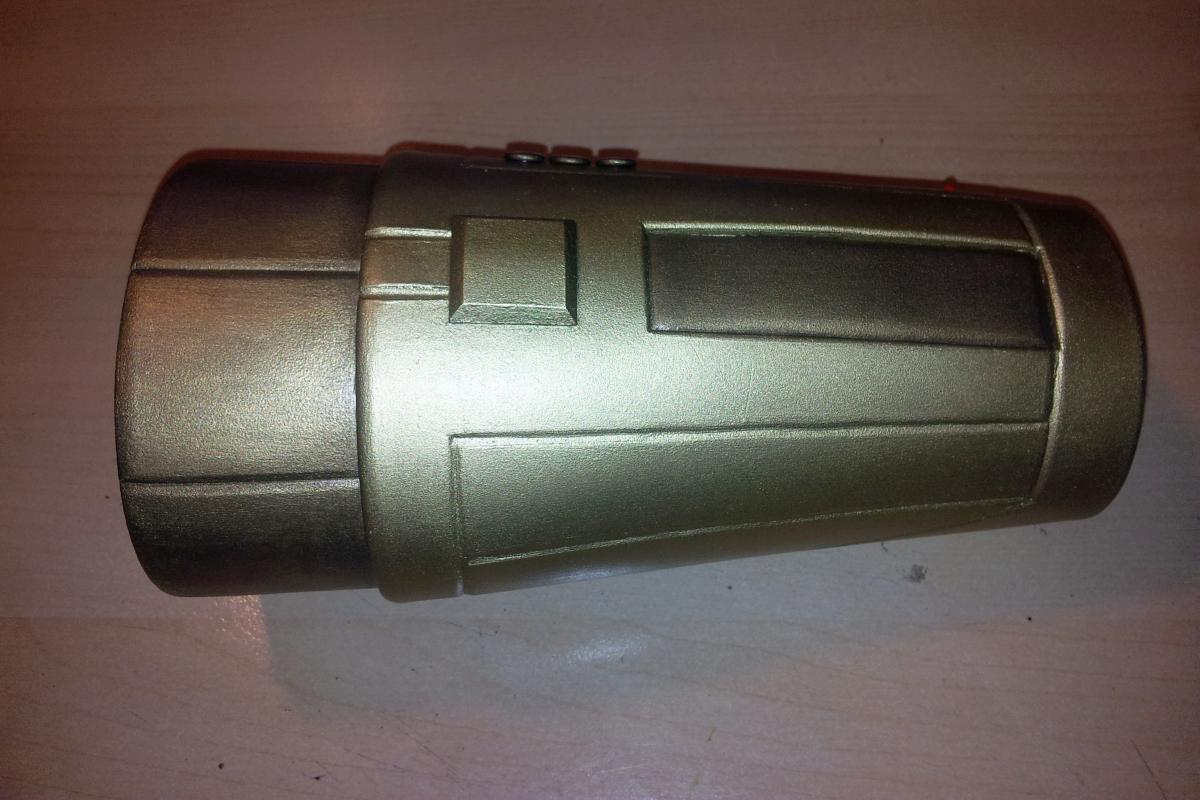
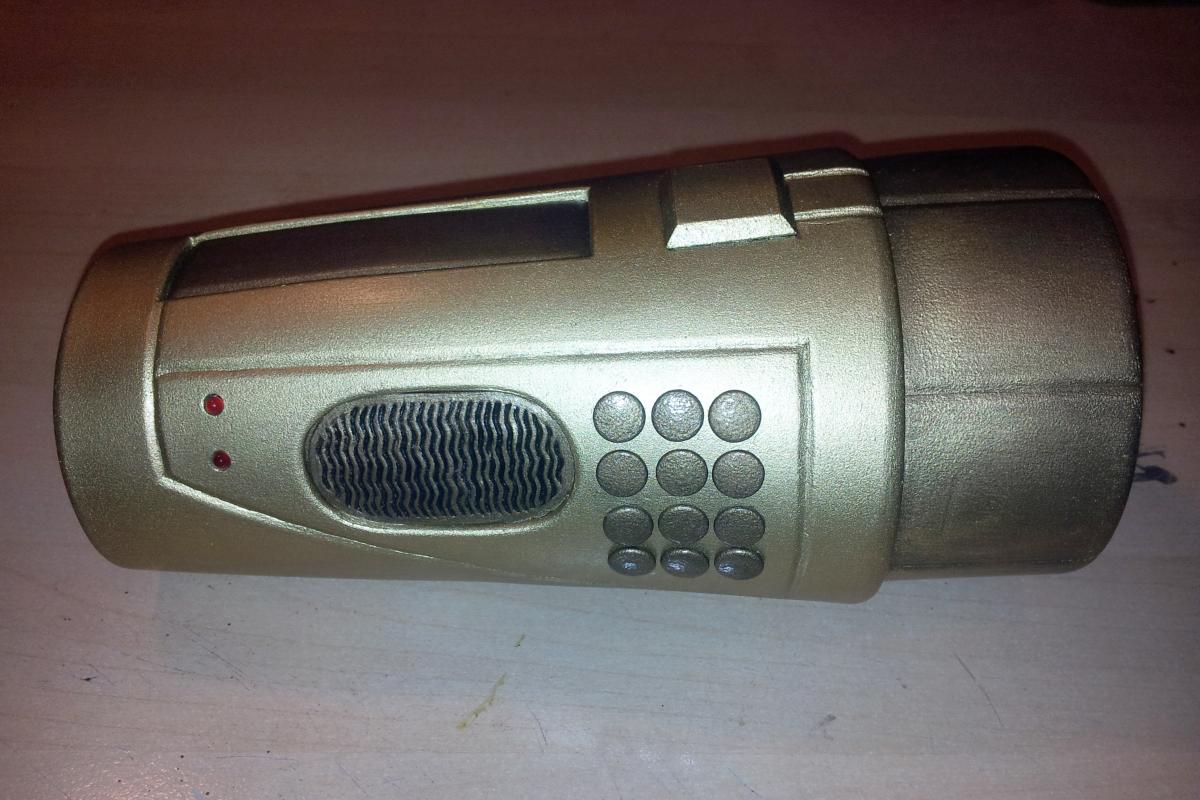
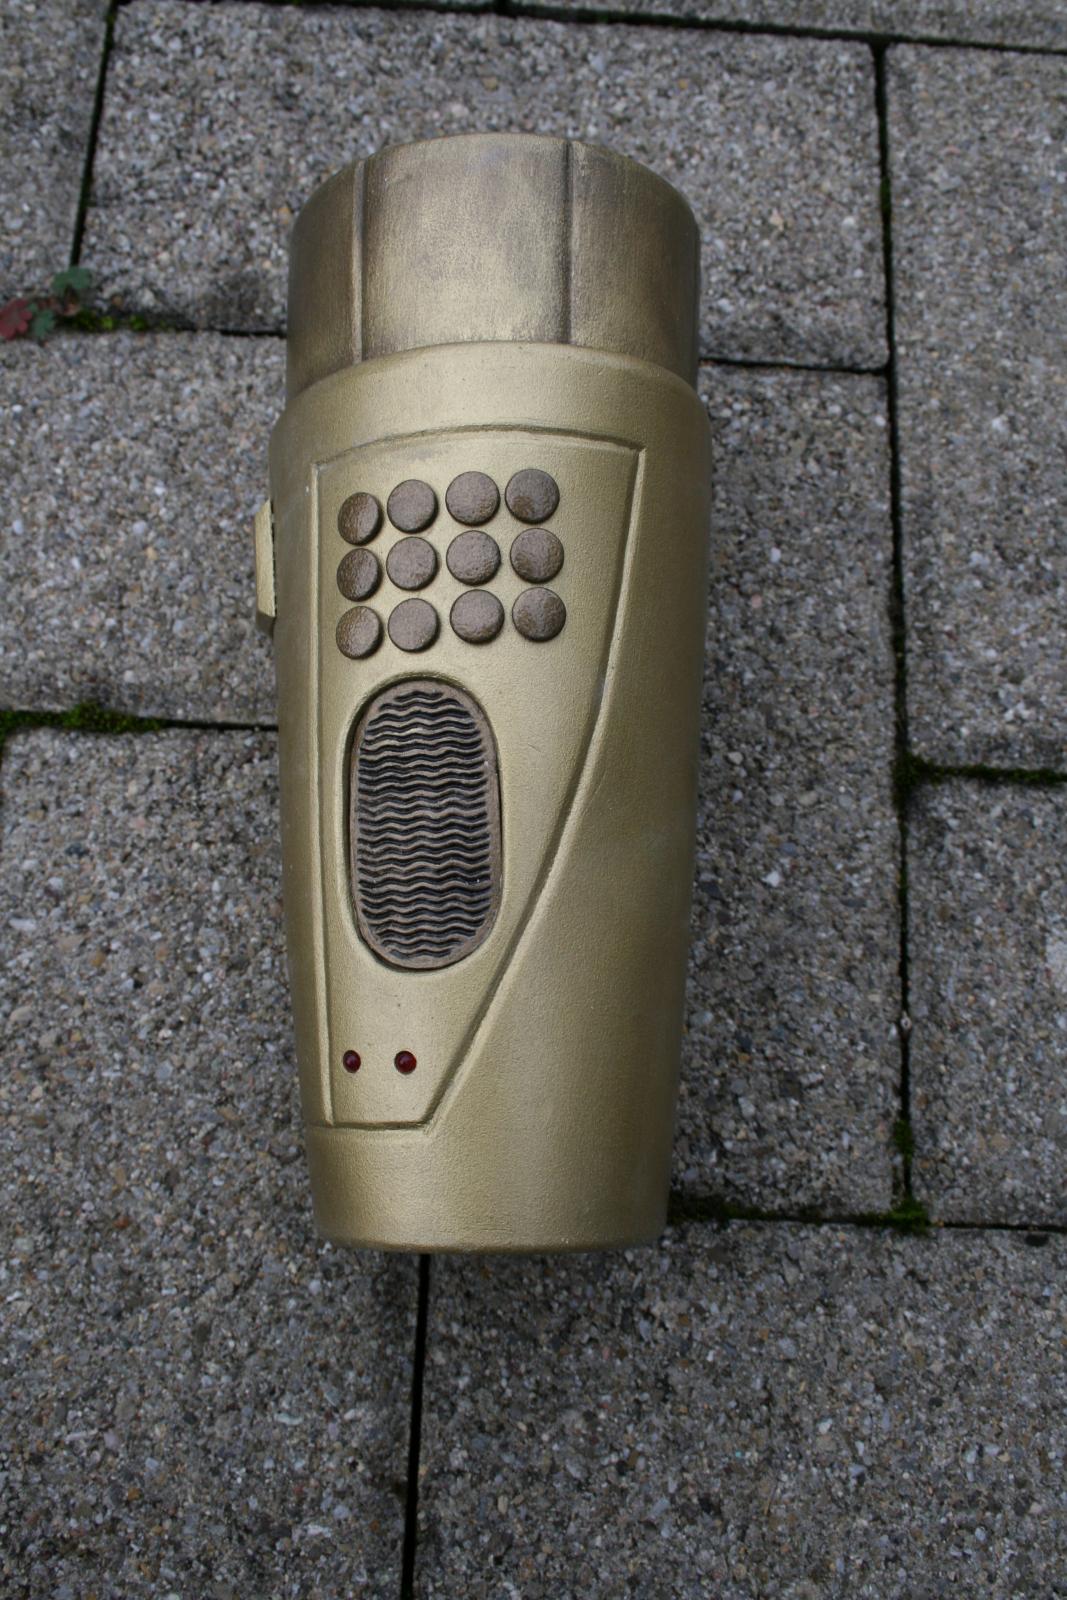
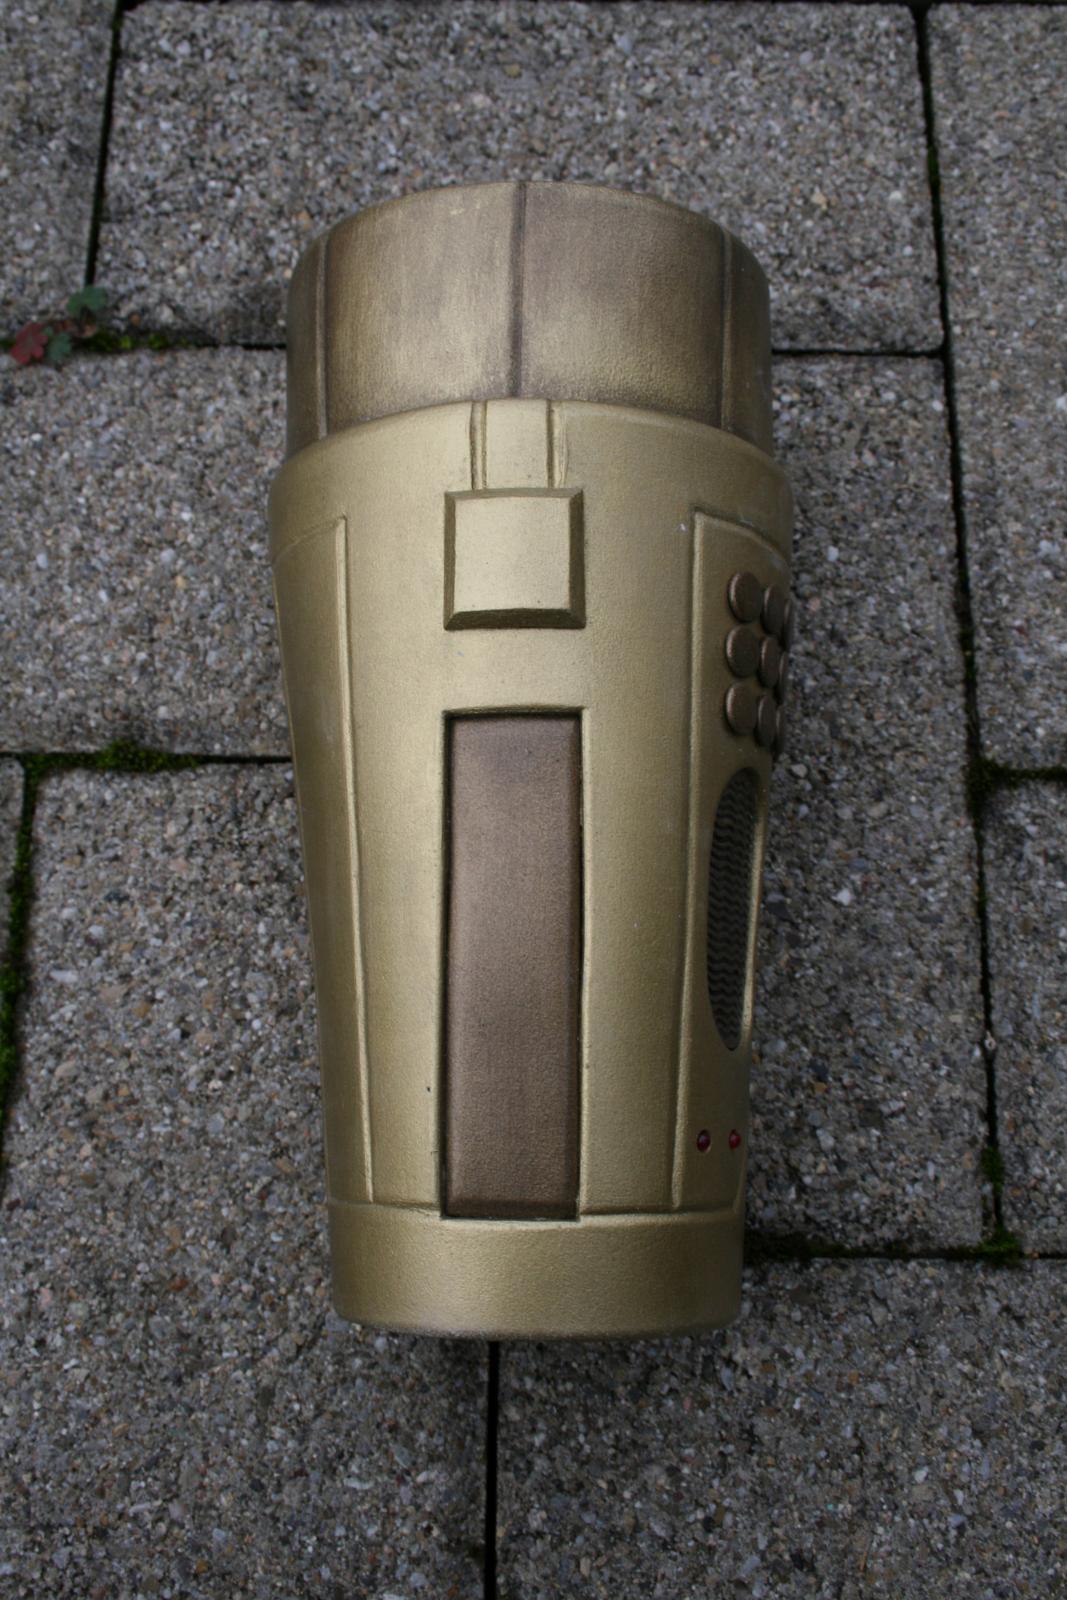
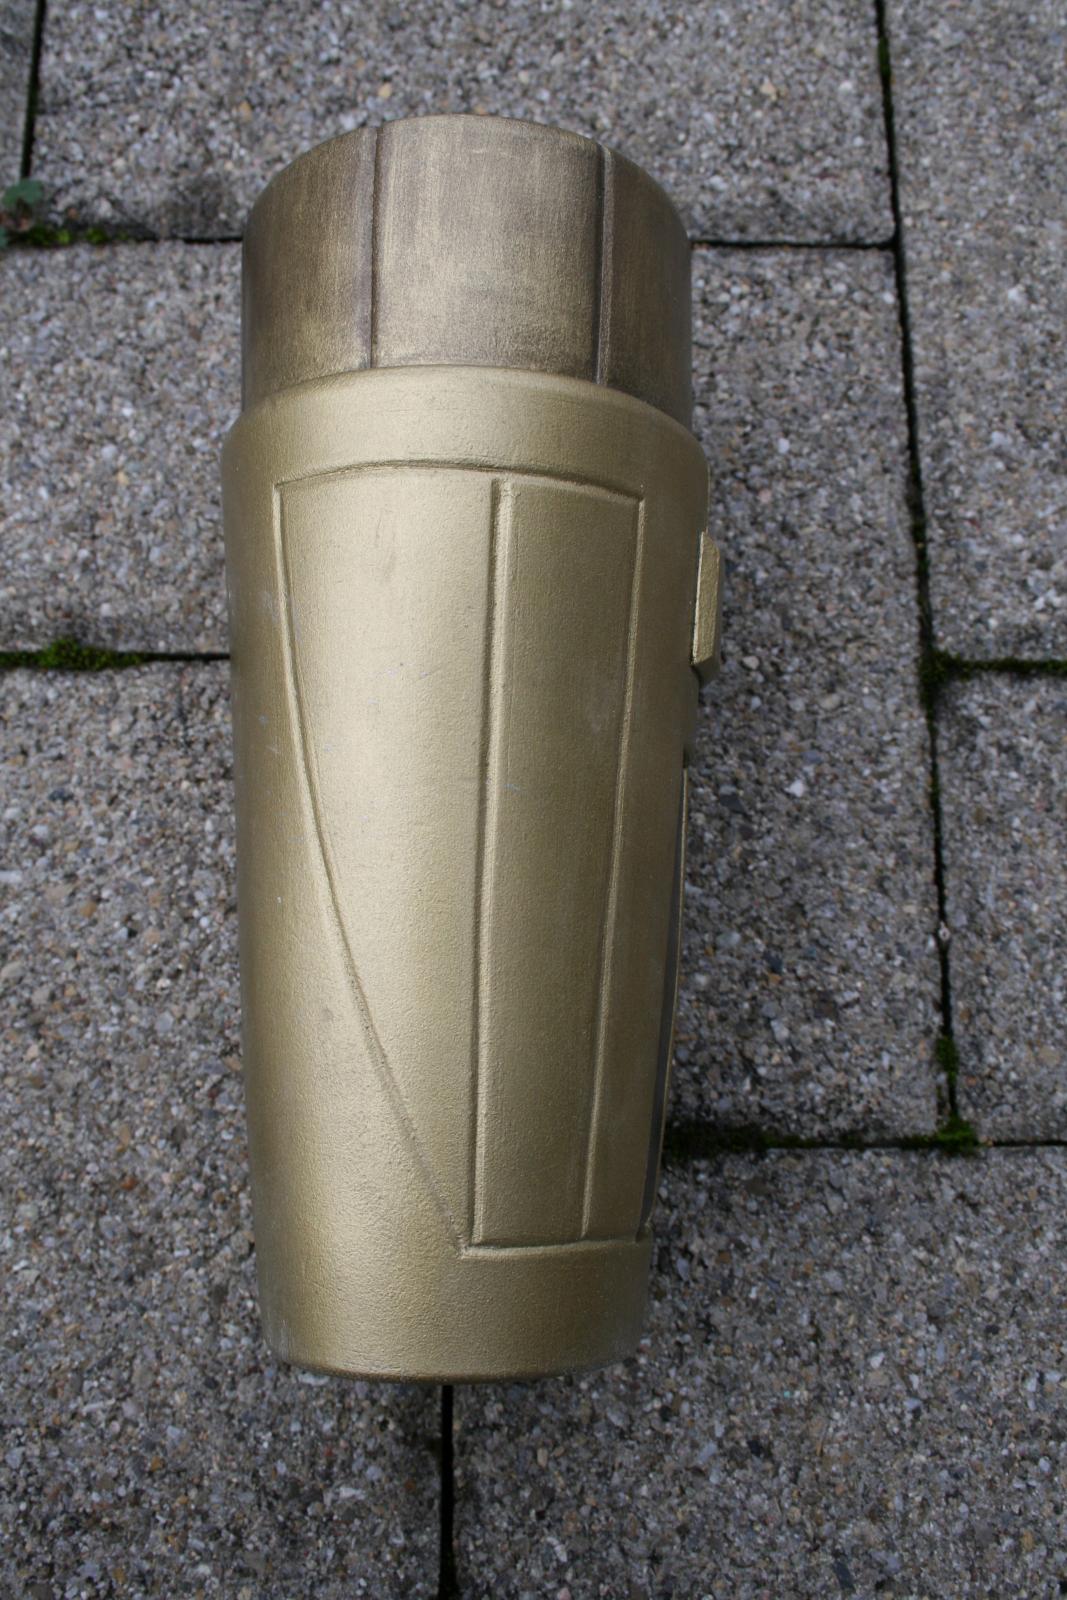
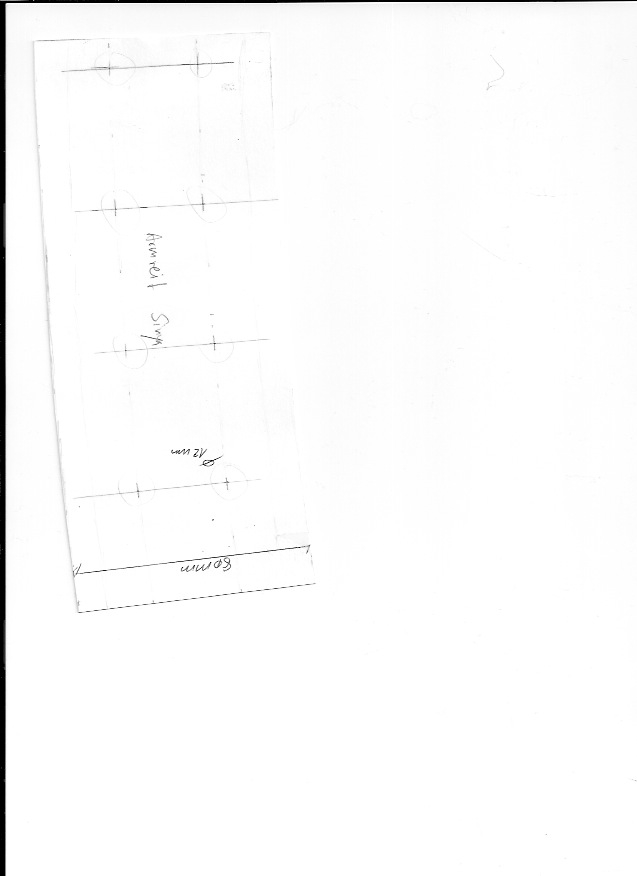
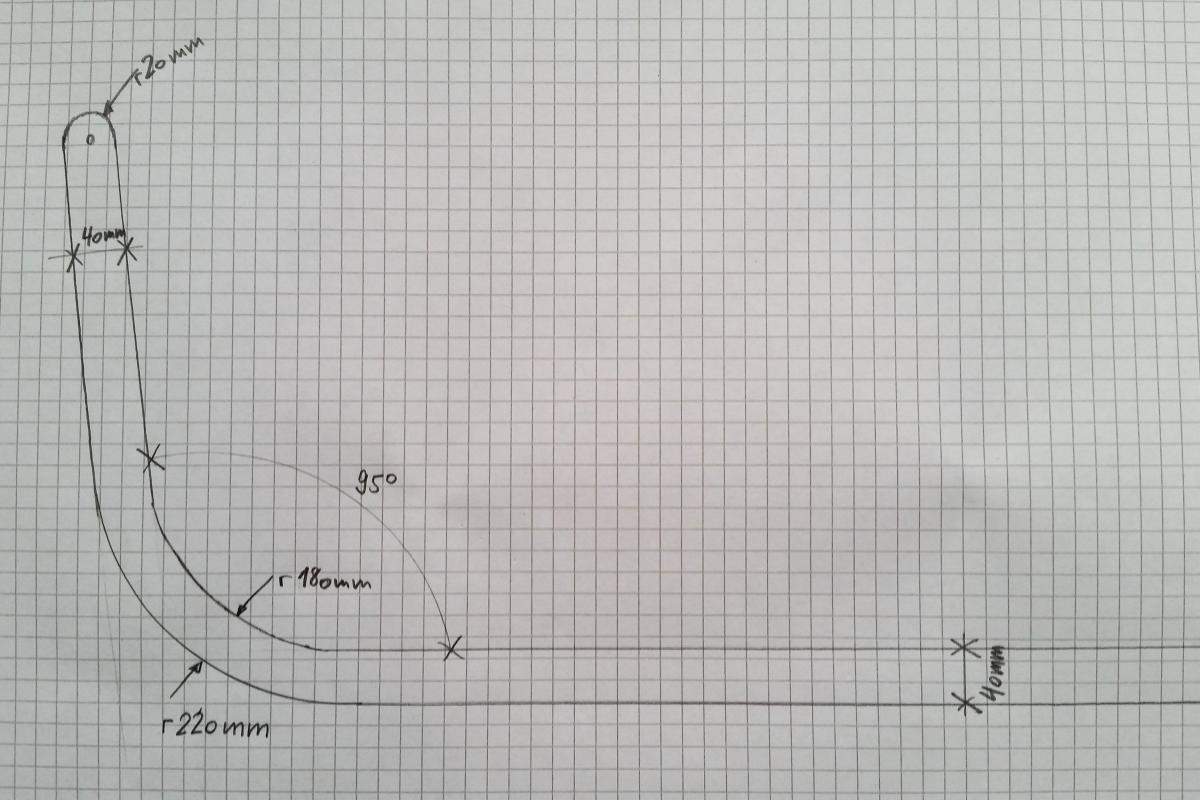
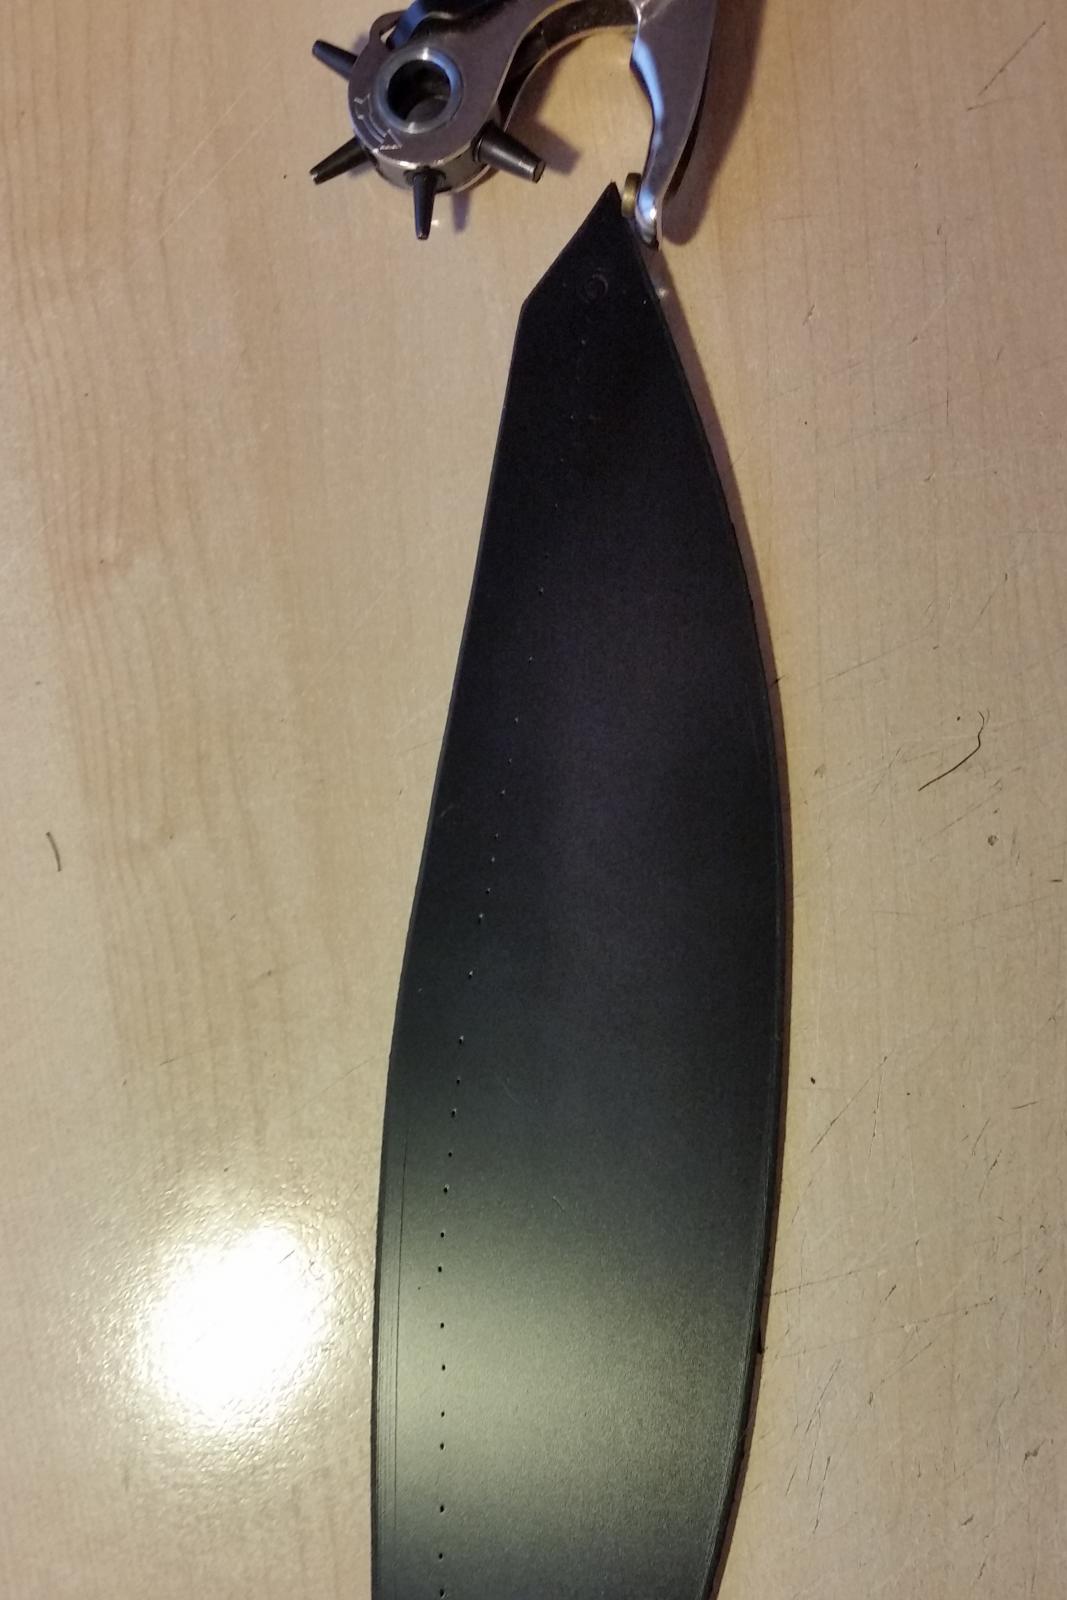
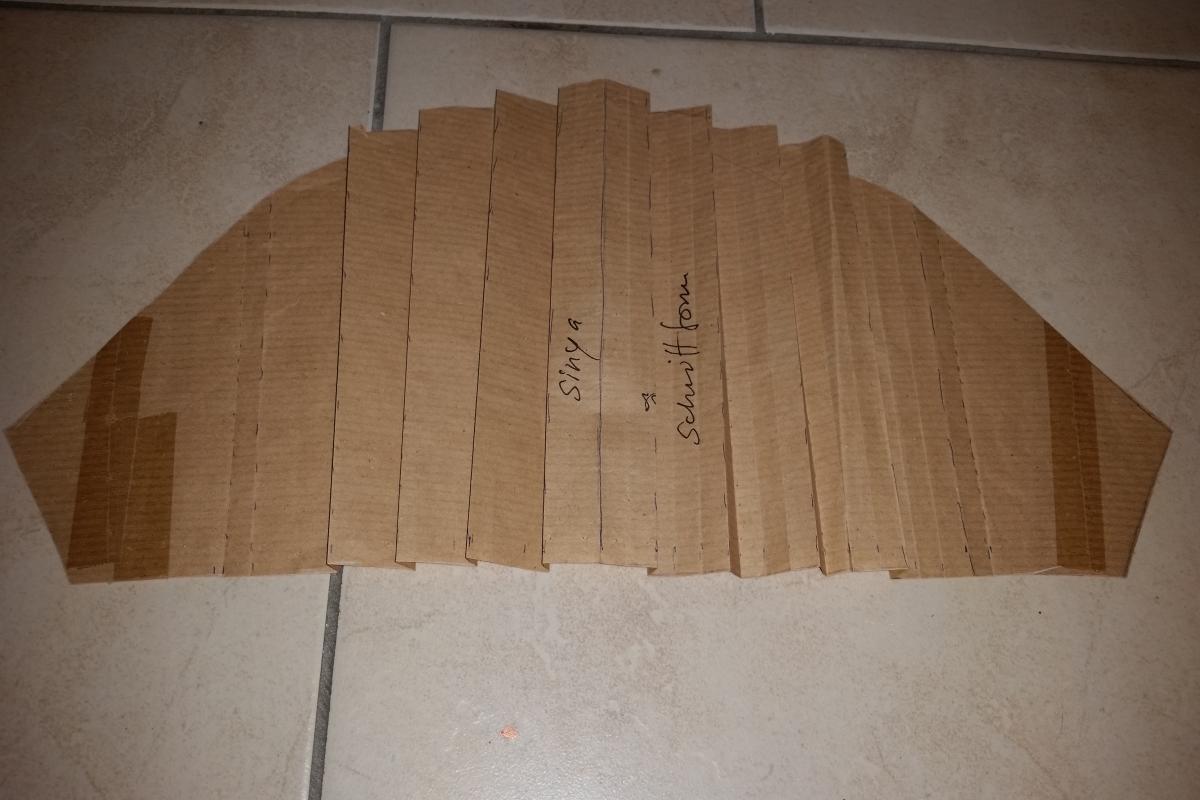
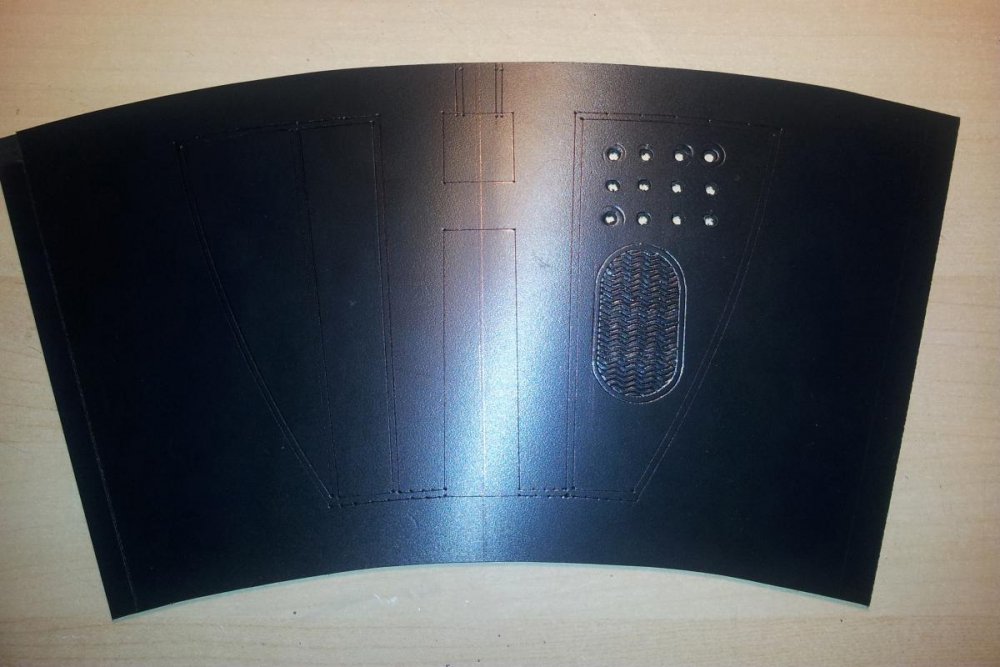
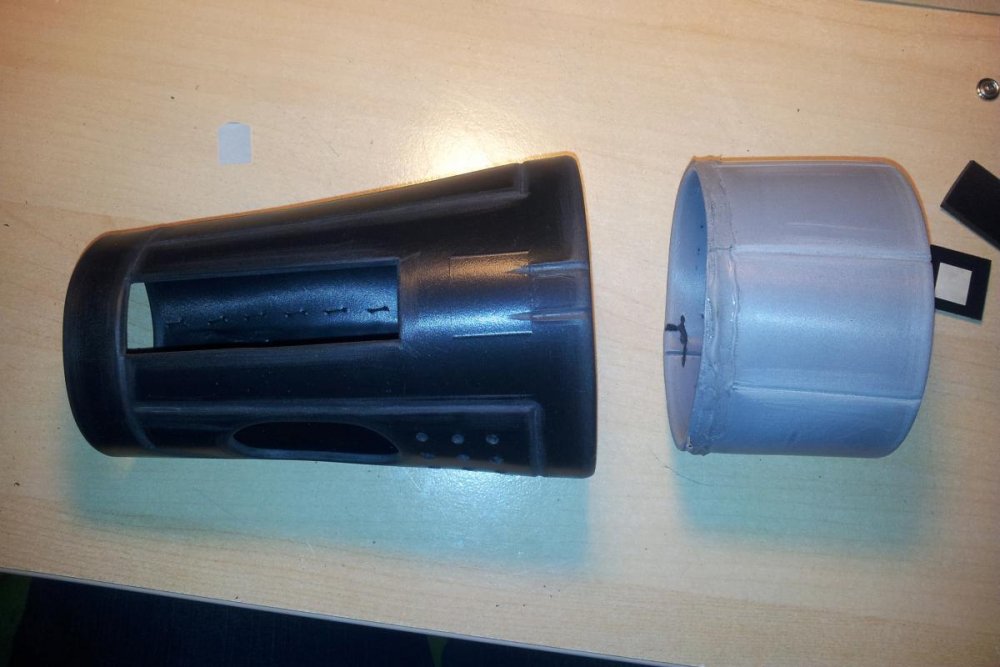
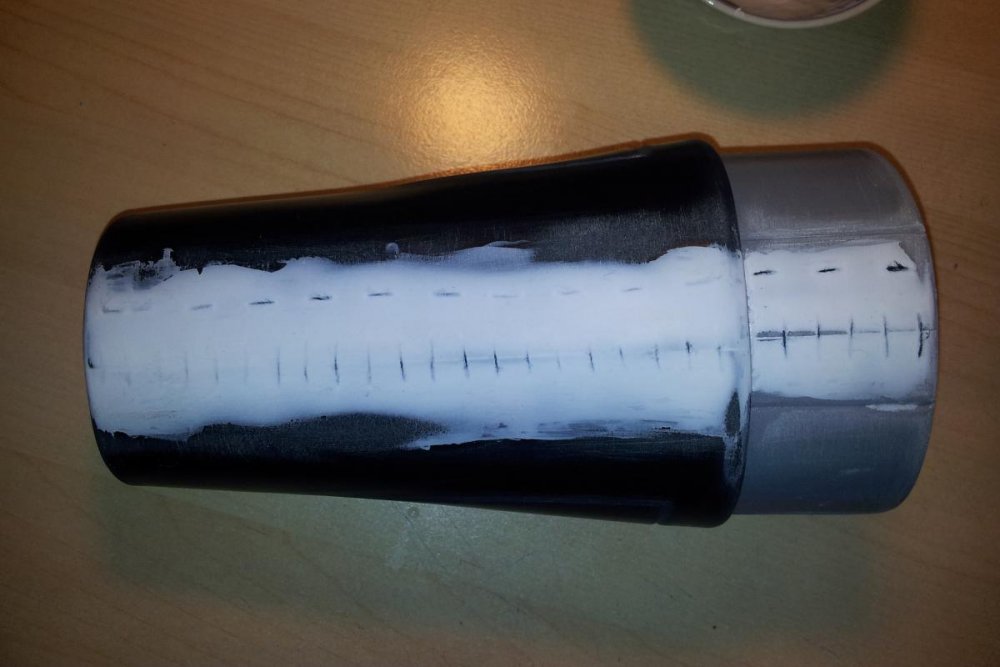
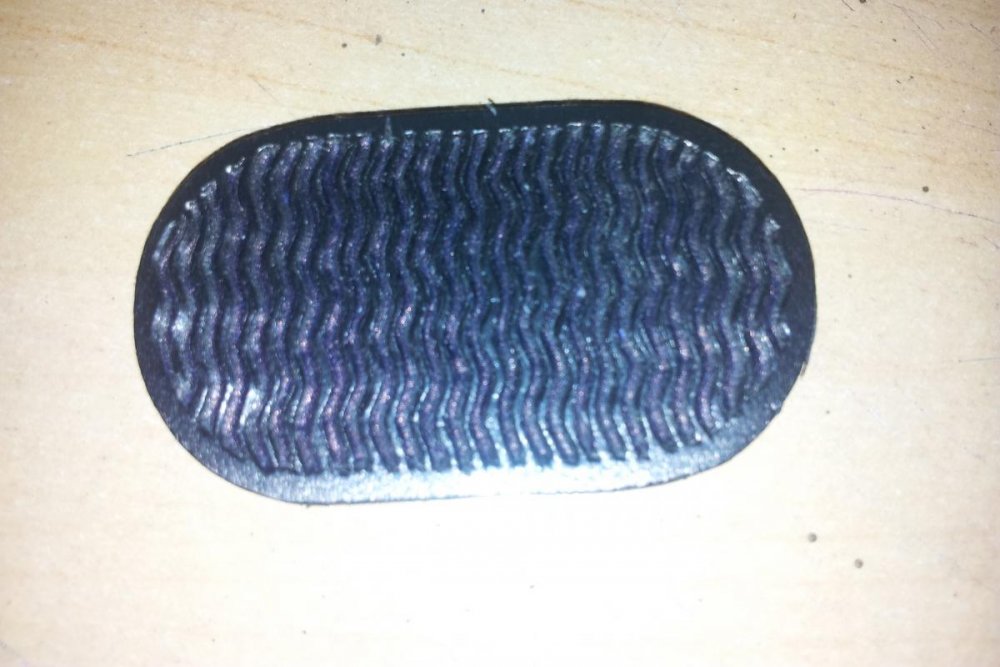
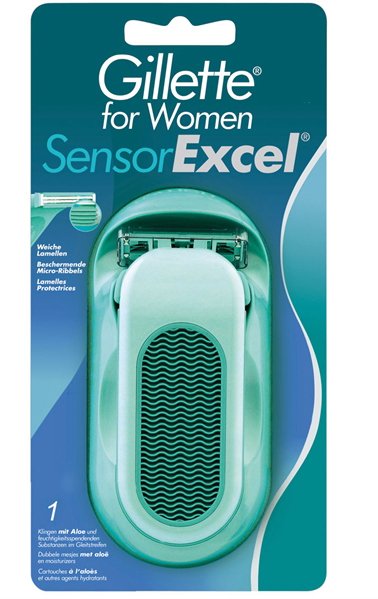
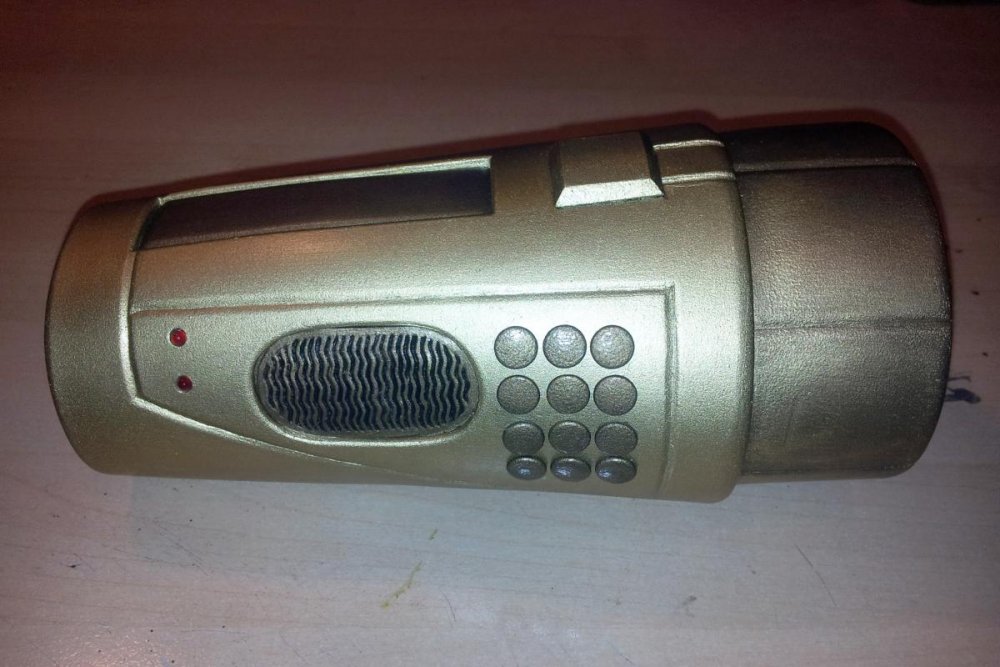
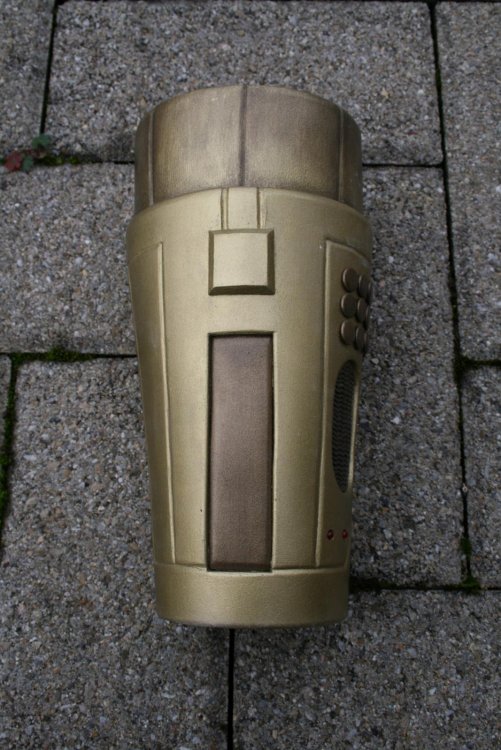
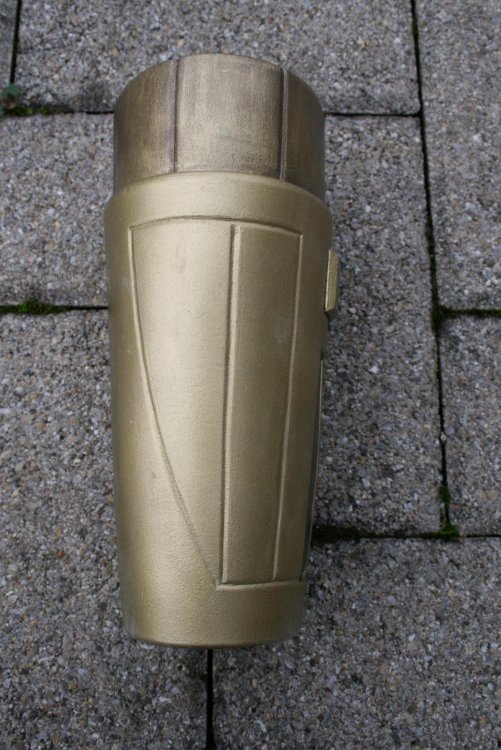
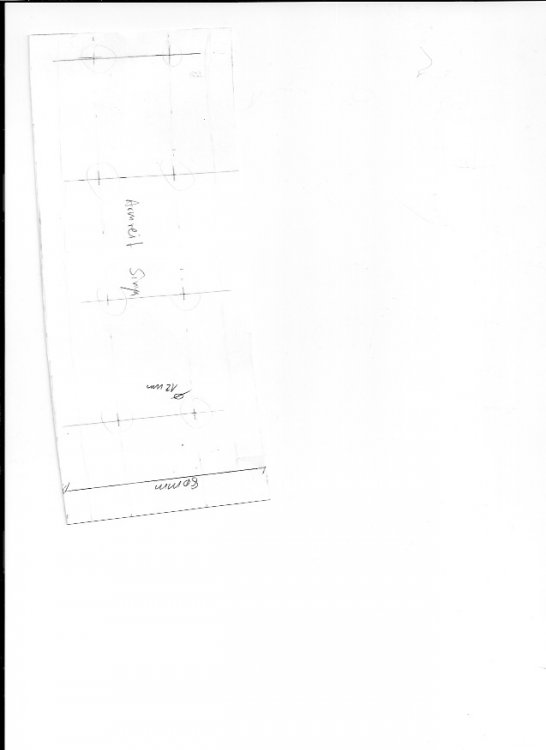
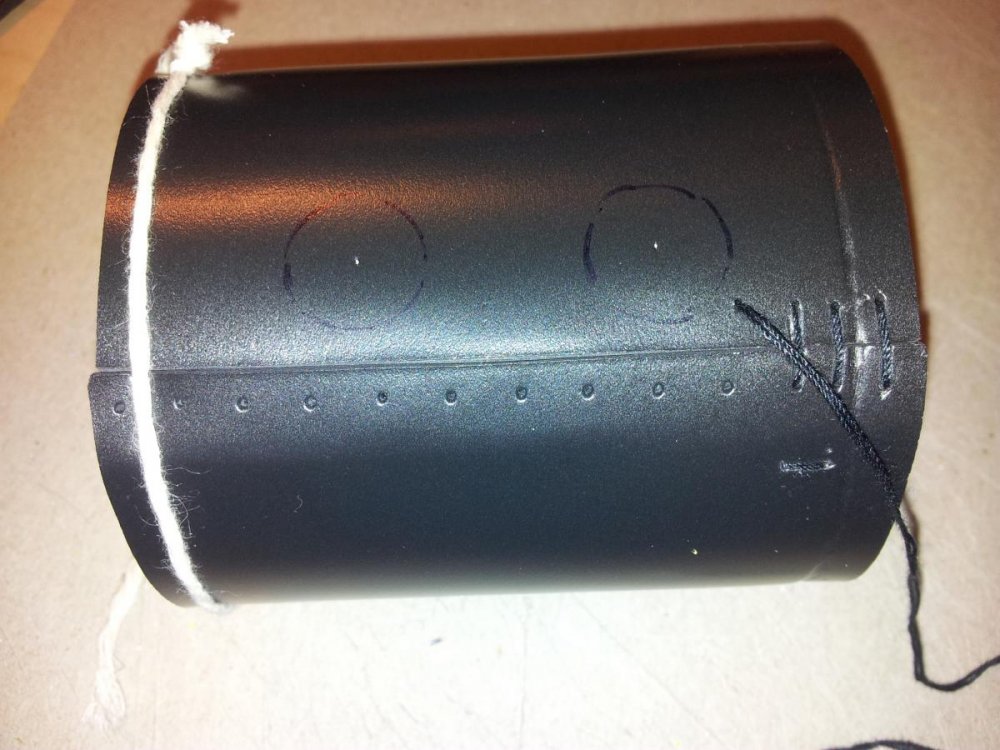
Right vambrace I attached a scanned design of the shape and the technical elements on the lower part. The upper part is not really spectacular - just a plain tube with some scores. The technique is the same I used for the bracelet. The upper part is made of grey PVC sheet. There's no deeper meaning of it, it’s just because I ran out of the black one … Here you can see a little bit more detailed how I sew the two edges together. The vambrace fits very tight around the right forearm, it’s just wide enough to slip in and out. It shows two colours, while the lower part is almost smooth brighter and more golden, while the upper part shows the same colour and structure as the bracelet. For the comlink like detail i used the structure of a gillette lady shave as a sample. It took me an afternoon just to carve the structure into the PVC sheet, because the original was to big to use.


-
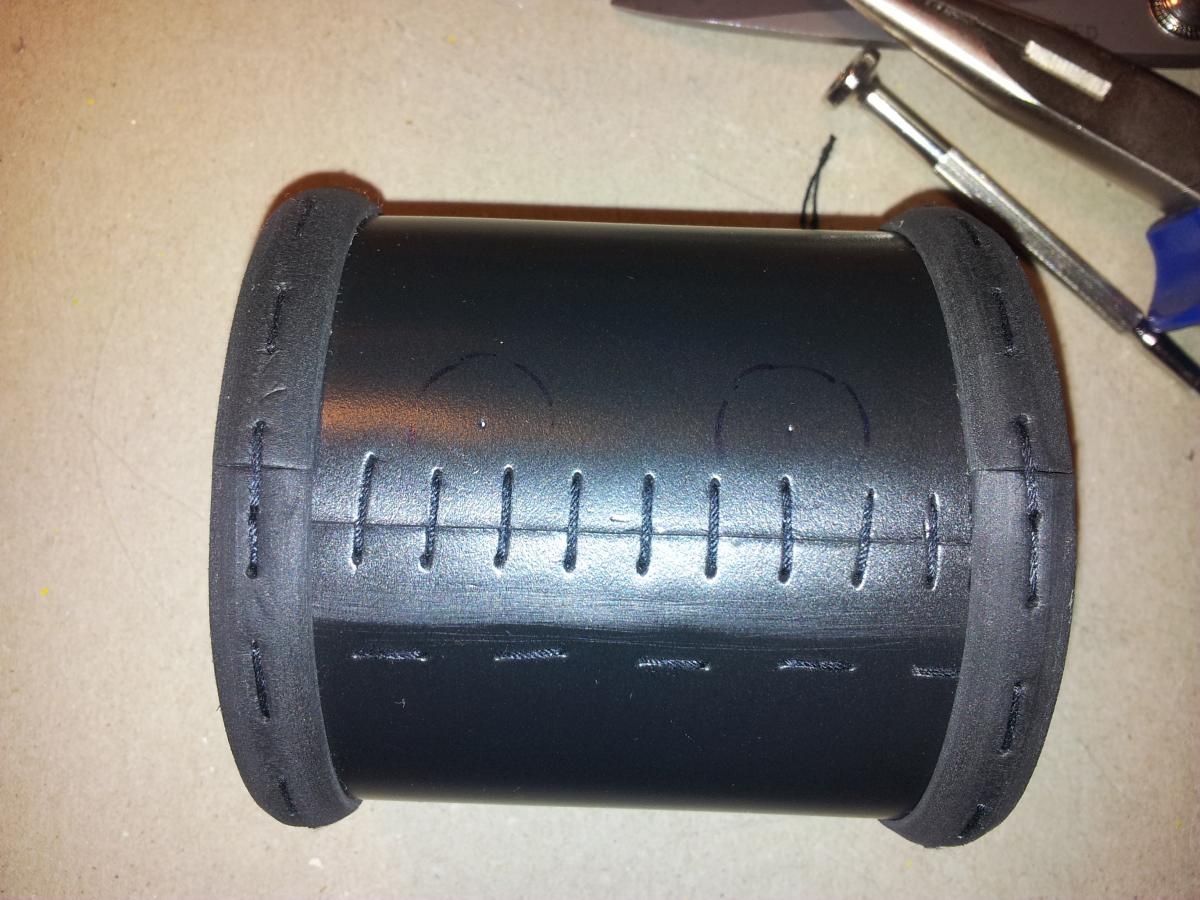
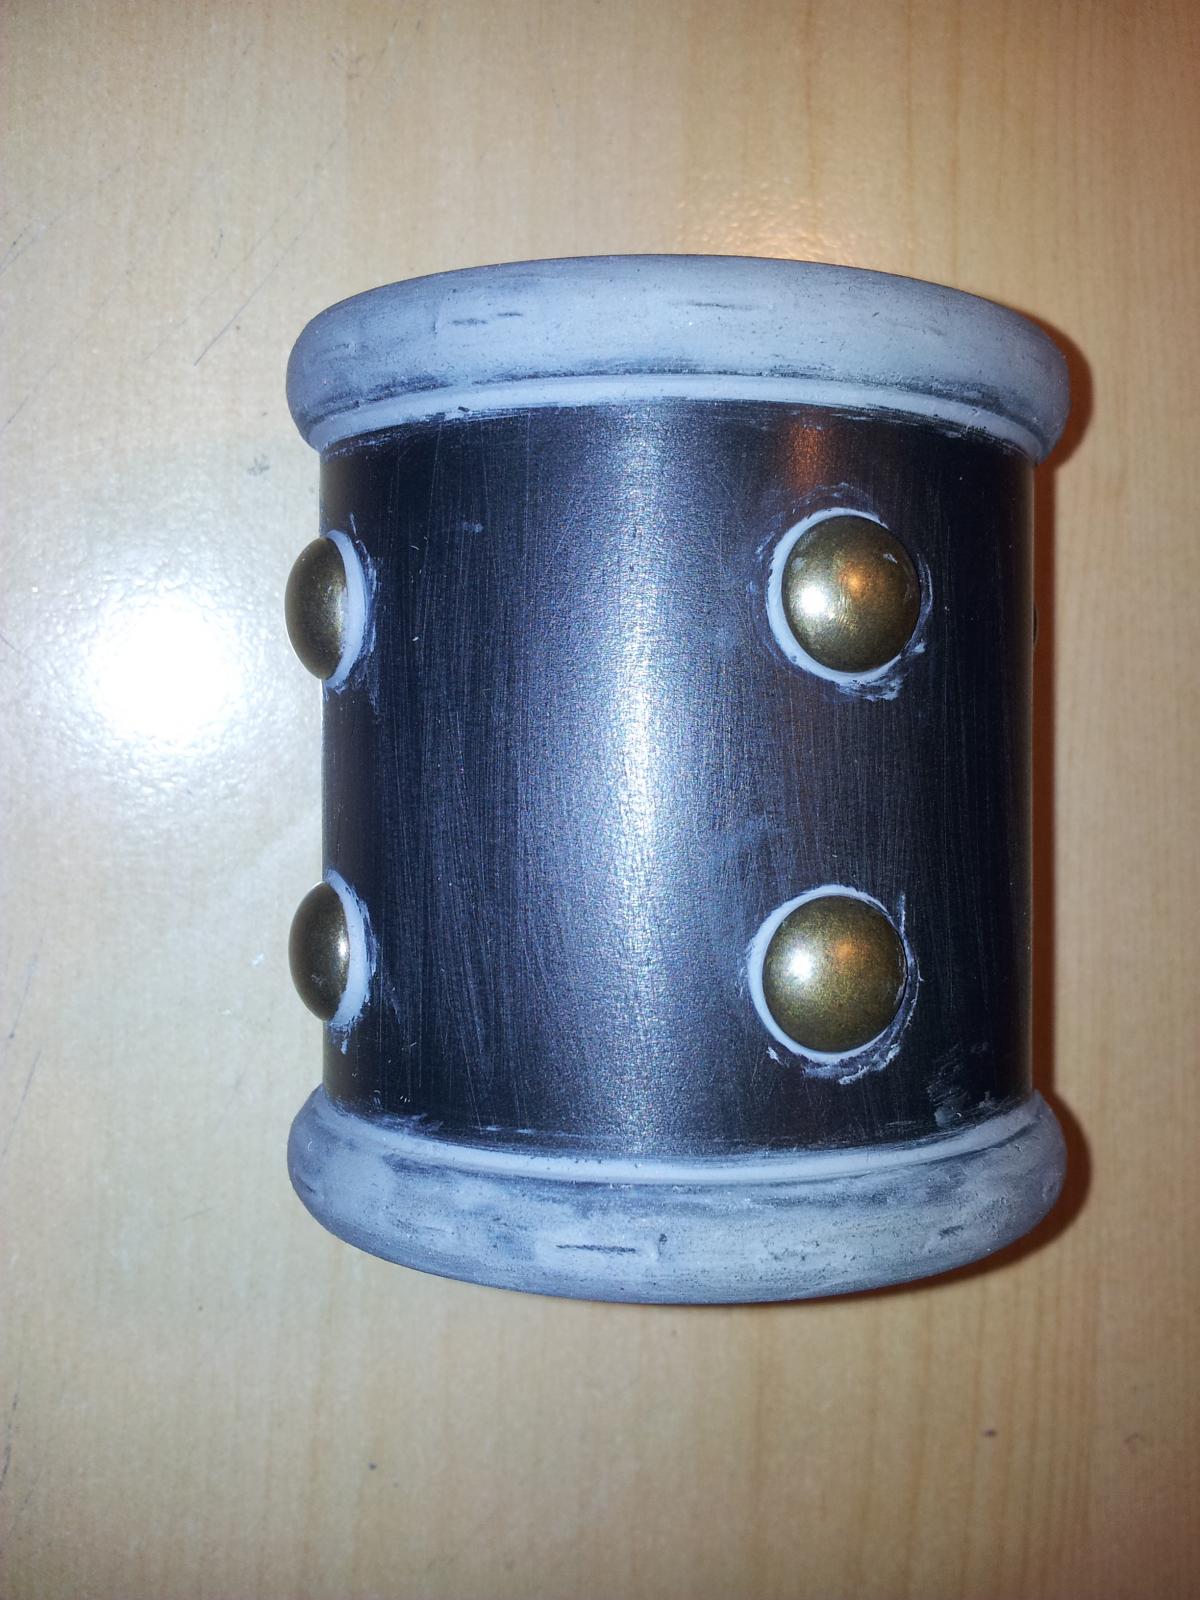
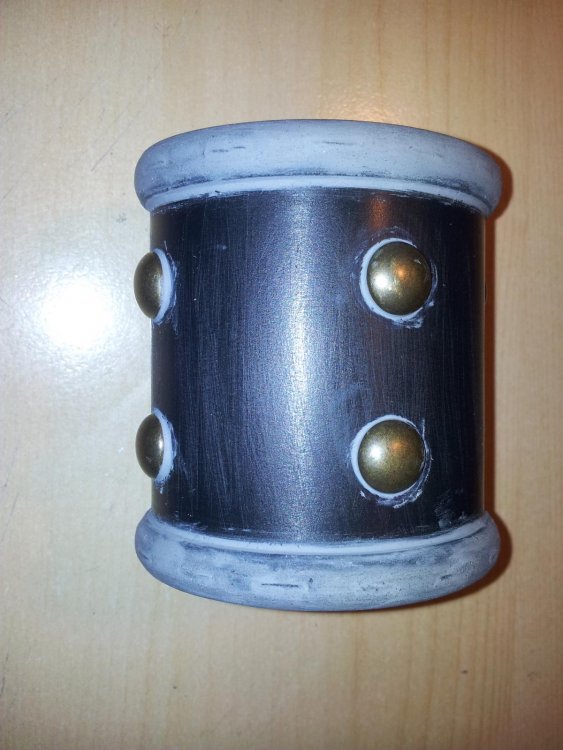
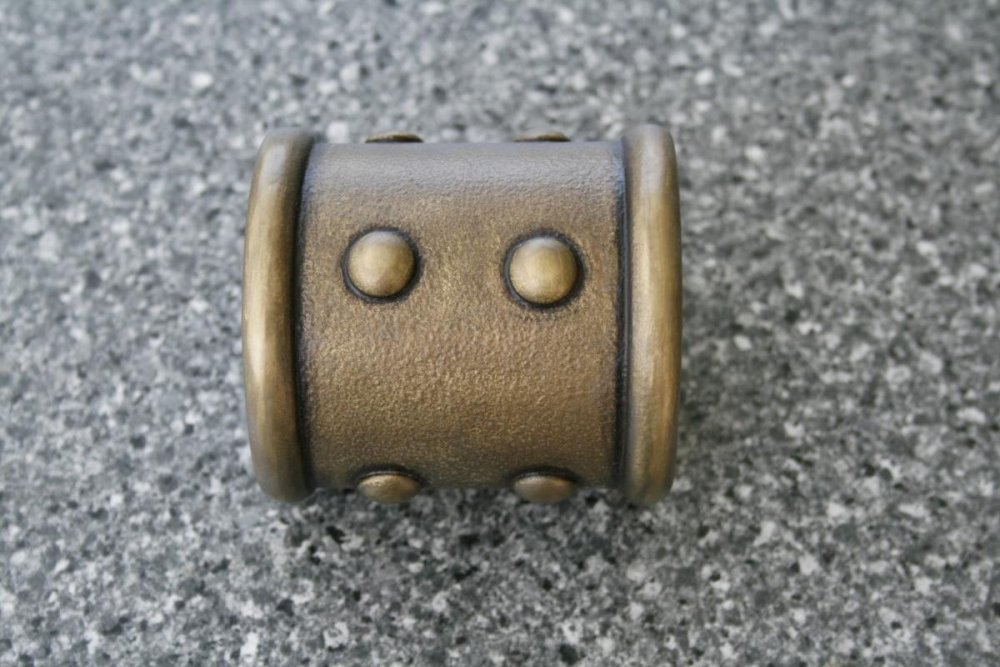
Bracelet The bracelet is made of my favourite and hot loved 3 mm PVC sheet. I heated it carefully with the hot airgun and sewed the open gap together. Then I filled the gap with acrylic sealant. Of course, it’s a little bit tricky to come in (I use a rolled piece of PET-foil) and out (with soap or Vaseline) but it works. I can’t recommend Vaseline to come in - the colour on your hands wouldn’t hold and look properly anymore. After a troop, It doesn’t matter. The eight buttons are “real” metal buttons 12 mm in average. The embossments at the edges are 10 mm wide. I used a 10 mm strip of PVC sheet and grinded it in the right shape. Then I heated it and sewed it down on the edges. Make sure, that you’ll build a pipes for the thread, so it’ll be easier to spackle the roughness whith the acrylic sealant. And again: Of corse, real metal would be more “chic”!

-
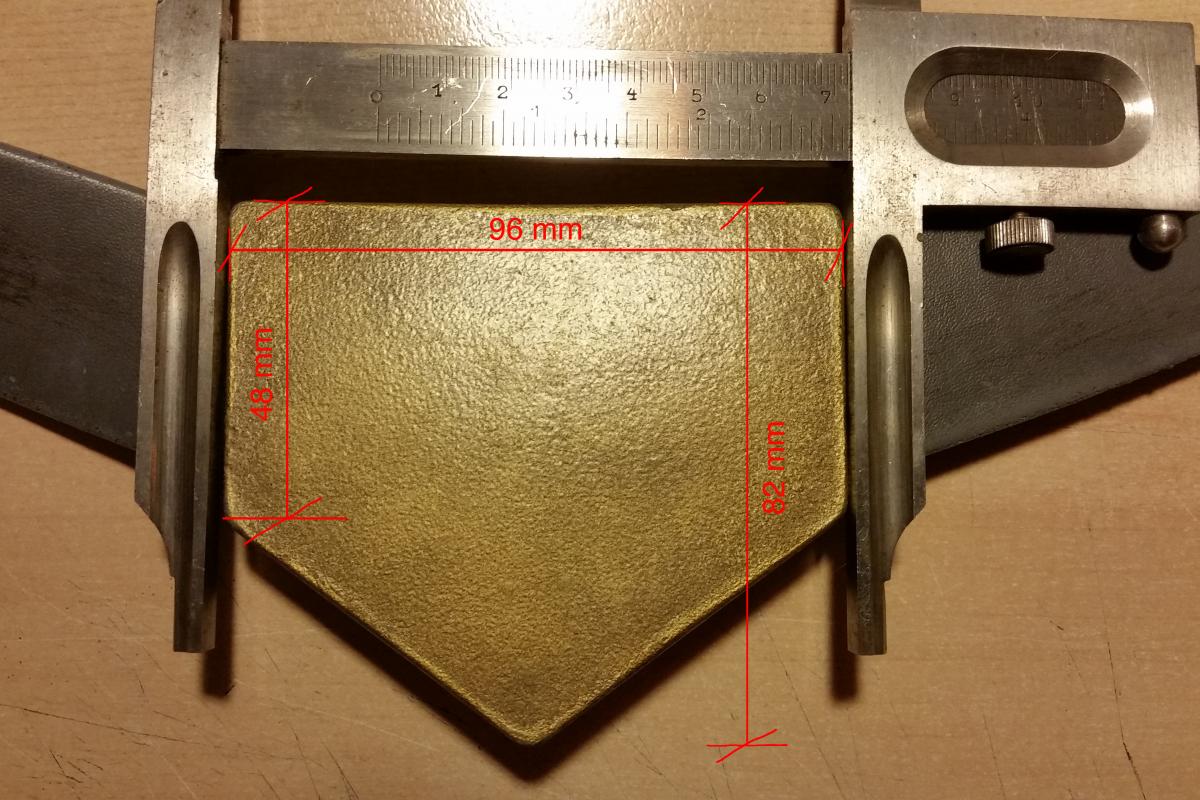
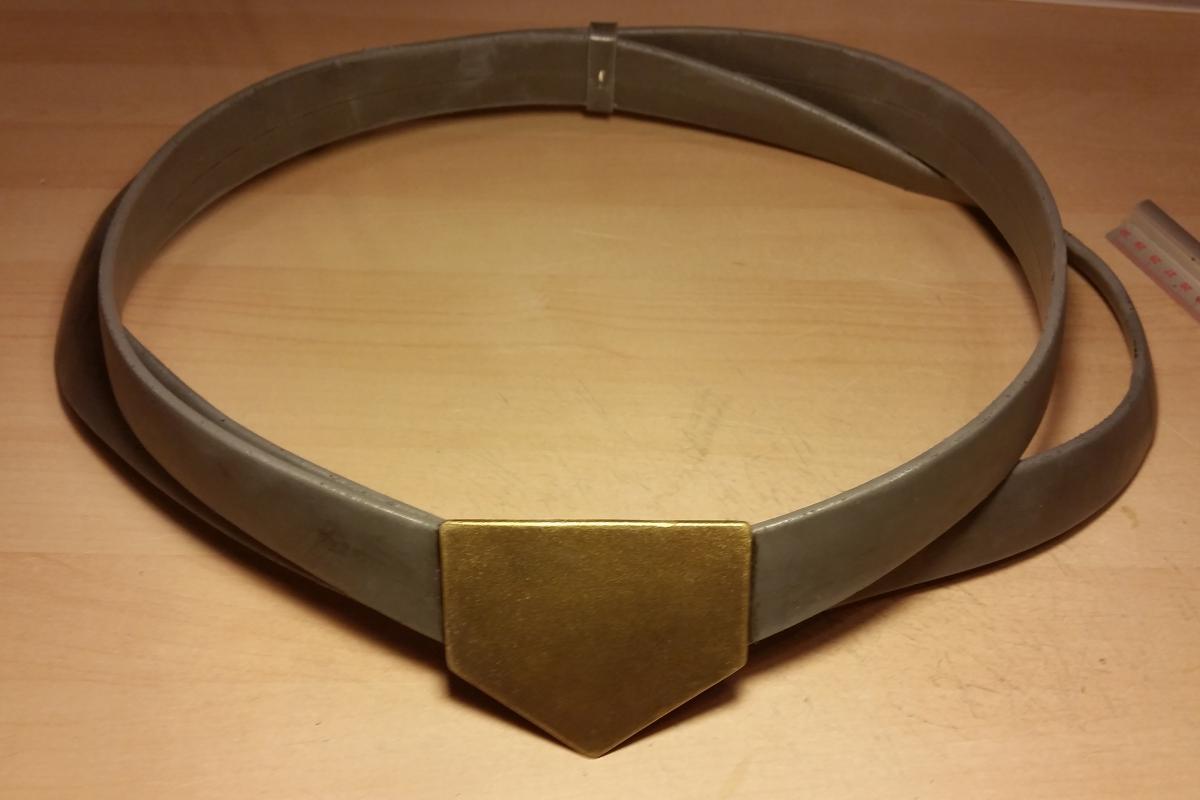
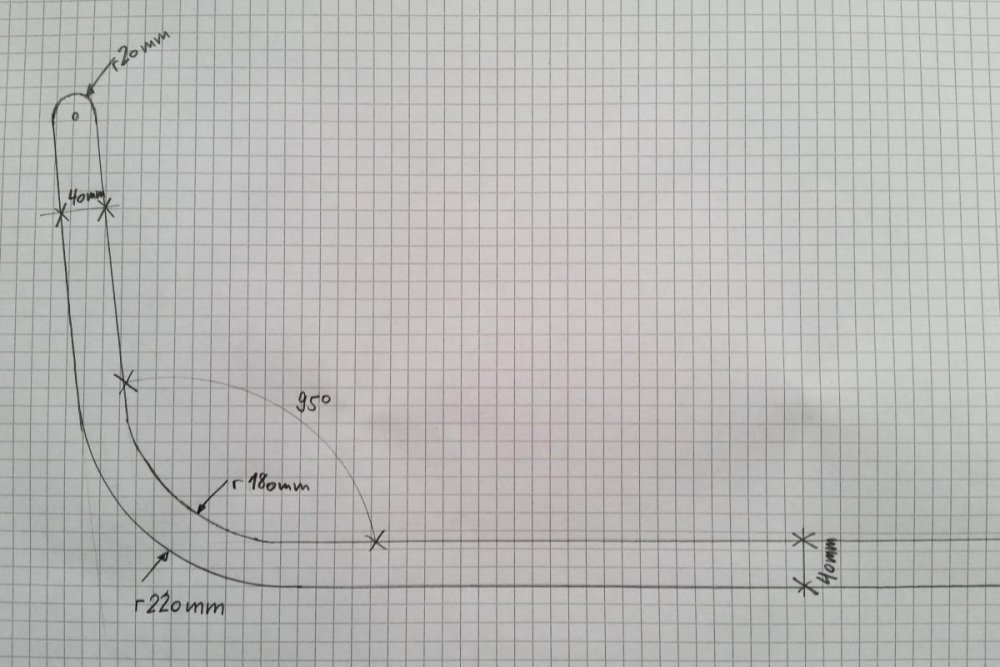
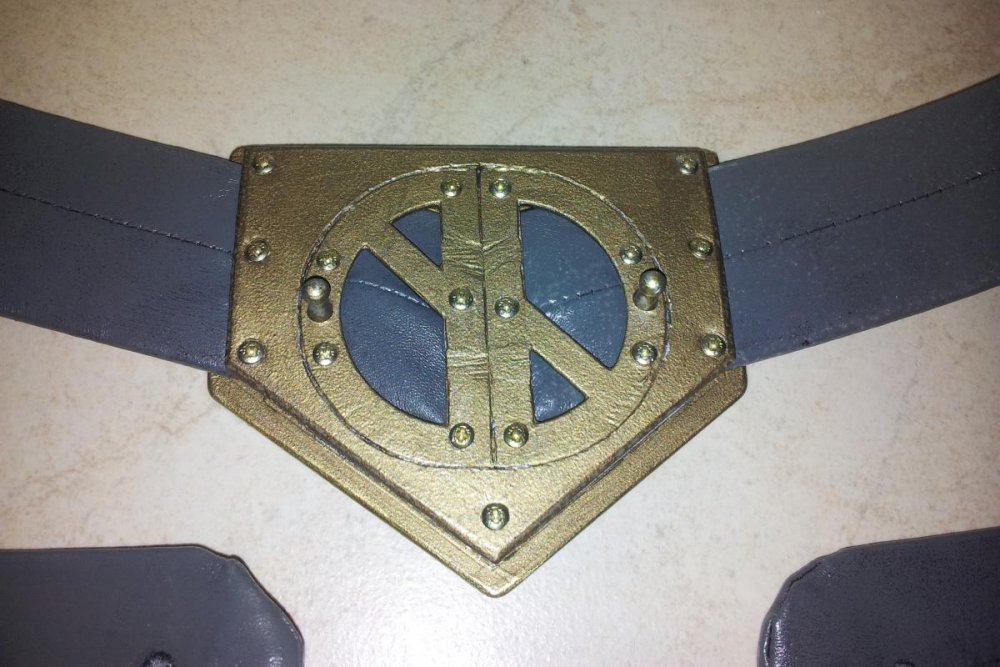
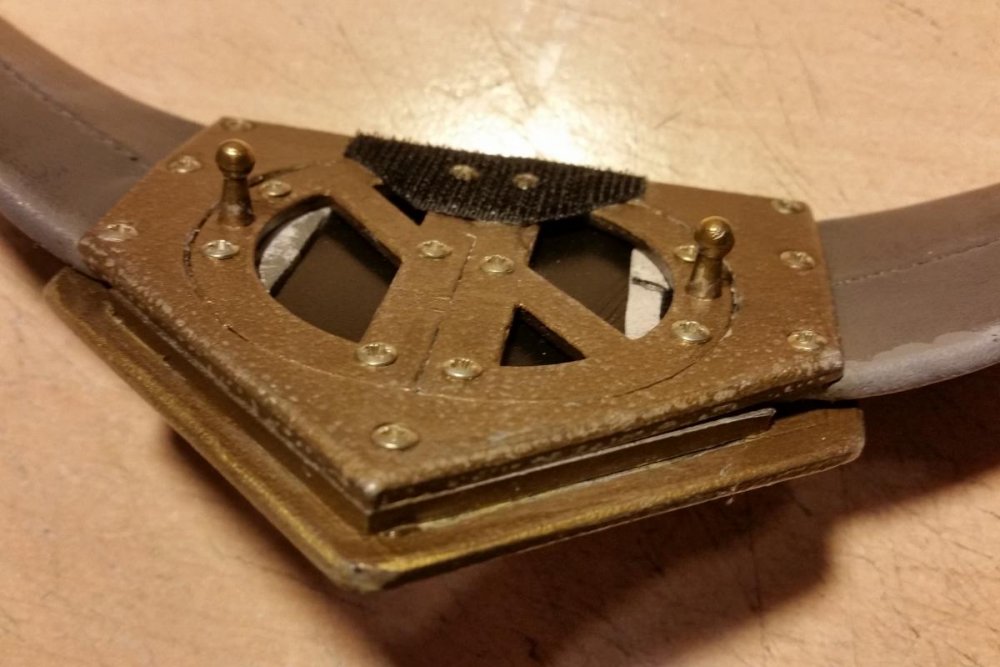
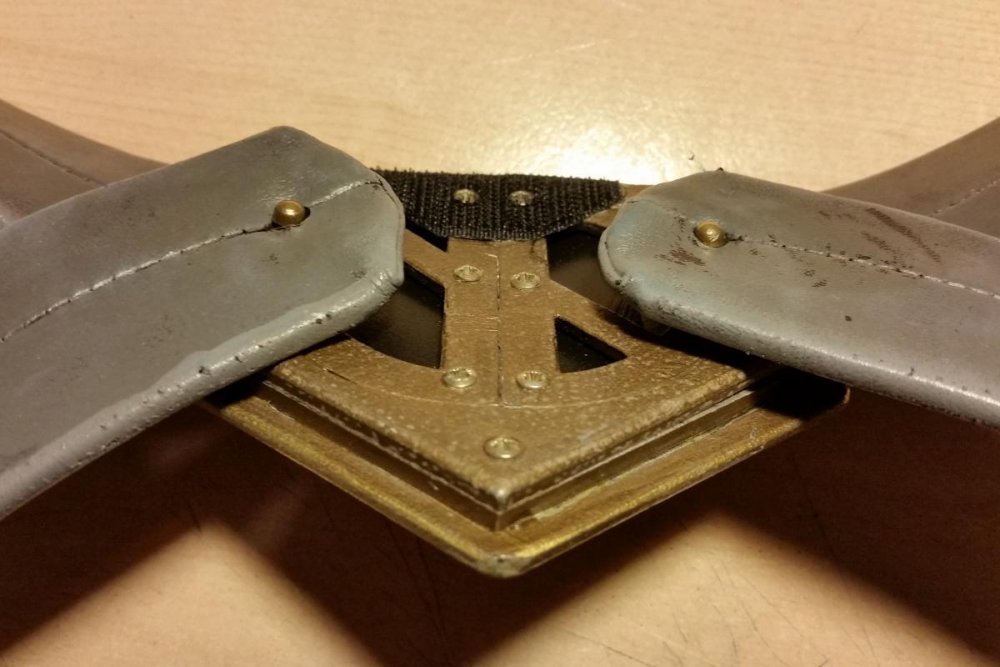
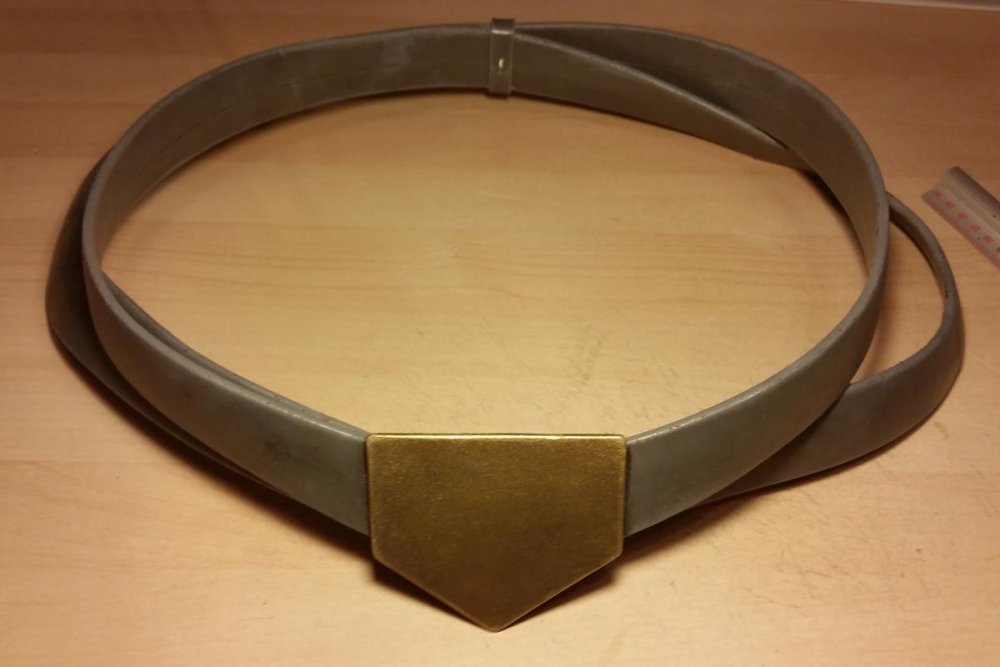
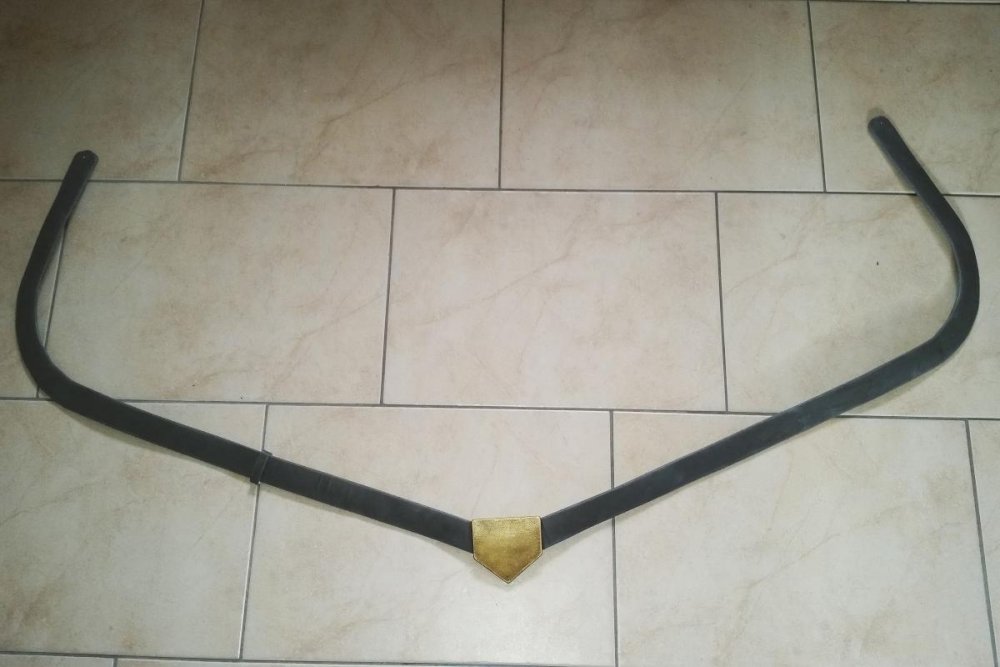
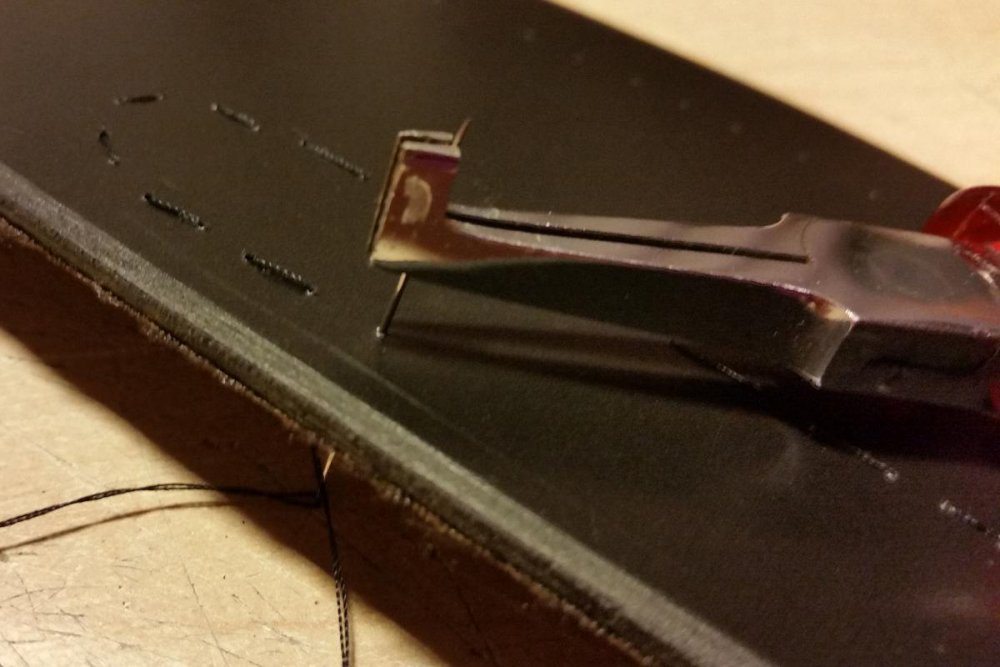
Belt and belt buckle The crosswise worn dark grey belts are made of solid 40 mm wide (faux) leather. I bought two identical faux leather belts in over length. Unfortunately the inner edge of the lower worn belt part started to tilt outward on my thighs, so I had to curve them. I cut out five slim wedges on each strap and sewed them together again. I got an angle of around 95°. To cover the stiches I had to sew two overlays of thin faux leather. Of course I also didn’t got any faux leather in the colour I wanted, so I had to paint it in dark grey. Well, I had to weathering it anyway … Acrylic colour seems to be a good idea to paint faux leather, as long the surface is made of vinyl … The buckle is made of 3 layers of 3 mm PVC sheet. It builds a point-down right-angled pentagon of 92 x 86 mm. I used the buckles of the belts I bought and sawed them in half because I needed two identical pieces with a bolt. I had to drill some holes in it to fix it with the PVC sheets and the upper belt loops from the backside. I used an acrylic colour mix of different gold and brown shades and dabbed it with a sponge on the PVC. If you dab in half dried color in various layers you’ll get a kind of hammer paint look. I sealed it with some clear acrylic enamel. If you have the chance to make the belt and the buckle of real thick and solid leather and metal, please do it! I'm sure it’ll turn out great!

-
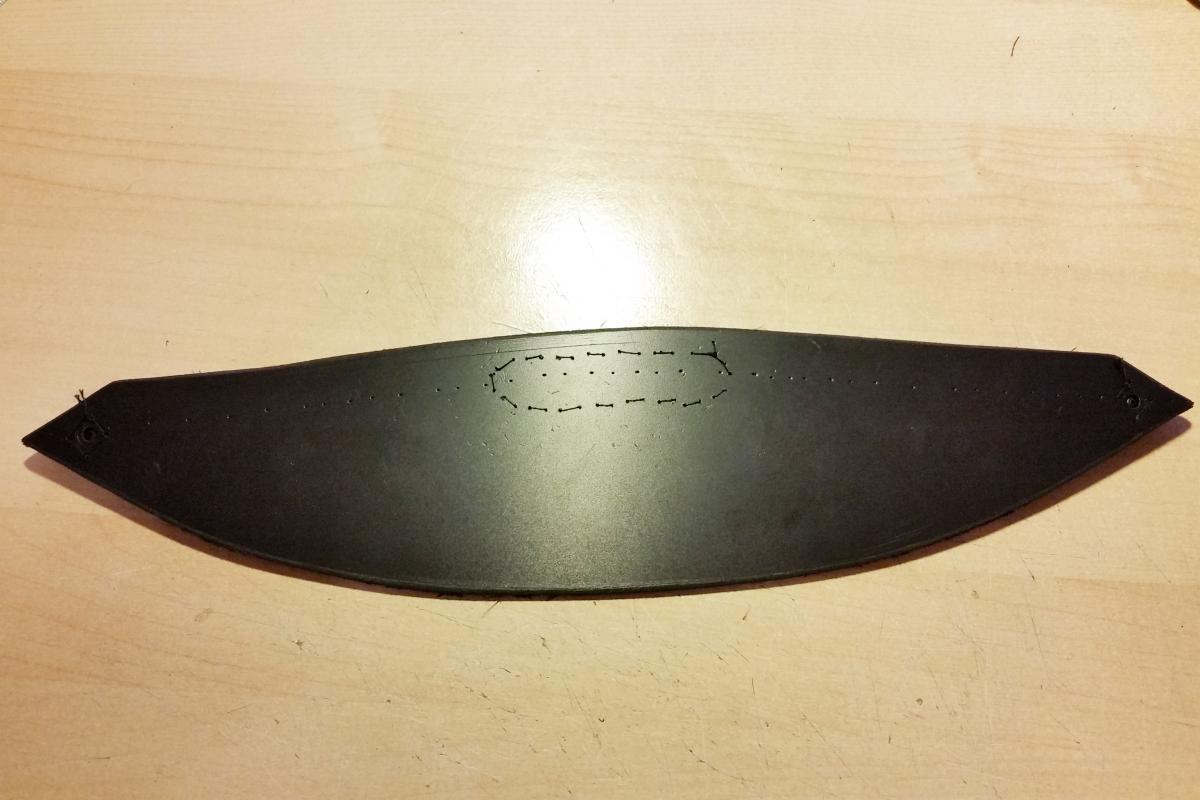
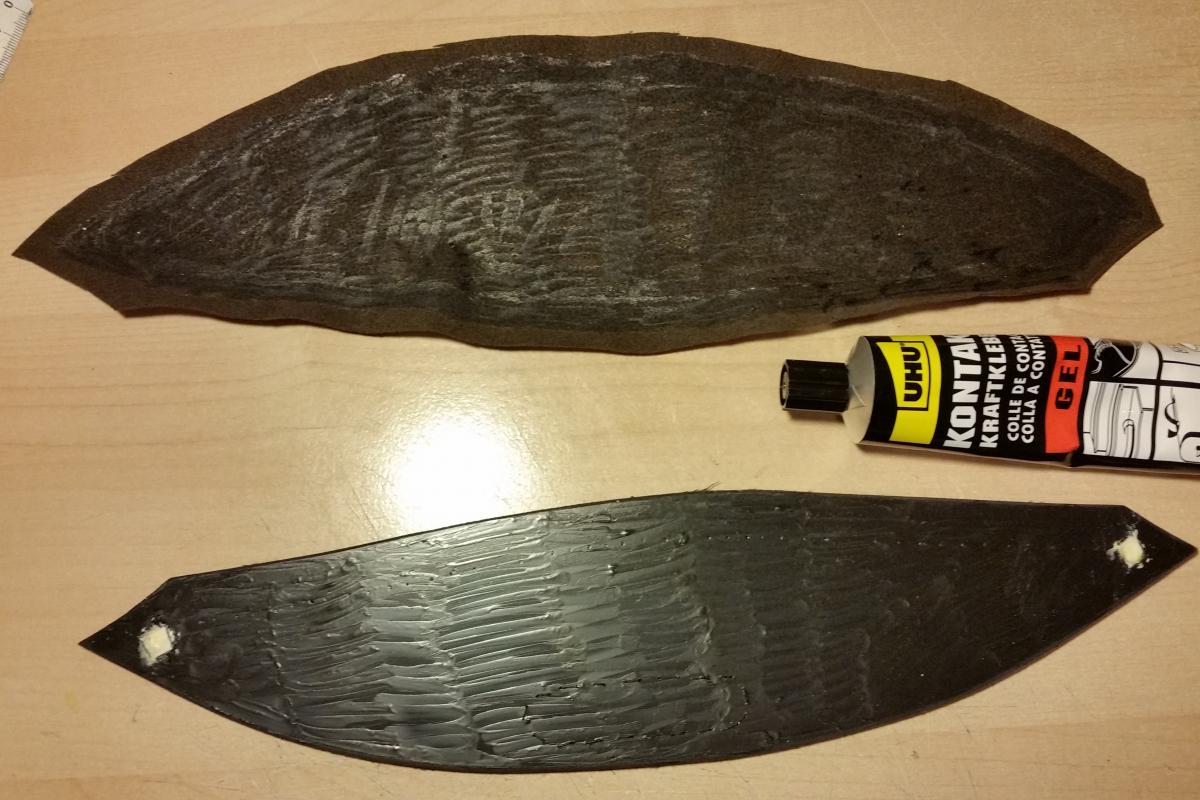
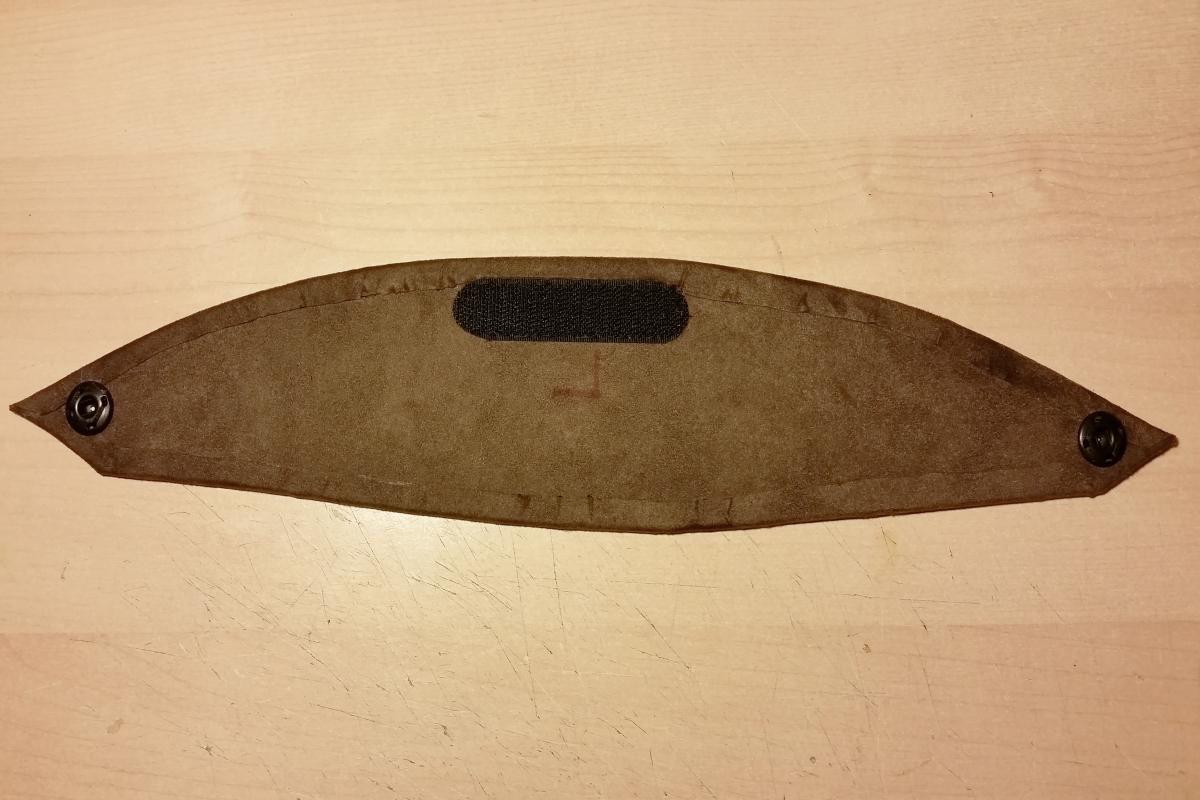
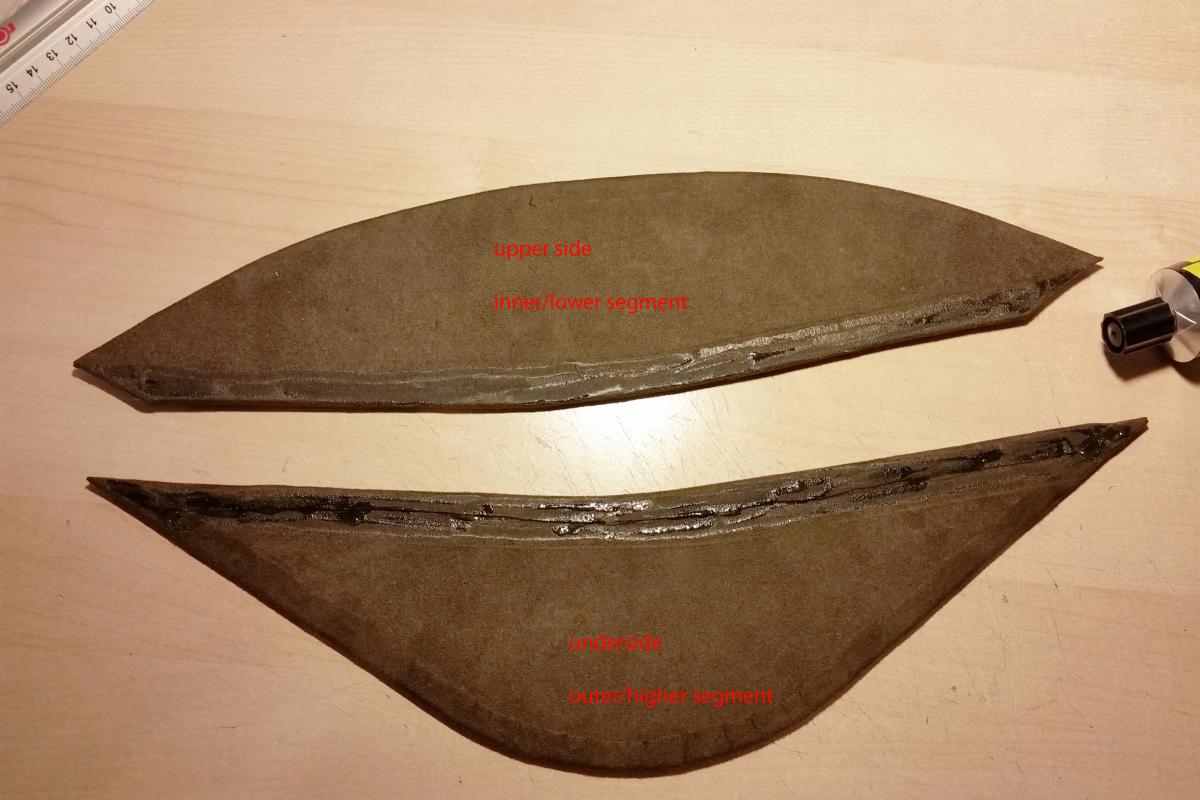
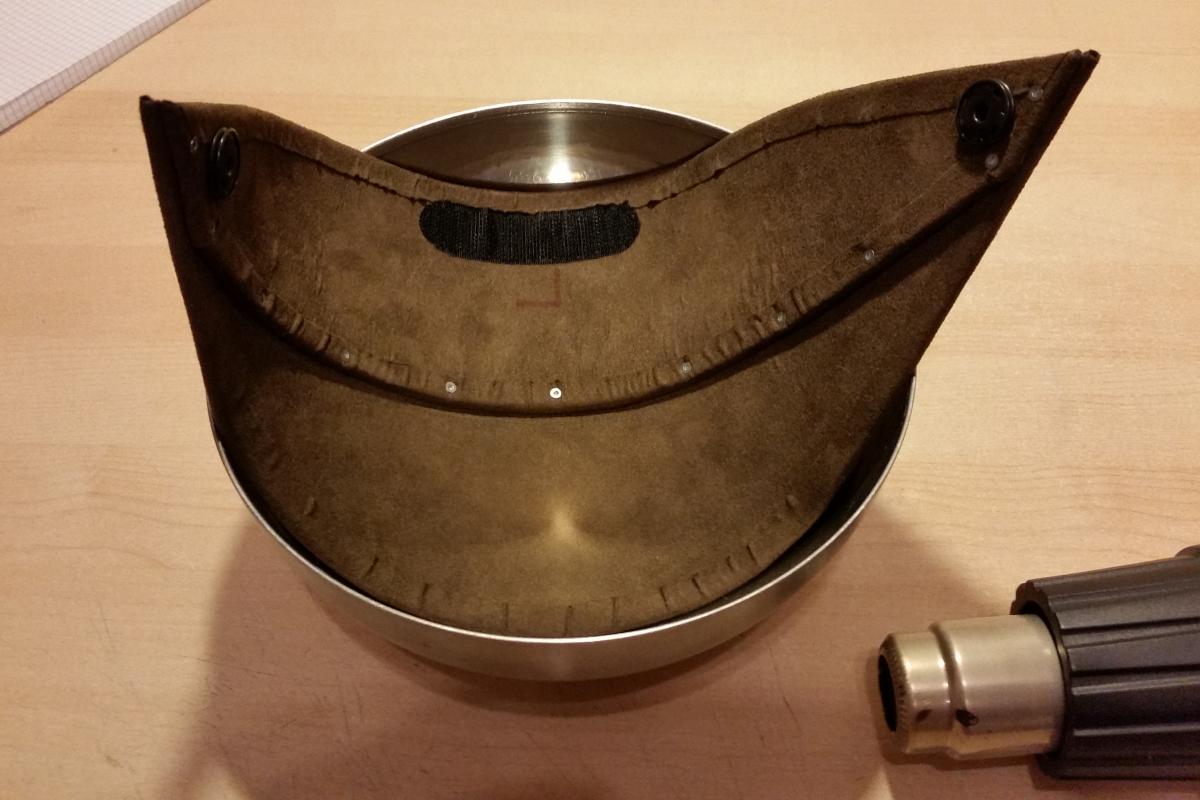
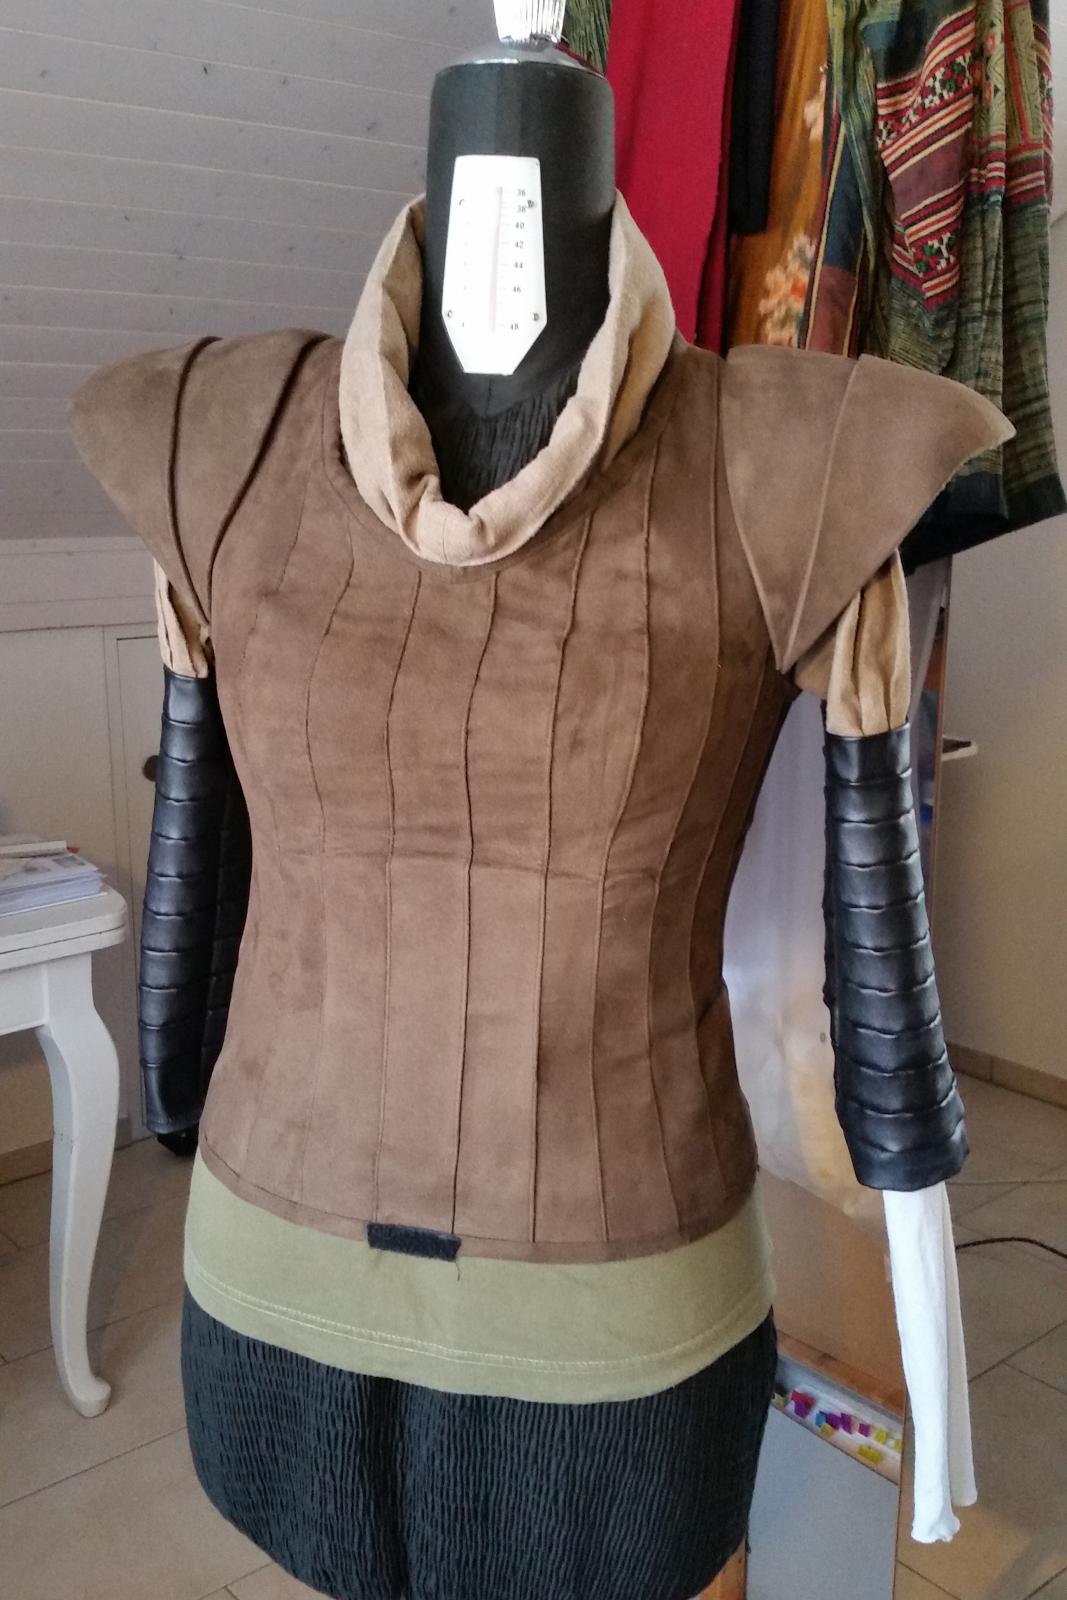
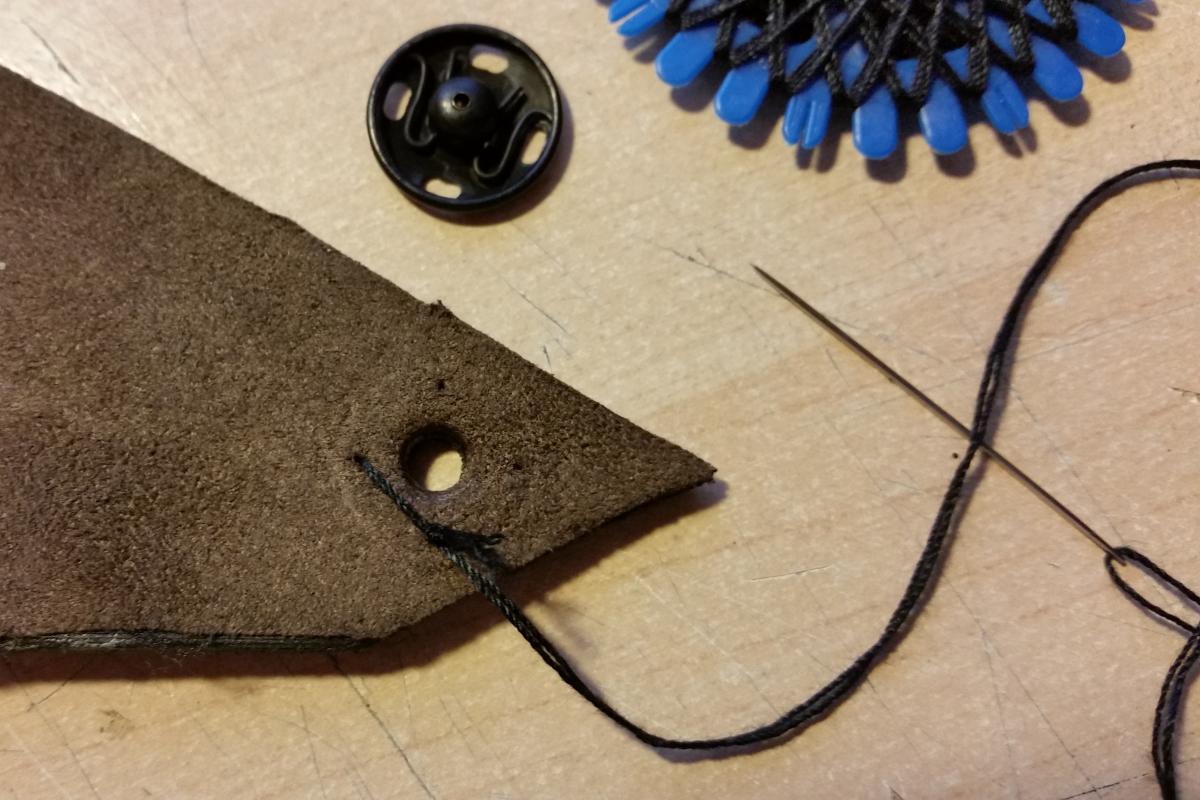
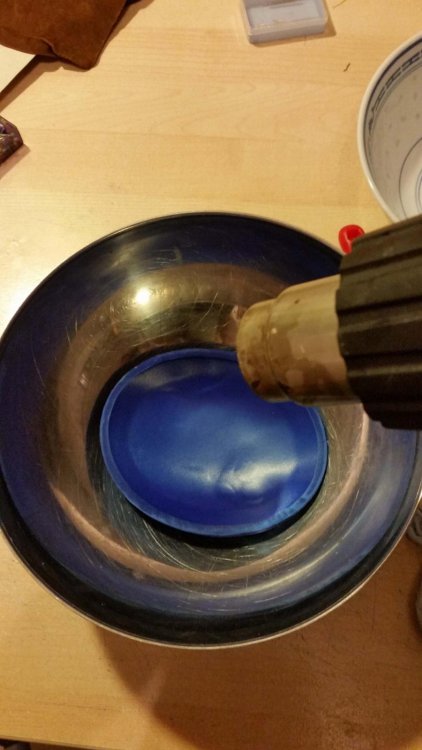
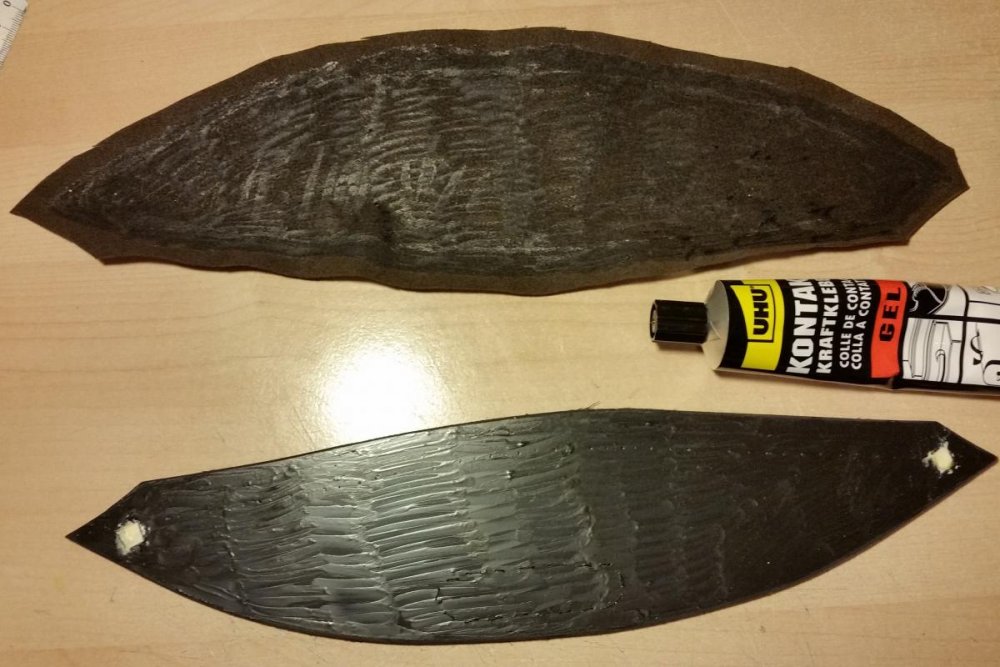
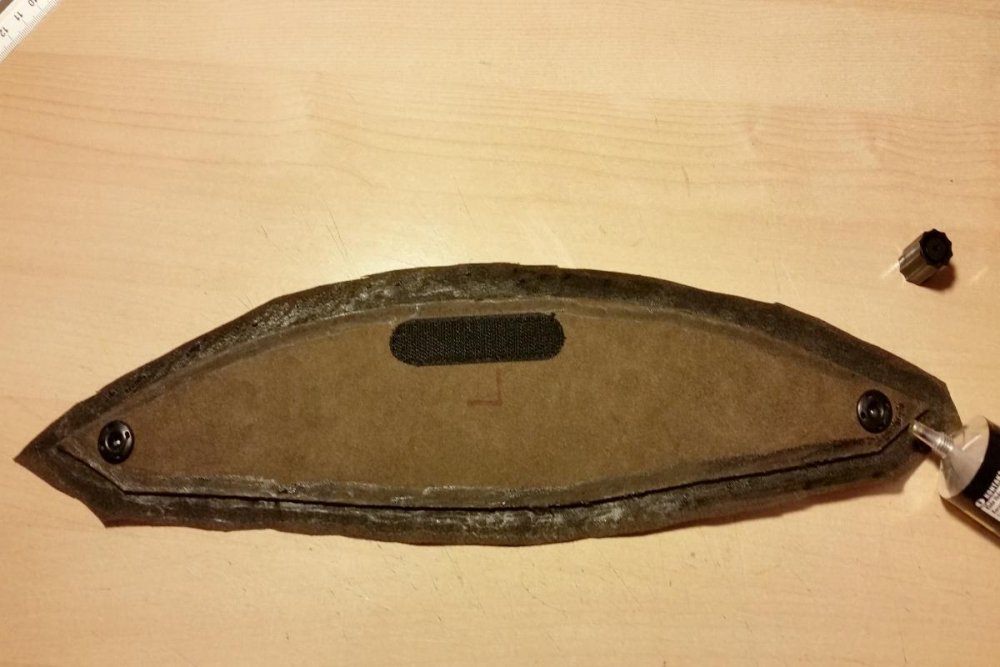
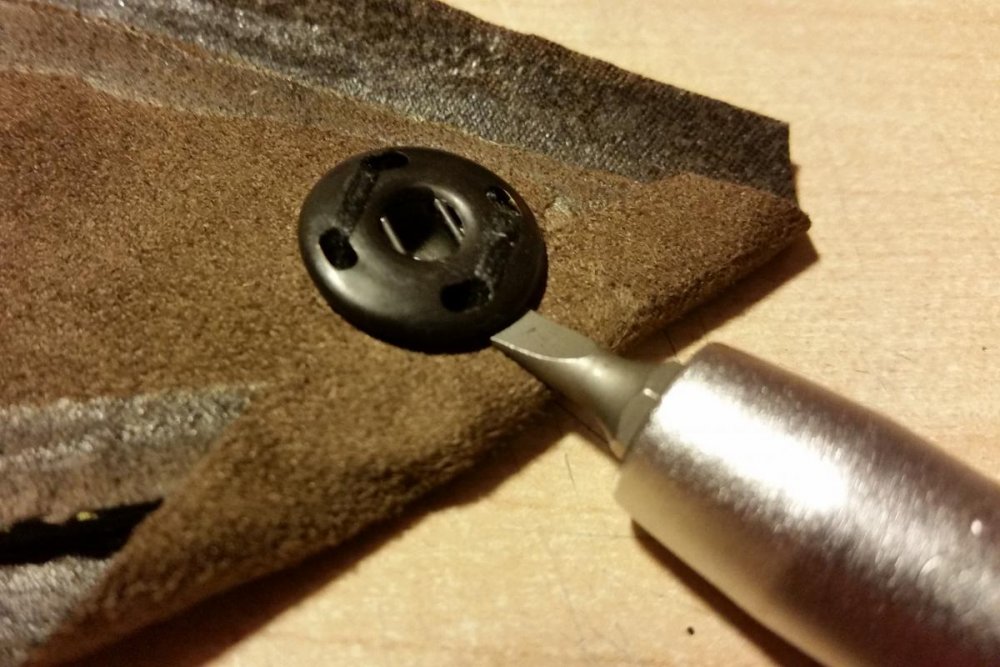
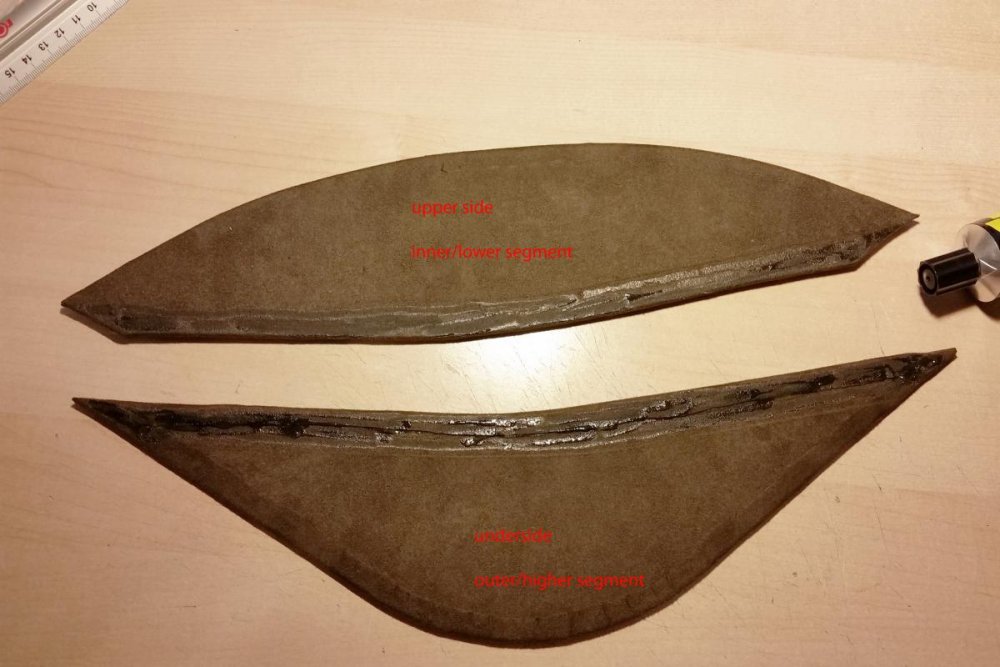
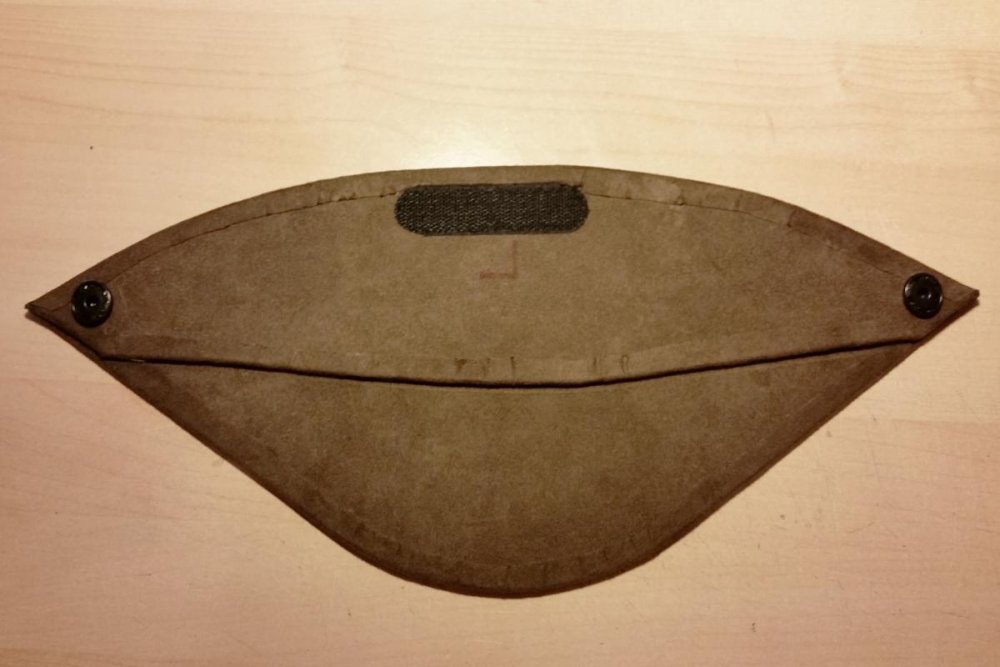
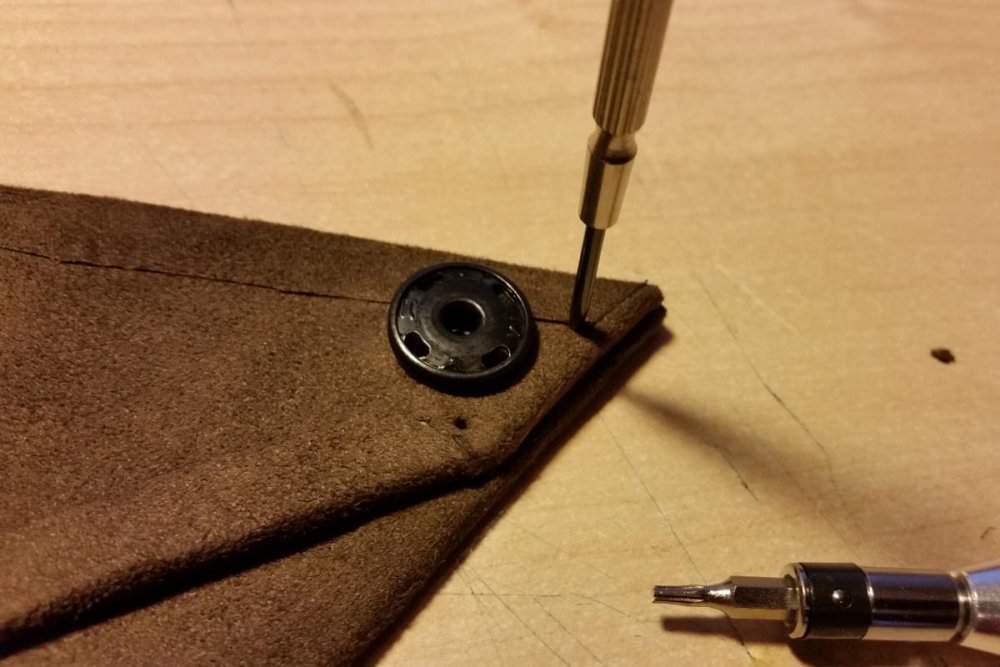
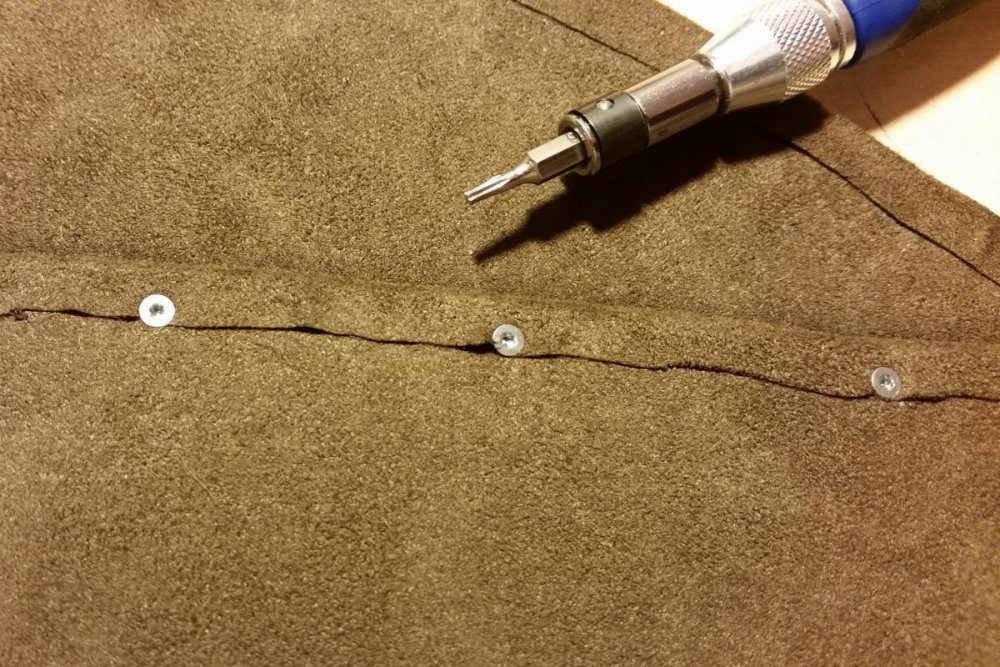
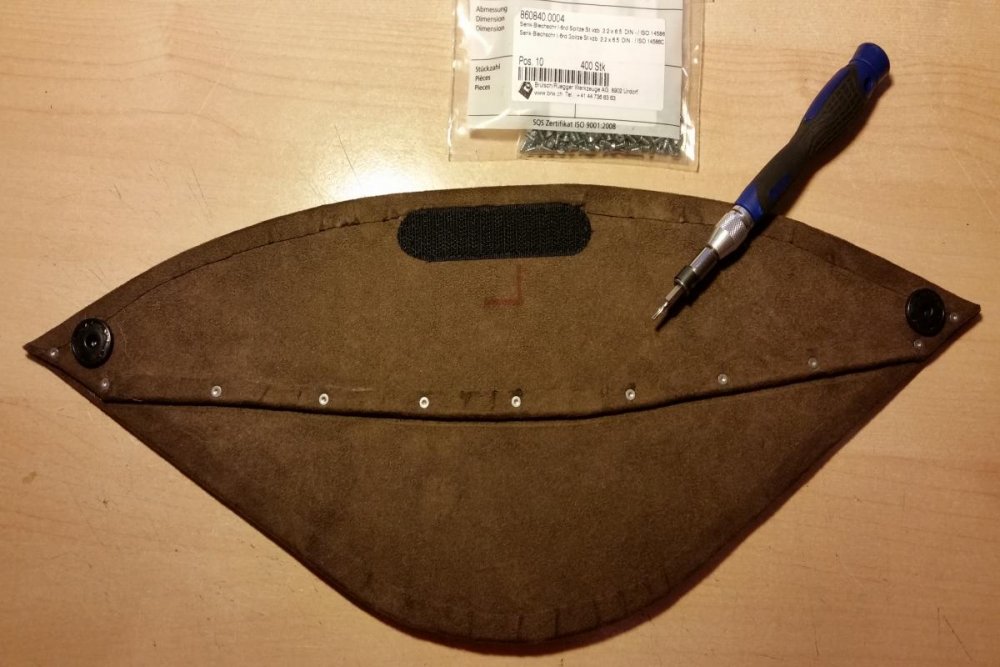
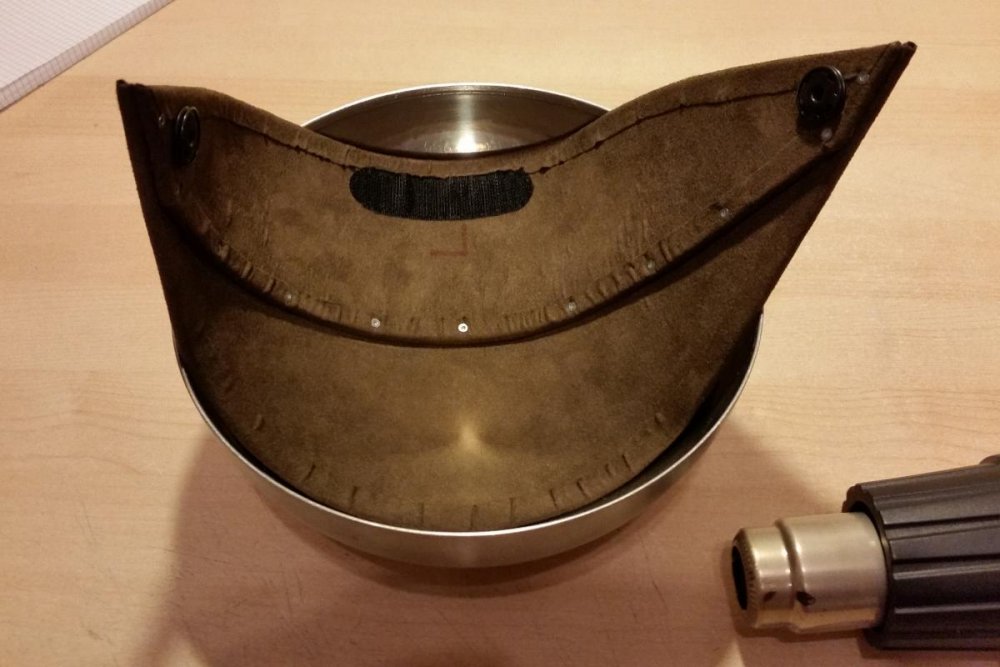
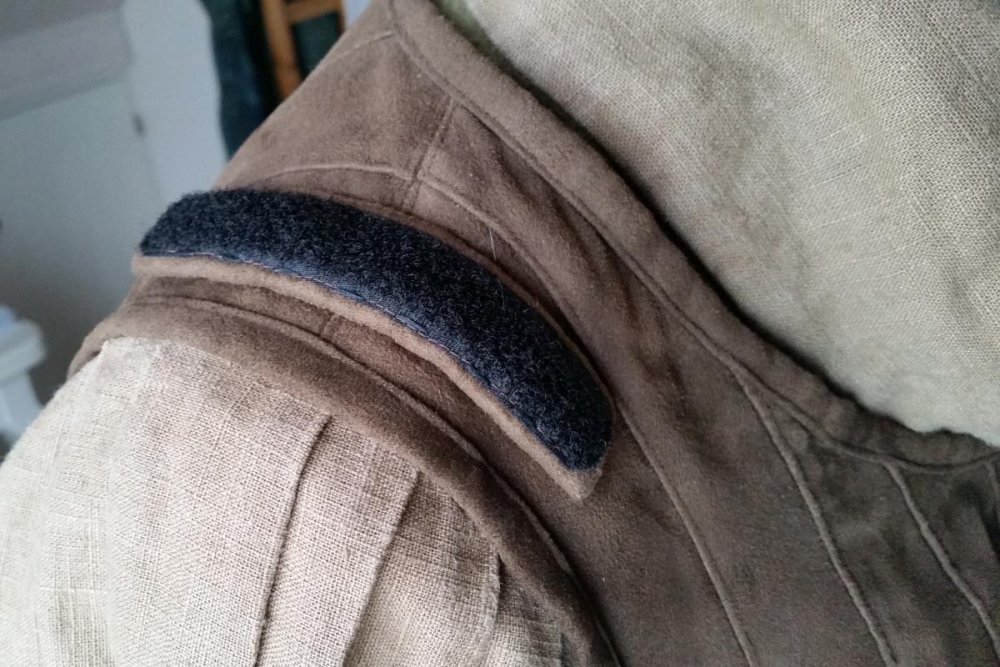
Shoulderbells – Second part Before I applied the faux buckskin pieces on the upper side of the lower/inner segment I filled the holes I did for the snap fasteners with some acrylic sealant from the upper side. In the meantime I was able to apply the under and the upper side of the outer/higher segments and grinded the edges with the glue allowance. It is necessary to apply the smaller buckskin pieces on the underside, before applying the bigger pieces on the upper side. … after the sealant was dry, I applied the bigger buckskin pieces on the upper side of the lower/inner segments and grinded the edges accurately. A screw driver assisted me to place the glue allowance carefully under the snap fastener. I applied contact adhesive along the inner edge of the underside of the outer/higher segment and along the under lapping edge of the upper side of the inner/lower segment. Be careful that you apply the contact adhesive just to the overlapping line. Than I positioned the two segments and pressed together. With a stitching awl I pre-stung small holes along the under lapping edge. After that I used tiny countersunk head screws to connect the two segments firmly. Well, the next step is a little bit tricky. I used a small stainless steel IKEA serving bowl and a heat gun to warm up the shoulder bells carefully. It needs some intuition to not overheat the material. I had to do it step by step and the bowl and the dummy helped to bend the shoulder bells into it’s round shape. For the last step I had to sew the stud of the snap fastener on the corsage. It’s necessary to identify the correct snap fastener position while you wear the corsage on your body and not on the dummy. So far so good for the shoulder bells ...


-
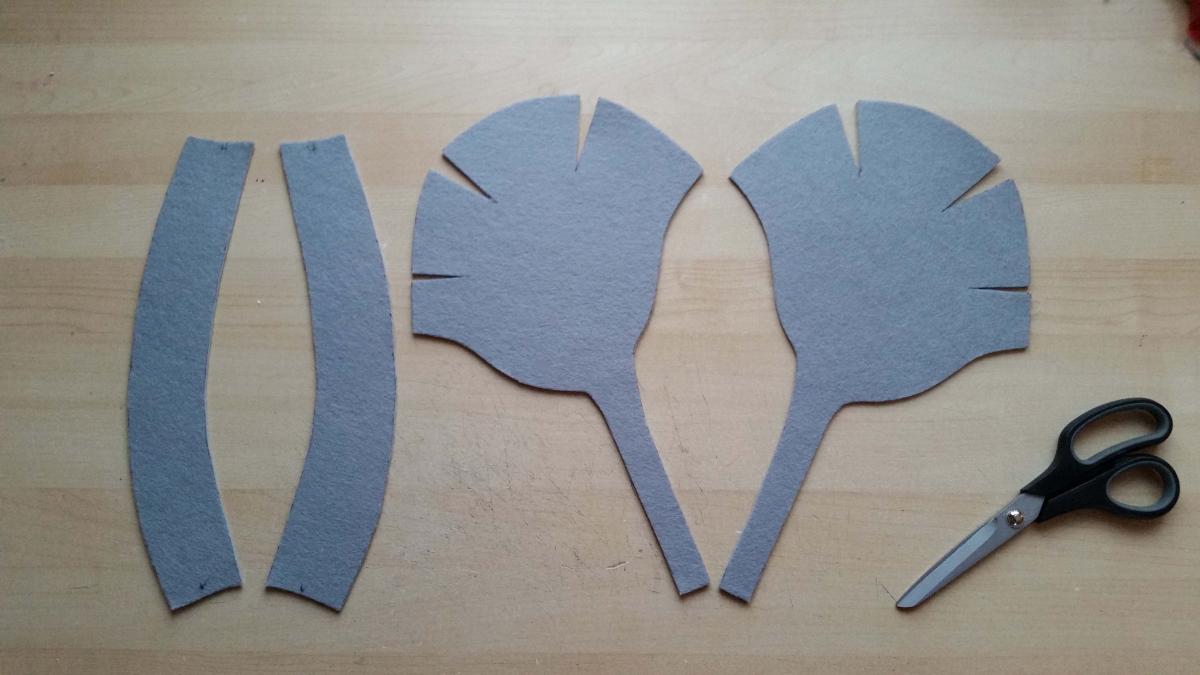
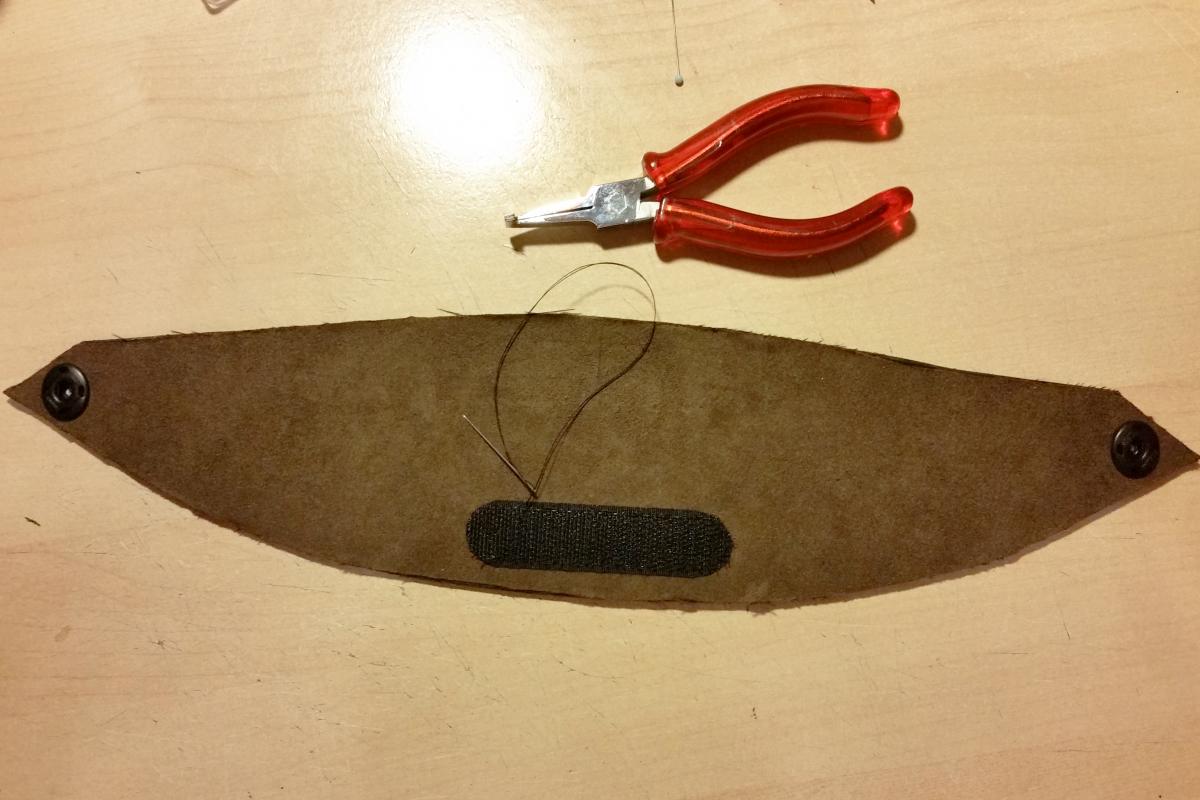
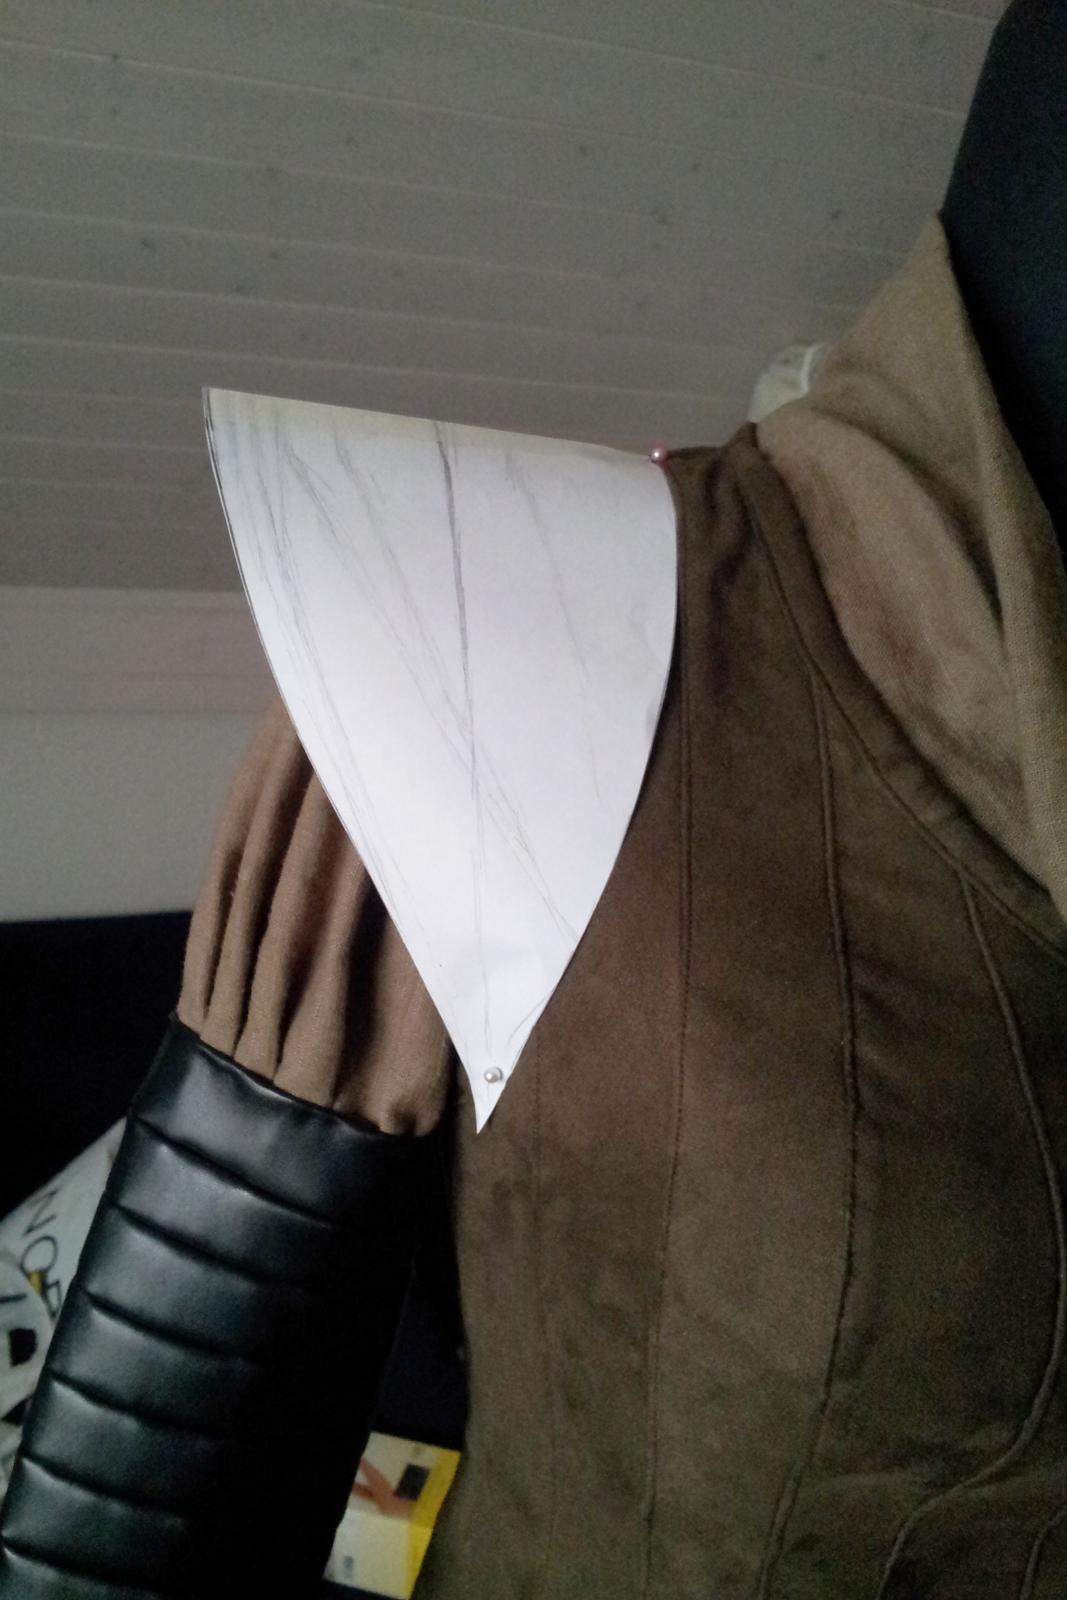
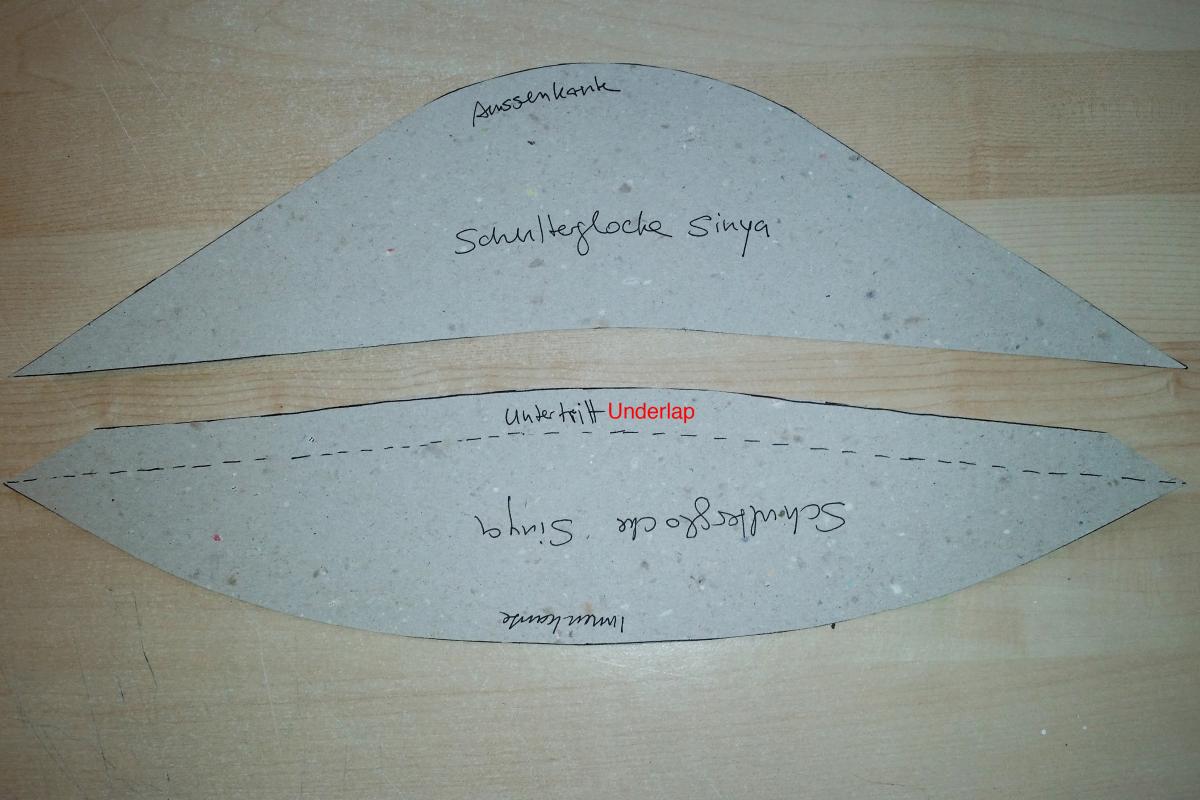
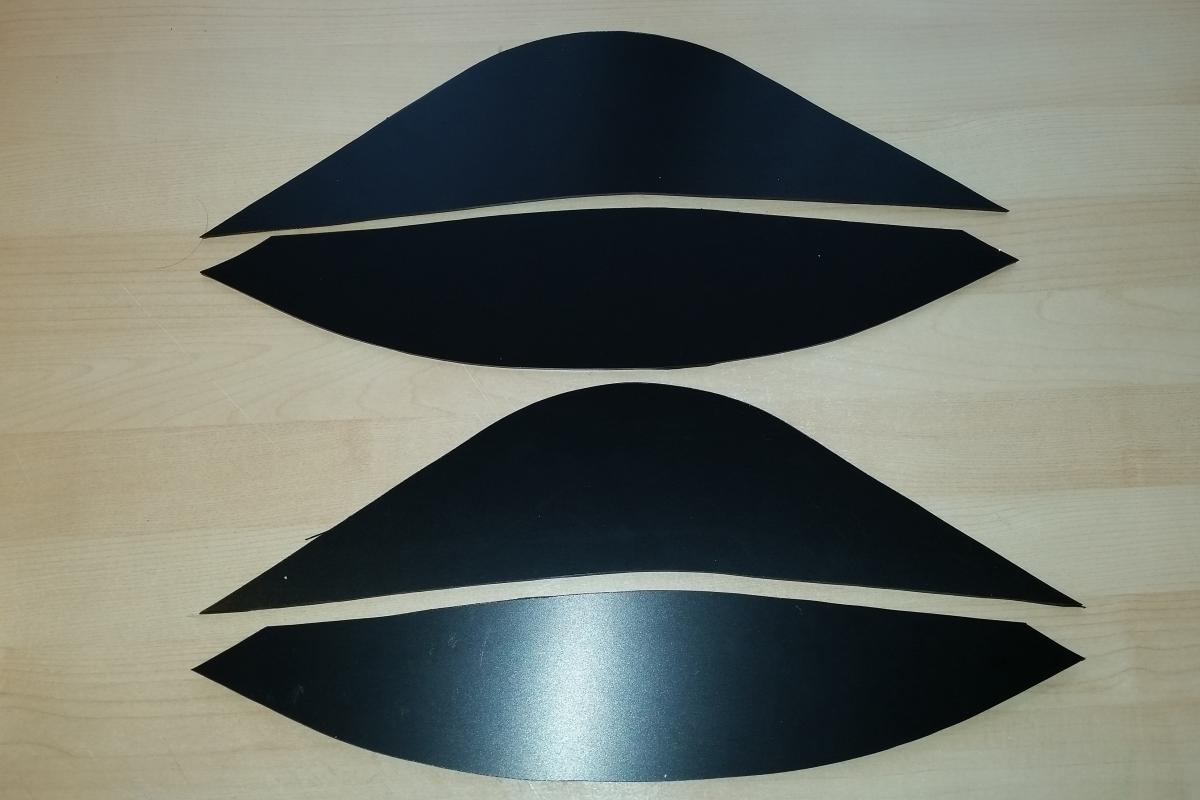
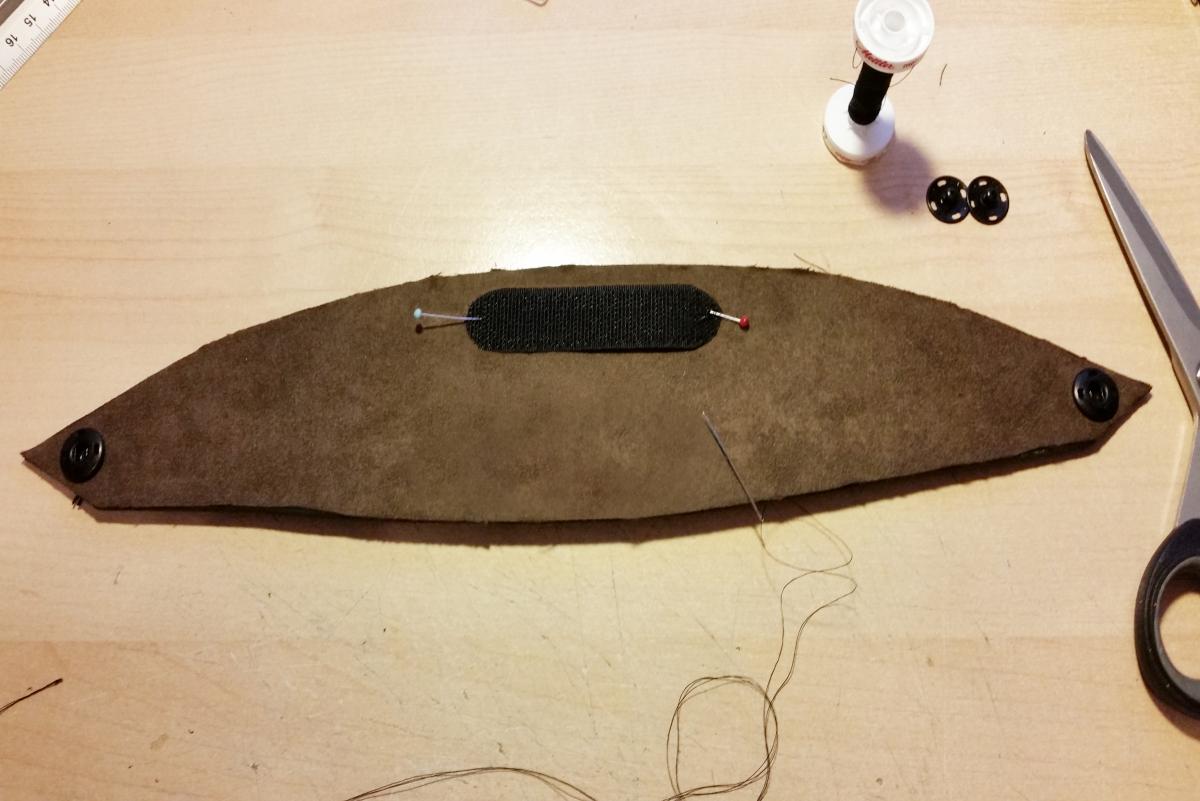
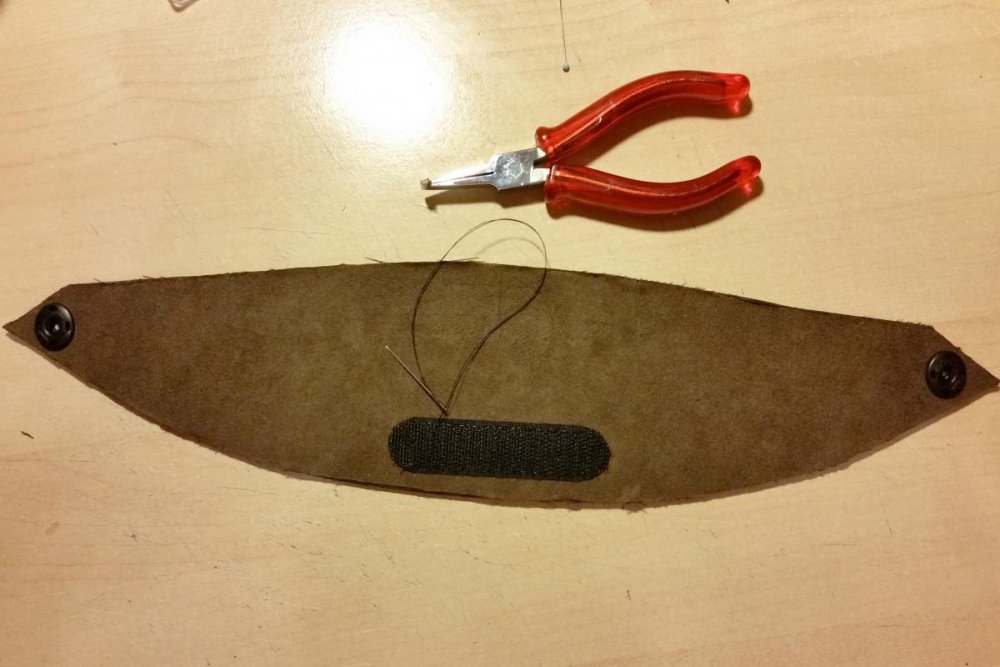
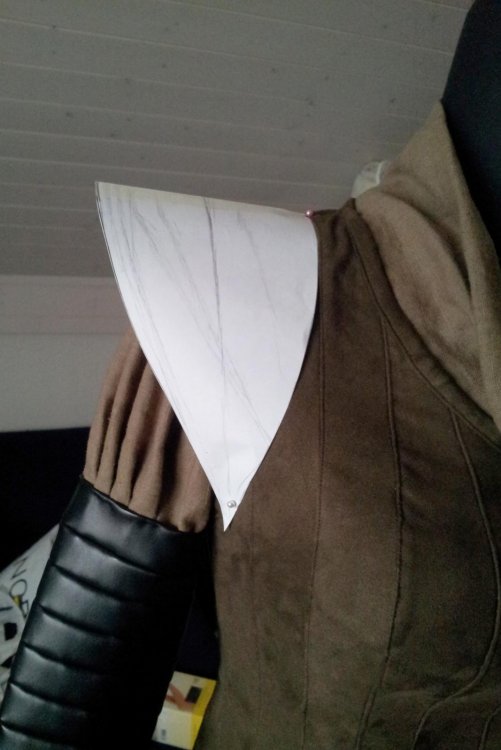
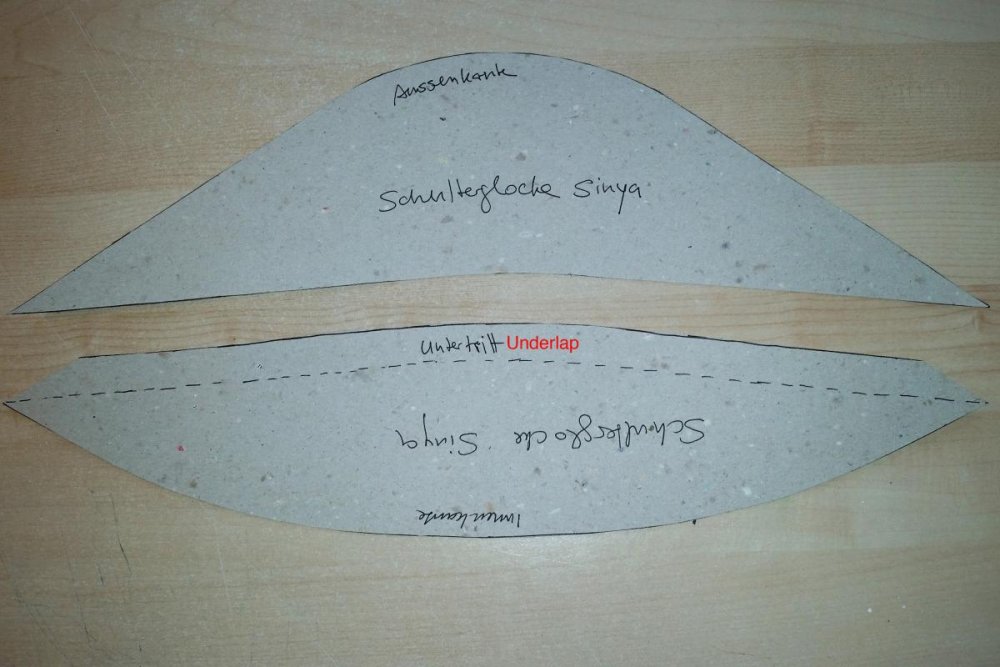
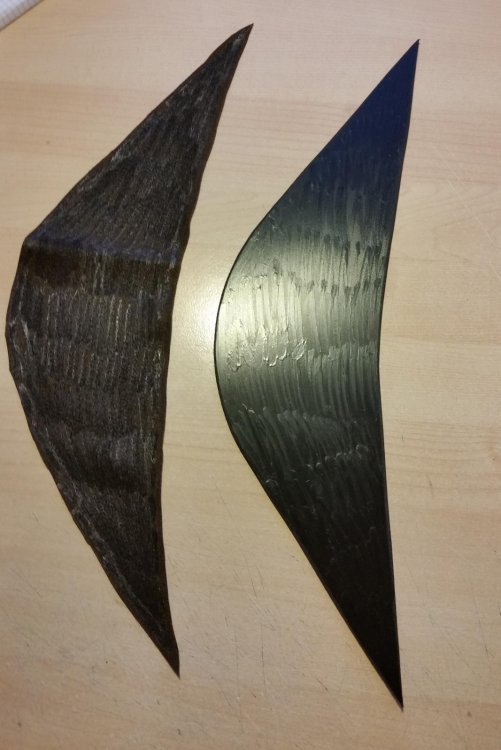
Shoulderbells – First part The shoulder bells are made of 3-millimeter PVC sheet and the same faux buckskin as used for the corsage. Every shoulder bell shows two overlapping segments. The outer/higher segment overlaps the inner/lower one by 15 or 20 millimetres. For a first step I sewed a velcro fastener on each shoulder and on front of the lower edge of the corsage. The Velcro Fastener will help to keep the shoulder Bells and the bucklet of the belt in position. Be sure that you’re sewing the “loop”-side on the corsage. After that I created a paper pattern to get the shape and transferred it on thin paperboard. Don’t forget to chart the 15 millimeter under lap on the inner/lower segment. Than I transferred the pattern on PVC sheet twice and cut it out. Next I transferred each pattern on the faux buckskin. I did four parts of each segment – two of them are exactly the same size as the pattern and two of them are bigger and show a 15 or 20 mm glue allowance. All in all there should be 8 buckskin pieces. Than I applied contact adhesive on the underside of the PVC sheets and the smaller faux buckskin pieces (without glue allowance) and agglutinated it. To plunge the socket of the (BIG) snap fastener, I made a small hole on each corner of the inner/lower segments. Using a strong thread I sewed the sockets on the underside if the inner/lower part. I also sewed some velcro fastener (“hook” side) on the inner edge of the underside. I used a small pilers to get the needle trough the material. I know, it’s unusual to sew something on PVC sheet, but it is one of the most solid ways to attach something when glue doesn’t work. As long as the stitches aren’t to close to each other, the PVC sheet will not break at the perforation.


-
Hi, I started to upload my WIP back in 2013. Hope it'll help you. best wishes Kathi
-
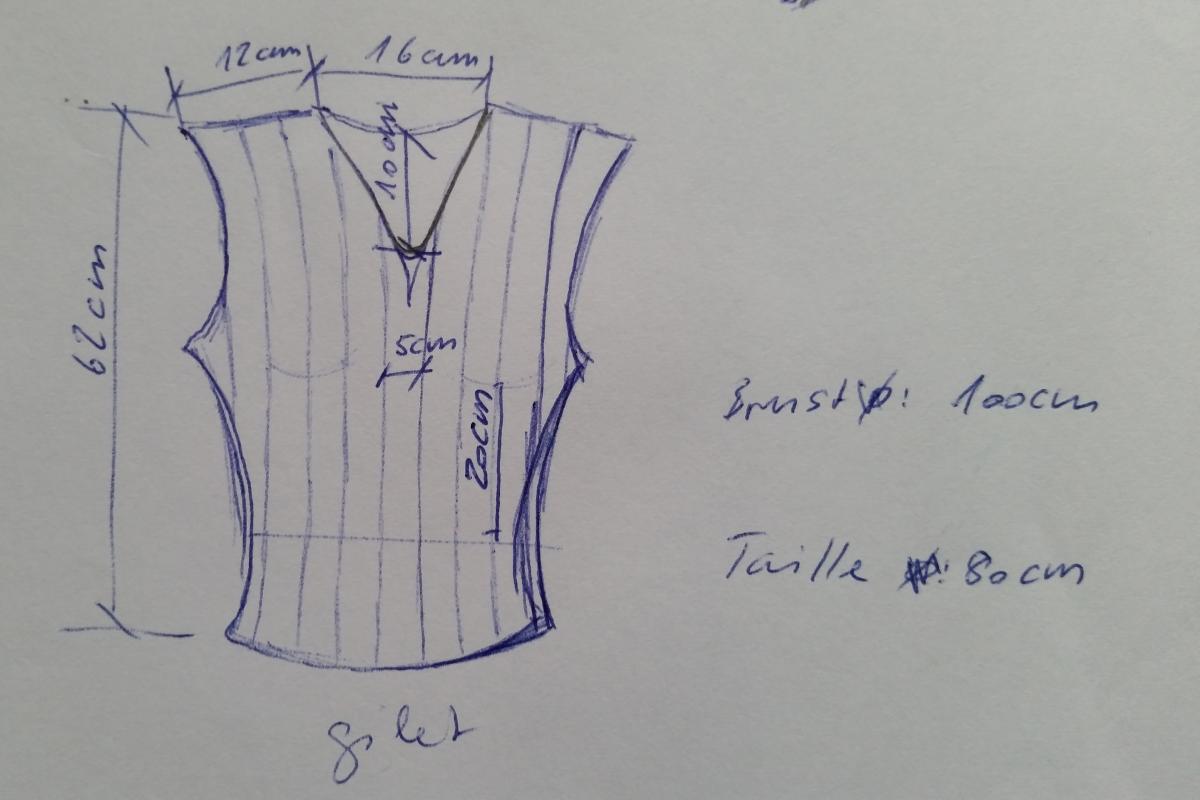
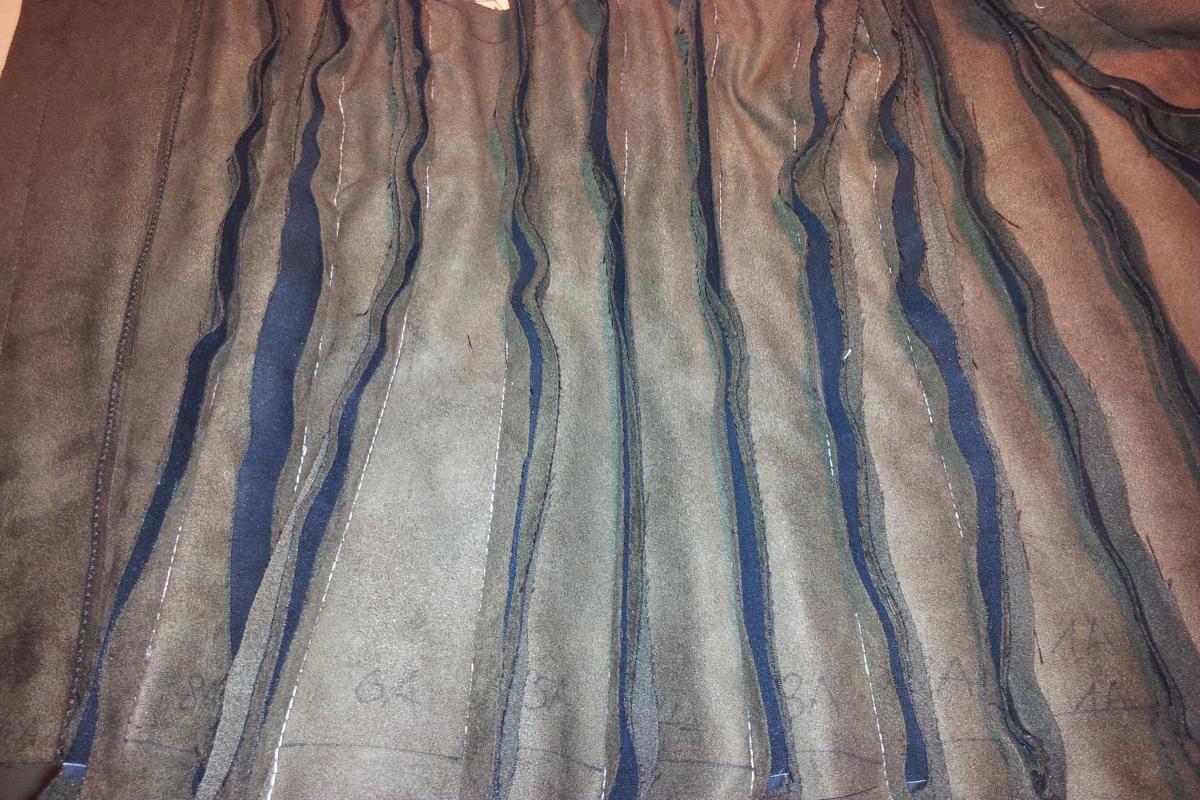
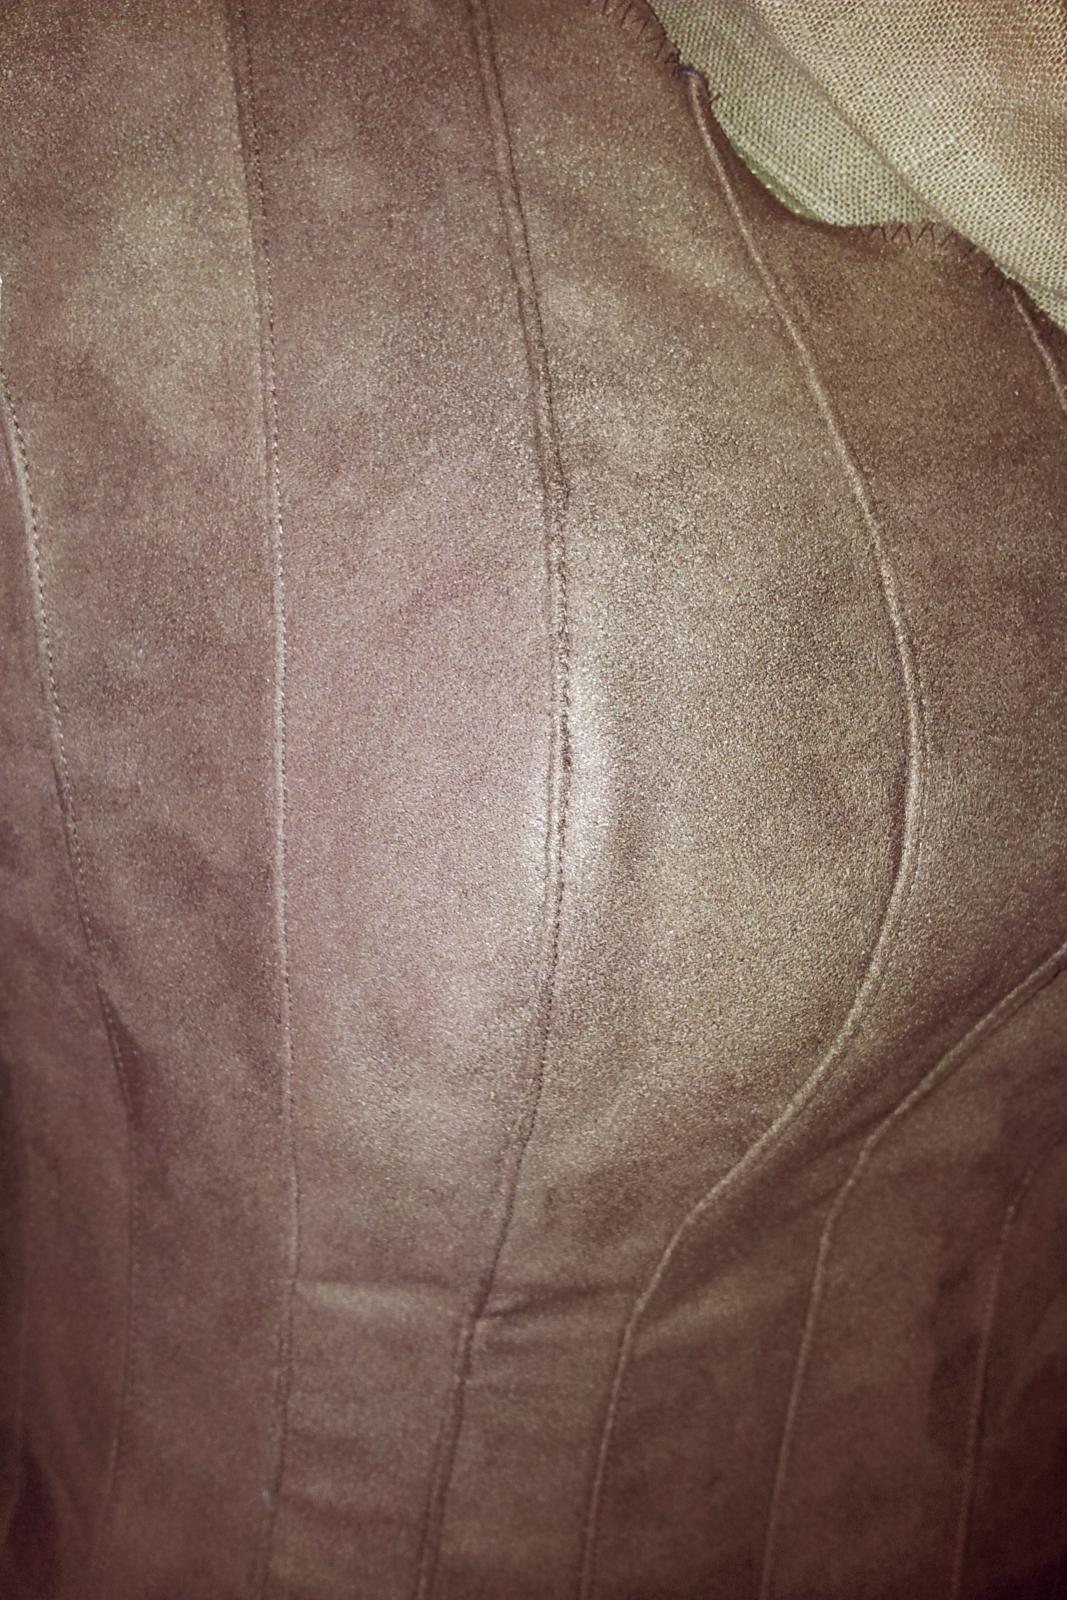
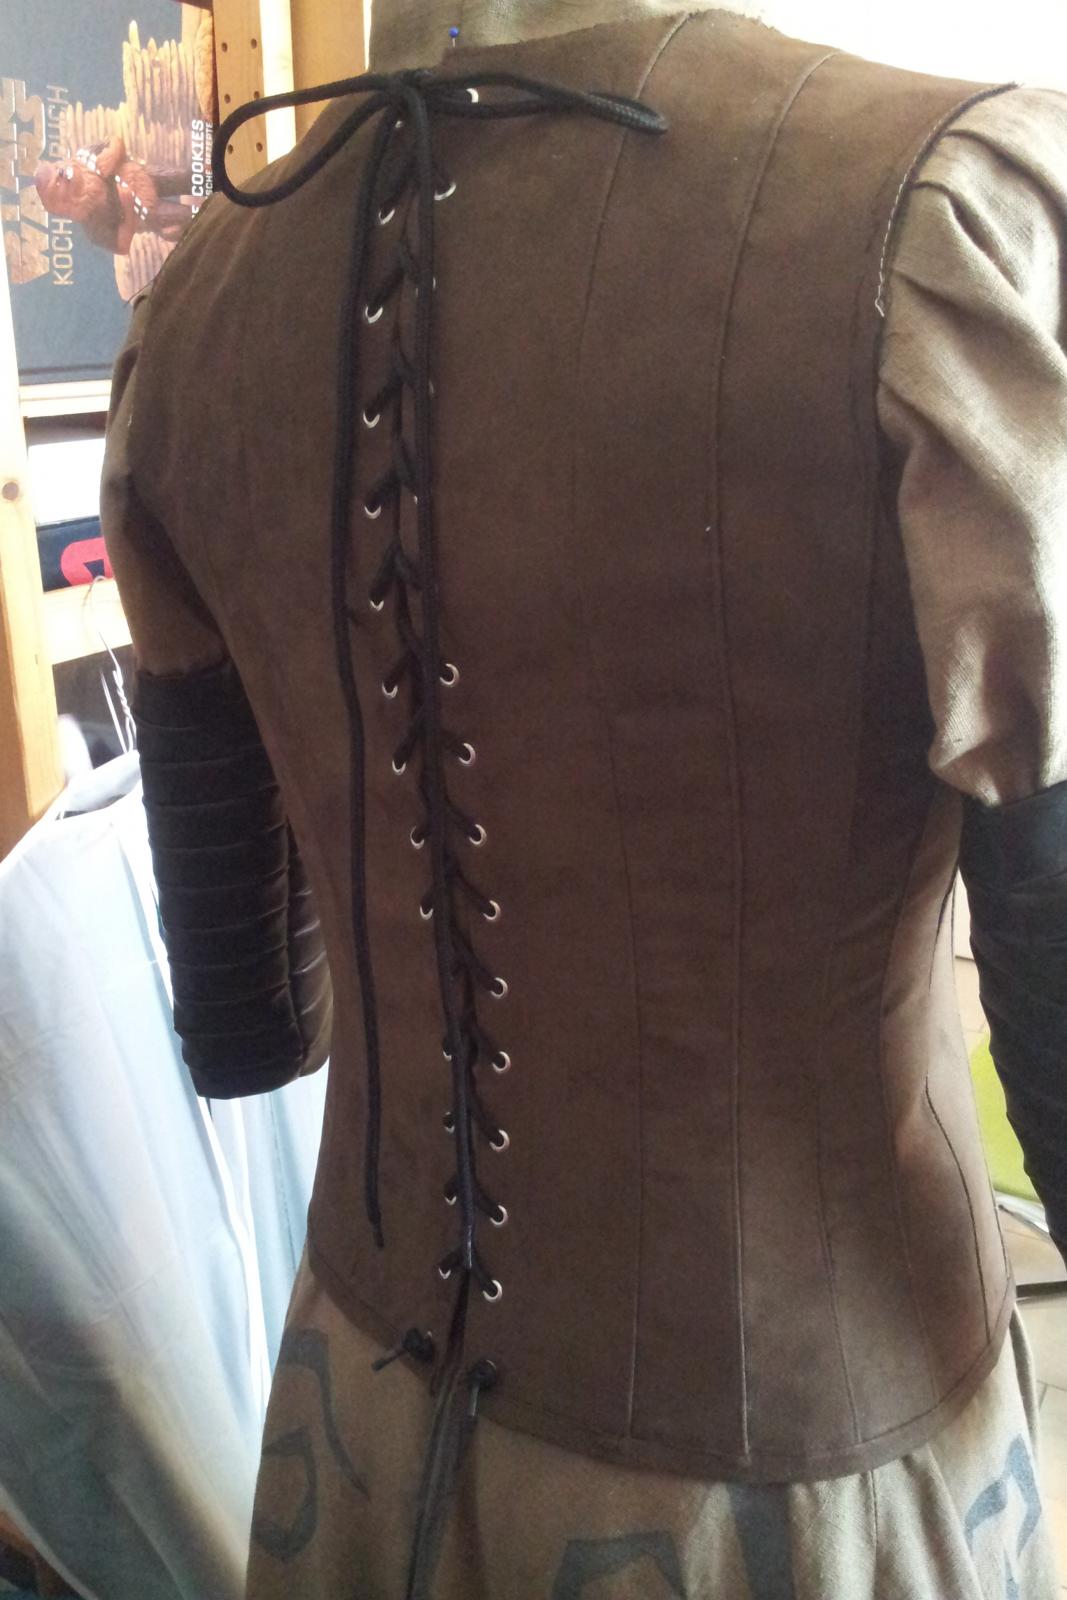
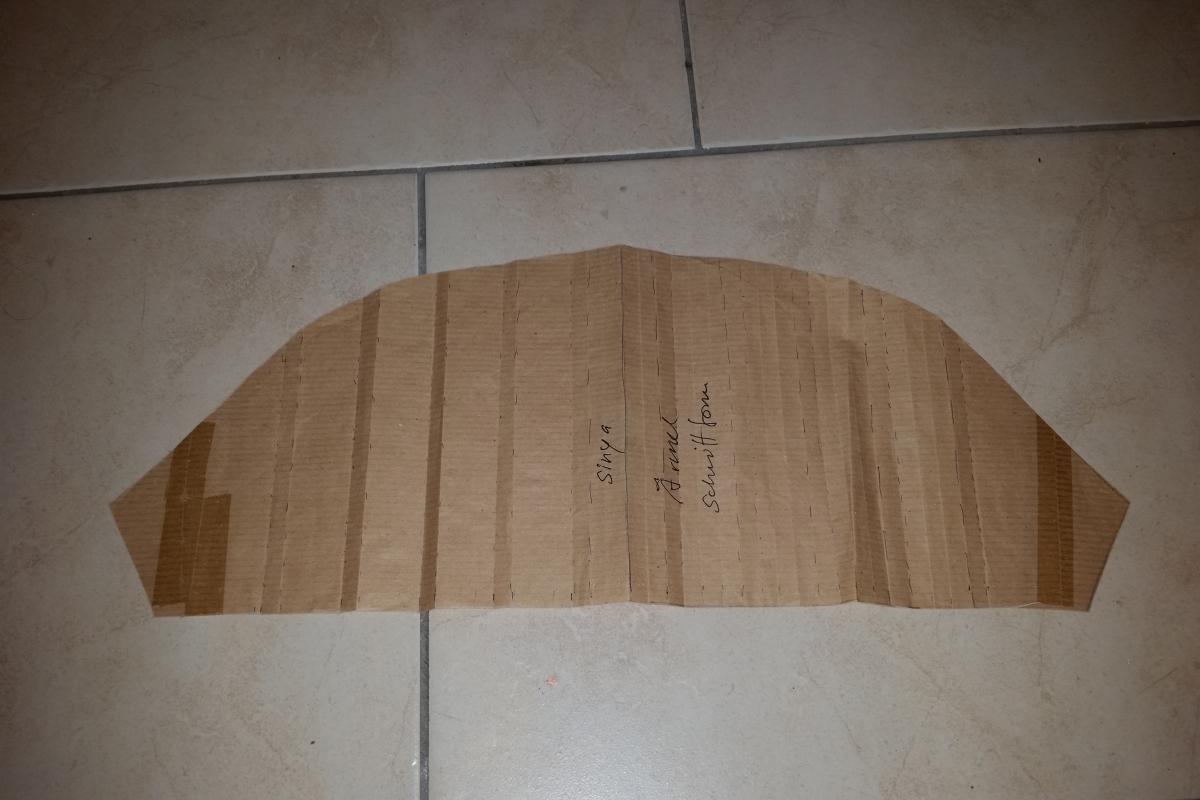
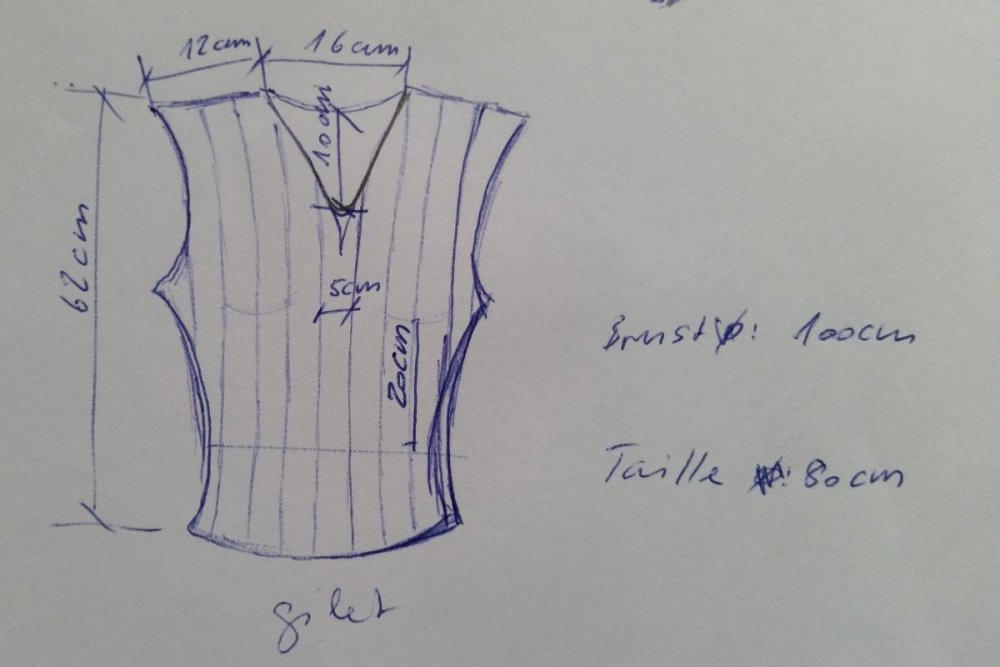
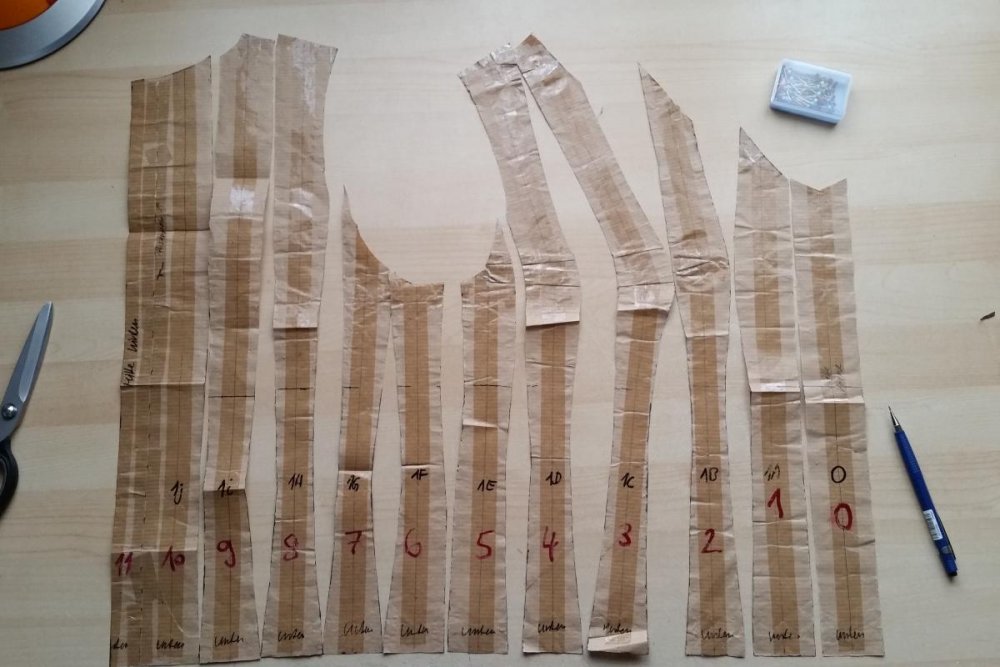
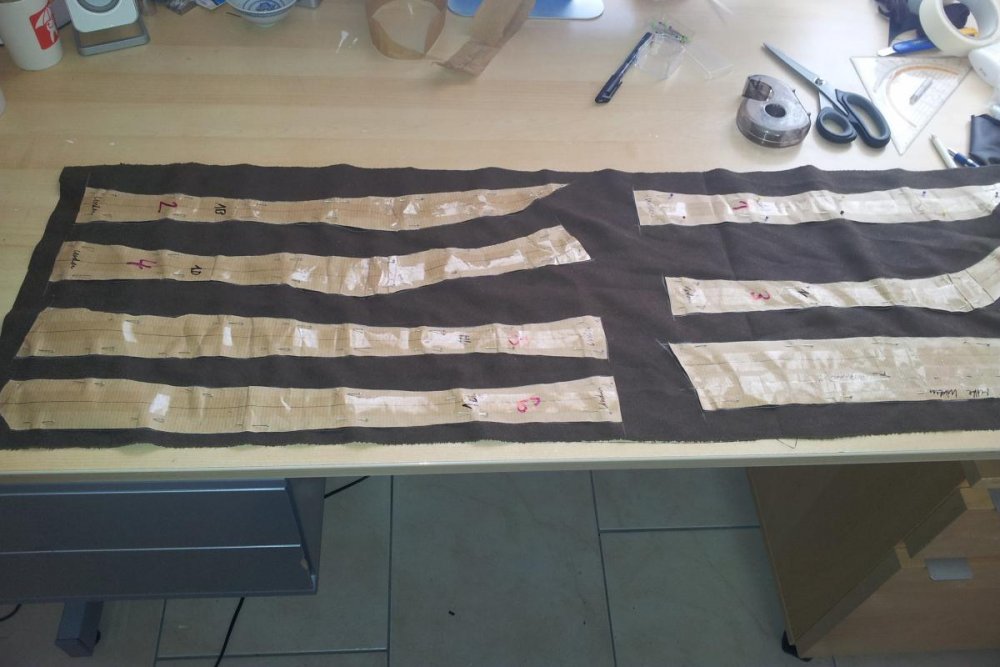
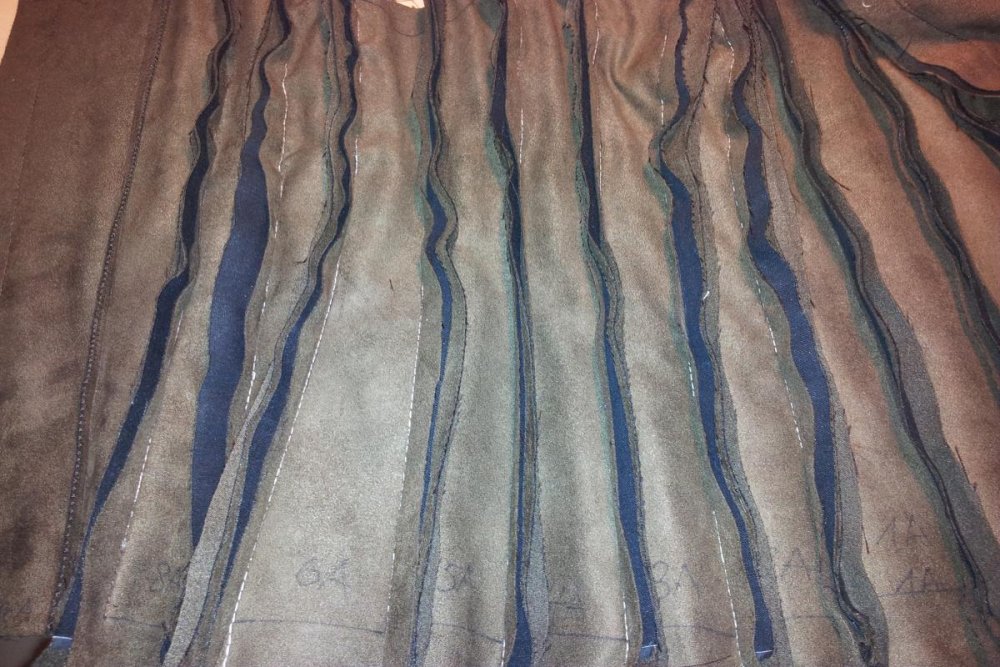
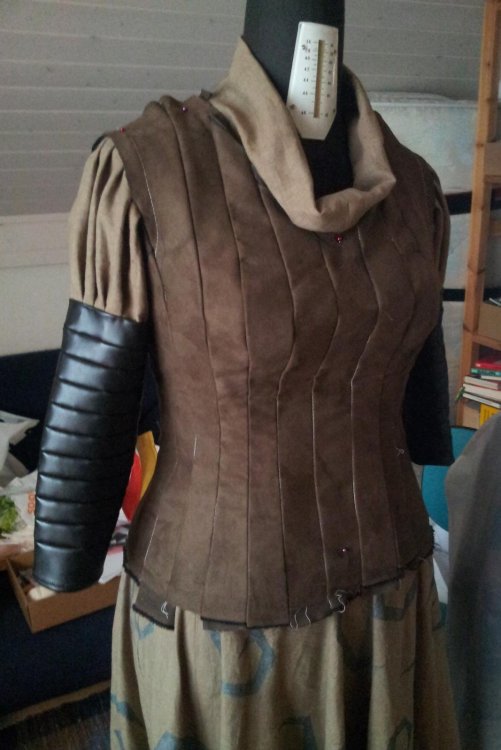
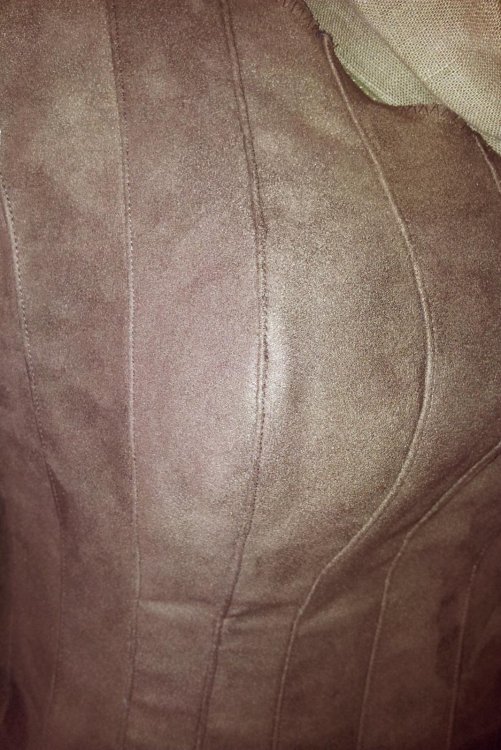
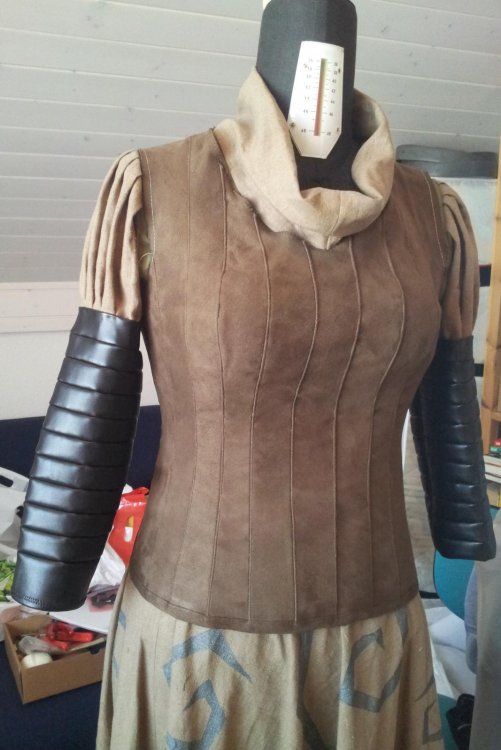
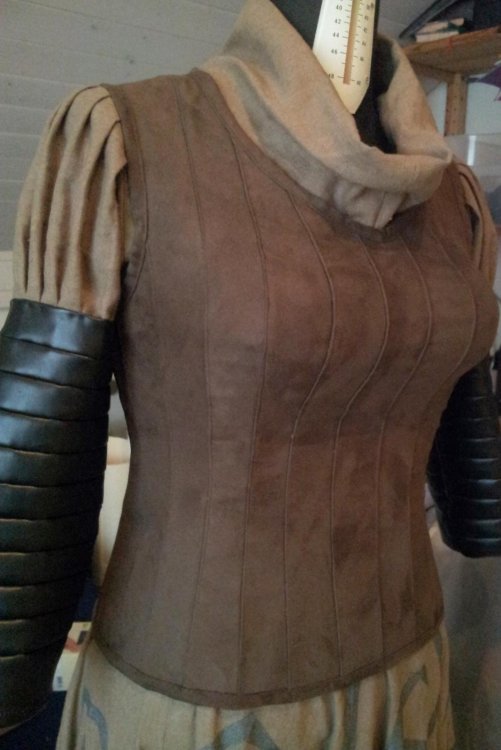
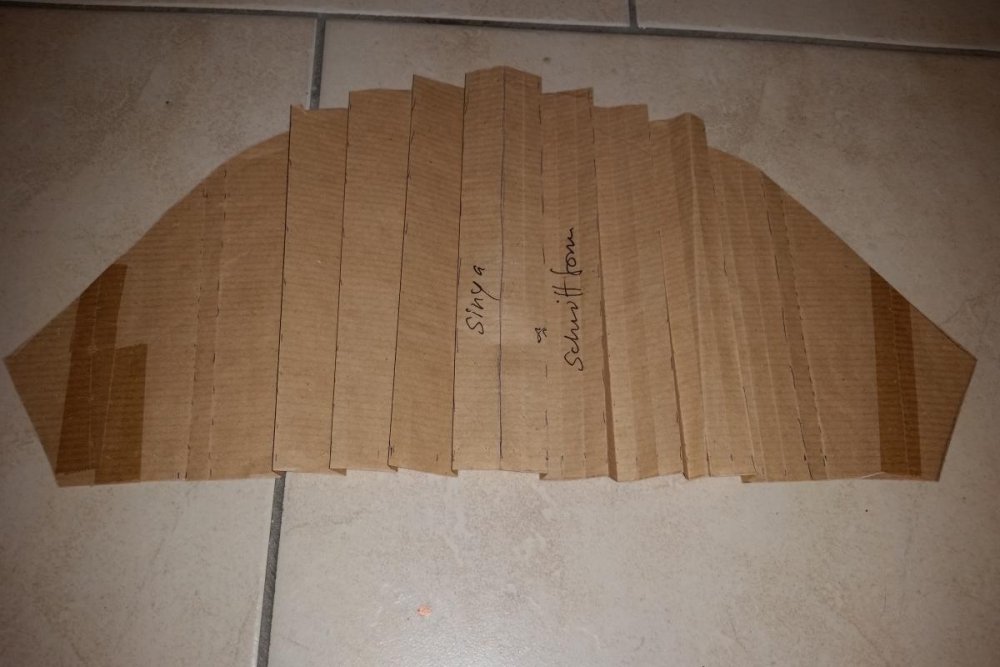
Corsage: The corsage was an extra challenge, because I’ve never ever done something like this before. It’s made of dark brown faux buckskin (alcantara). Primarily I wanted to use real buckskin (hush-hush, I love the smell of leather, yeah-yeah-yeah) but I couldn’t find exactly what I was looking for. At least I bought this fabric in a curtain shop. The corsage is sewed together of 22 vertical segments. It is extremely close fitting (the dimensions on the sketch are just a raw guess). I made the pattern of kraft paper, which I wrapped around my dummy, dressed with skirt and shirt. Unfortunately I didn’t make any picture of this process (but here is a picture of the pattern I took later). First I measured breast, weist and hip circumference. Than I cut a big sheet of kraft paper in exactly the same length of the largest circumference (in this case the hips). After this I divided that length by 22. The result was the maximal width of every segment, so I drew a continuous vertical marking line after each space. I folded the paper on each marking line and fixed it with some tape and pins on the dummy. Than, I started to pin the superplus paper carefully on every prefolded crease. I just did the half, because it has to be symmetrical anyway. After this, I just had to cut away the superplus paper and got my pattern. I took the Material double, because it was not as thick as it should be and I used a solid fusible fleece to make it stiffer. It is very necessary to label each piece with a number. Otherwise you will loose the overview completely.

-
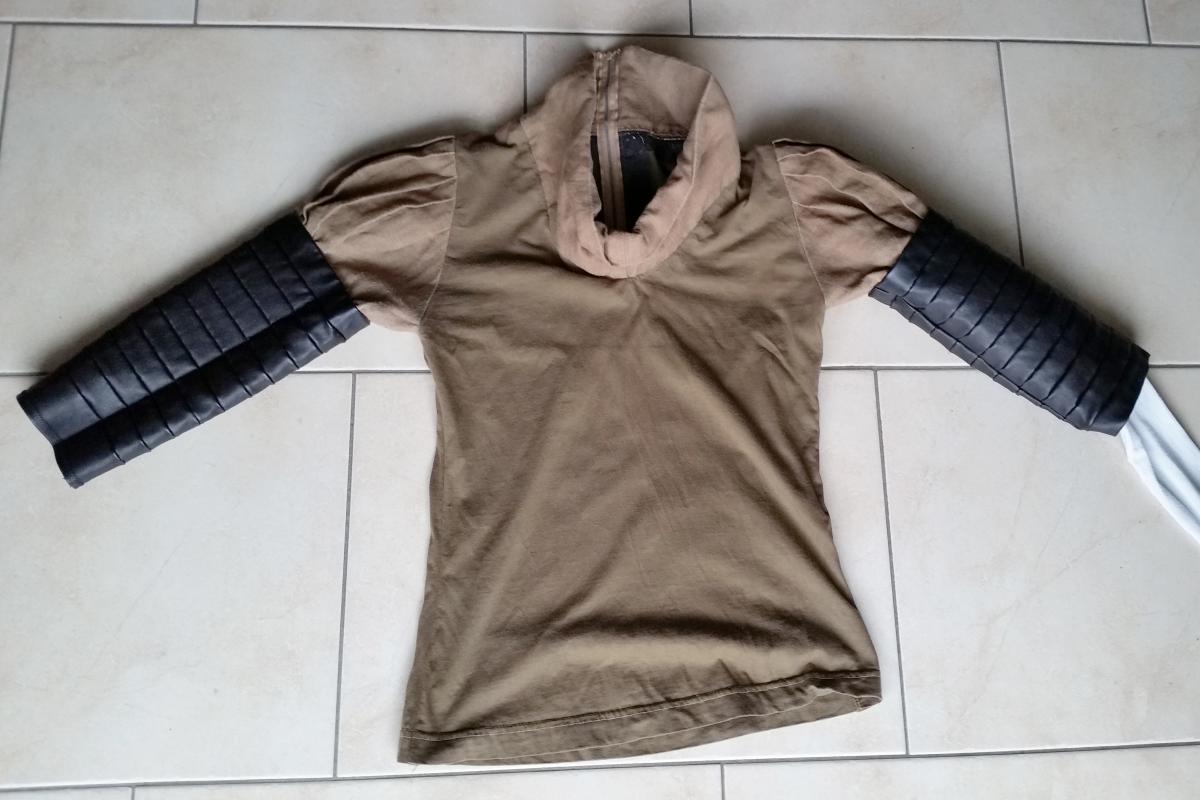
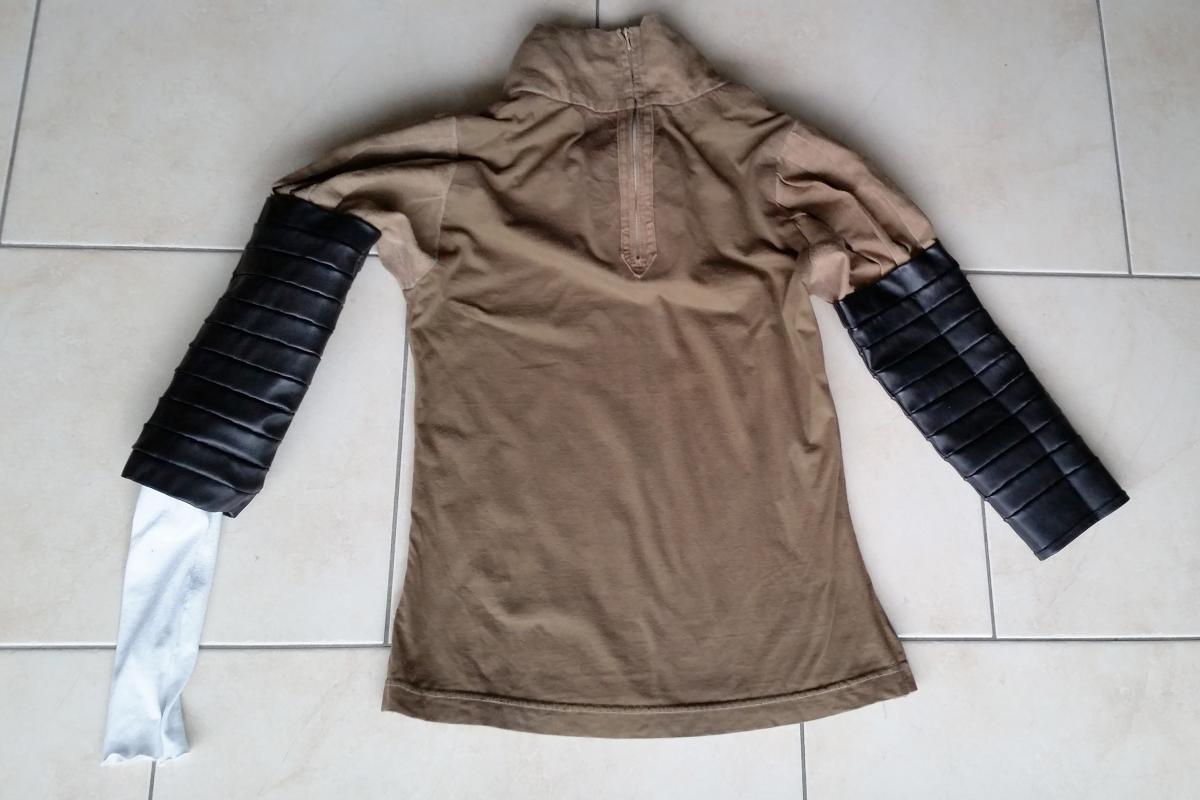
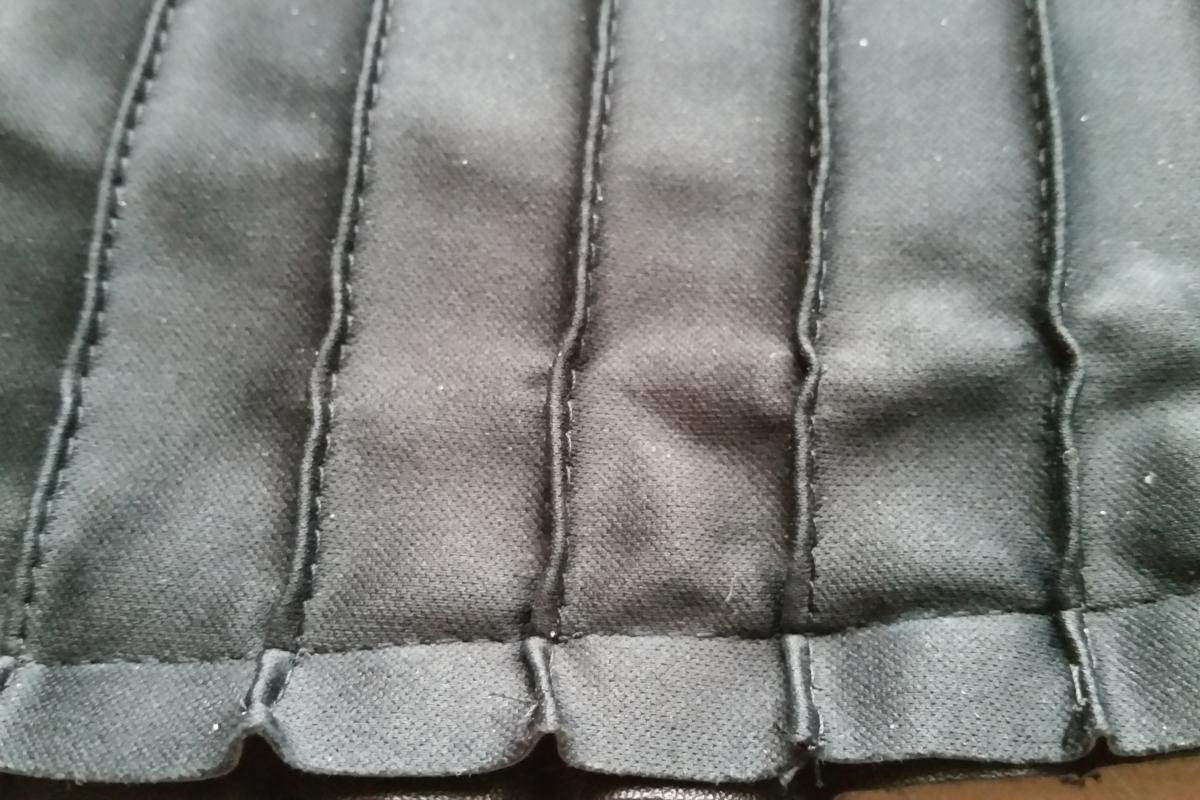
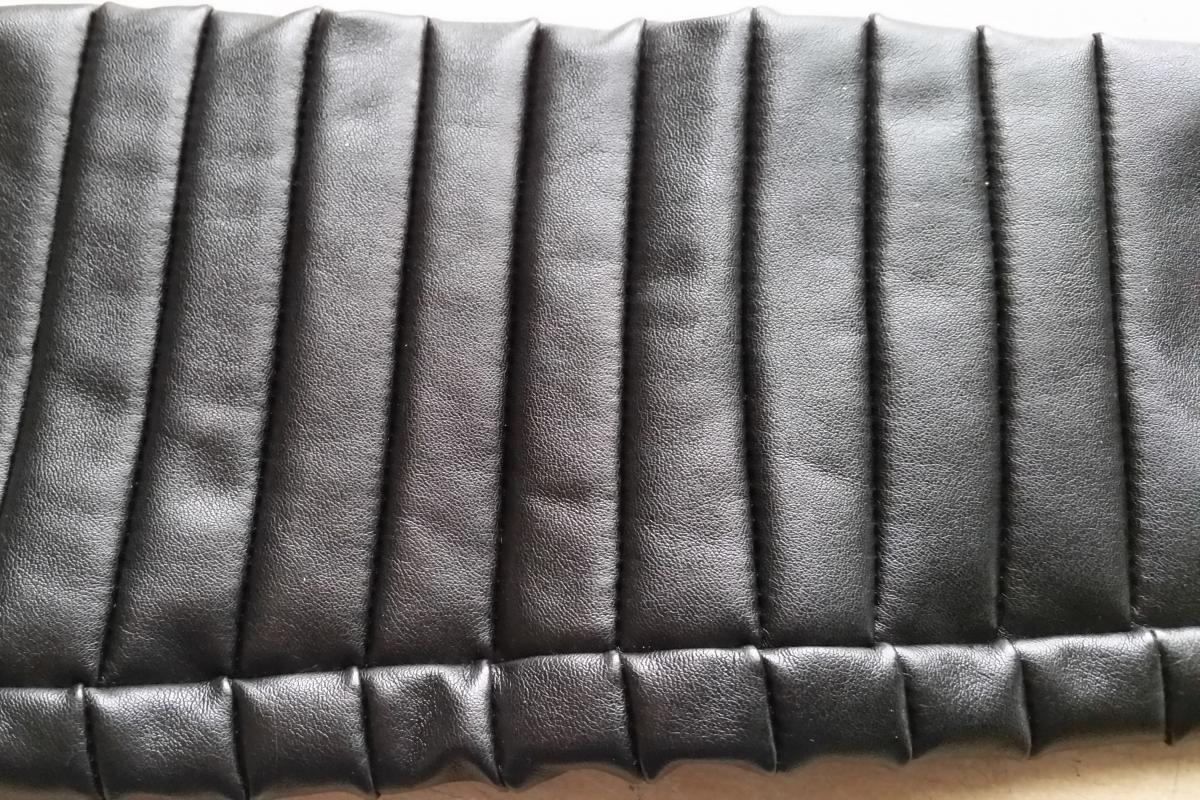
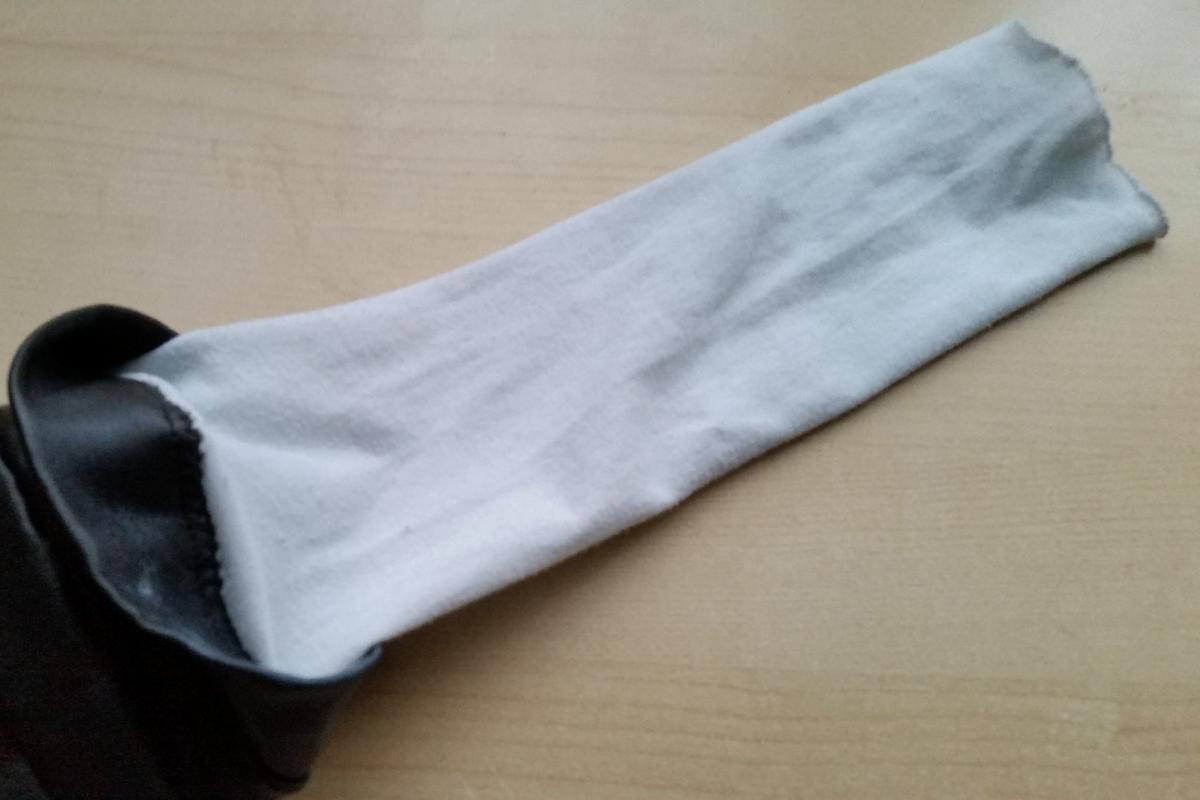
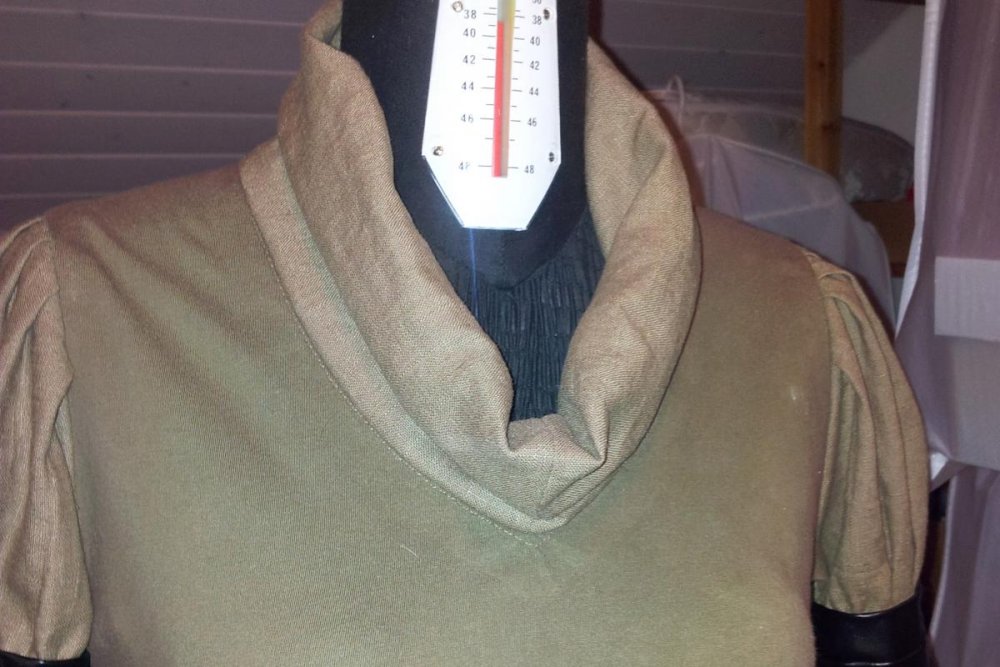
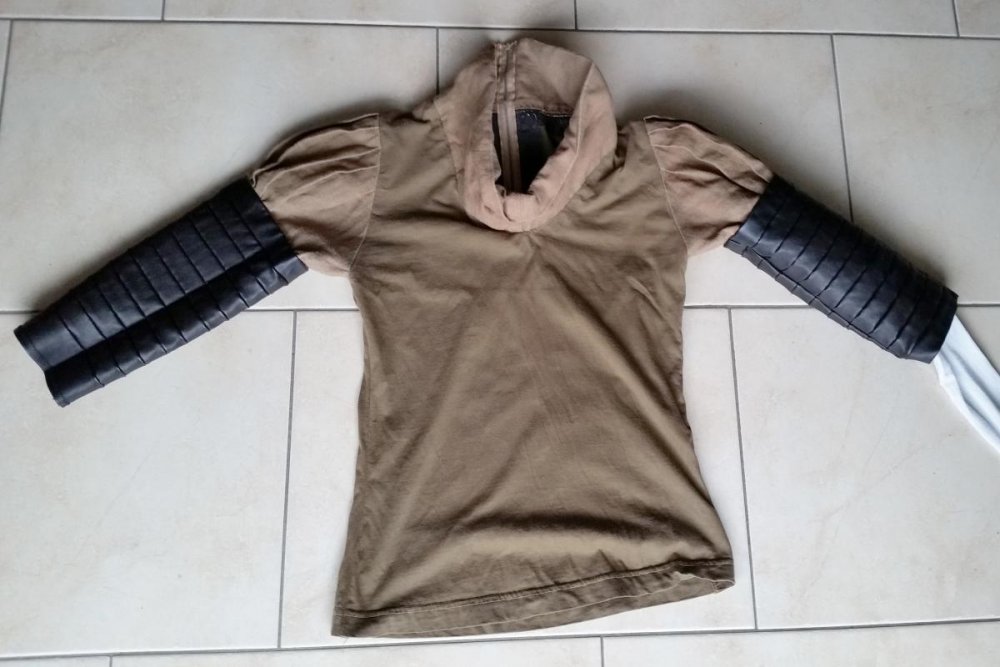
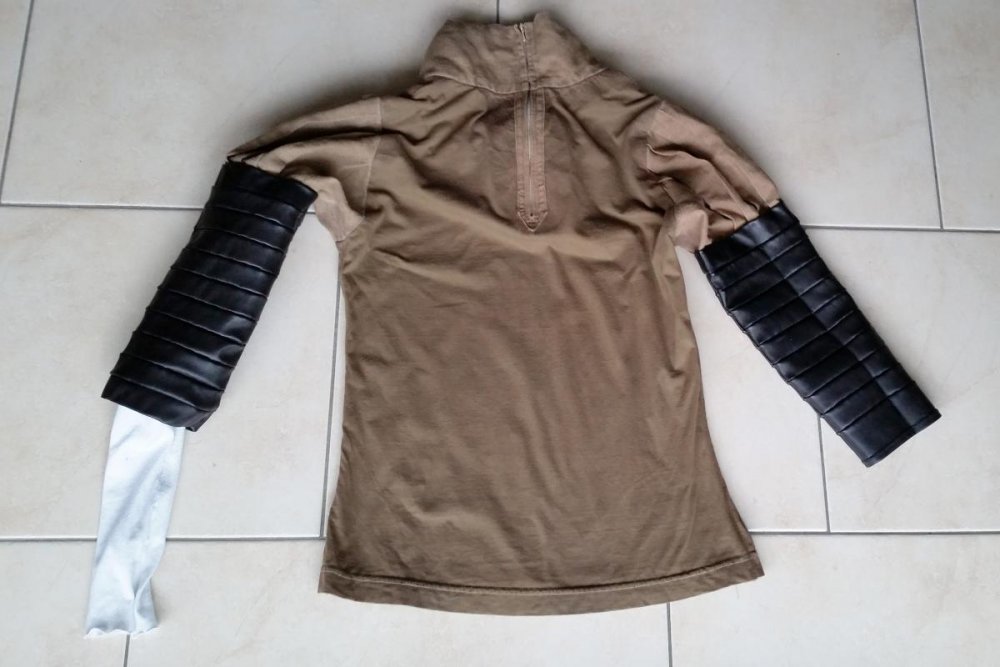
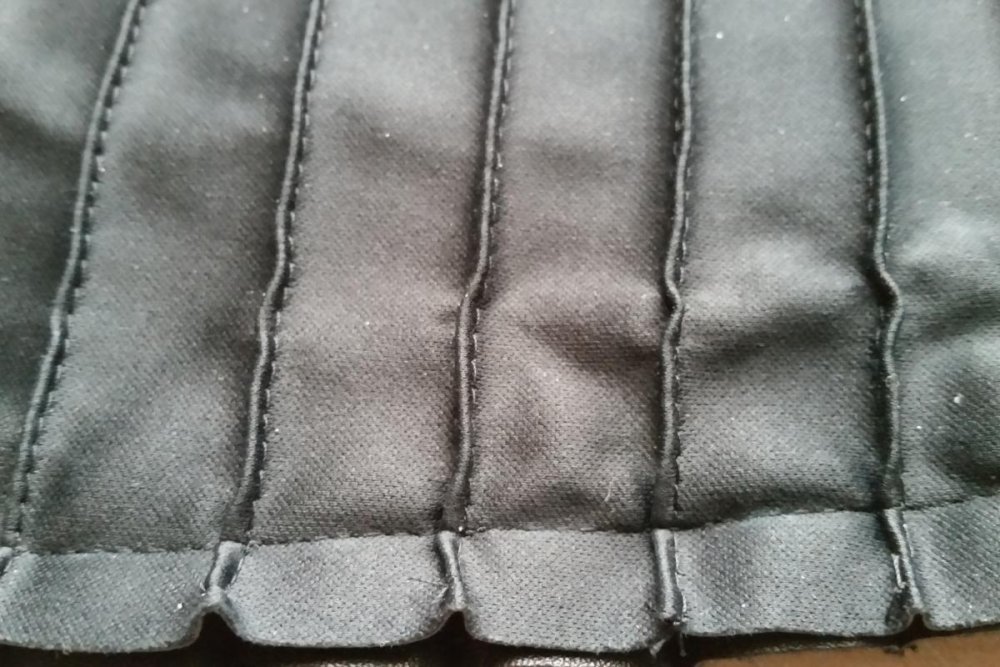
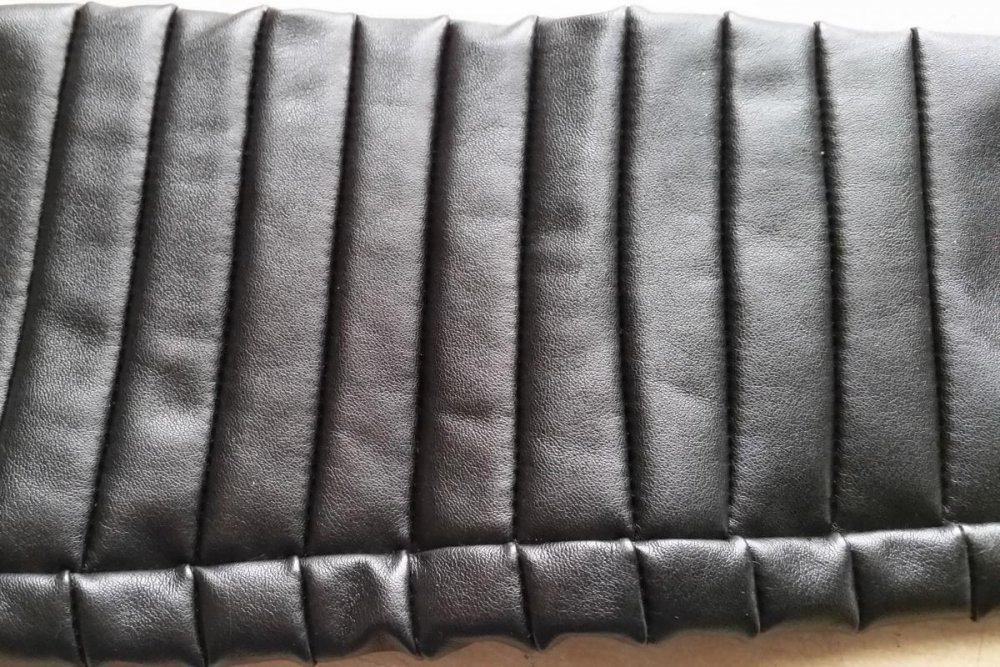
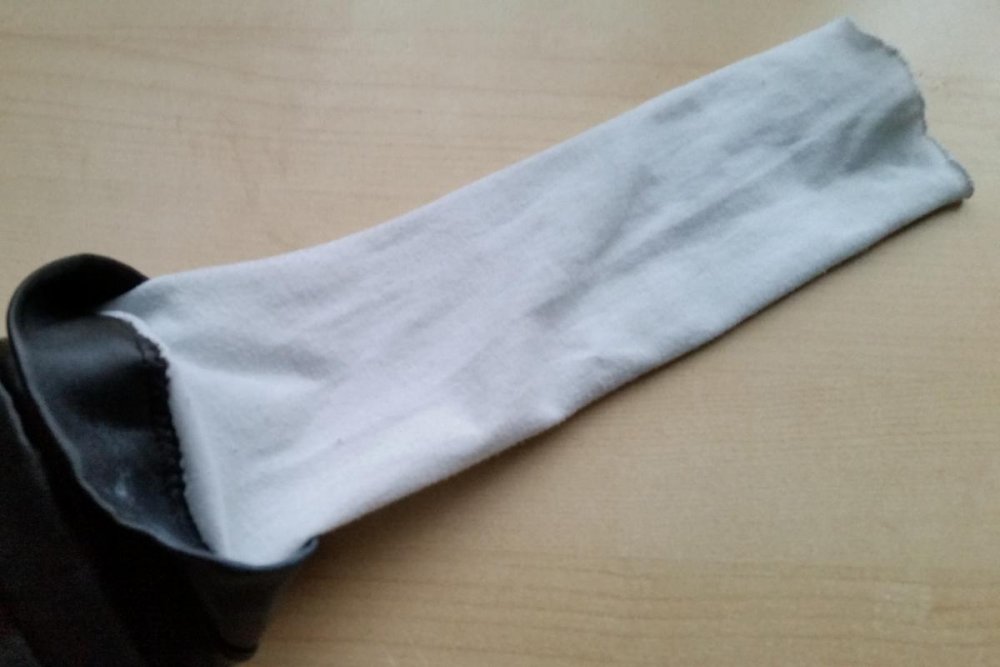
Shirt: If there is any chance to borrow a dummy in your size during the sewing process, please do it. It’s almost impossible to get a proper result without it, especially later, when you start with the corsage. The shirt is made of a solid jersey fabric, matched to the colour of the Skirt. The v-line turtleneck and the puff sleeves are made of the same material like the skirt, but without spiral paintings. Because I couldn’t find a pattern I liked online, I decided to design the puff sleeves by myself. I underlaid the v-line and the armholes with some fusible fleece to reduce the deforming of the flexible jersey while I was stitching down the inflexible turtleneck and the puff sleeves. I would highly recommend to sew a zipper in the back of the turtleneck. It’s much more comfortable when you dress on. The lower part of the very, VERY(!!!) tight fitting sleeves is made of black faux leather. I choosed faux leather because it’s much more flexible than real leather and it’s washable. It’s quilted in horizontally lines from the backside, spaced one inch apart. After I blurred my costume at every event on and on again (because of my white painted left forearm) I decided to sew on a white nylon stocking. It also saves time when I dress up, because there is much less skin to paint.

-
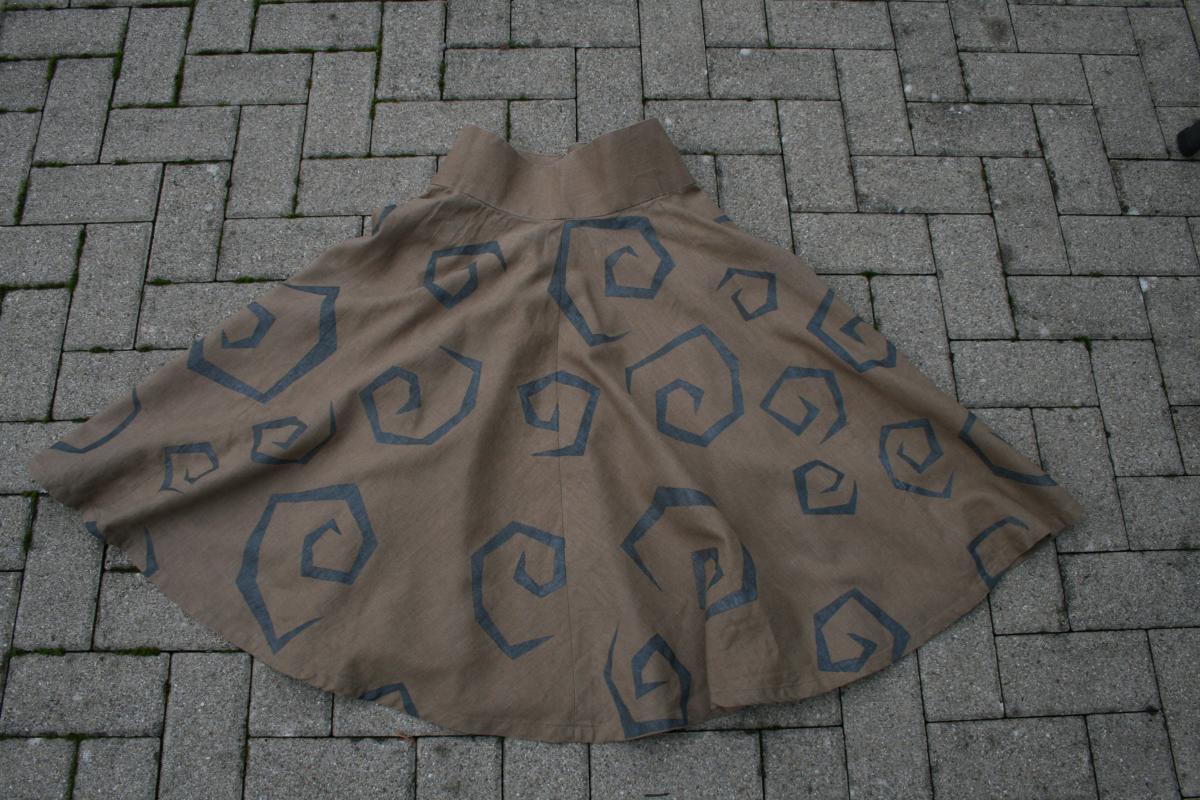
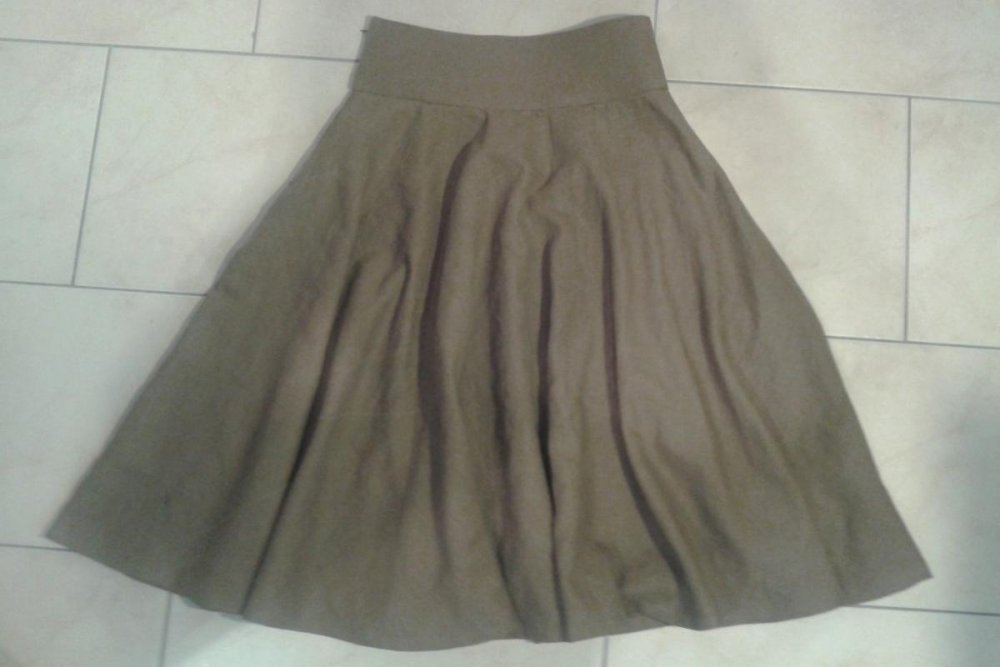
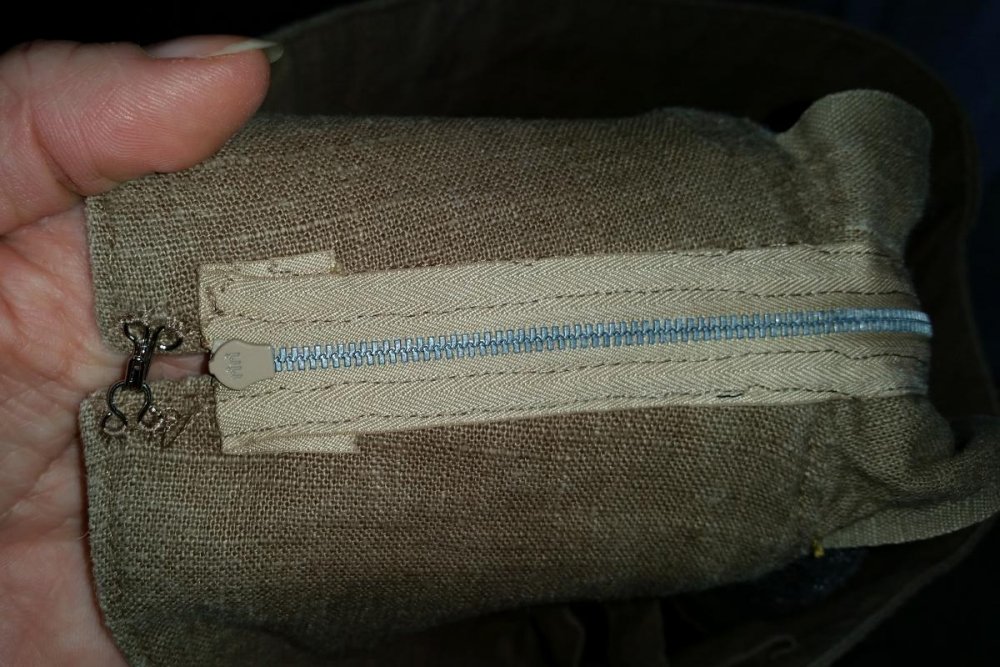
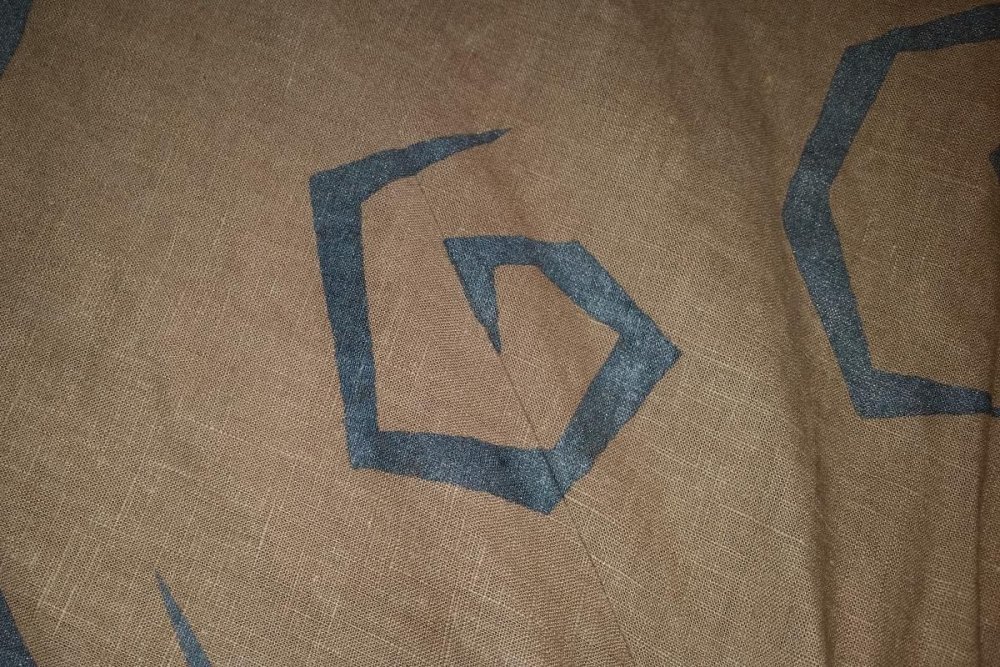
I had noticed there are still so many people out there with questions about my Sinya costume; I decided to load up now the WIP-steps I did in 2013 to get her approved. I hope it'll help you further and give answer to some questions you have. Let's start with the skirt: The skirt is made of heavy linen in the same colour (we call it olive brown) as shown in the comic book. It has a flared form and the six segments make a three-fourths of a whole circle so it swings nicely when you walk. The under edge reaches to the calves and it fits the waist high and very tight to get this “wasp waist” (well, breathing is optional in this costume). I used a solid vilene to keep it in form and sewed a zipper in it. I sewed the skirt together before I painted it, because I didn’t want to have any differences in the design on every sewing line. The pointed anthracite spirals are dabbed with a little sponge by different stencils on the fabric. PS: I’m very sorry about my creepy English – I’m still learning it at an evening school. So if I write something completely wrong, please feel free to correct me, thank you.

-
Hello! Great idea! I'm plannig to build a Dr Aphra too, but a different version. I got the wig, the boots the shirt and the fabric/faux leather for the trousers, the jacket, the cap and the gloves. Unfortunatelly there existes just one single picture of this version, so it looks like I can forget it to try to get it approved, but I'll do it anyway ...

-
Yes. Legoland in June too. And maybe Spieleland next weekend.
-
Well done. I hope you'll get her approved very soon. See you in twoo weeks, I guess ... Best wishes from Switzerland Tlana
-
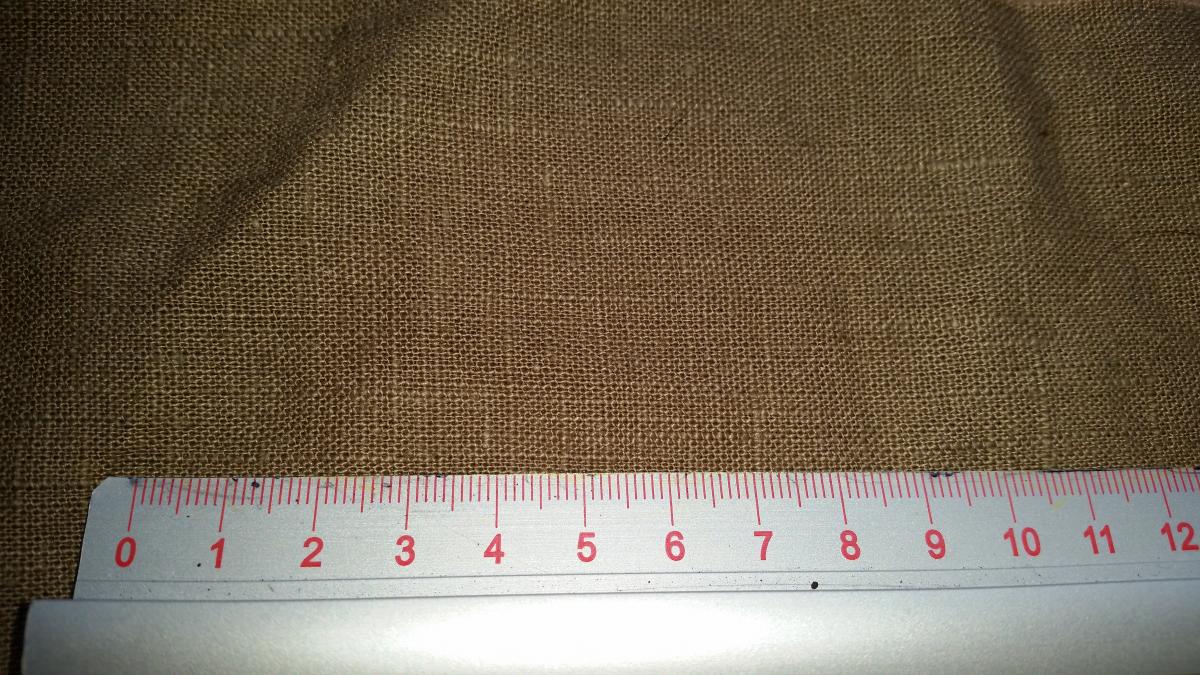
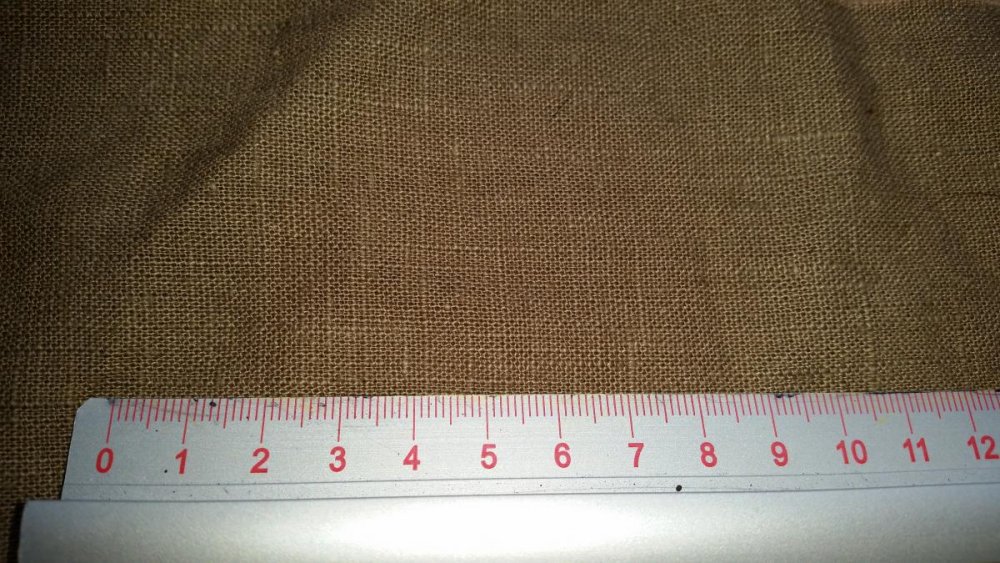
Good evening. I saw that there was a question about the linen fabric. I took a close picture to show the structure. It's table-cloth linen. I found it in a store for home textiles. I often buy my fabric in such shops, because they have a lot of different textures in different uni-colours.
-
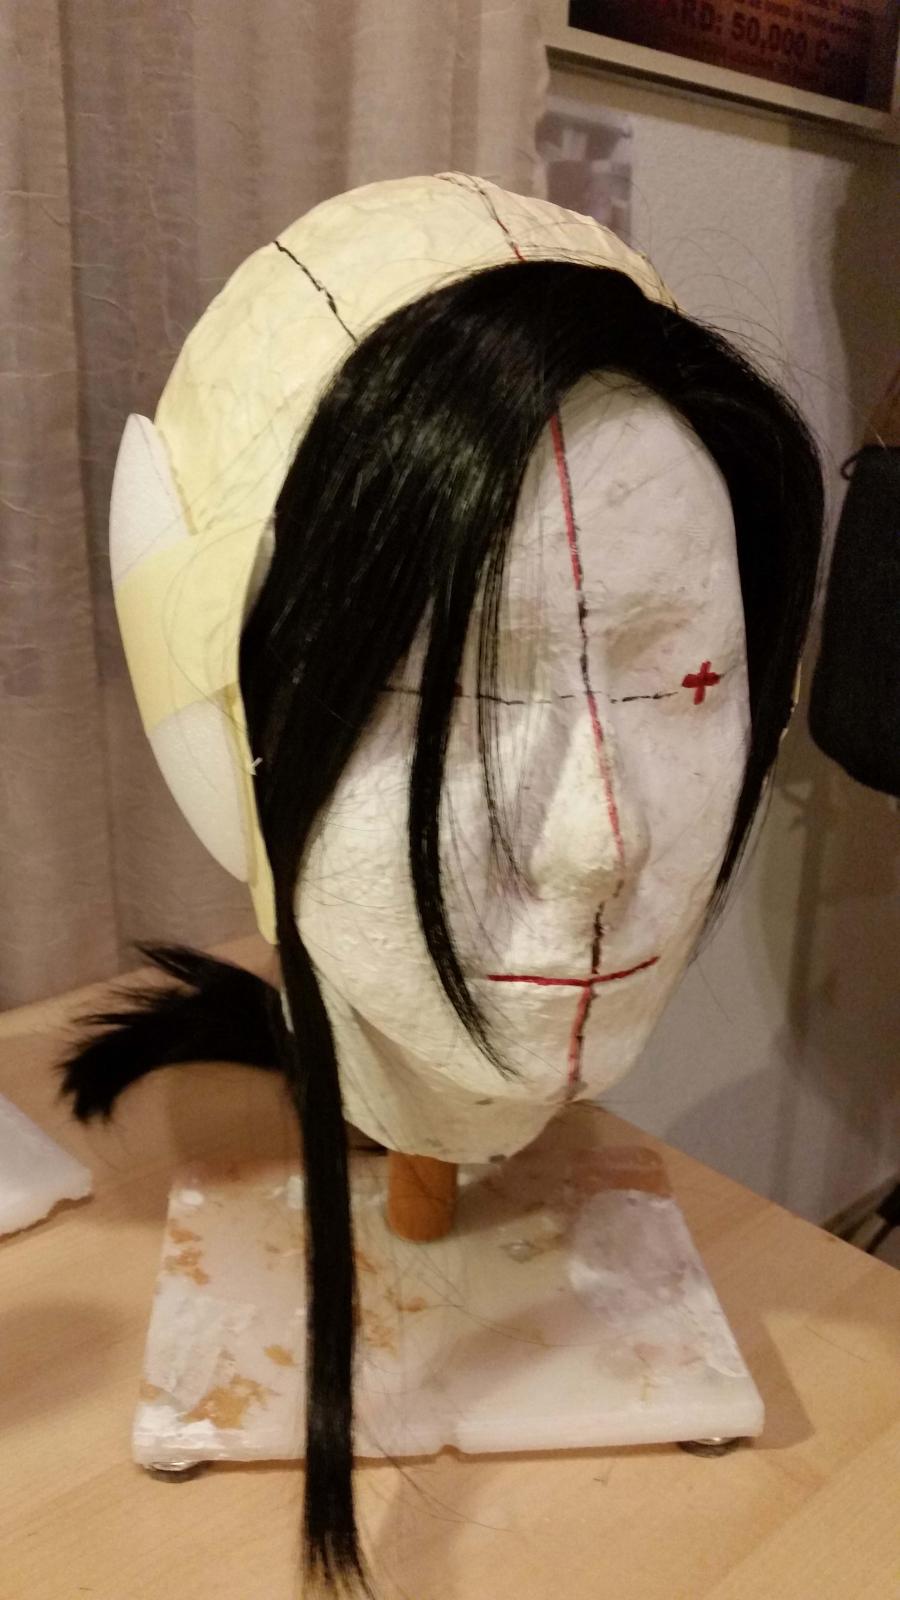
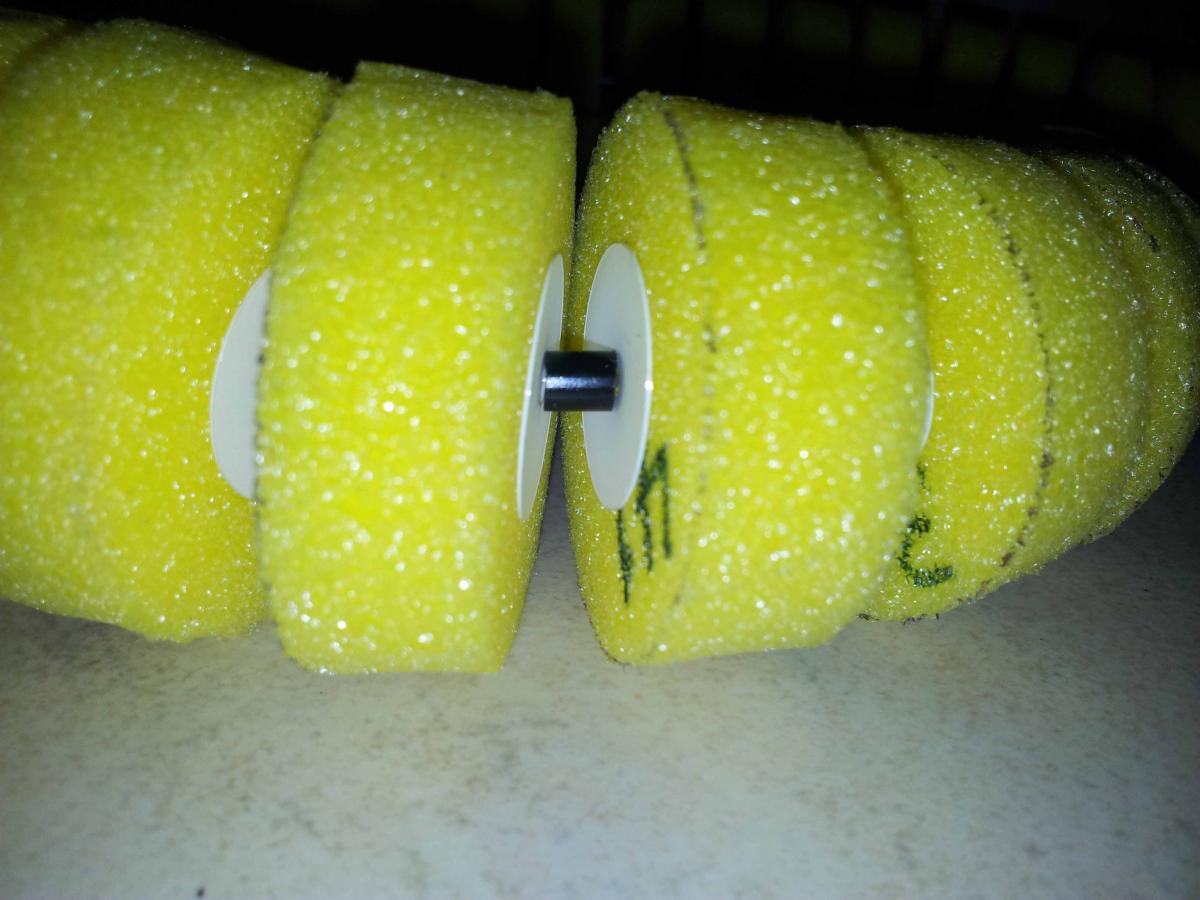
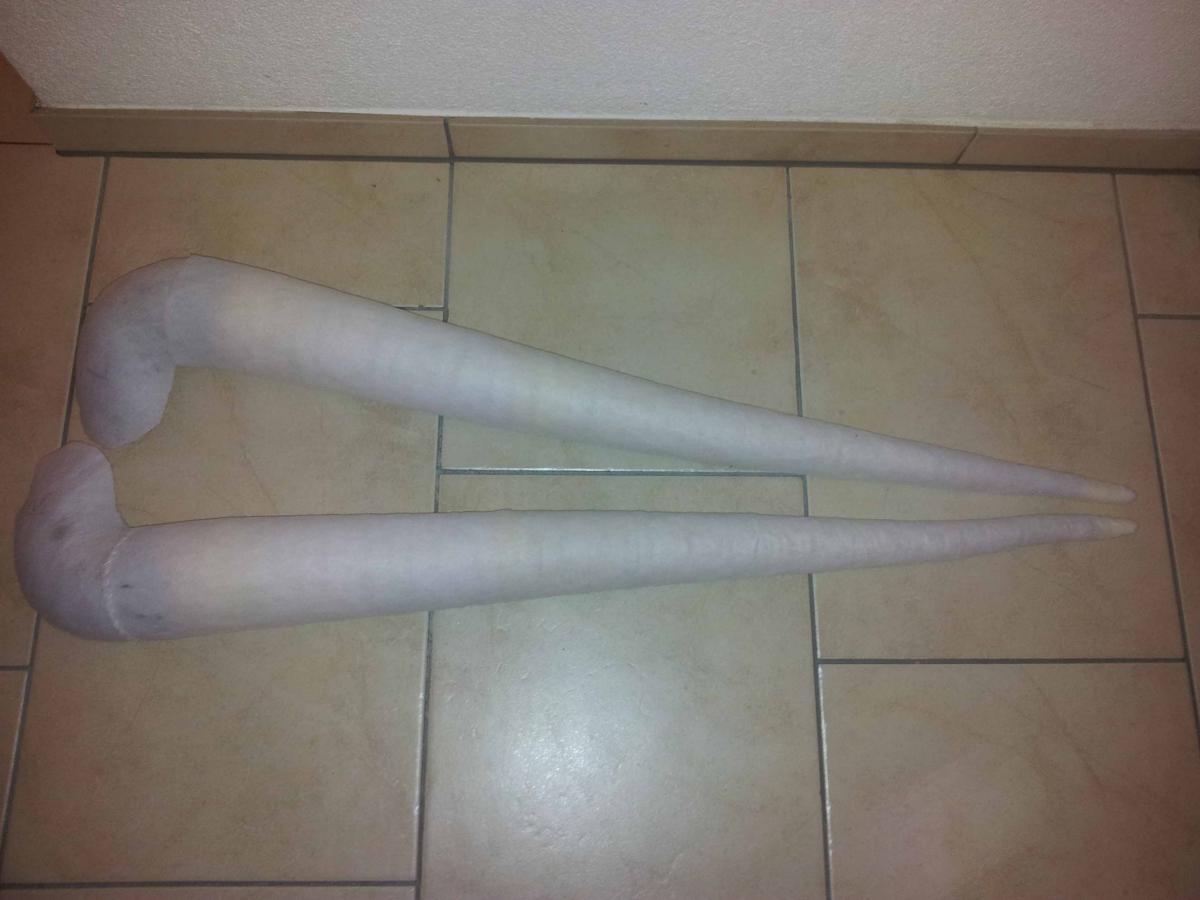
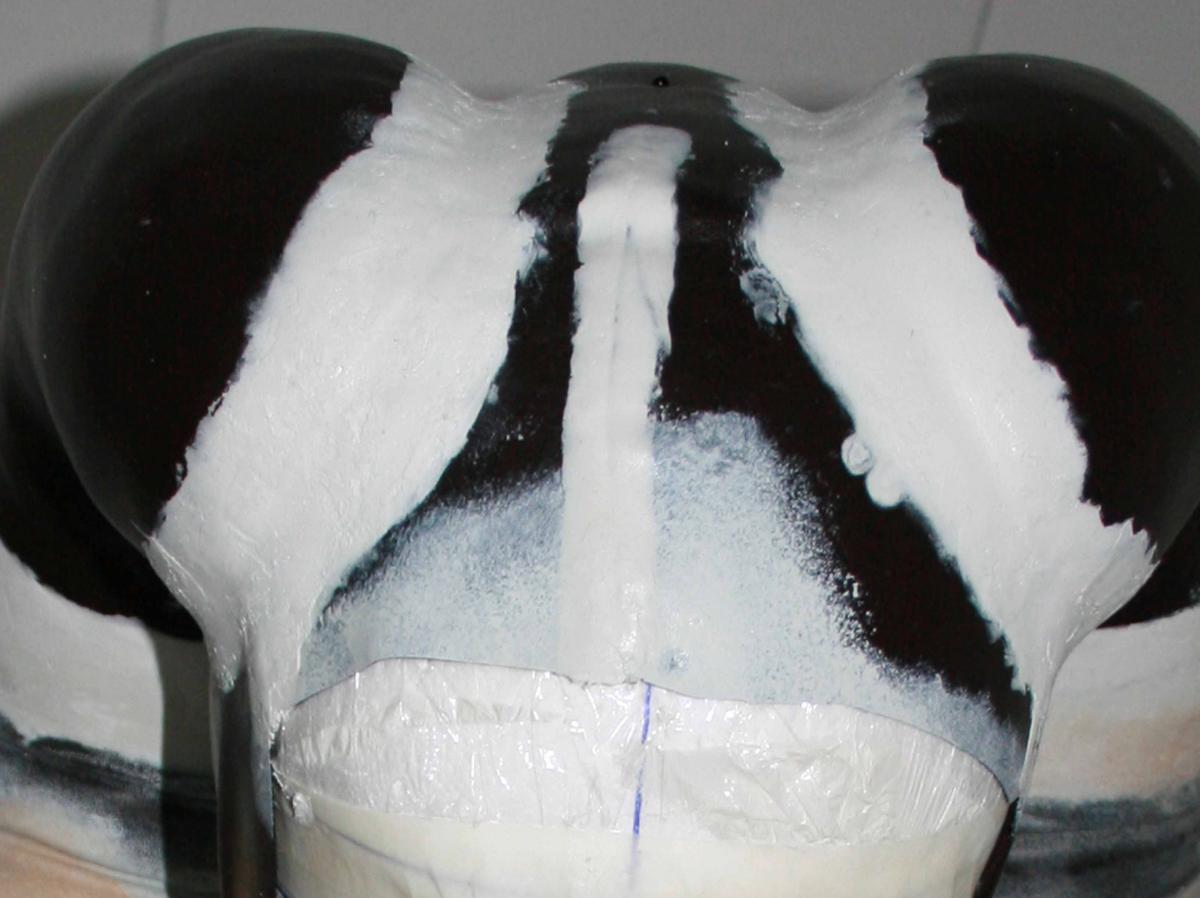
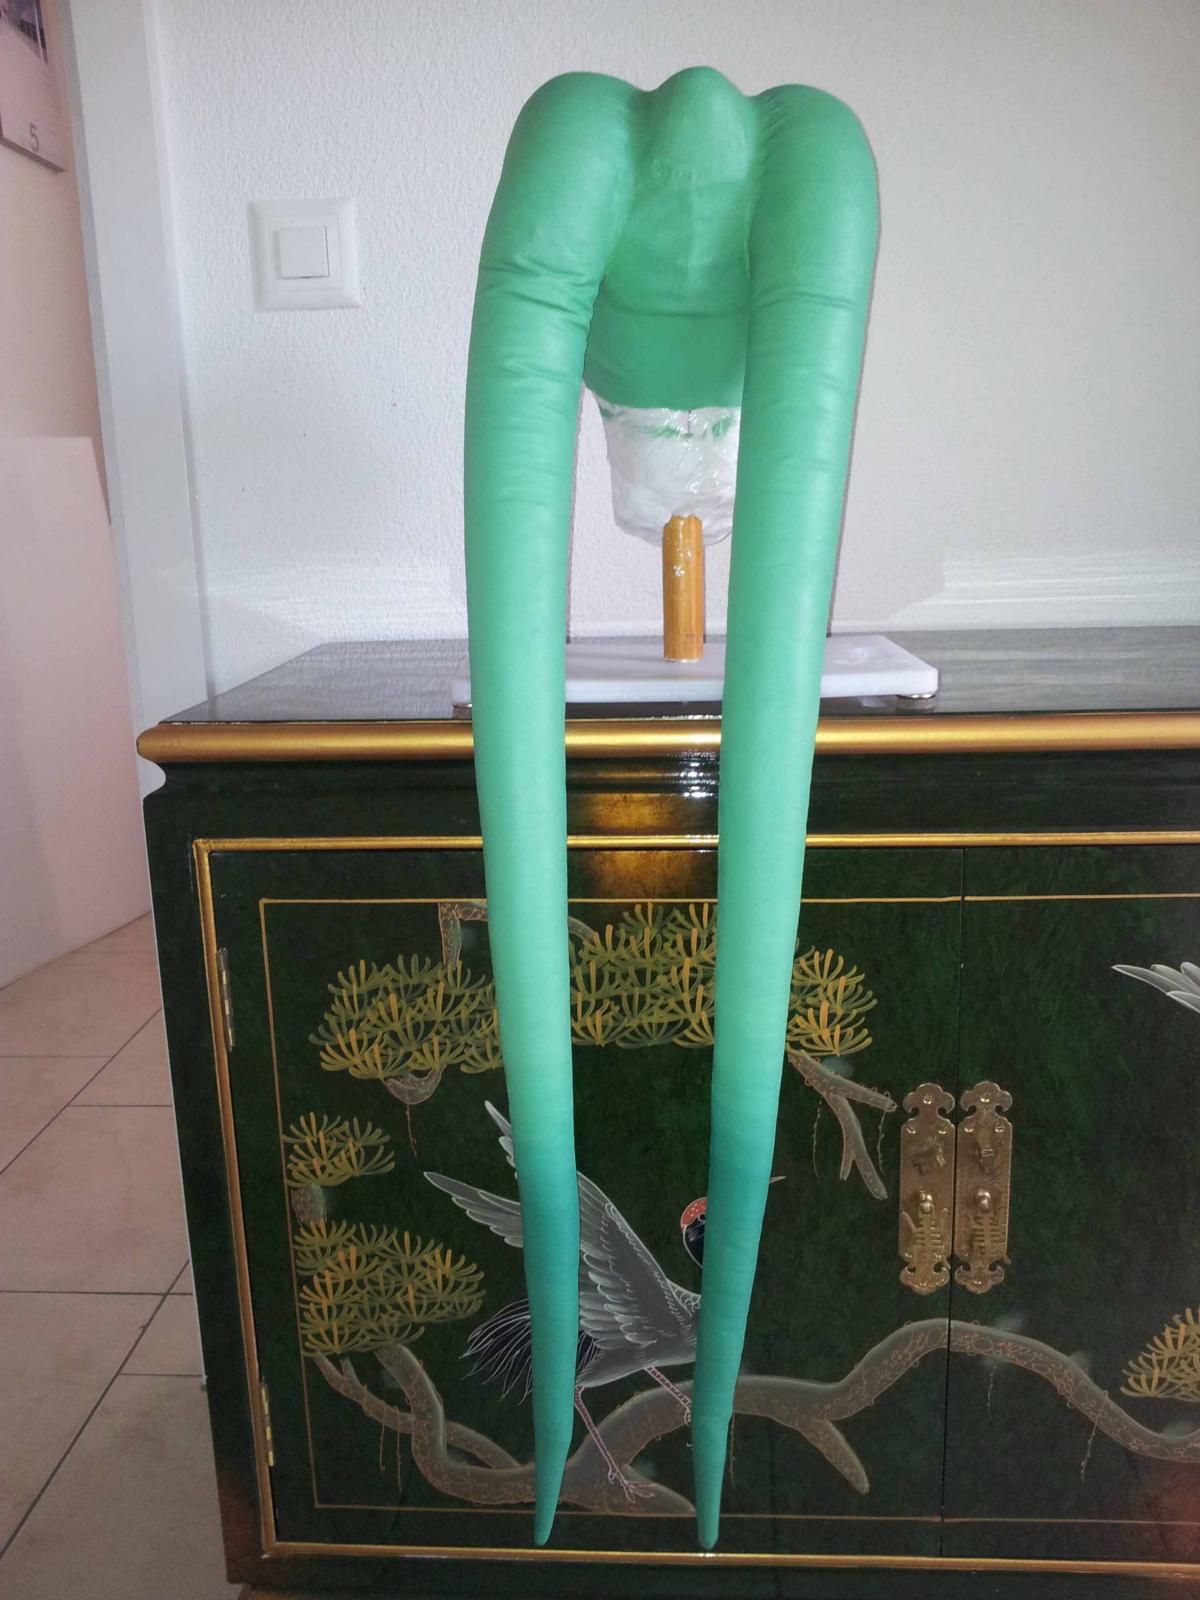
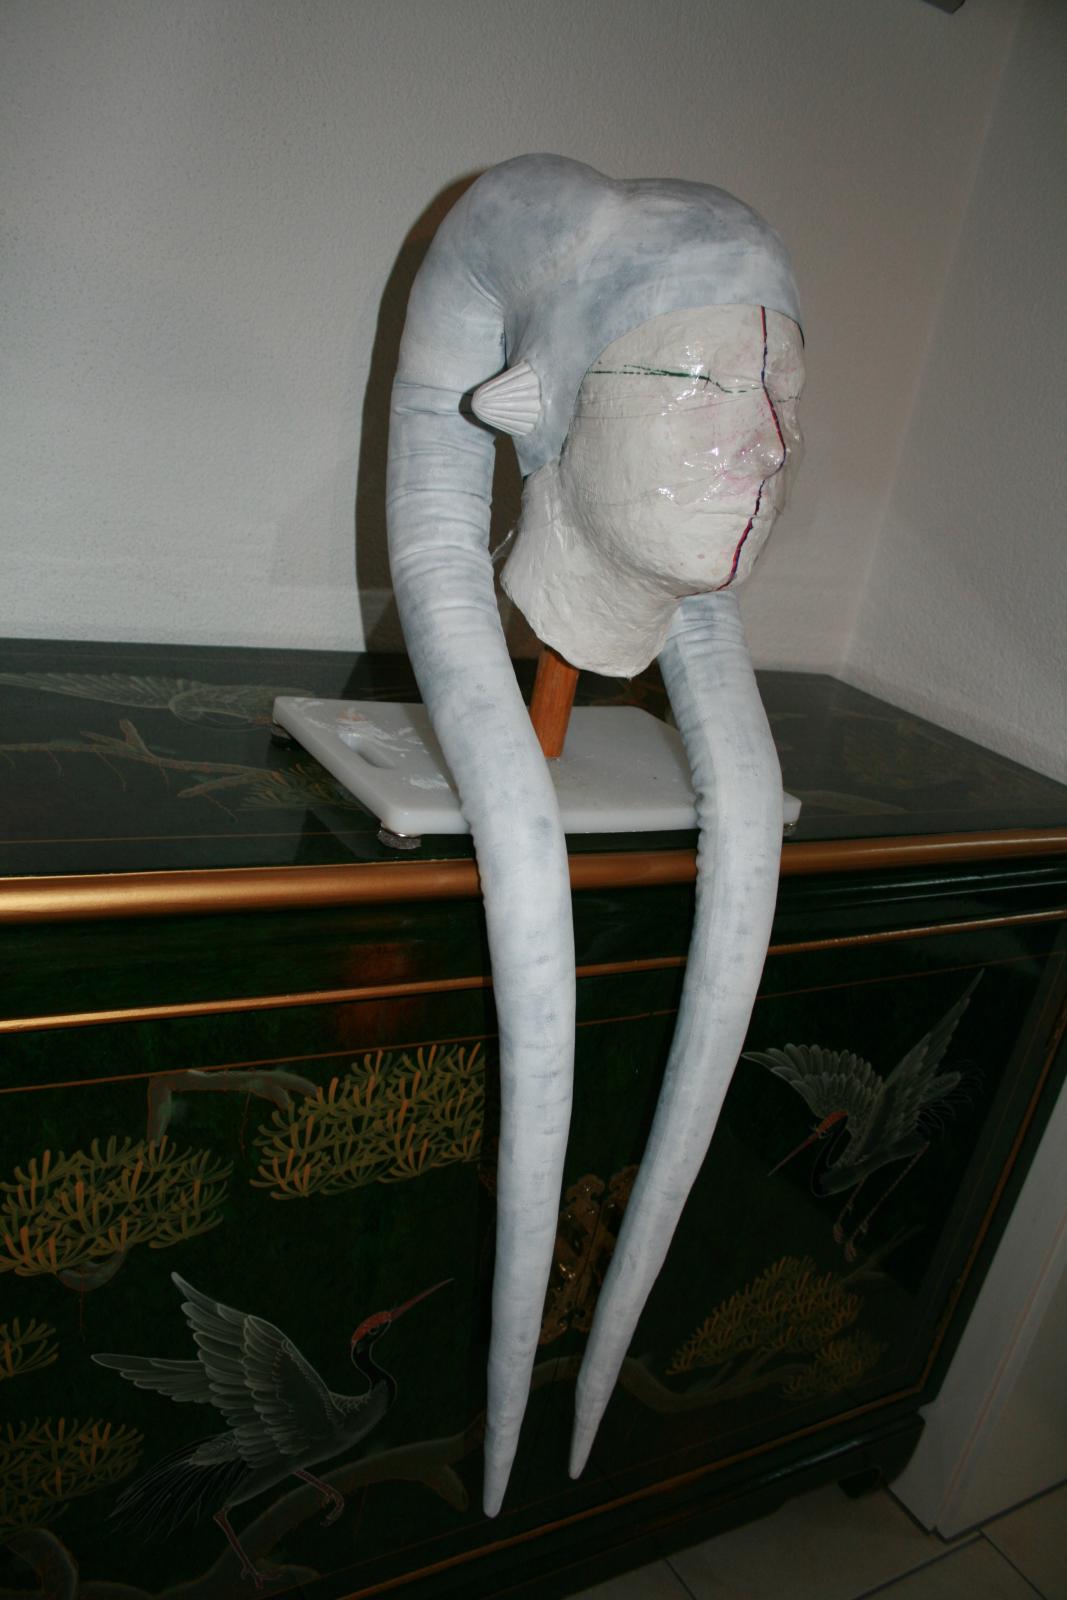
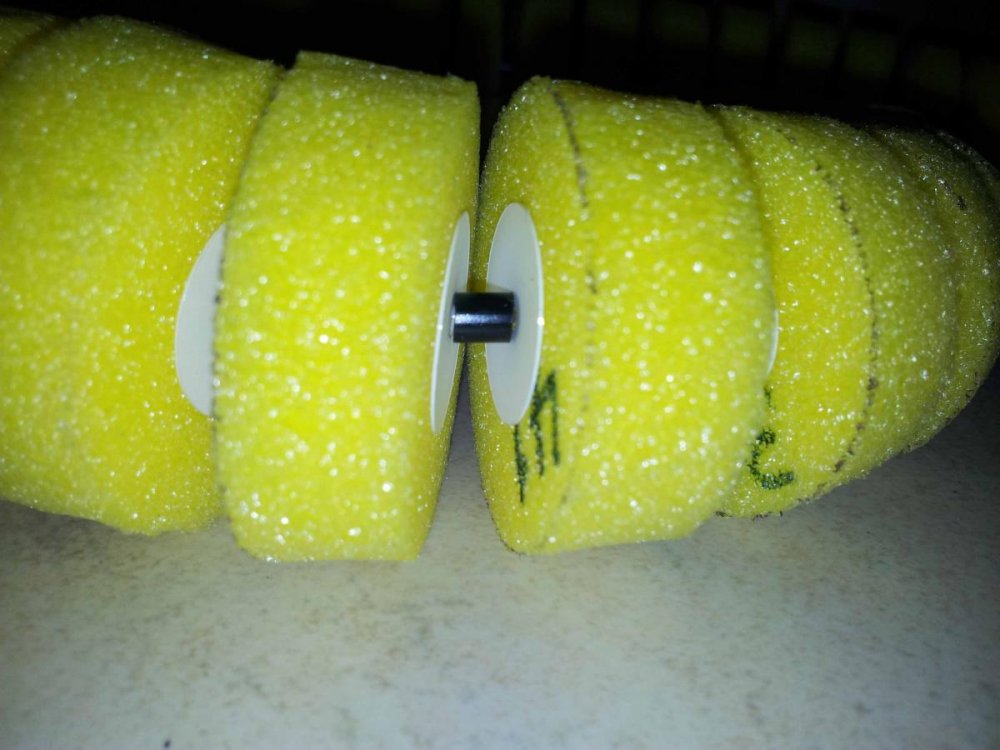
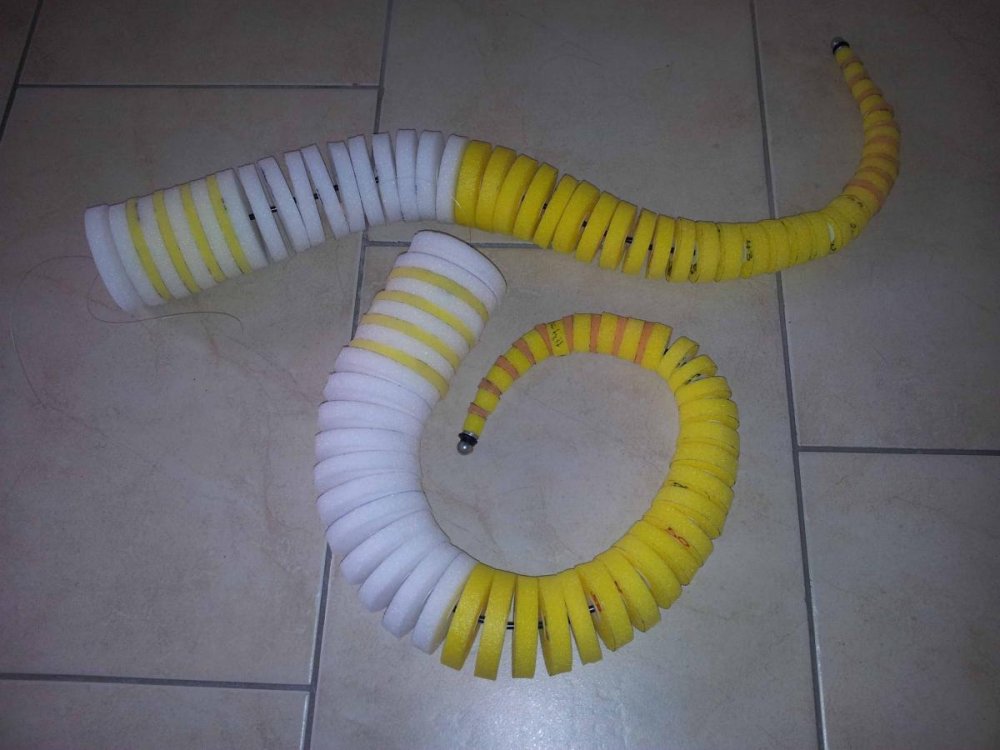
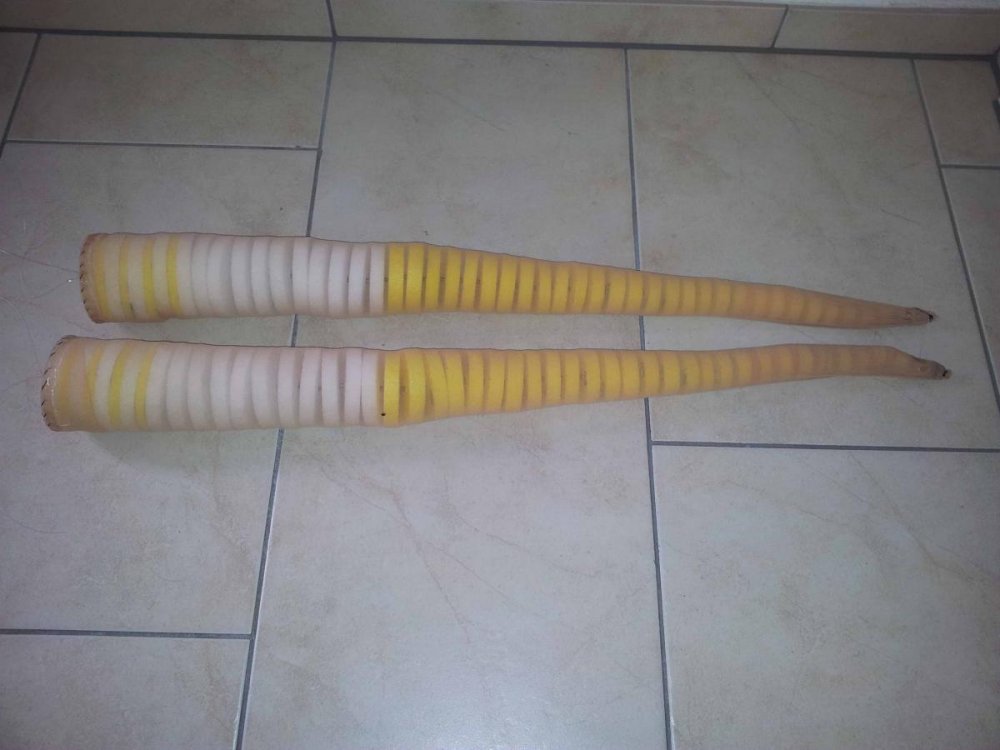
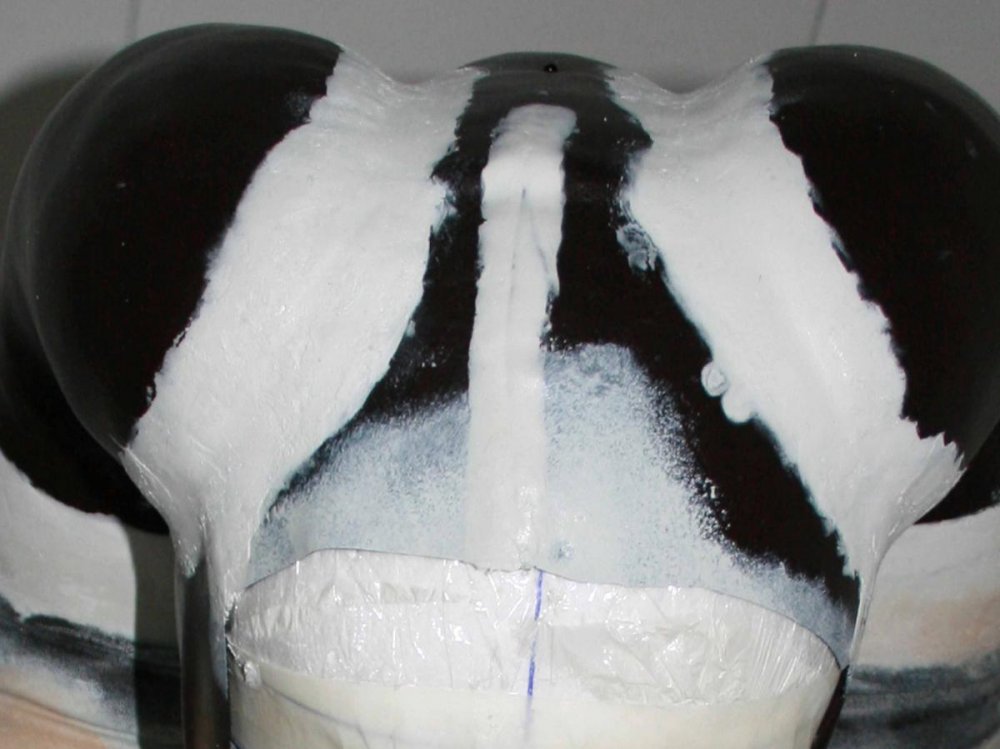
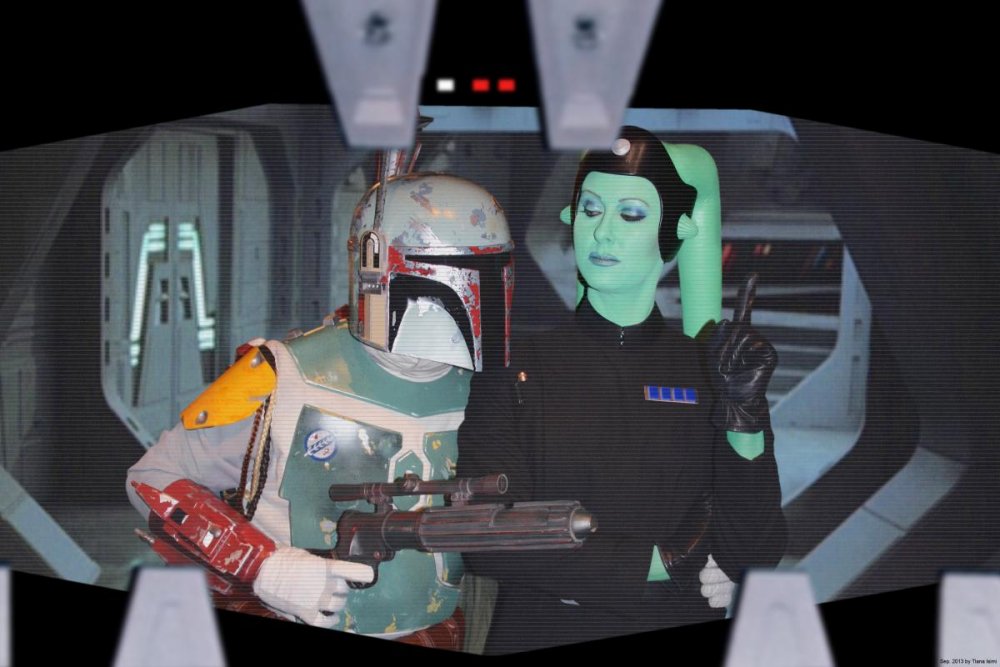
Oh-Oh-Oh … I know, there are some lekku to buy online. Most of them look great, but they weren't long enough for my plans. The Sinya-lekku is an unusual self-construction I did, because it seems that I was just too stupid to get a satisficing result with latex milk ... Okay, short version: The inner life is made of 12 mm thick PLZ sheets (same material like pool noodles are made of). I cut it in different sized circles. I threaded them on a solid fishing line. I covered it with a nylon stocking and quilting mat. The outside layer is flexible faux leather. I used a lot of acrylic sealant to fill the gap between head-cap and lekku and painted it with acrylic colour. This is just a rough overview. If you like, I can send you the more detailed tutorial I wrote a few years ago. Unfortunately it is in German, but I attached a lot of pictures and I think, if you understand the main principle, it should work.


-

501st/SLD and/or TFE Detachment Access Requests
Tlana replied to DarthBrute's topic in Welcome Area and Forum Help
Good morning. I'd like to become a member of the detachment. This is the link to my Sinya costume. http://www.501st.com/members/displaymember.php?userID=13692&costumeID=304 Best wishes and Thank you -
Hi guys! Do I interpret it right? Until now there isn’t any Pagetti Rook (former Queequeg – he was the weequay in Episode VI who pushed Luke Skywalker on the plank over the sarlacc pit) approved yet? So, it looks, like this costume would be a “new in the legion”, IF somebody does it …? I’m wondering why nobody did it yet. I was on the krayt clan forum and tried to get some information. Unfortunately two weeks passed by and I’m still waiting to get my account validated. All I saw, was that there were one or two started weequay projects, which seem never to be finished. I wasn’t able to see some pictures, they seem to be removed, and I have no idea what happened and why happened what happened. A friend of me and I are actually working on a Pagetti Rook costume since a fiew weeks. In the meantime we have almost finished it. There are just some details we need to modificate. But we still have some questions, for example: -How many belt pockets does Mr Rook wear? I’m not sure, if there are for or five in the movie. They seem to move scene by scene. -Is this a holster belt on the right side? The action figure shows a blaster, but in the movie he just uses a vibro axe and in the scenes, when he shows his right side, there is no holster belt anymore … What do you think? It’ll be great to get some advice. Thank you very very much. Best wishes from Switzerland
-
I'm going to get a twin sister - yeah! The second boots are the better choice, I think. You don't need to shave and paint your forehead. The "skin" you can see through the headpiece, is a part of the Lekku-cap. Can't wait to see some pictures of the work in progress. If you have any questions about this costume, please just ask. best wishes Tlana
-
Congratulations! Great Mara Jade!
-
Yeaaah! Congatulations, Benny *hug-hug-hug*!!!
-
My Sinya costume has been approved a view days ago! Thank you so much! I’m really very very VERY happy !
-
Hello everyone! Thank you very very much for all your positive feedbacks … I’m already in contact with my GML. In the next few weeks we’re going to plan our next steps. But … oops … shame on me! I put the scratches on the wrong direction on my face – ouch! Here is an actual picture from yesterday. I also shaved my eyebrows to give them sharper and more “aggressive” curve (well, my husband was not so amused, but anyway they are going to grow again). Greetings from Switzerland
-
Oookay, I'm still fighting with the upload - sorry ...