-
Announcement
Welcome to the forums!
If you are a newly-approved member, make sure you check out the New Member Checklist!
If you are a Detachment member and can't see the member-only area, post here for access.
-DV


Officercato
-
Posts
137 -
Joined
-
Last visited
-
Days Won
24
1 Follower
Recent Profile Visitors


Officercato's Achievements
55
Reputation
-
You are killing it! Great job on all the troops!
") I've recommended that there be a new certificate at 200, which obviously you are well on your way to.
I've recommended that there be a new certificate at 200, which obviously you are well on your way to.
-
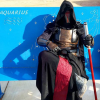
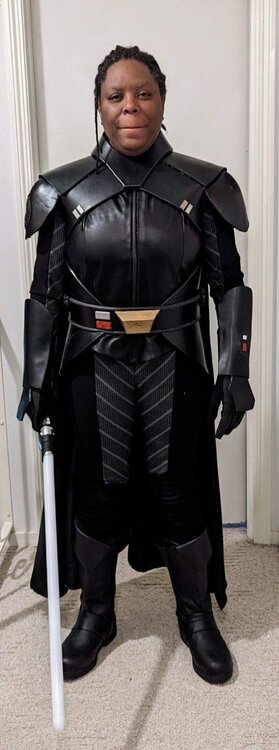
Live action Third Sister (Reva) build
Officercato replied to Officercato's topic in Third Sister: Reva
CRL pics have been submitted! On the last stretch. I plan to create a cleaner thread for the build that only includes what I actually used and did so it’s easier to follow.
-
Live action Third Sister (Reva) build
Officercato replied to Officercato's topic in Third Sister: Reva
The process has started. Pictures and write-up have been submitted. Now I get to work on the long process of bringing Reva to the 501st. -
Live action Third Sister (Reva) build
Officercato replied to Officercato's topic in Third Sister: Reva
So close to being done. I need to redo the arm guards and chest armor and shorten the bottom corset pieces.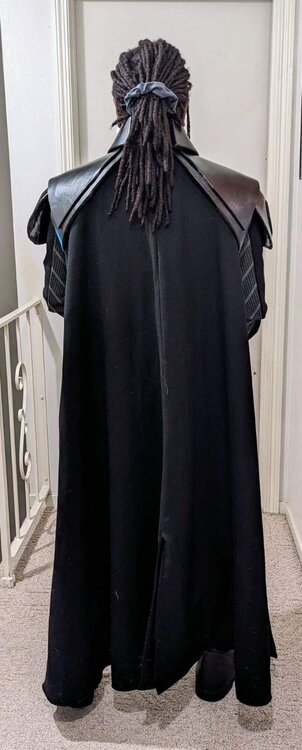

-
Live action Third Sister (Reva) build
Officercato replied to Officercato's topic in Third Sister: Reva
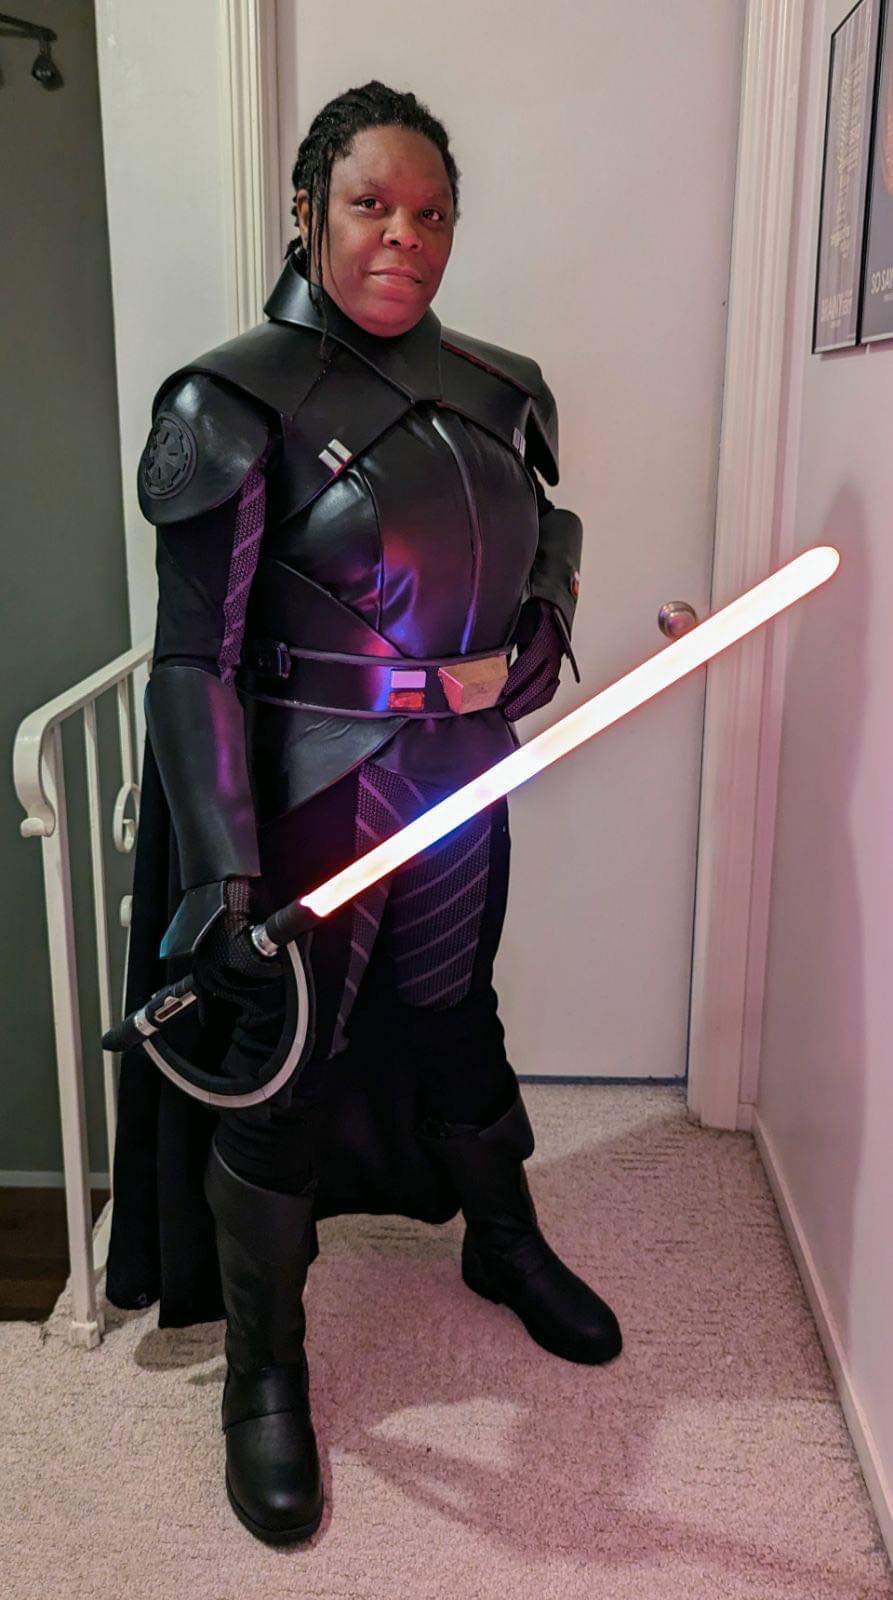
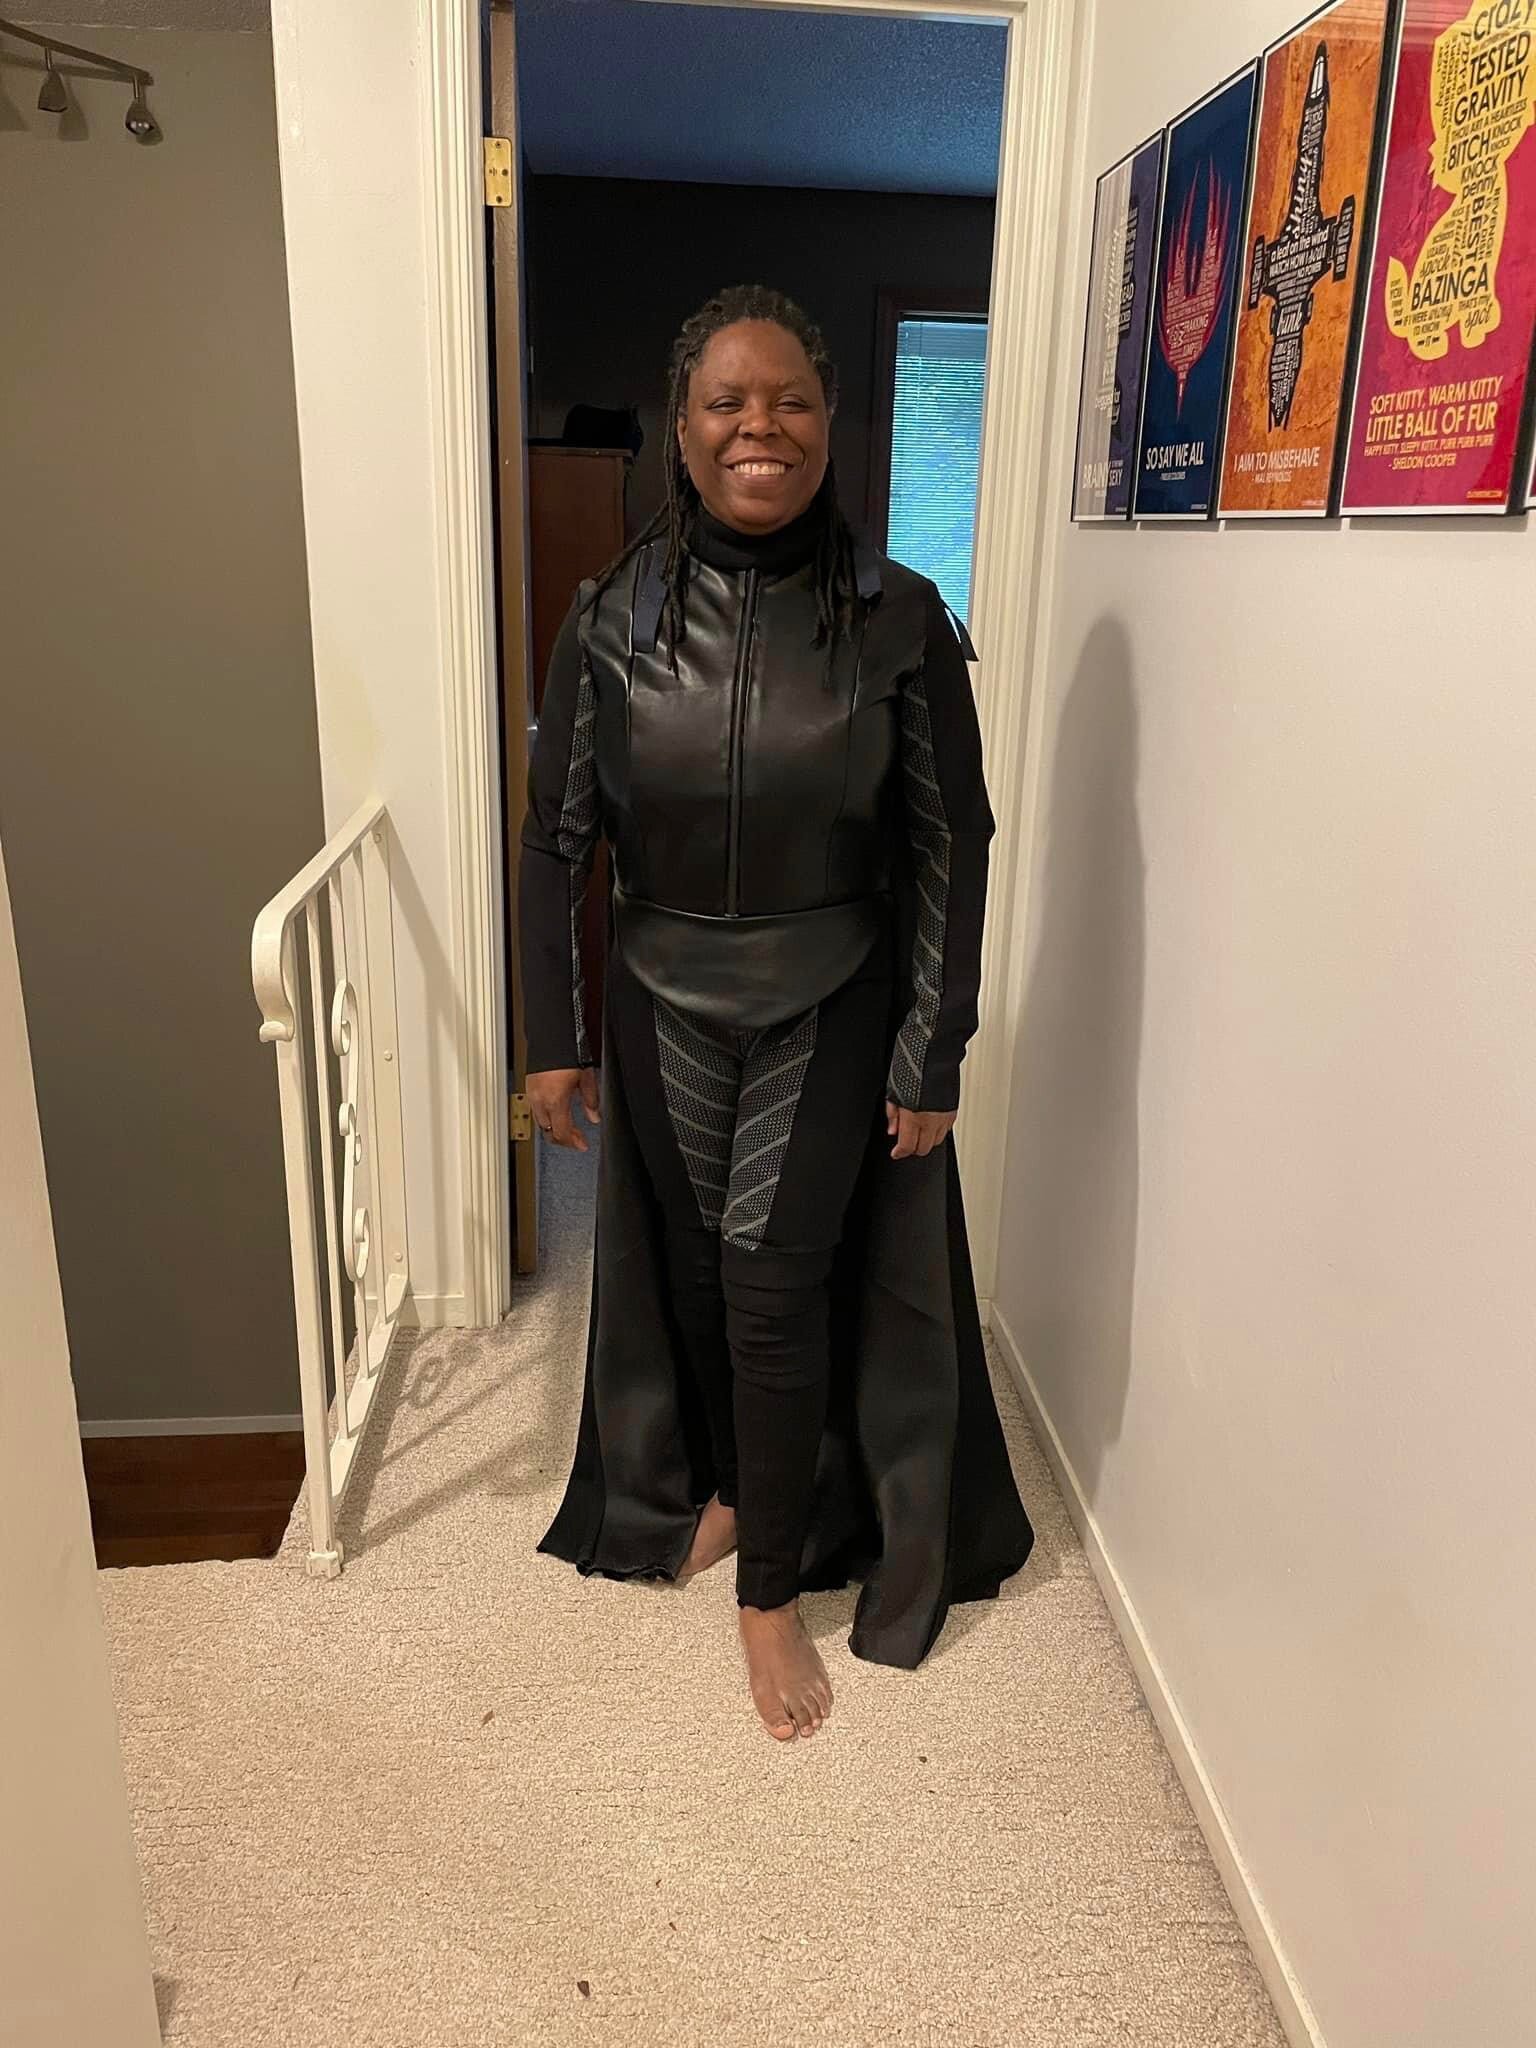
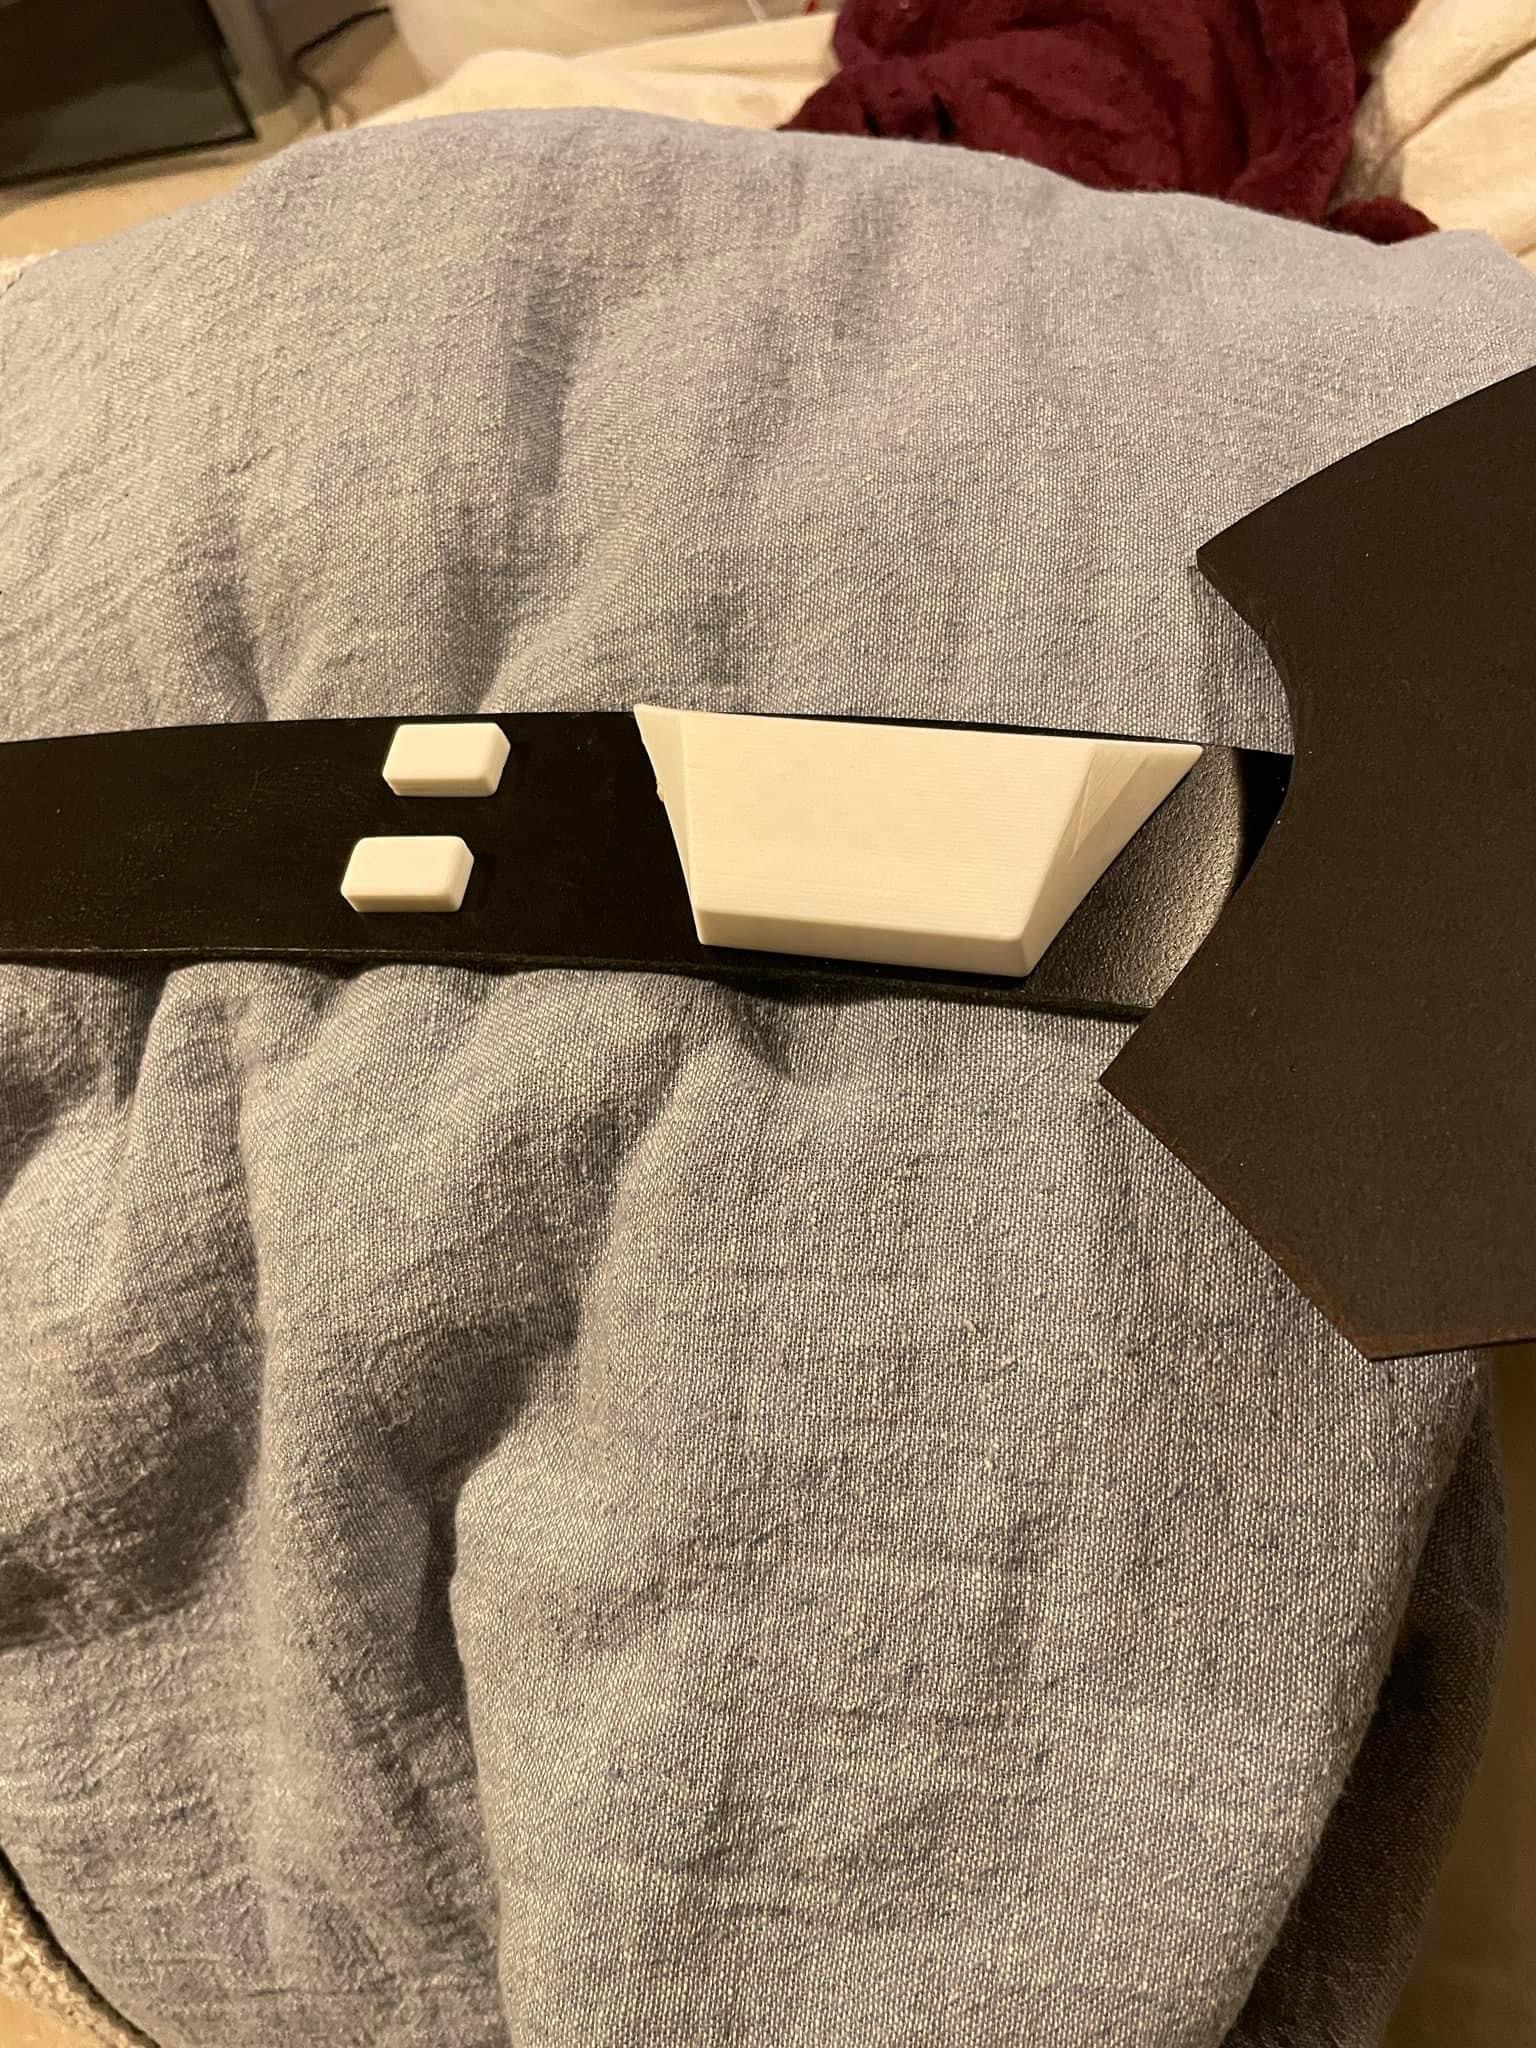
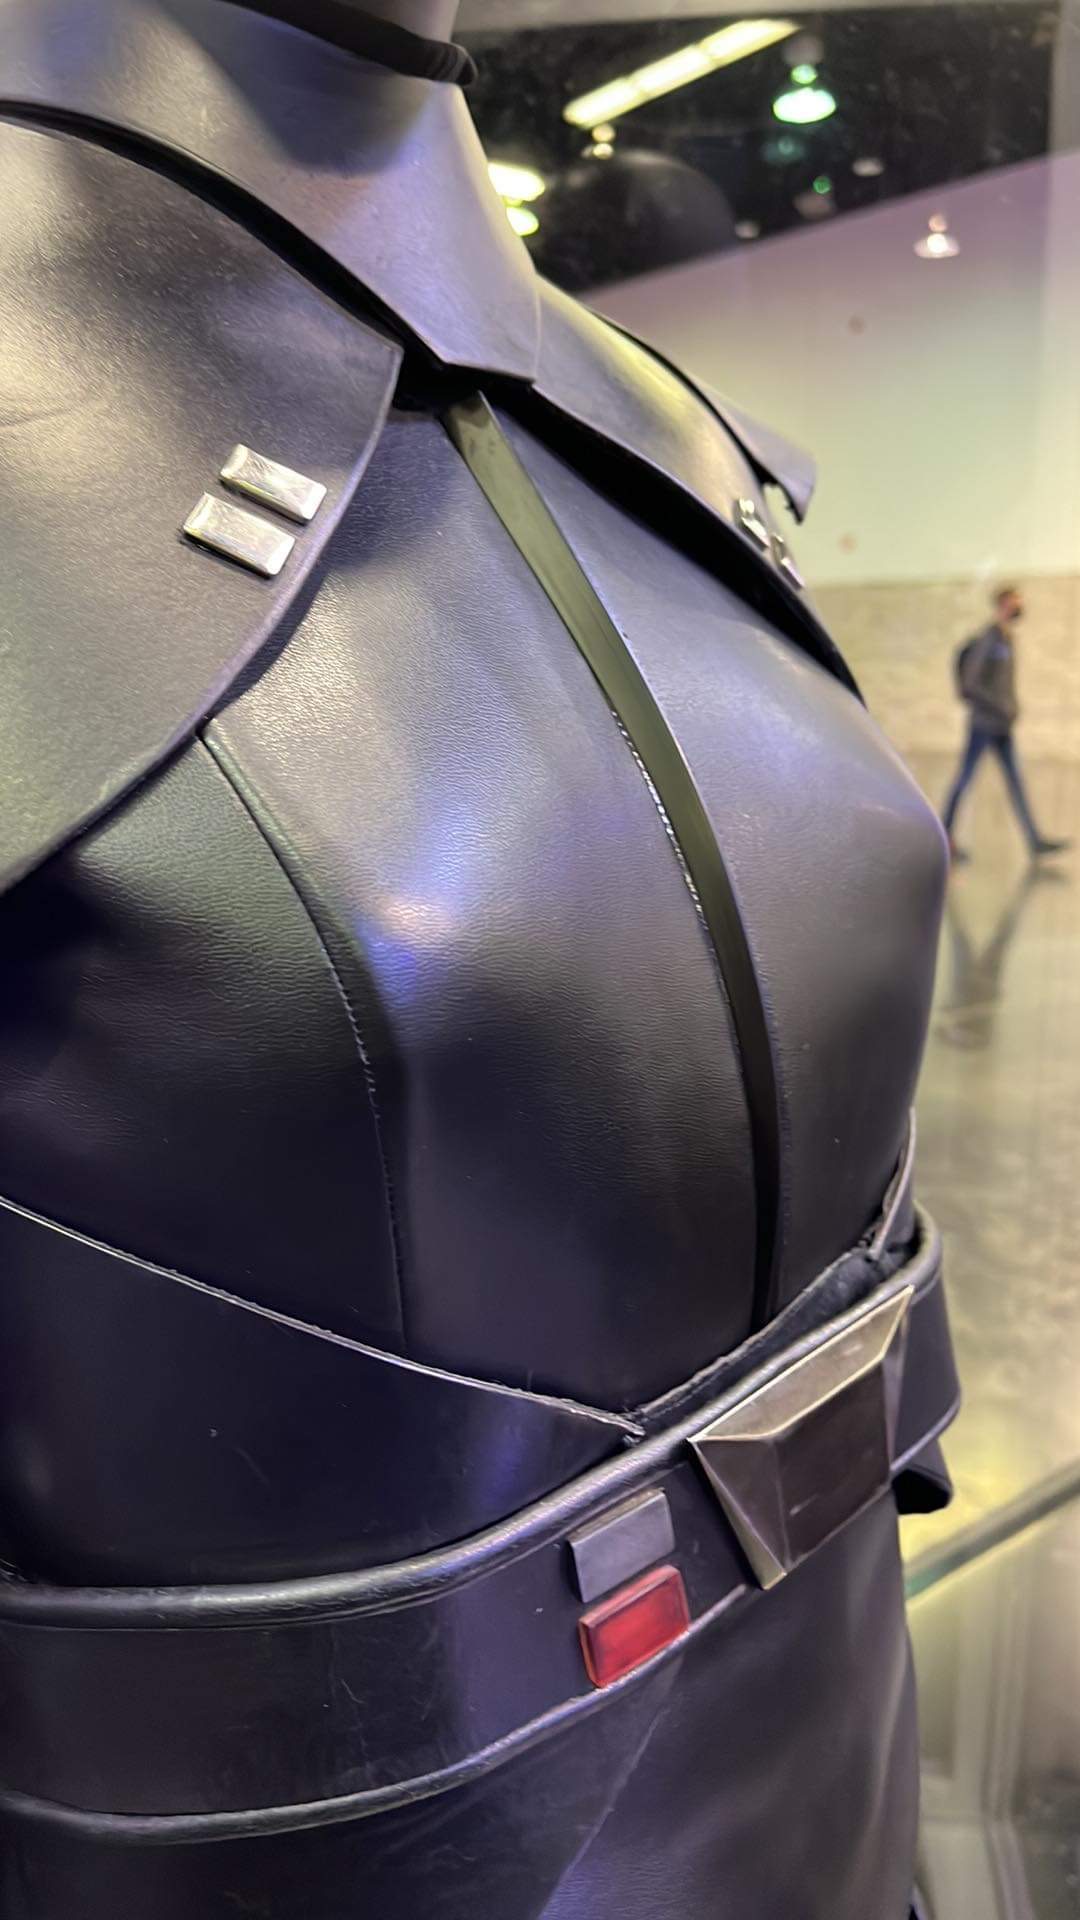
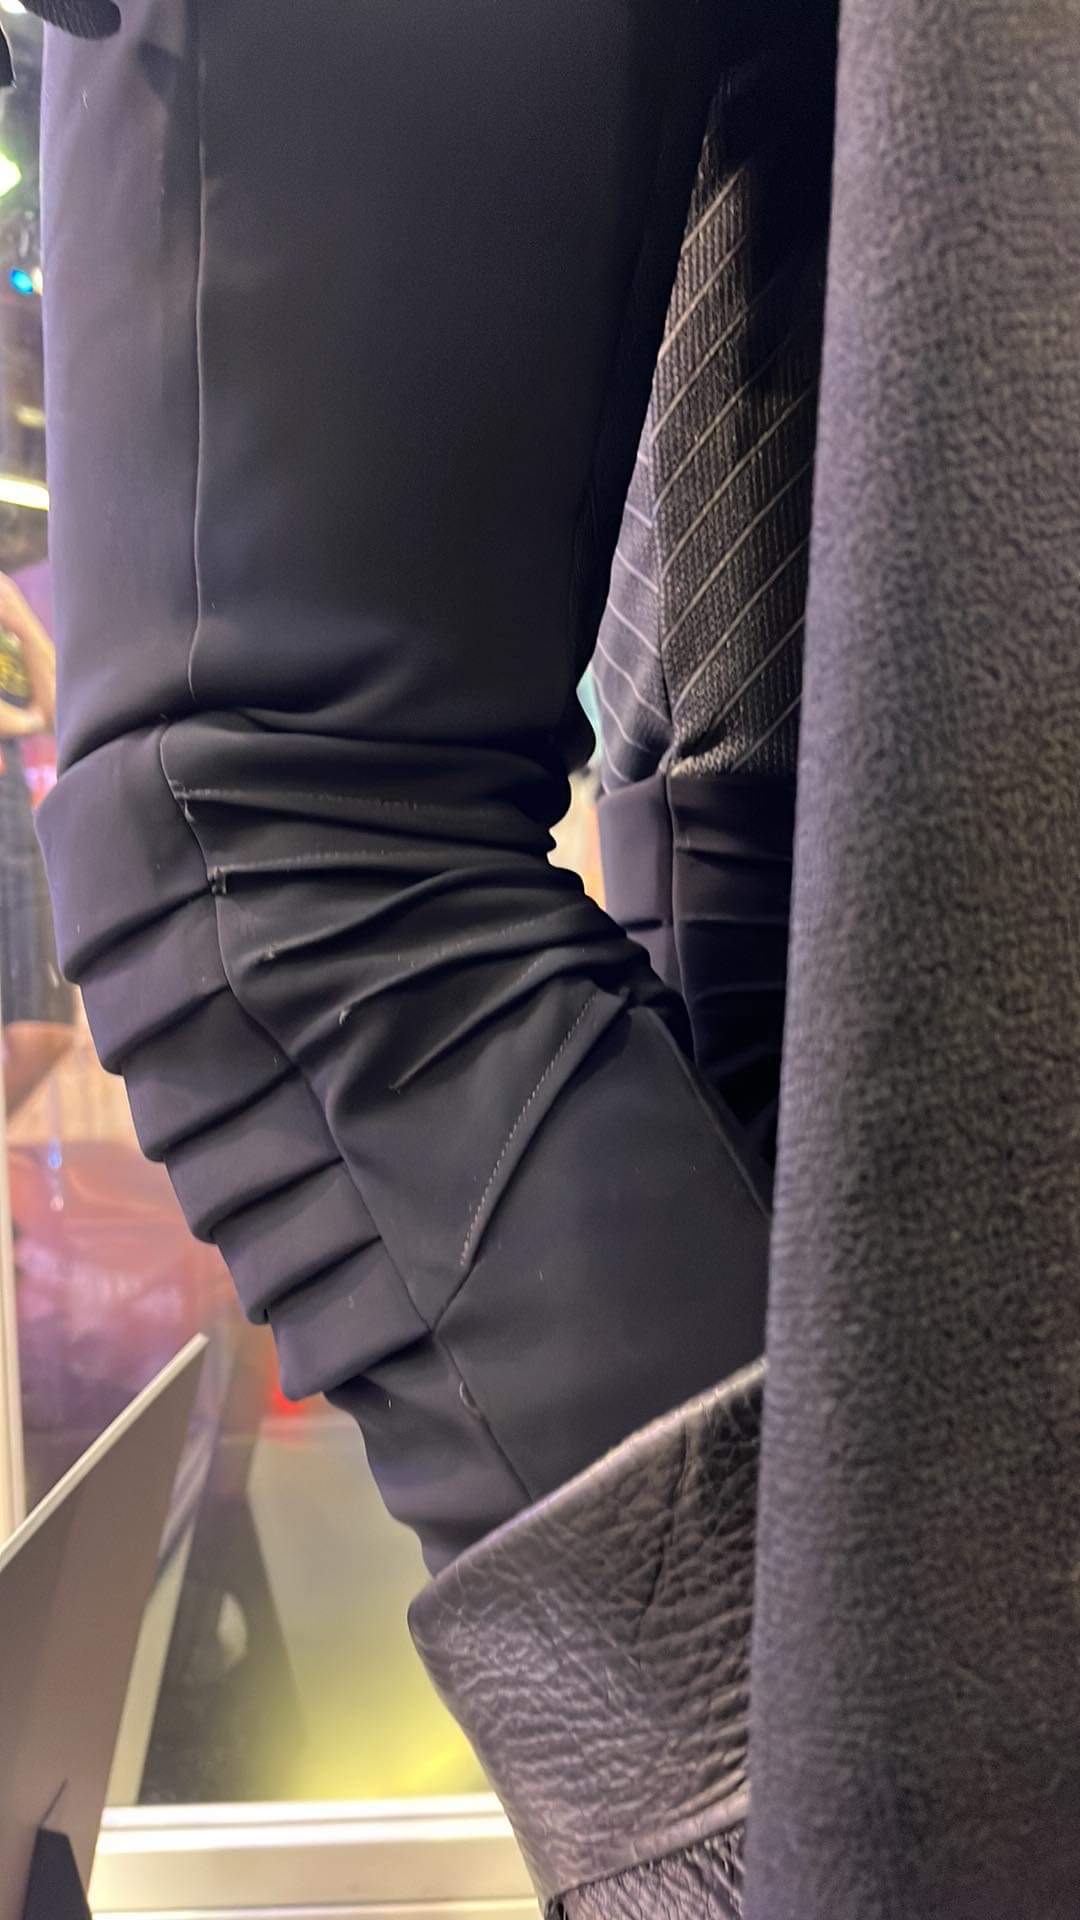
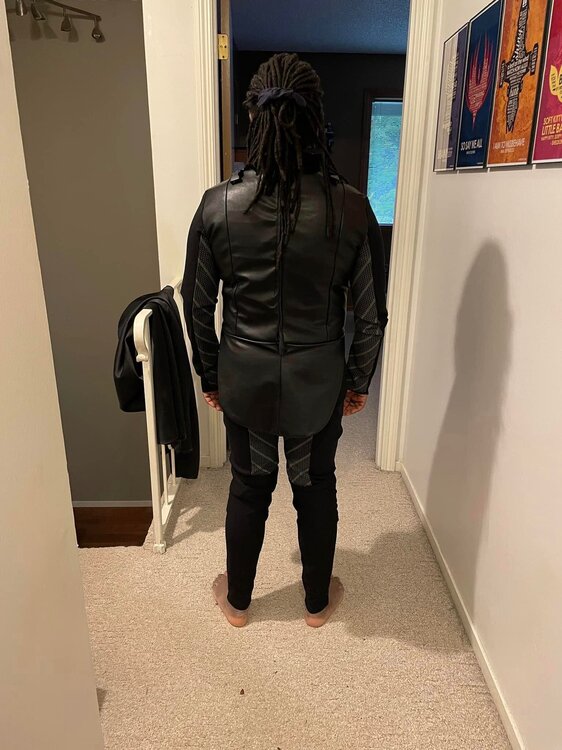
I’m skipping way ahead. I got a little hyper focused and just didn’t follow up with documentation. I have been taking pictures as I go. I have a photoshoot next Sunday and had to step up my game. Finished the bodysuit (sort of) and took some pics. The cape clips on to my shoulders. still to do: Place Velcro to hold armor in key locations Belt - cut to length, finish painting greeblies, wire LED Armor - apply Velcro, repattern collar, model greeblie for guantlets Boots - A friend is working on them for me cape - hem and shorten clip straps saber - all the things
-
Live action Third Sister (Reva) build
Officercato replied to Officercato's topic in Third Sister: Reva
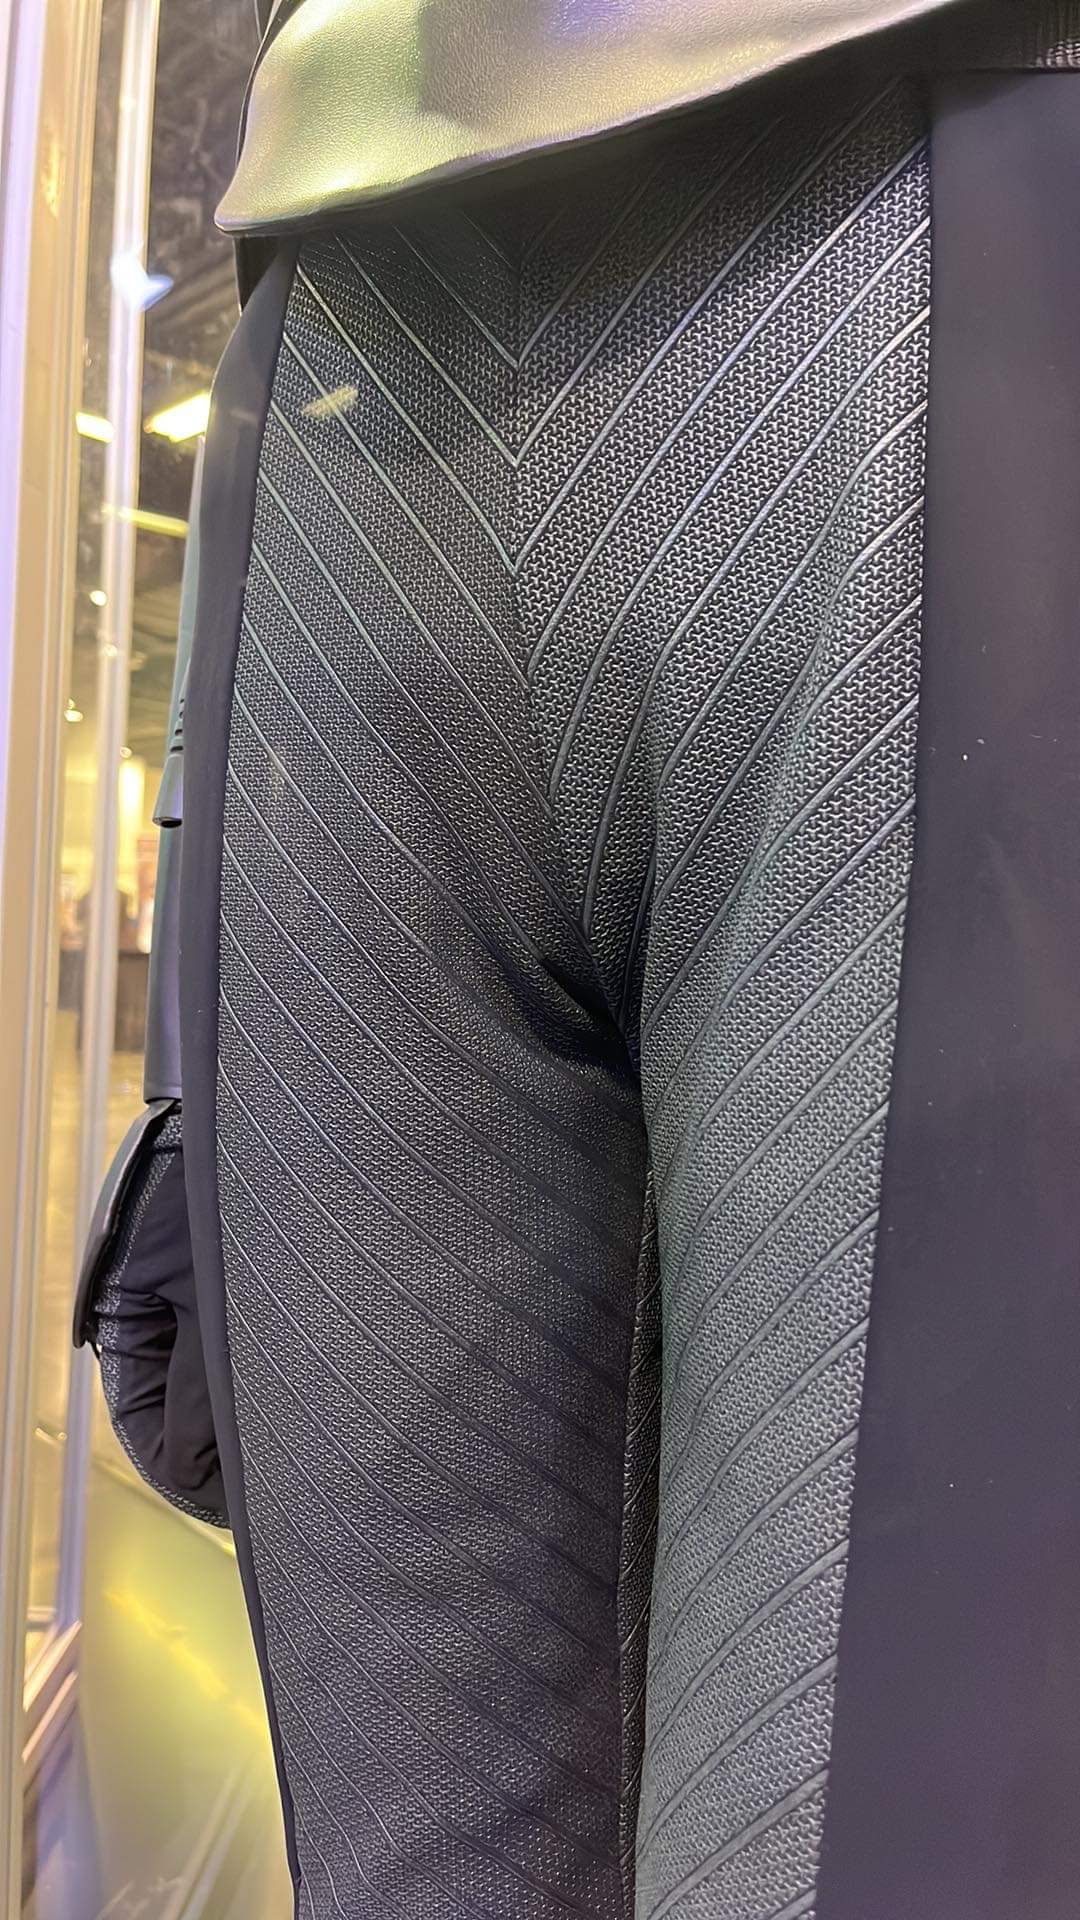
Quick update! Sorry for the delay. I've been hard at work sewing and assembling, but I have a hard time doing all that and keeping up with pictures and posting. Currently I'm getting ready to mold the front rubber detail and I'm sewing up the tunic. I have a lot of changes I made to my original plan. 1. EVA cosplay pattern - I decided to use the shoulder pieces "as is". I also used the cog pattern from this as well. When I modeled my belt buckle I used the dimensions from the one on the pattern in this package, but it was too small for a 2" belt, so I had to resize it, but the overall look is correct. None of the other patterns were working for me, so I drafted the rest myself. 2. Bodysuit and leggings - I made the most changes here. The legs of the bodysuit are attached to a plain bodysuit top that zips in the back. Why the back? It reduces bulk in the front. The tunic has a tight fit and I didn't want a zipper digging into my chest while wearing it. The base bodysuit has no sleeves. I attached the sleeves to the tunic as well as the knit collar. This also zips up the back. If I have issues with the tunic riding up at all I'll add some velcro inside at the waist that attaches to the base bodysuit. The side corselette parts will have it's own belt that are hidden under the main belt. I'm using straps attached to the tunic that clip to the cape just like the original costume has. Also makes it easier to replace the cape if something happens or I really want to remake it. The pleated leggings were made separately from the main bodysuit (you'll notice when I add pictures that the print on the legs doesn't extend all the way down to the ankle. it's because this legging would cover it anyway and the screen size was maxed out, so I couldn't get a piece long enough to print the entire length of the leg). I'll stich-in-the-ditch all the side seamlines to permanently attach the leggings to the main base so I don't have to keep pulling them on and off. So far these are the main differences. I can't finish the tunic part until I've finished the mold for the front detail. Unfortunatley all of my silicone has gone bad so I had to toss it. I'll pick up some more today and should be able to cast by tomorrow. Time is running out to get this done for the parade on June 3rd, so I may not post as much as I work through details, but I do promise to share as soon as I'm done. I have pics of progress (not as many as I probably could, but I have some). Honestly though I hope anyone coming after me comes up with more efficient ways of doing things. I'm sure I'm overthinking and overengineering in places. -
Live action Third Sister (Reva) build
Officercato replied to Officercato's topic in Third Sister: Reva
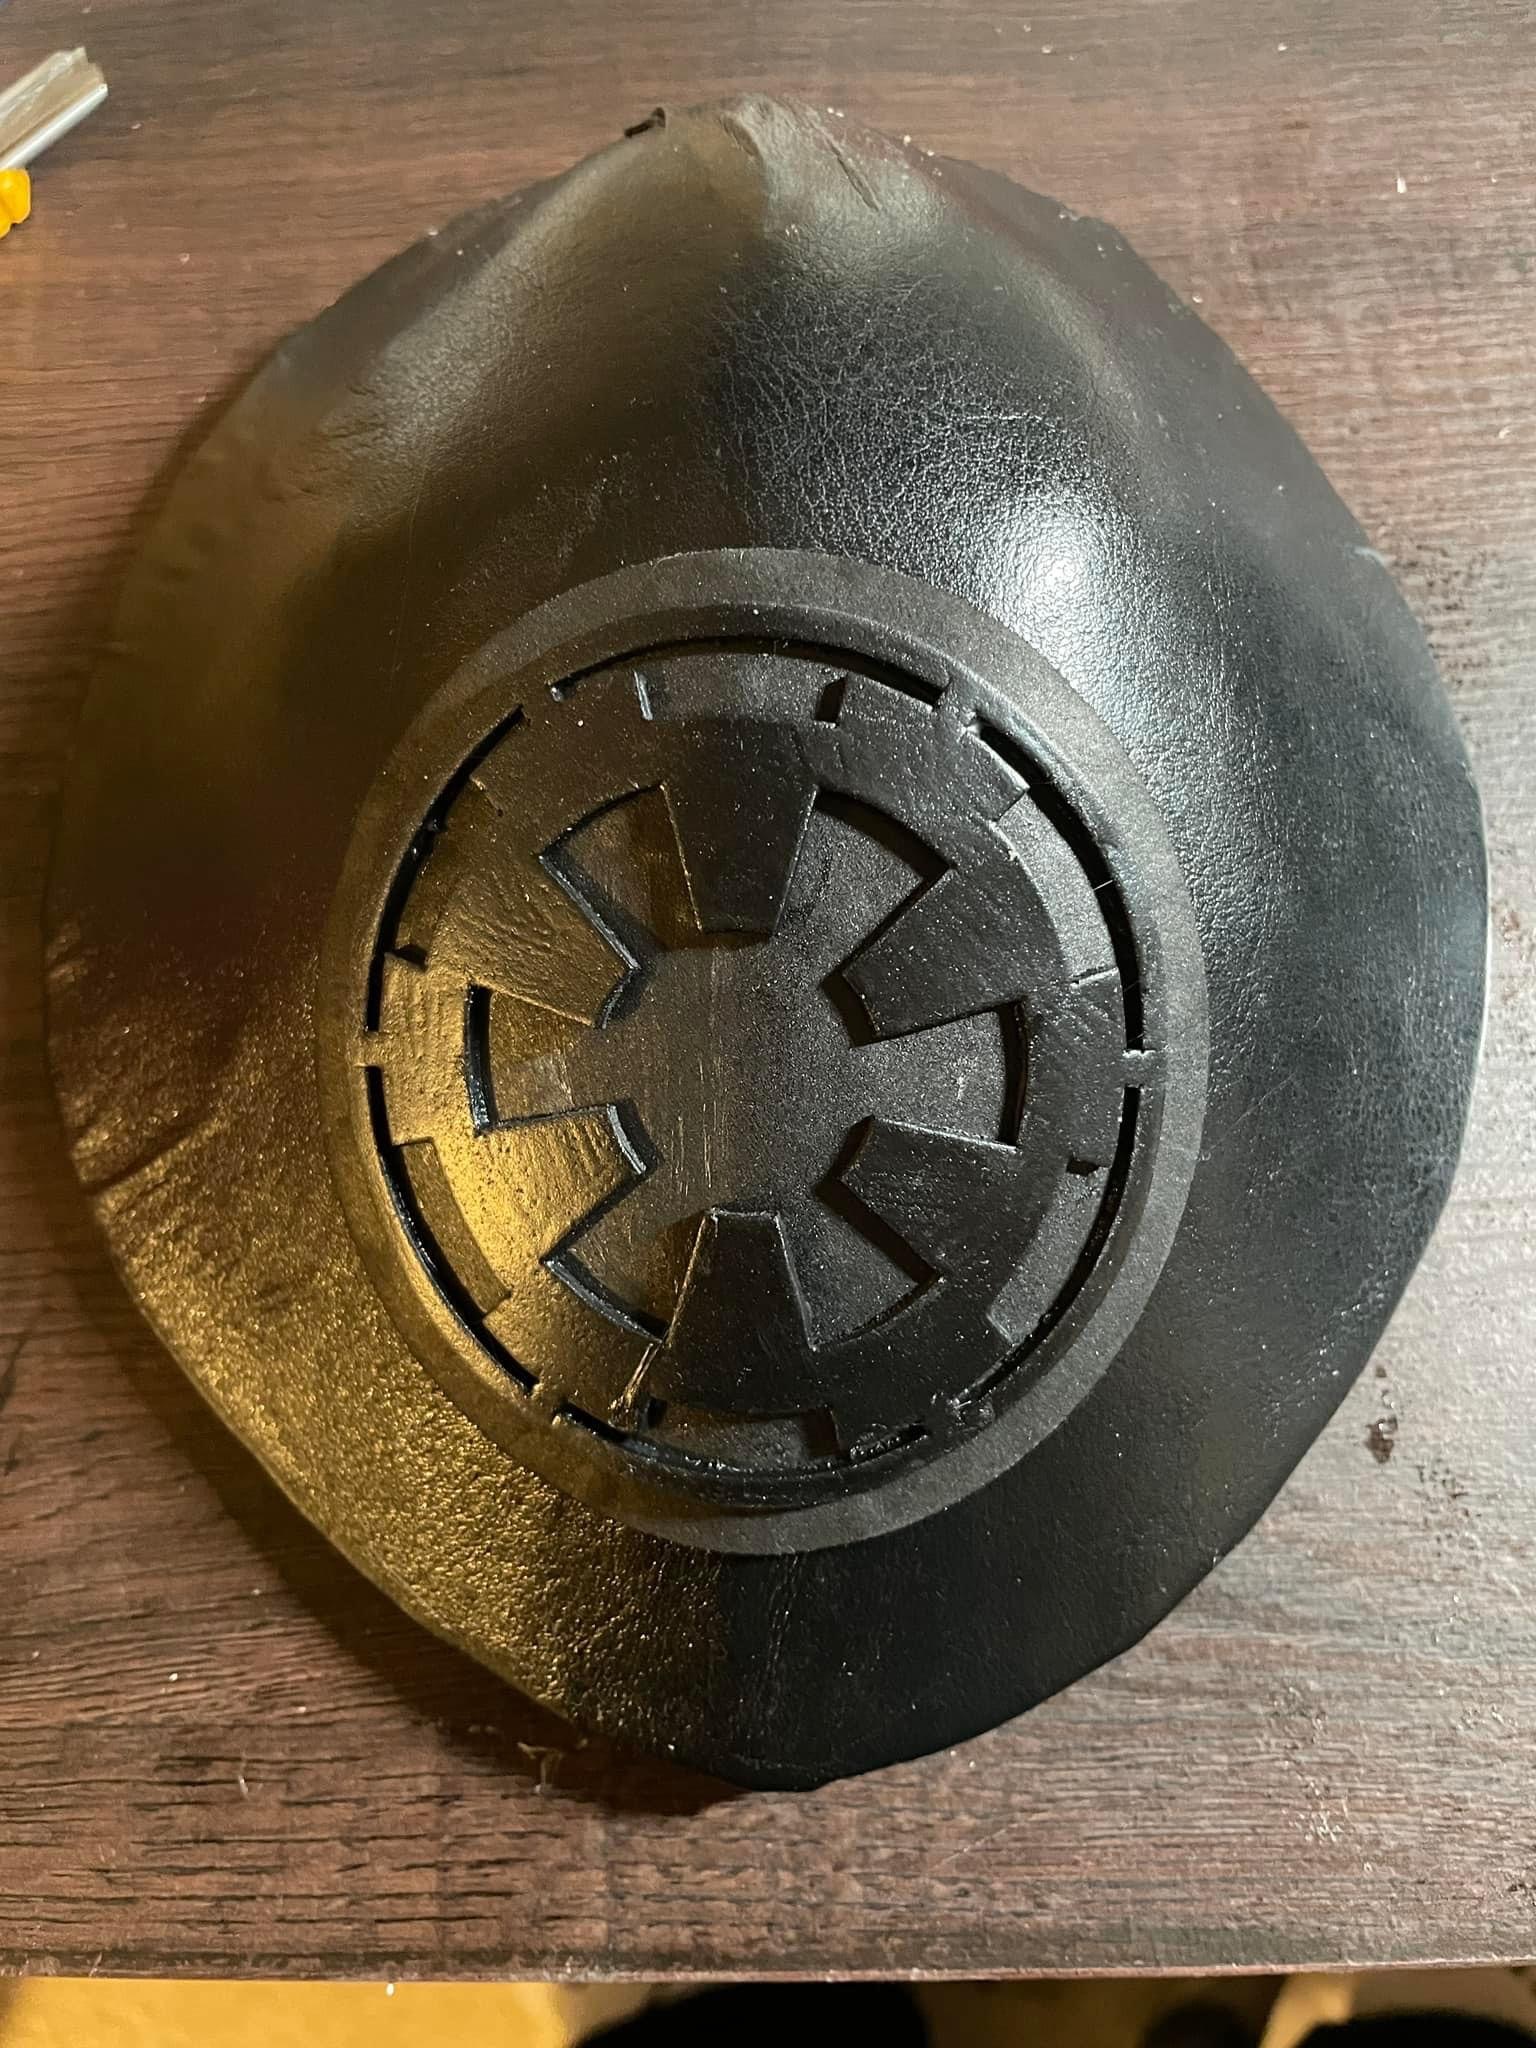
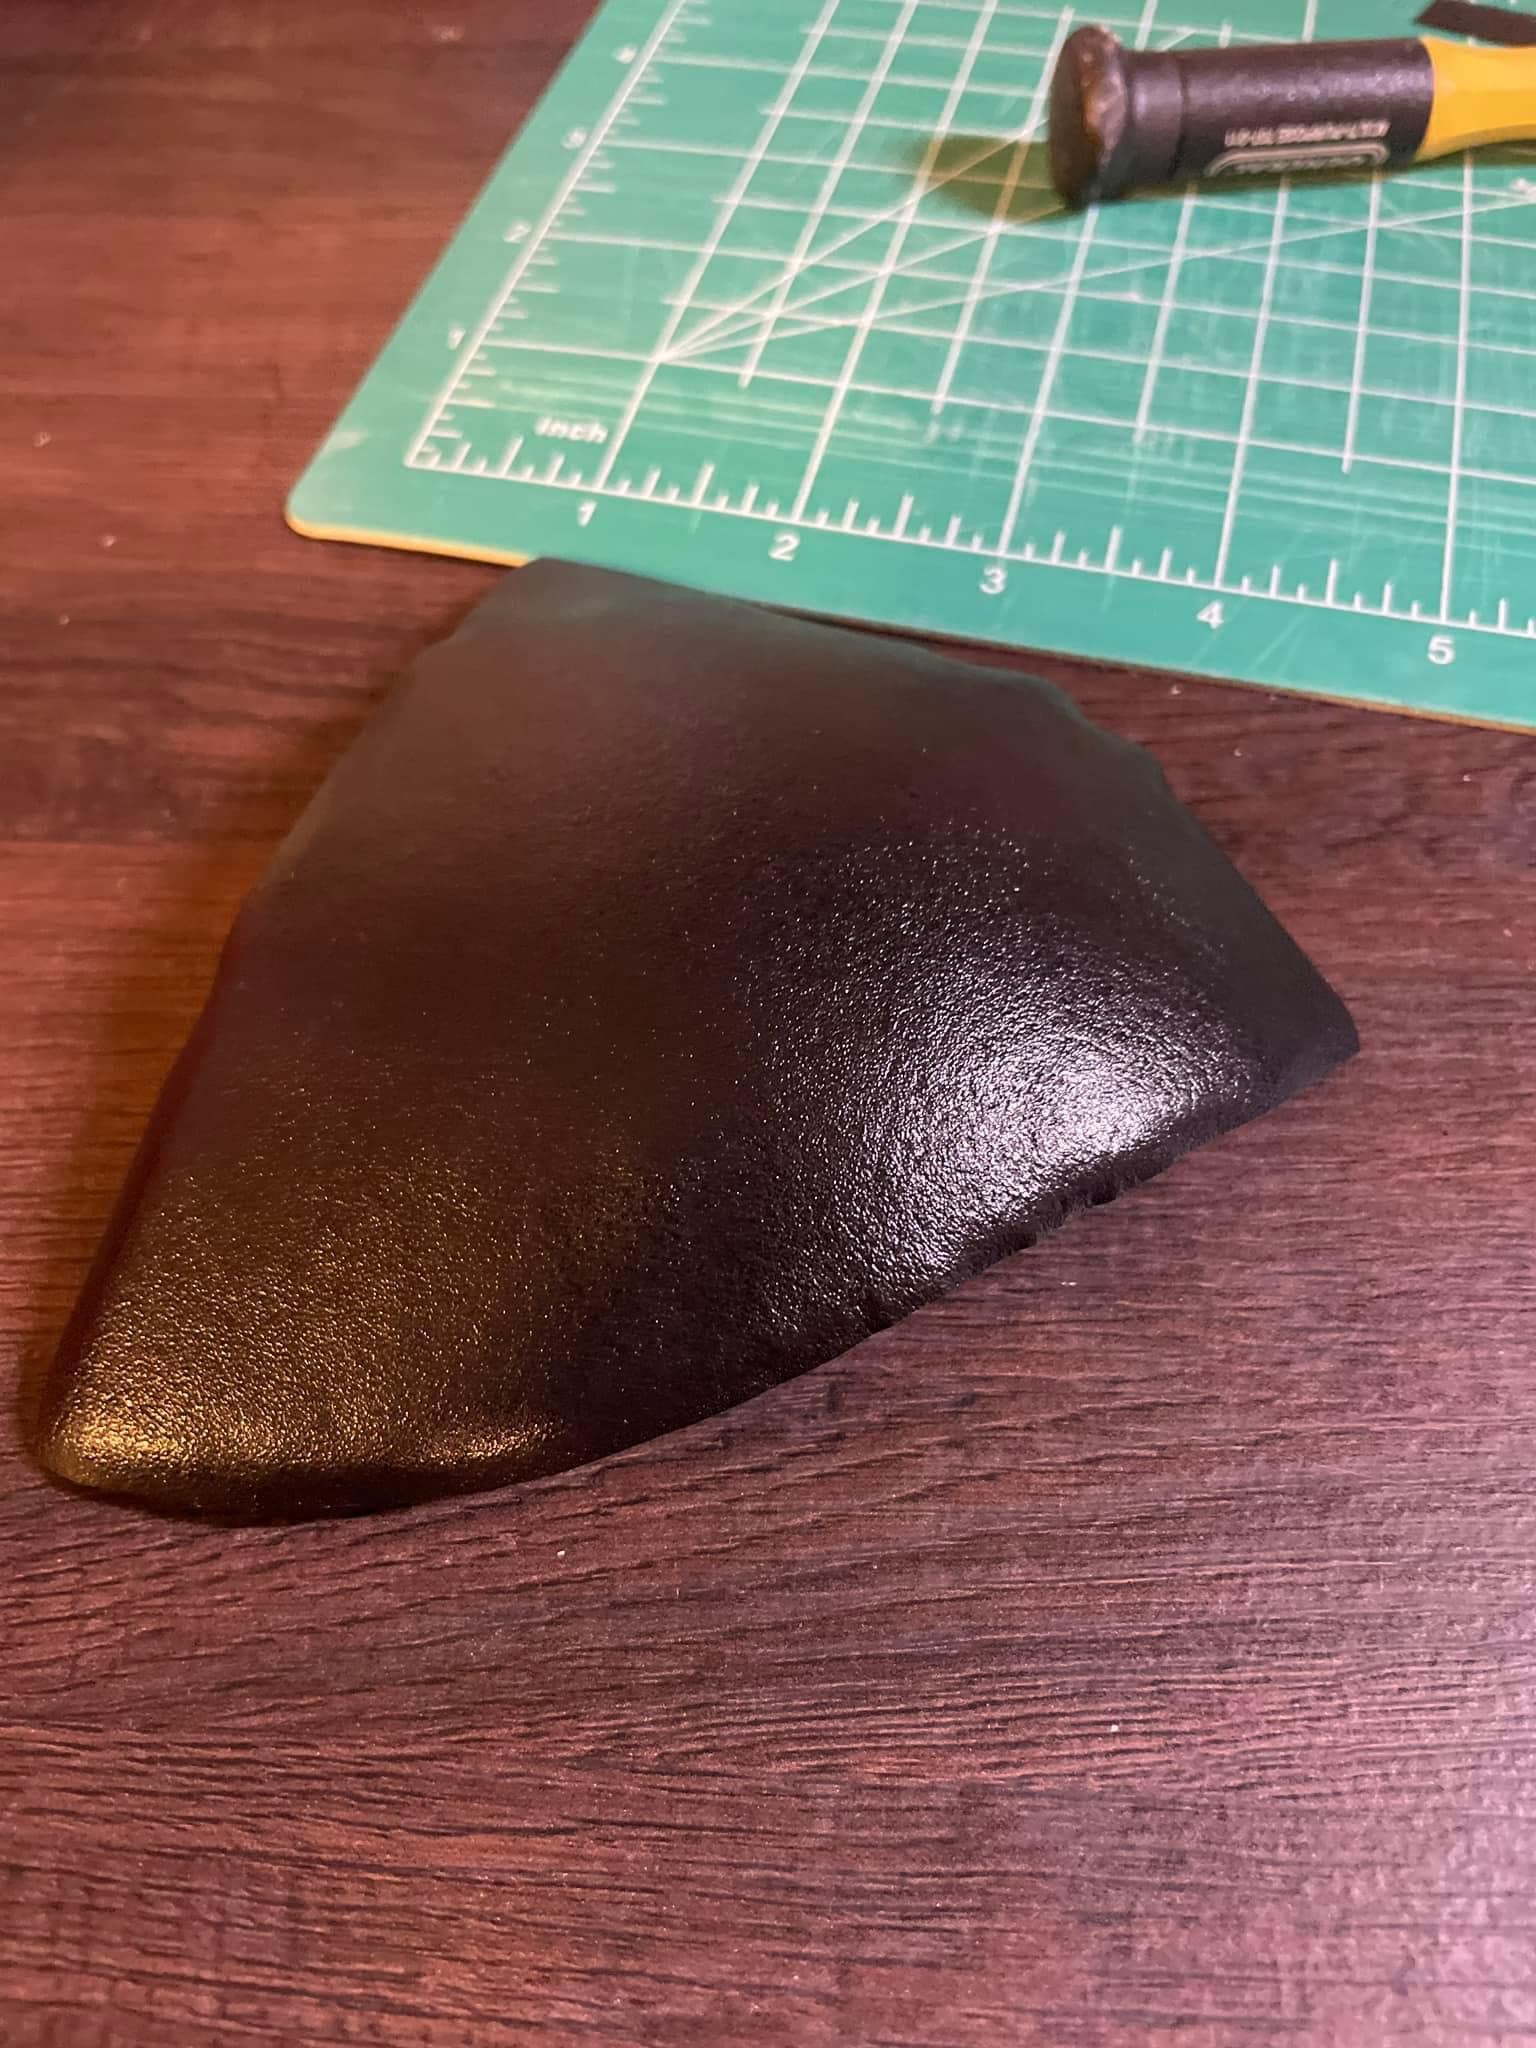
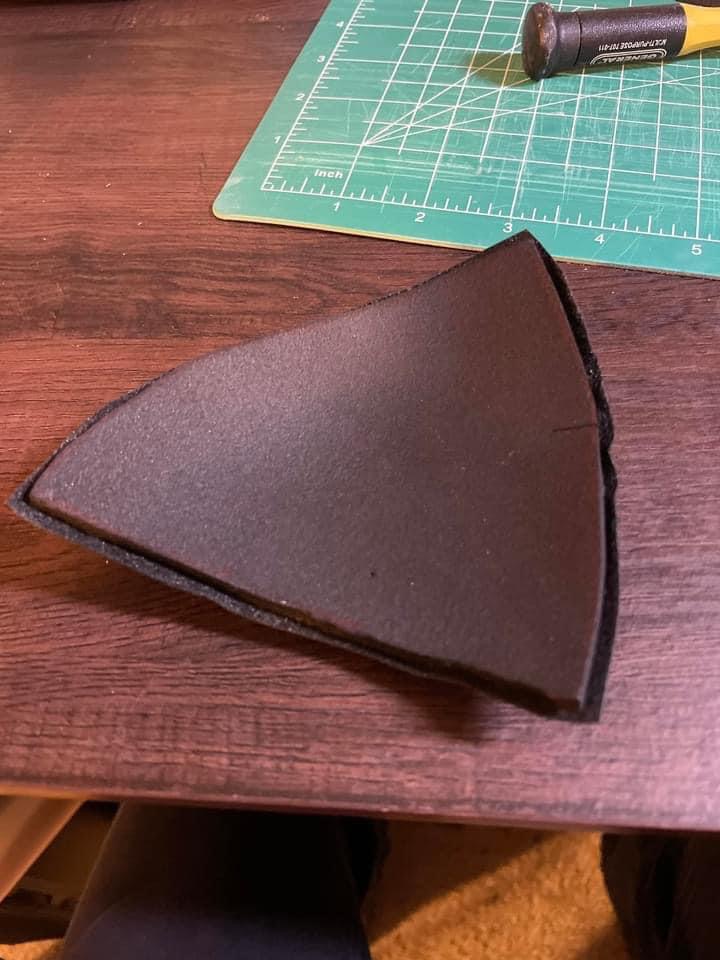
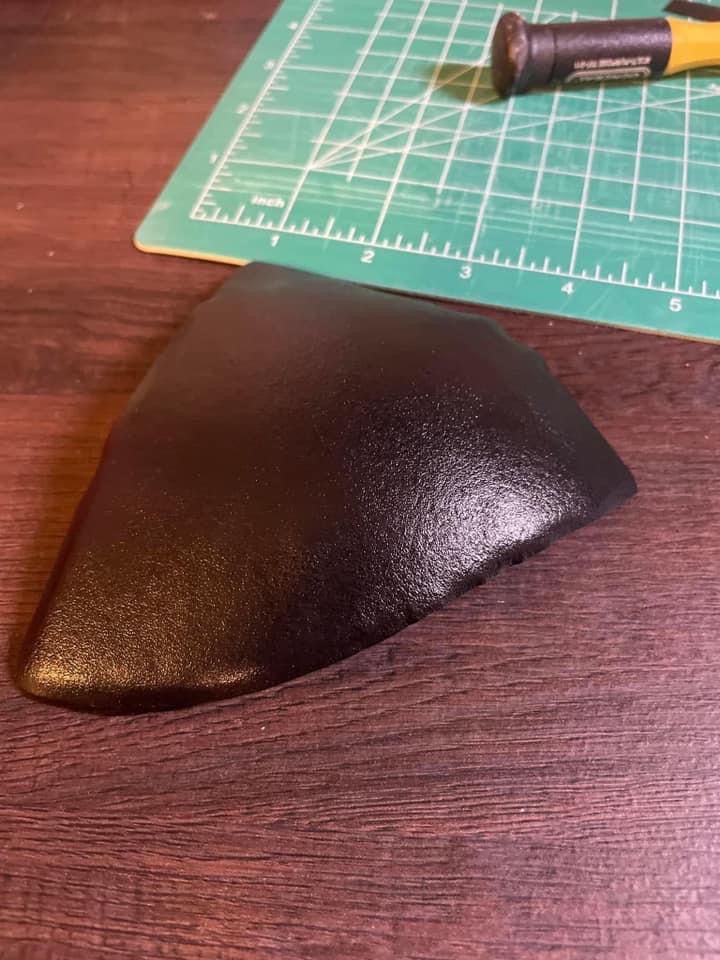
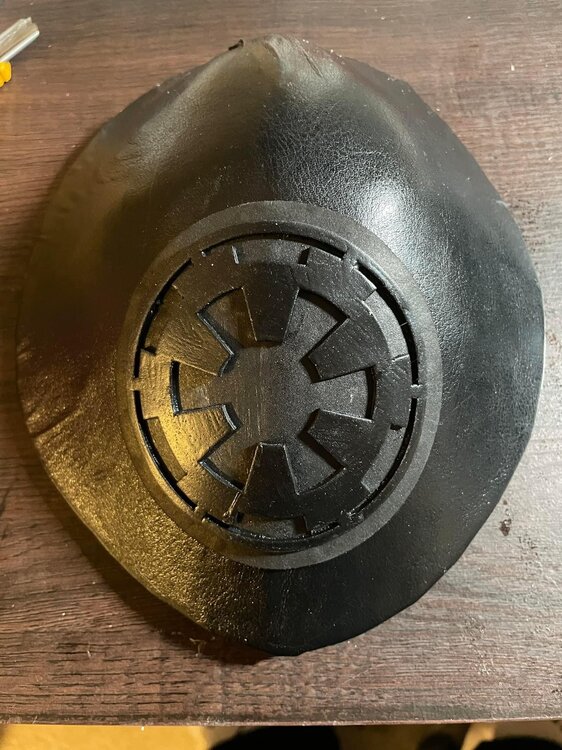
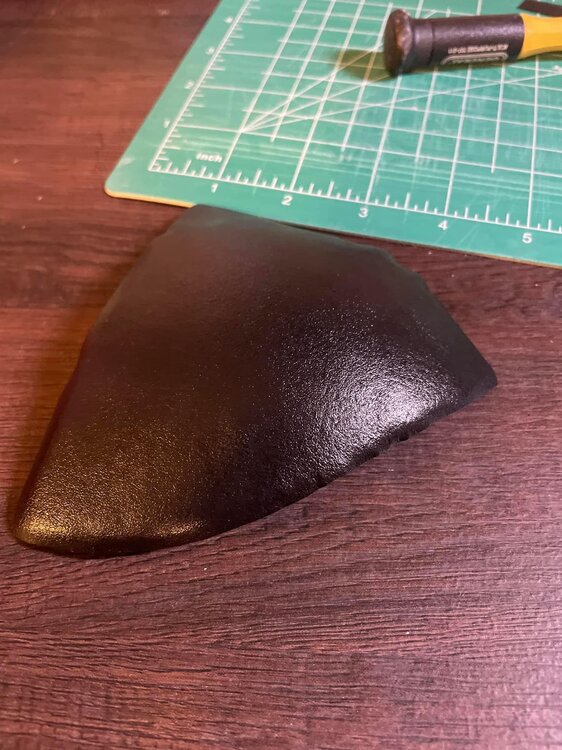
Did a little work tonight. Printed out greeblies and I’m very happy with how they all turned out. I plan to make a mold for the red light on the belt. I have resin printers but decided not to waste so much resin. I’ll be painting the other lights so the filament prints are fine for that. I think the insignia parts came out nicely. Hard to see in the pics, but I’ll paint them soon. The shoulders were covered with faux leather. I used contact cement and then heated it enough to stretch over the foam pieces. For the most part I’m okay with them, but I might give it another go to get a cleaner stretch. The places with the worst wrinkles is at the top edge or the back edge. Both will be covered so I’ll see how I feel when I do a full test fit.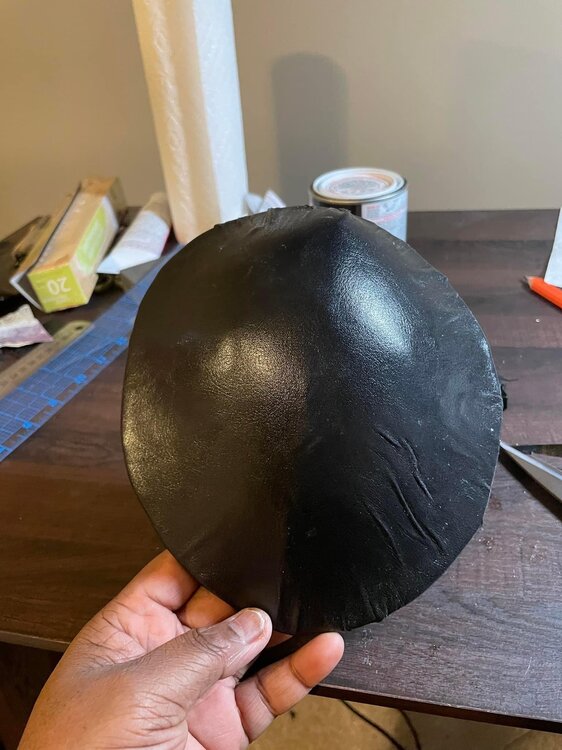
-
Live action Third Sister (Reva) build
Officercato replied to Officercato's topic in Third Sister: Reva
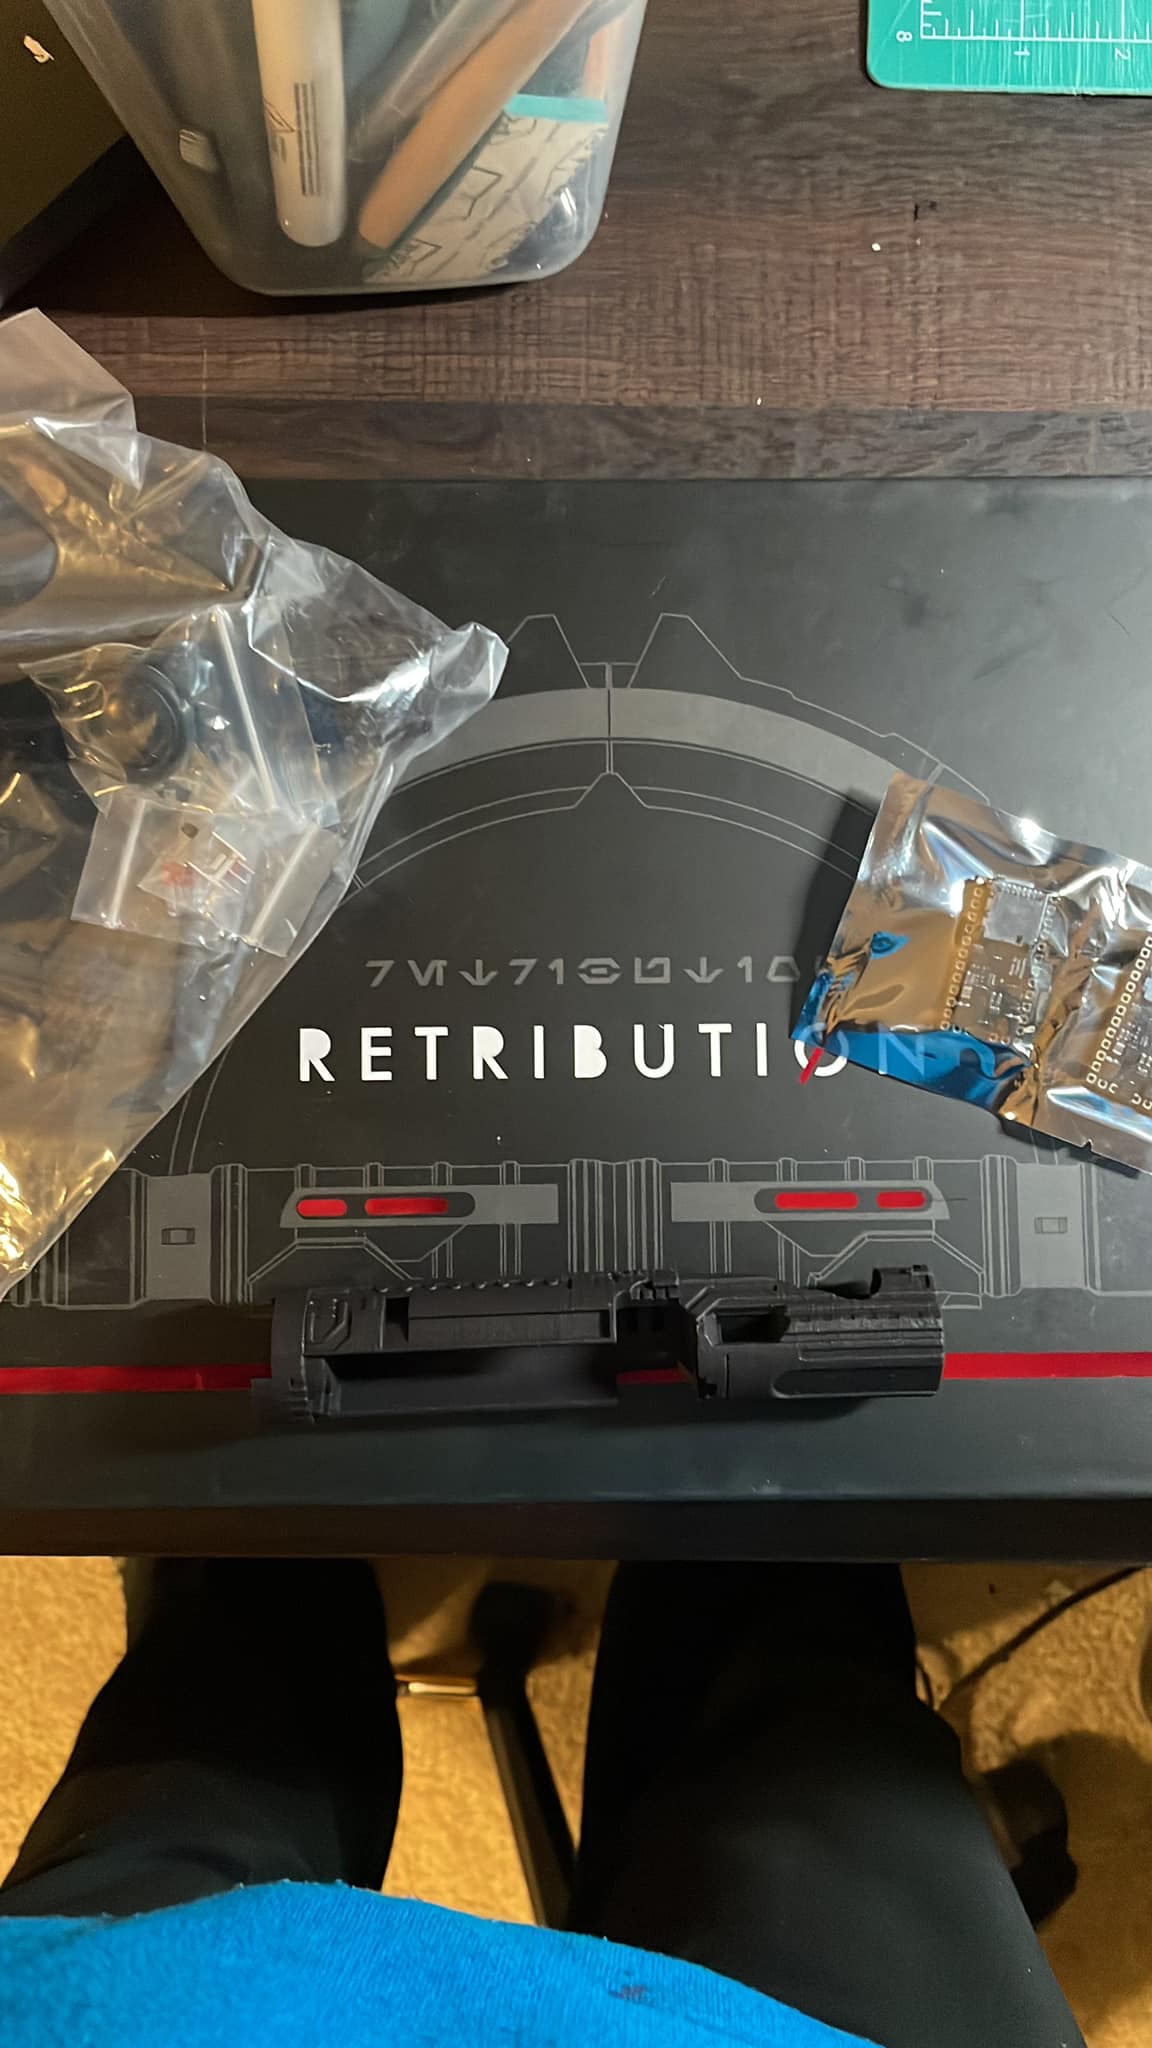
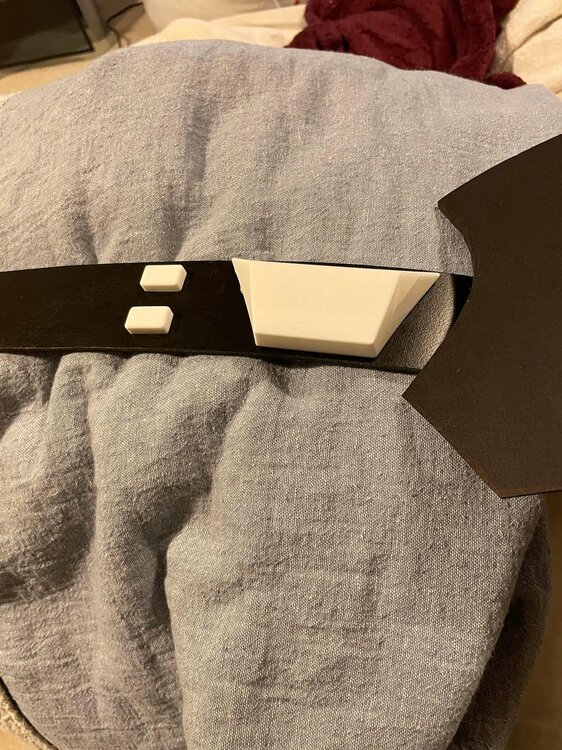
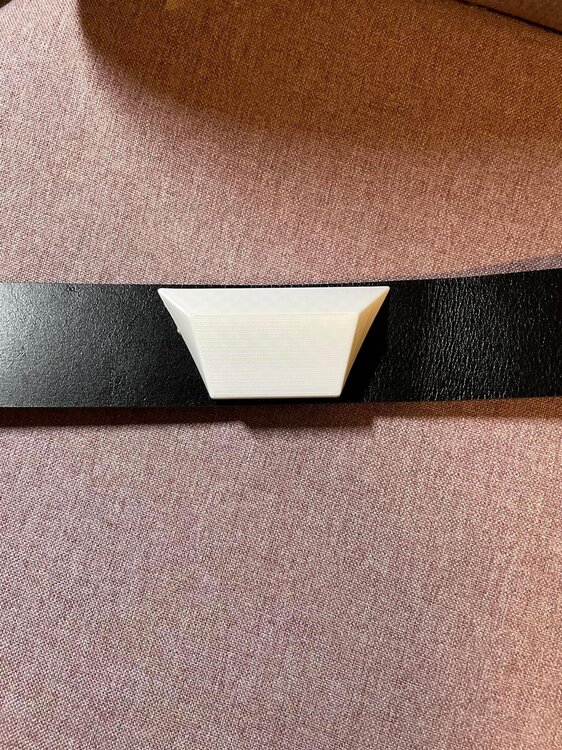
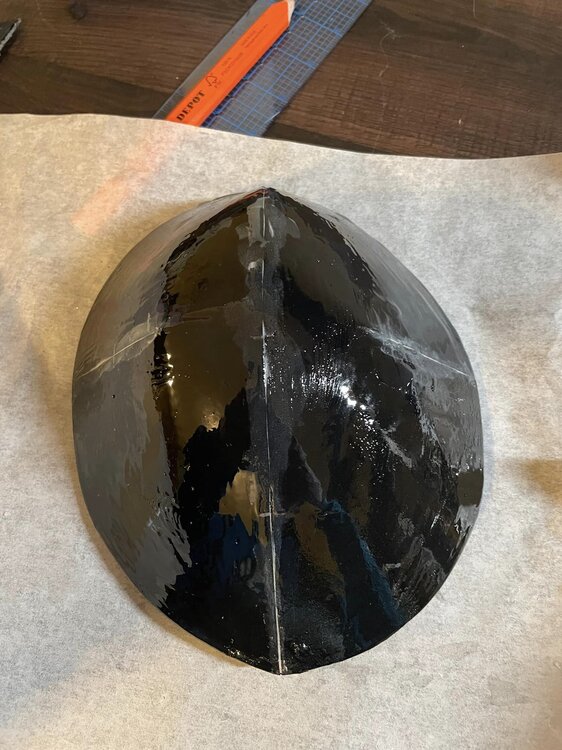
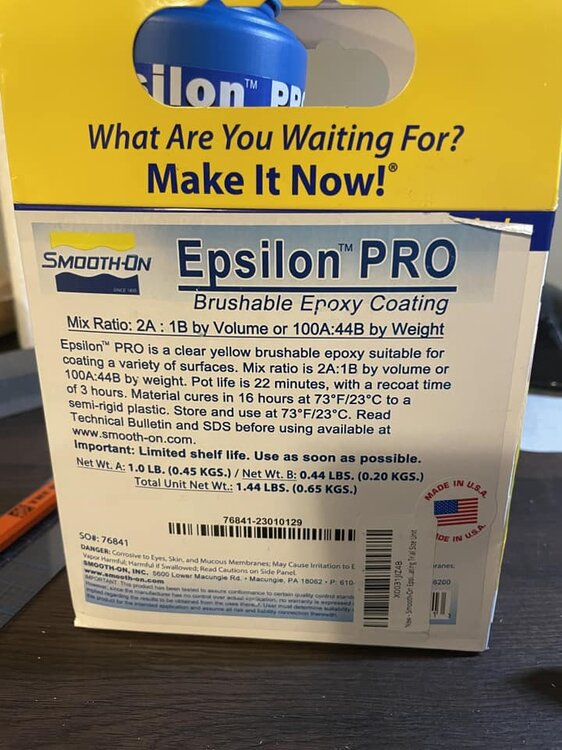
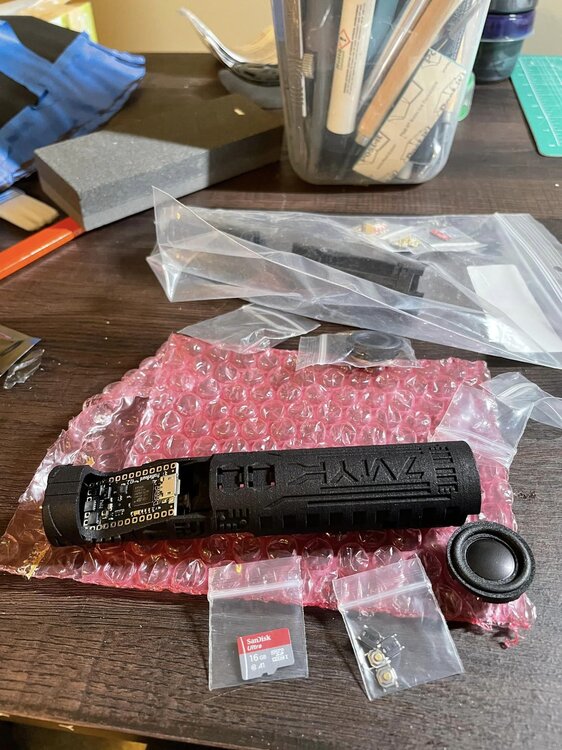
Another day down! Unfortunatley I didn't get to print anything today. When I opened the jar of ink it was completely solid. I guess it has a shelf-life. Since everything was closed today I had to order from Amazon so I'll work on that when I get my ink. Instead I fixed the issues on the armor patterns, redrafted the guantlets and did a bunch of small detail things. Plan to recut the armor in EVA tomorrow and start skinning it with the faux leather. I modeled the belt buckle a couple of weeks ago and originally was planning to print them on my resin printer, but I bought a new FDM this weekend and couldn't help it....I had to print on it instead. Soooooo fast! My first version of the belt buckle wasn't shaped quite right so I reviewed the images again and made some changes to the height of it. Much happier with the newer version. There is a recess underneath it to include a battery for the belt light. I did some work on the shoulder armor and decided to harden the foam for these parts and for the gauntlets. The rest I will shape, but not harden it. I decided to use Epsilon Pro from Smooth-On for the expoxy. I've included an image of the parts withtout the faux leather on them yet. They haven't cured yet, so my next step is going to be to cover them with the material. I have several textures of faux leather to choose from. The main thing is that it has the ability to stretch when I heat it without distorting the material on the surface. I also cut out the Imperial cog on the right shoulder at work this week. We have much better cutting equipment than I do at home. Both pieces are 2mm EVA foam. The cog piece was painted with Mod Podge to close the cells (it can be done with a heat gun too, but the heat distorted the cog when I first went that route, so Mod Podge was the best option). After it dried I sprayed Plastidip on it. I plan to add some texture to the bottom piece but I have to make a roller for it. The last thing to report from this weekend is about my saber! I have to say I've invested a pretty penny into this little toy. I regret nothing. Most of the electronics have arrived for it, but I'm still waiting on the batteries, battery charger, contacts, led strips and the blade kit. Should be arriving in the next week. Gives me plenty of time to finish the undersuit so I won't be distracted by it. If anyone is following this thread (sorry if it's not very exciting) I do have a note to share: I did know there would be challenges being the first one to do this costume and there have been. i'm sure others that come after me will come up with better ways to do things. In the end though I'll share what I can in the way of materials and files. There are quite a few patterns that I used and liked, but everything required redrafting to a degree and some extra work. If you want to reproduce this costume too, just be prepared for that. It's not as easy as it looks. More to come soon....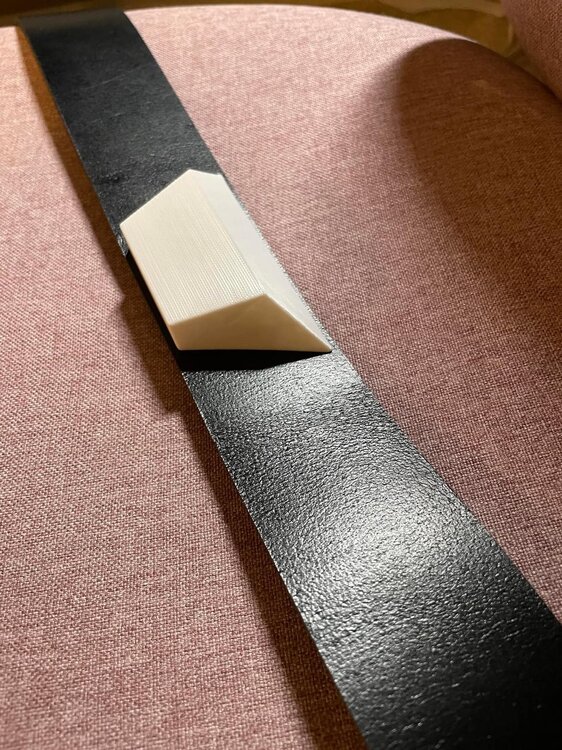


-
Live action Third Sister (Reva) build
Officercato replied to Officercato's topic in Third Sister: Reva
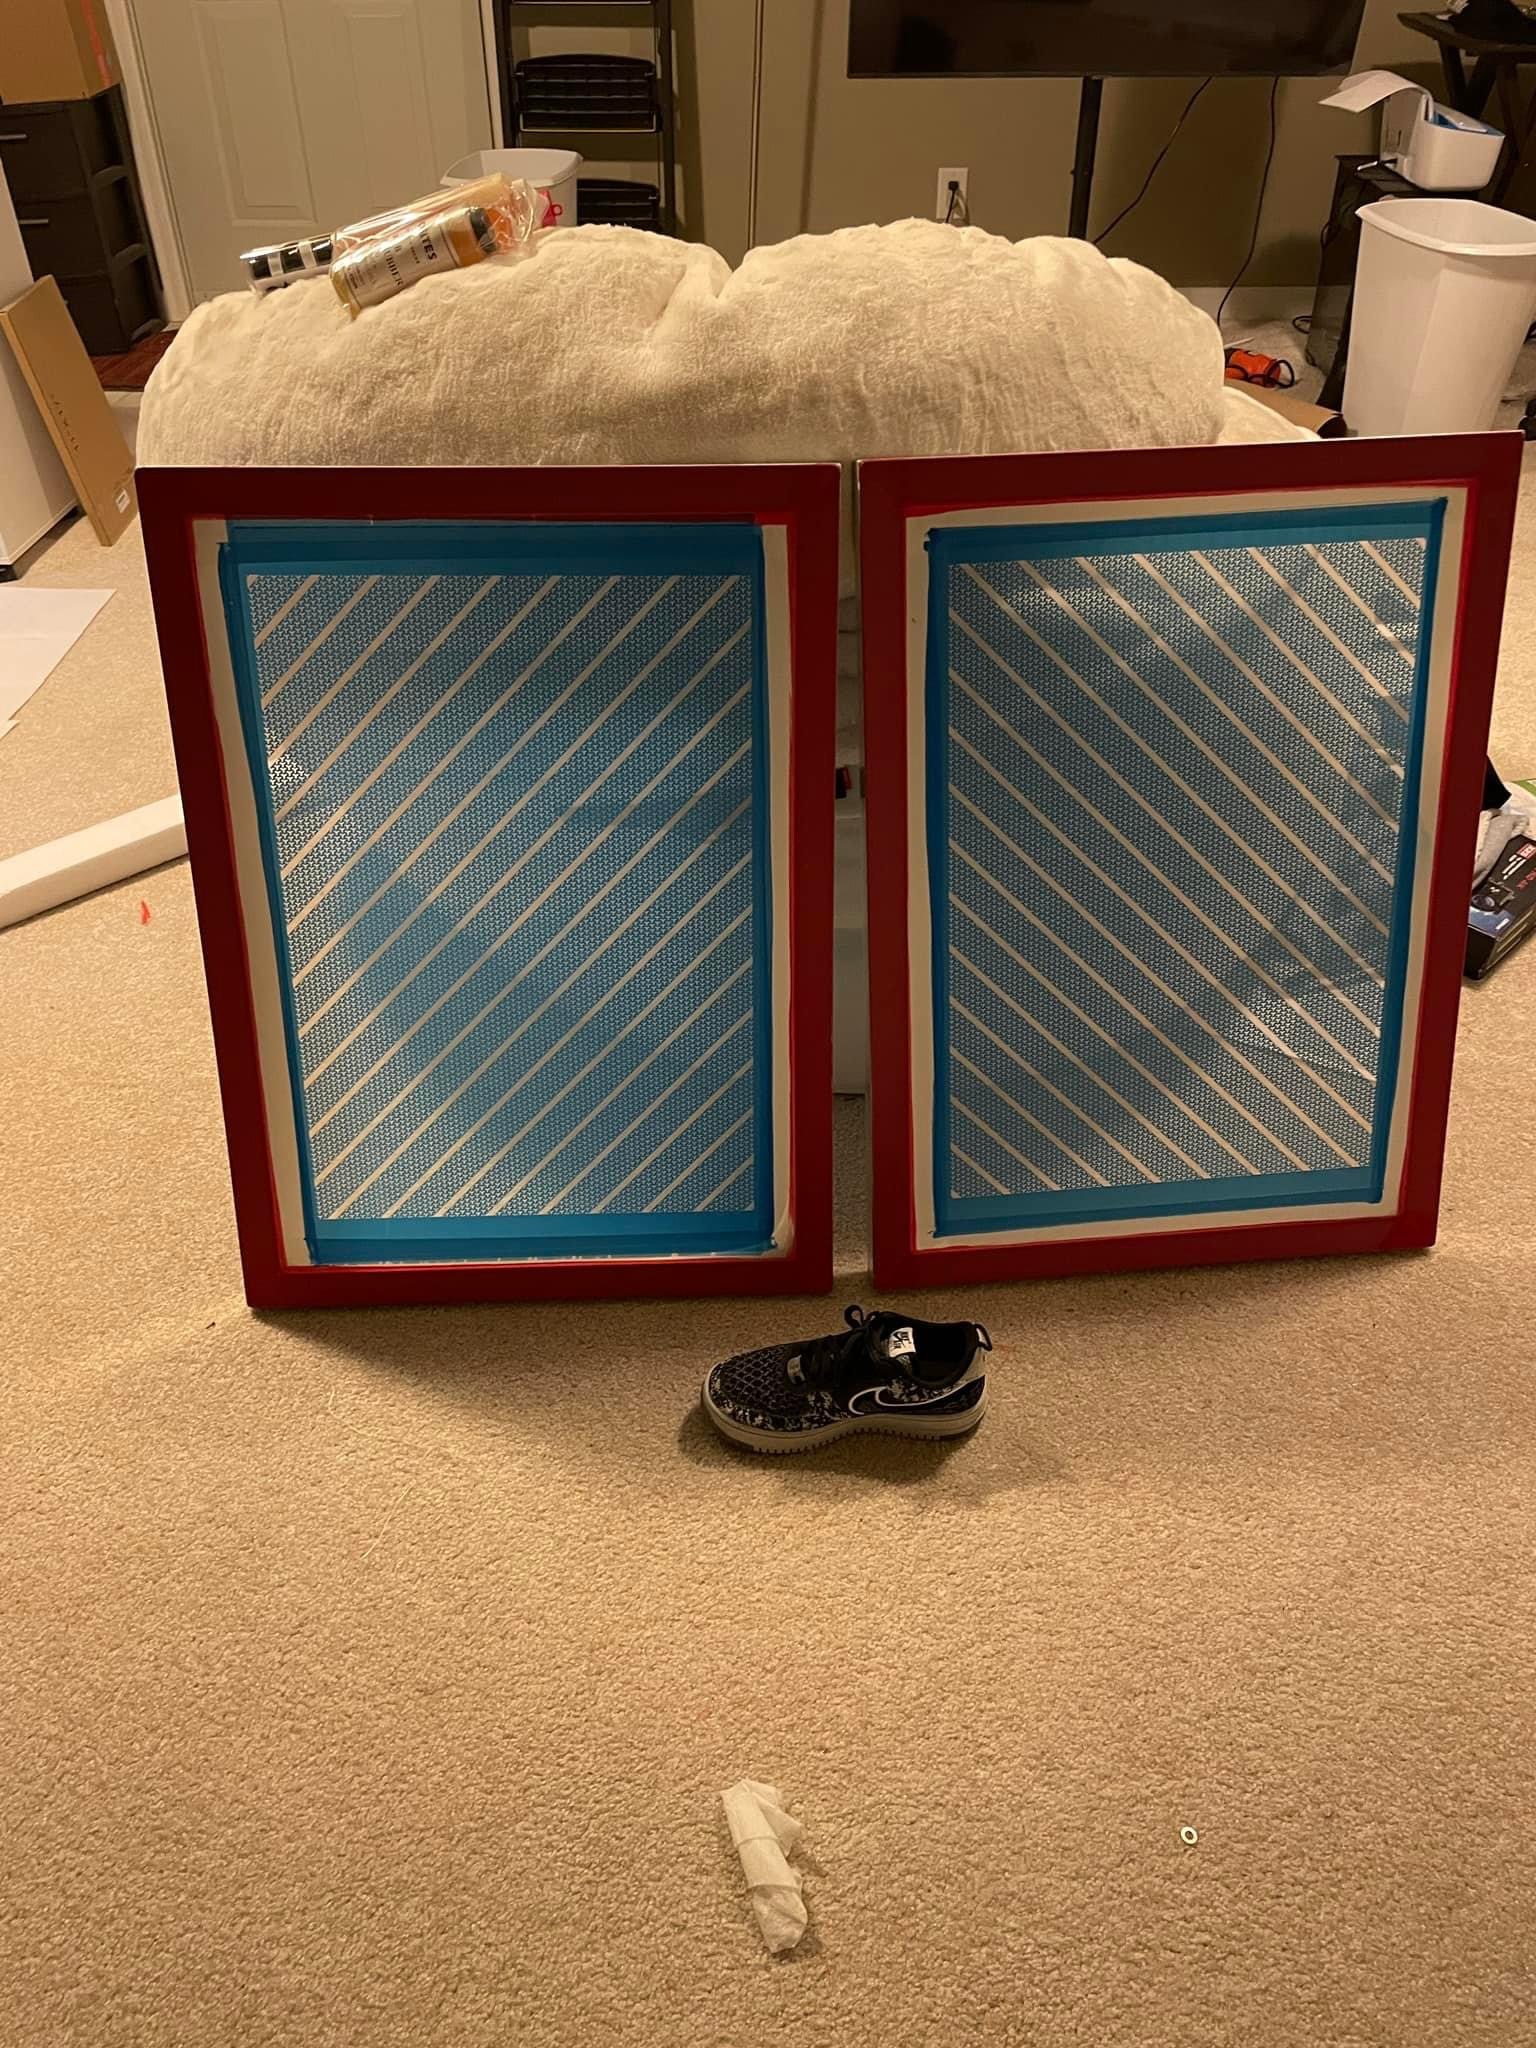
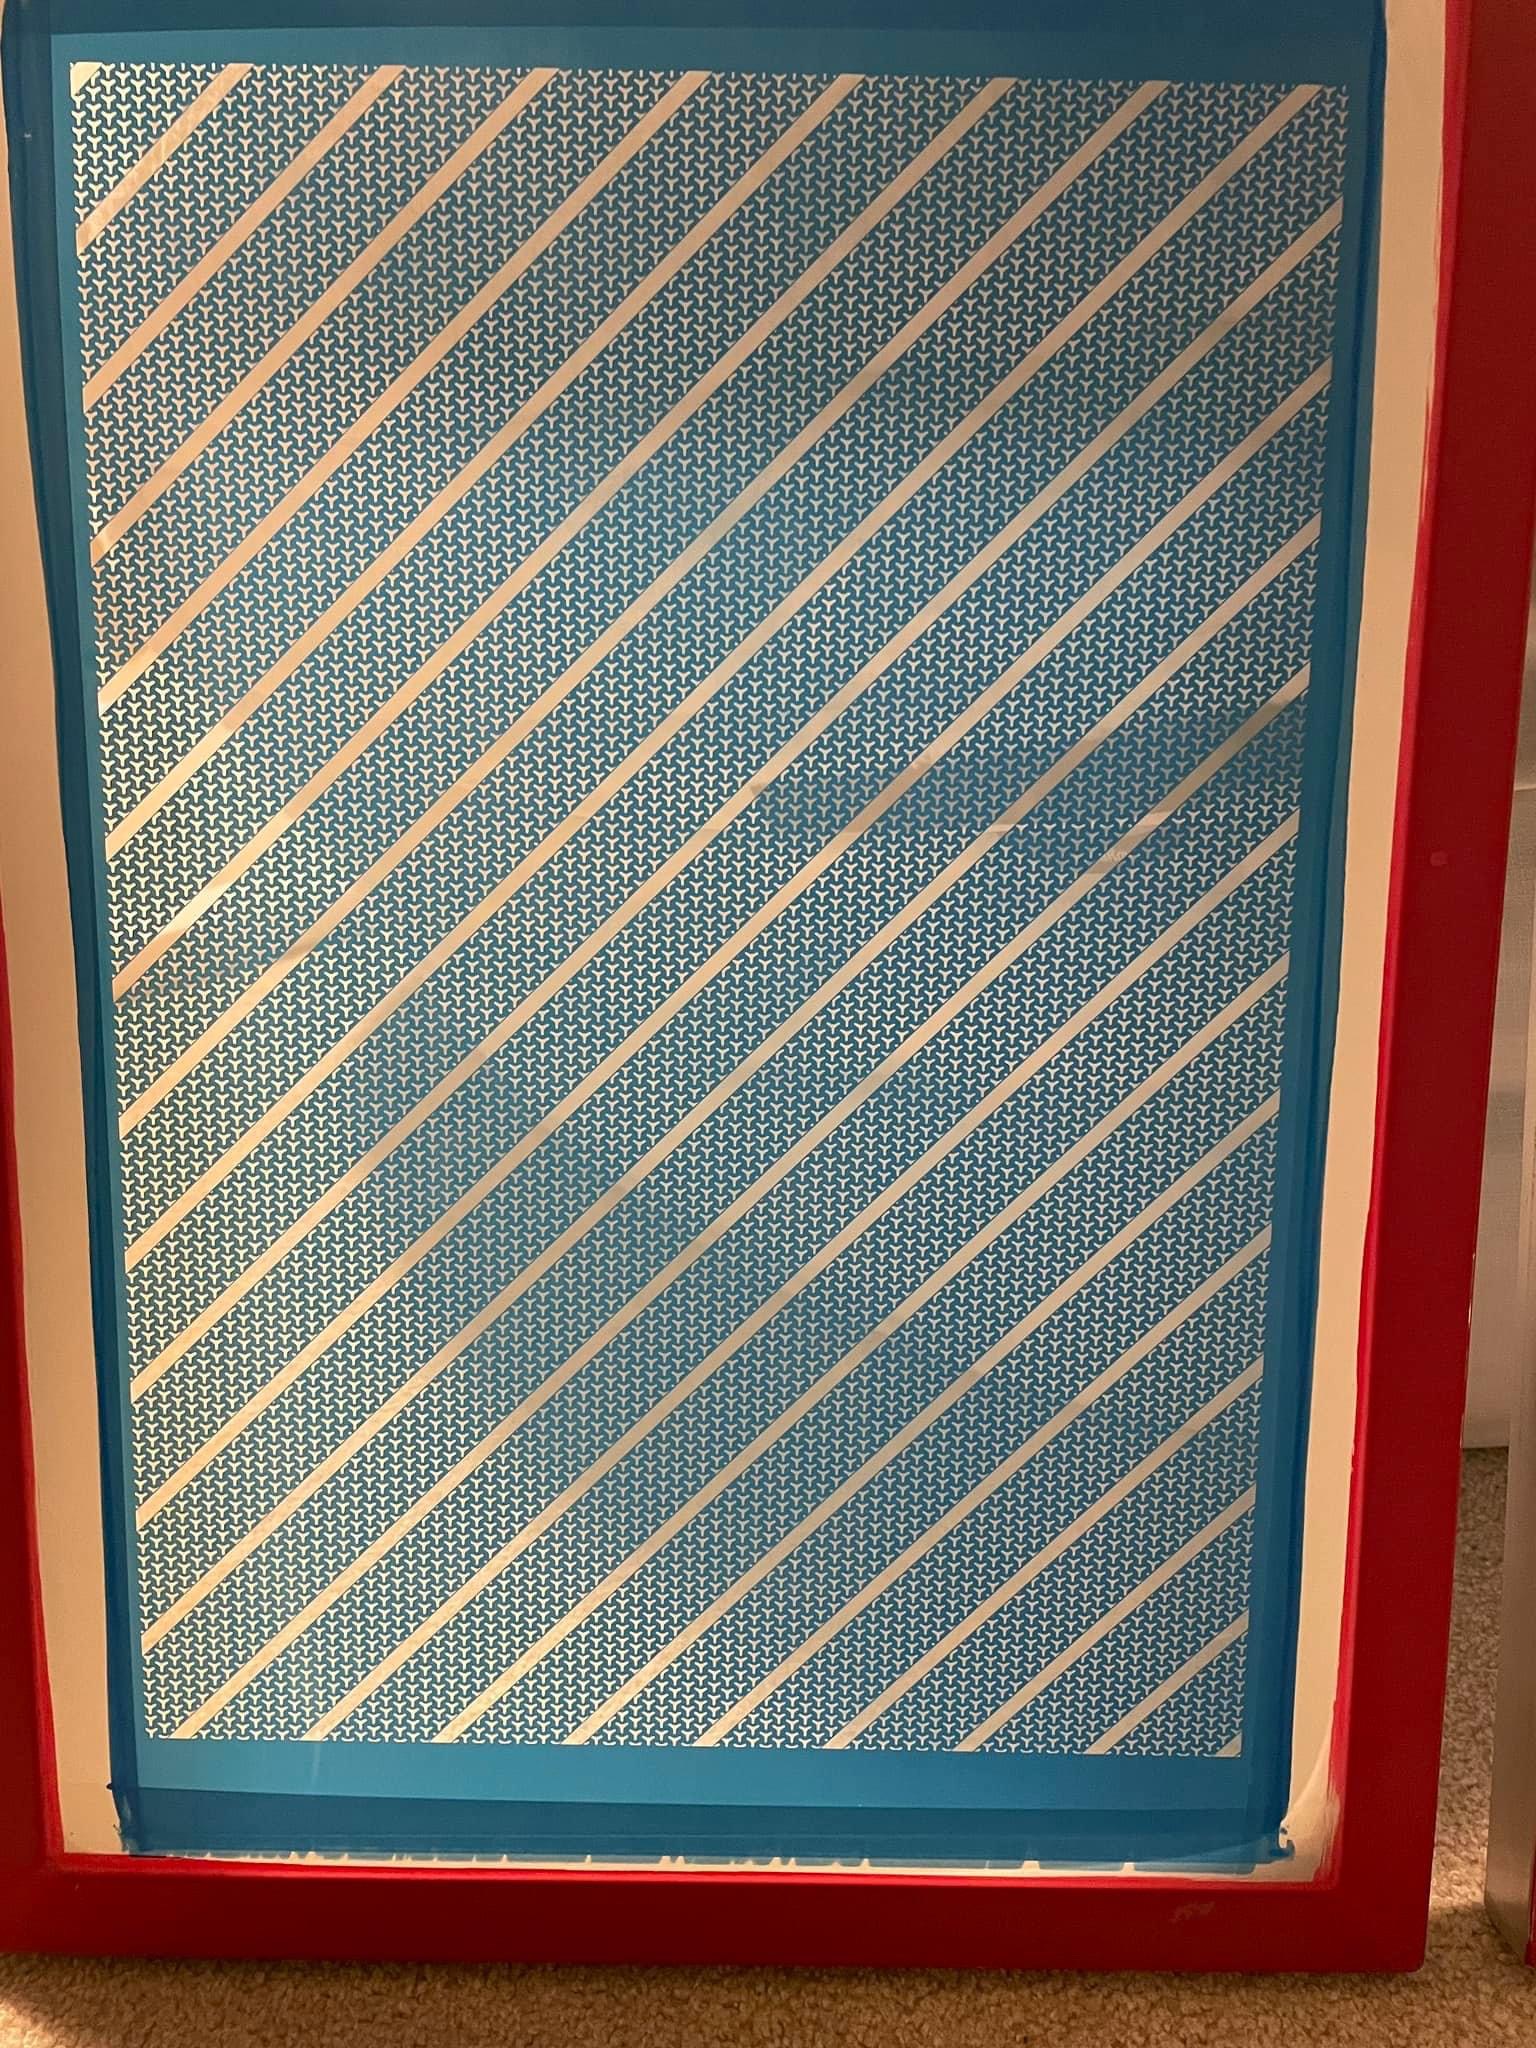
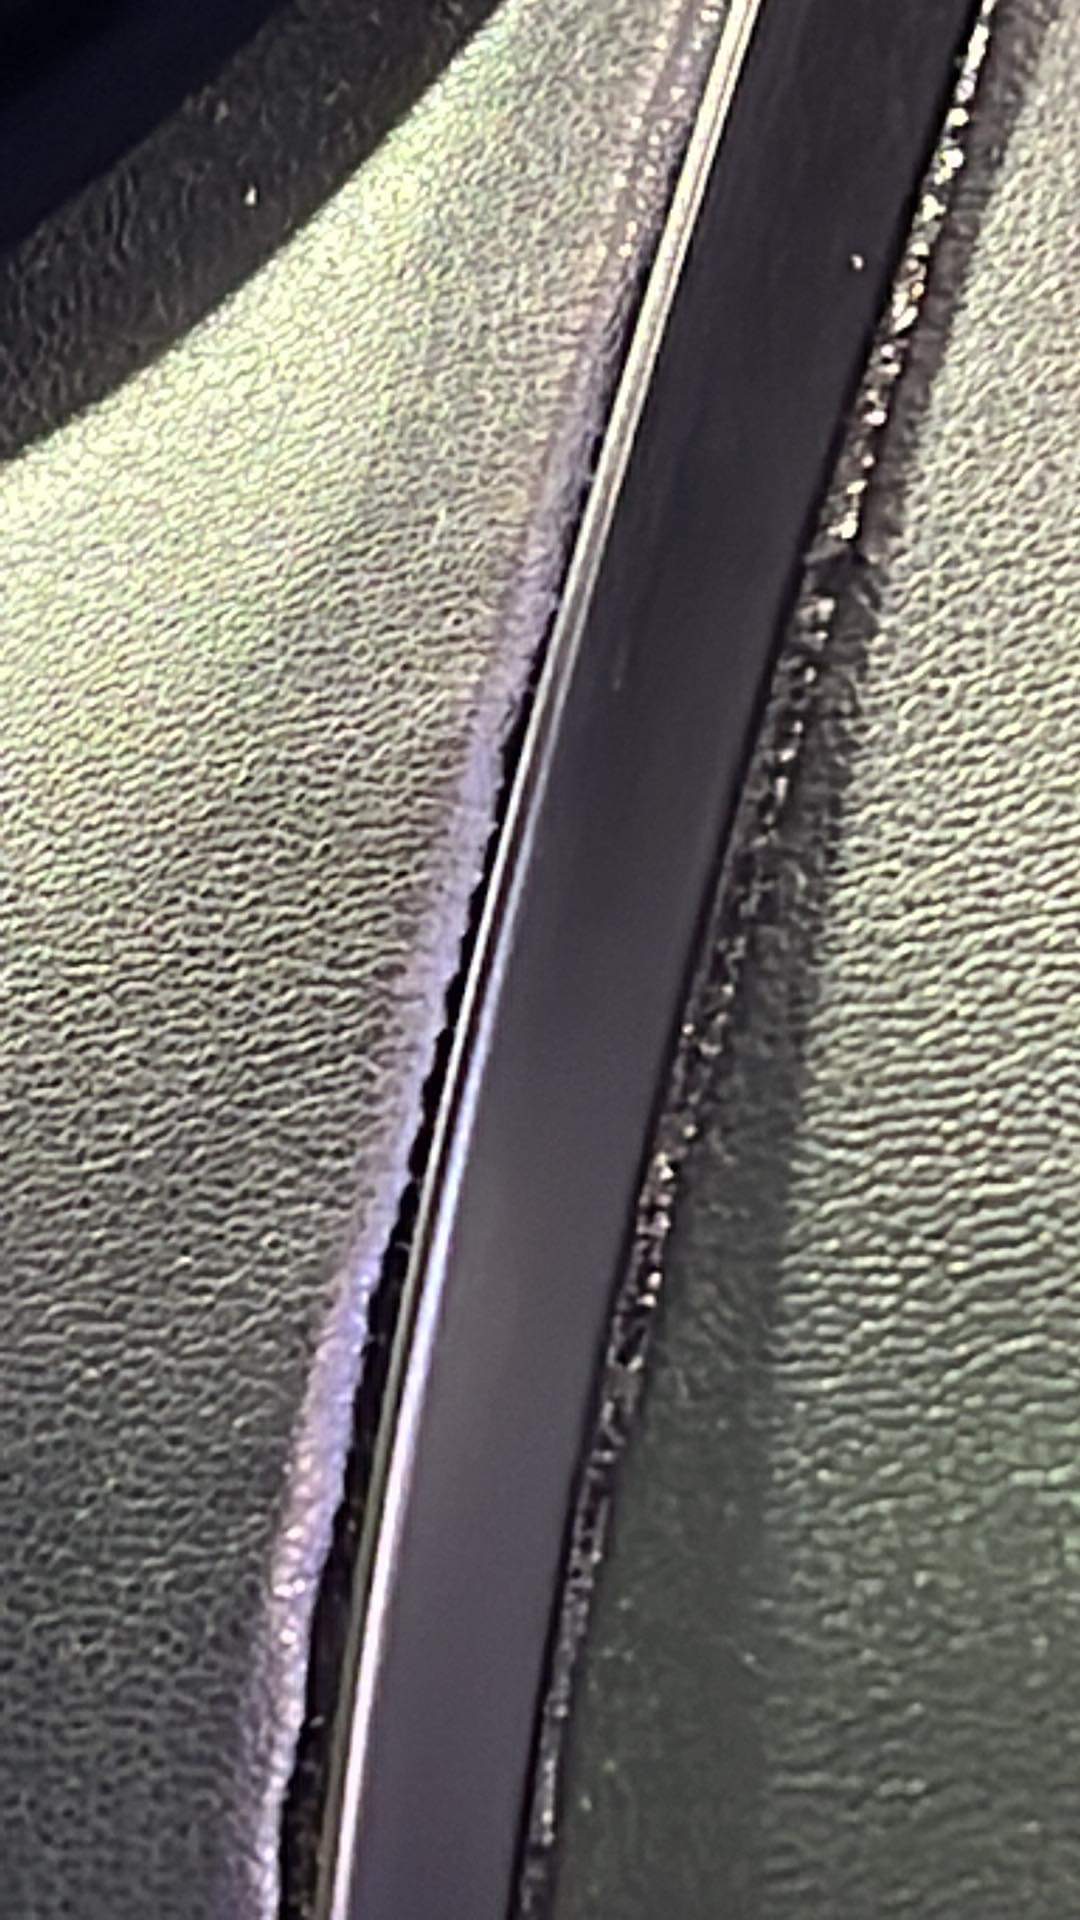
Time for updates! Lots to share! First, my new screens arrived and are great! I’ll be printing out panels for the undersuit tonight. I’m also stitching up the knee pad/leggings and cutting out the cape. I’m trying to get all of the sewing done this weekend. SIDE NOTE: I’ve been asked why I’m choosing to have the zip up the back instead of in the front and wanted to share my reasoning here. 1. There is a zipper pull visible at the top of the ribbed collar and from thr high res images you can see the sleeves sewn into the bodice. 2. someone supplied a lovely image of the actress with just the bodysuit on and the zipper is partially open in back. 3. Makes applying detail on thr front easier I’ll be using a small tab on thr zipper pull that can be removed to raise and lower the zipper. Next let’s talk about that pesky front detail. I’ve searched all the possibilities for rubber and foam seals and just couldn’t replicate the original shown above. This is the closest I got and both of these options are really problematic. It was suggested I try plasti-dip over foam, but thr test piece I made creases when bent which I wouldn’t want on the front of my costume. Luckily I have some urethane rubber for casting along with pigment. I shall add this to my growing weekend list! I’ll make parts for the bodice and gauntlets. Found an interesting image that lends more support to my idea of using foam covered with faux leather for the armor. In the image below the creases in the collar and just below would be hard to get in leather unless it’s really conditioned or super super thin. I reviewed it with my resident leather expert to get her opinion as well. I also experimented with using MEK substitute to knock back the shine on the faux leather. Pics on that soon. Did some modeling work on greeblies and will print this out Friday night, so if there’s time I’ll start working on the belt so I can get the light, battery and switch put together. The last thing for today is an update on my saber. I decided to take all that droid building knowledge and build the chassis myself. Since the saber is technically two hilts everyone quoted double for installs, but after watching many many videos I’m confident I can do it. Electronics will arrive on Monday.


-
Live action Third Sister (Reva) build
Officercato replied to Officercato's topic in Third Sister: Reva
-
Live action Third Sister (Reva) build
Officercato replied to Officercato's topic in Third Sister: Reva
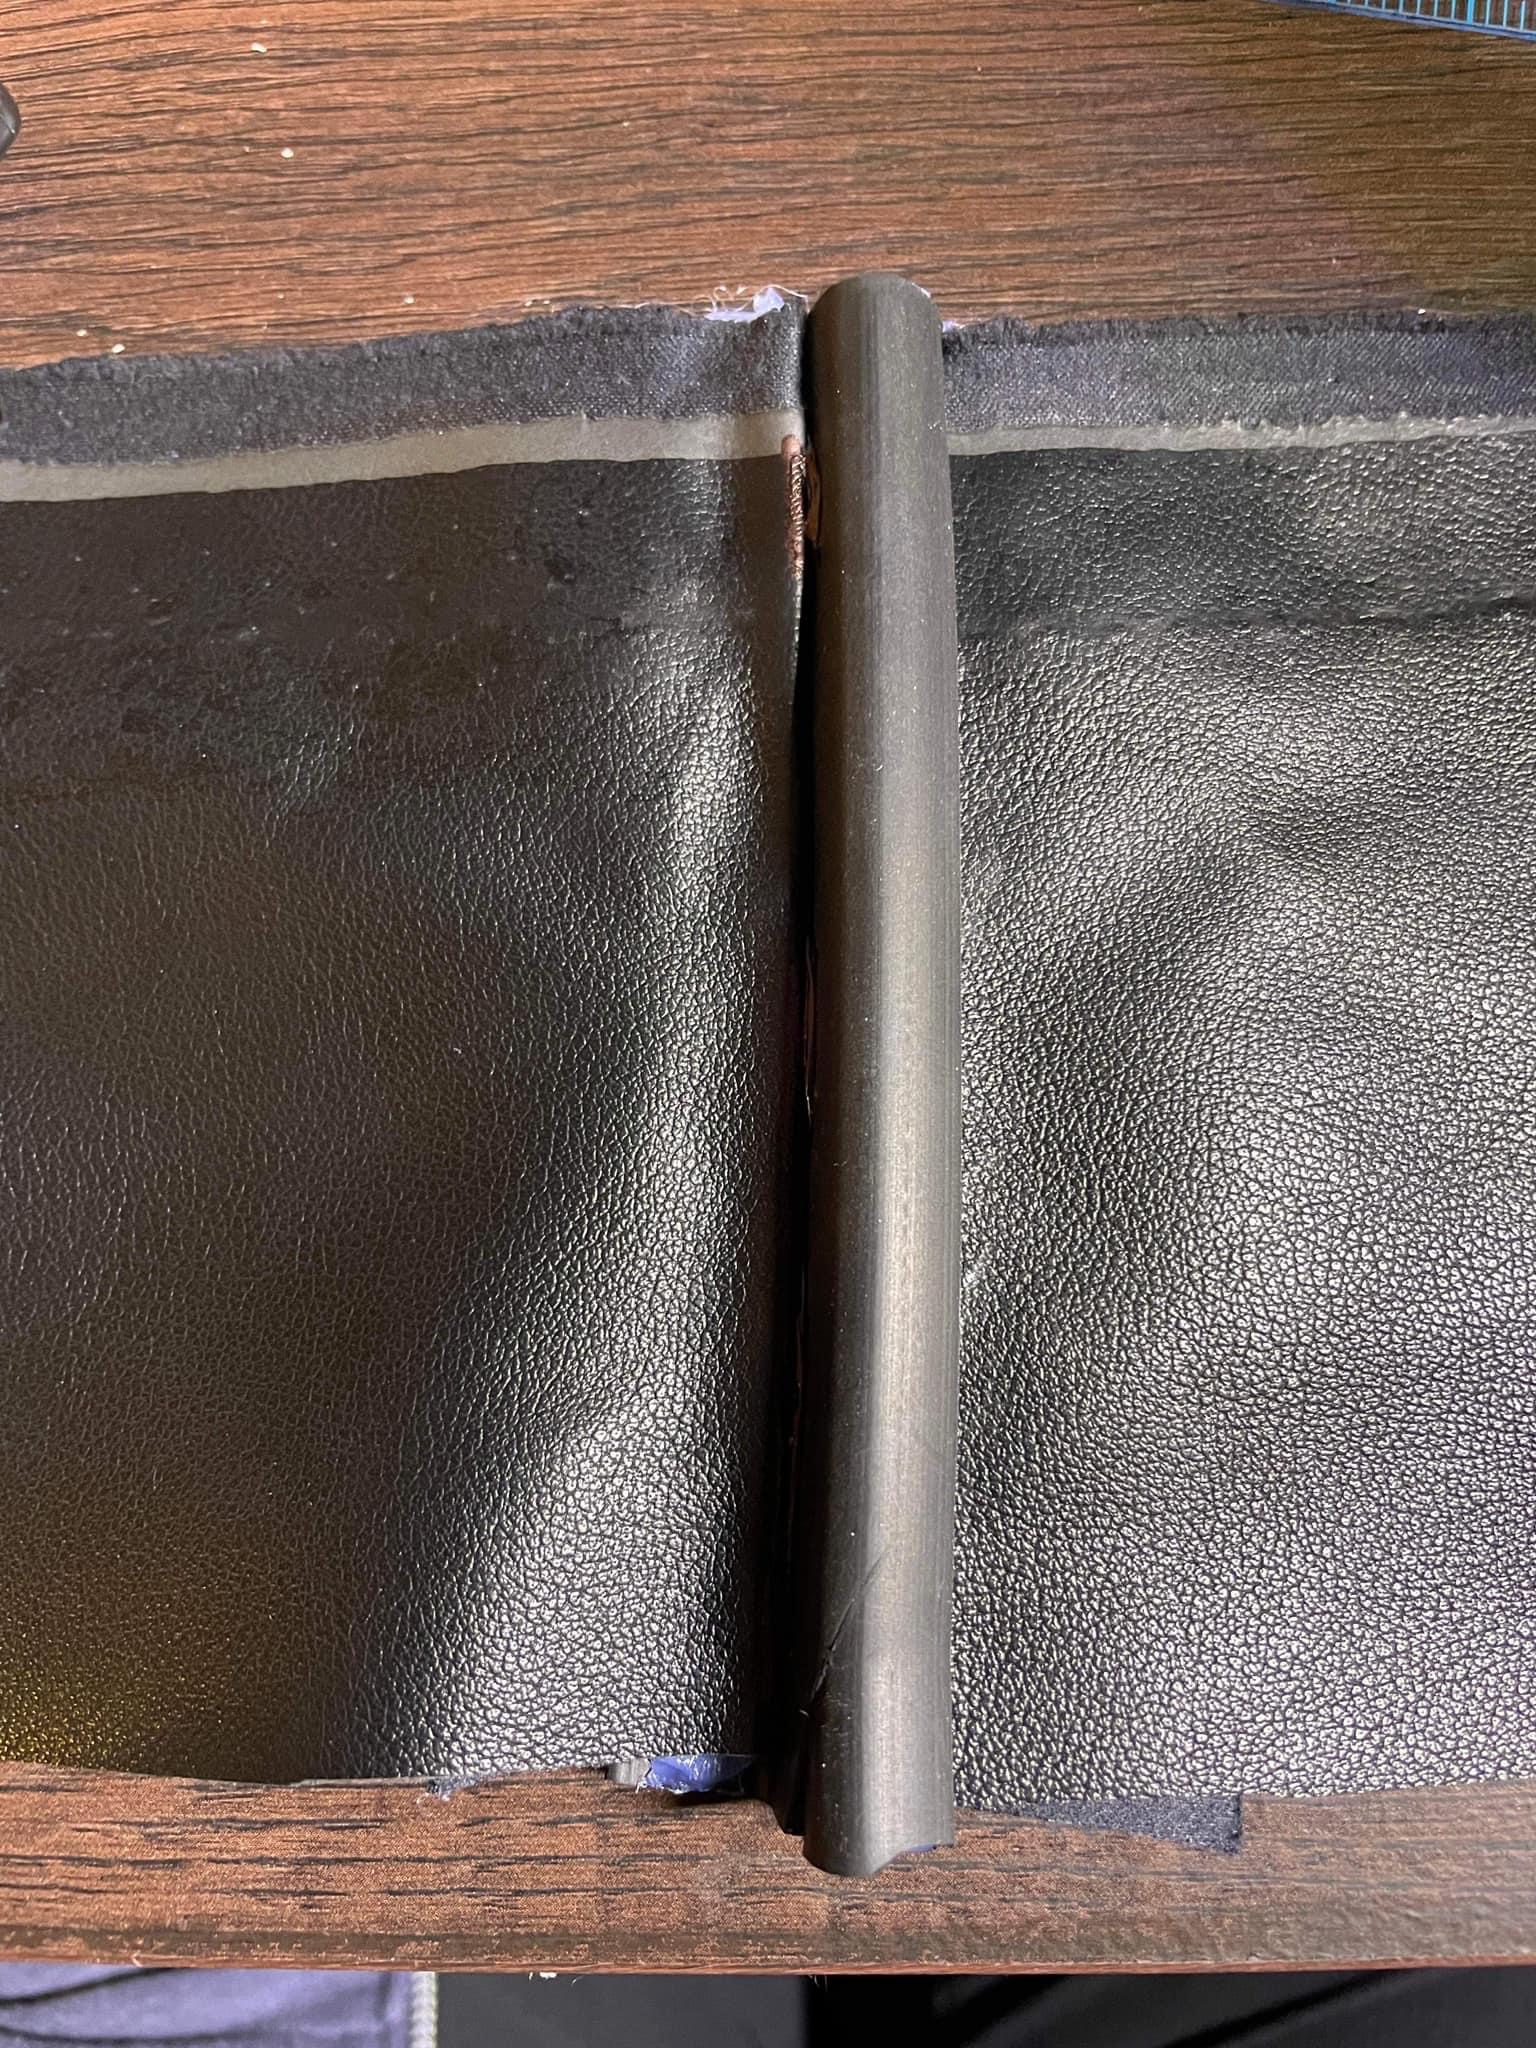
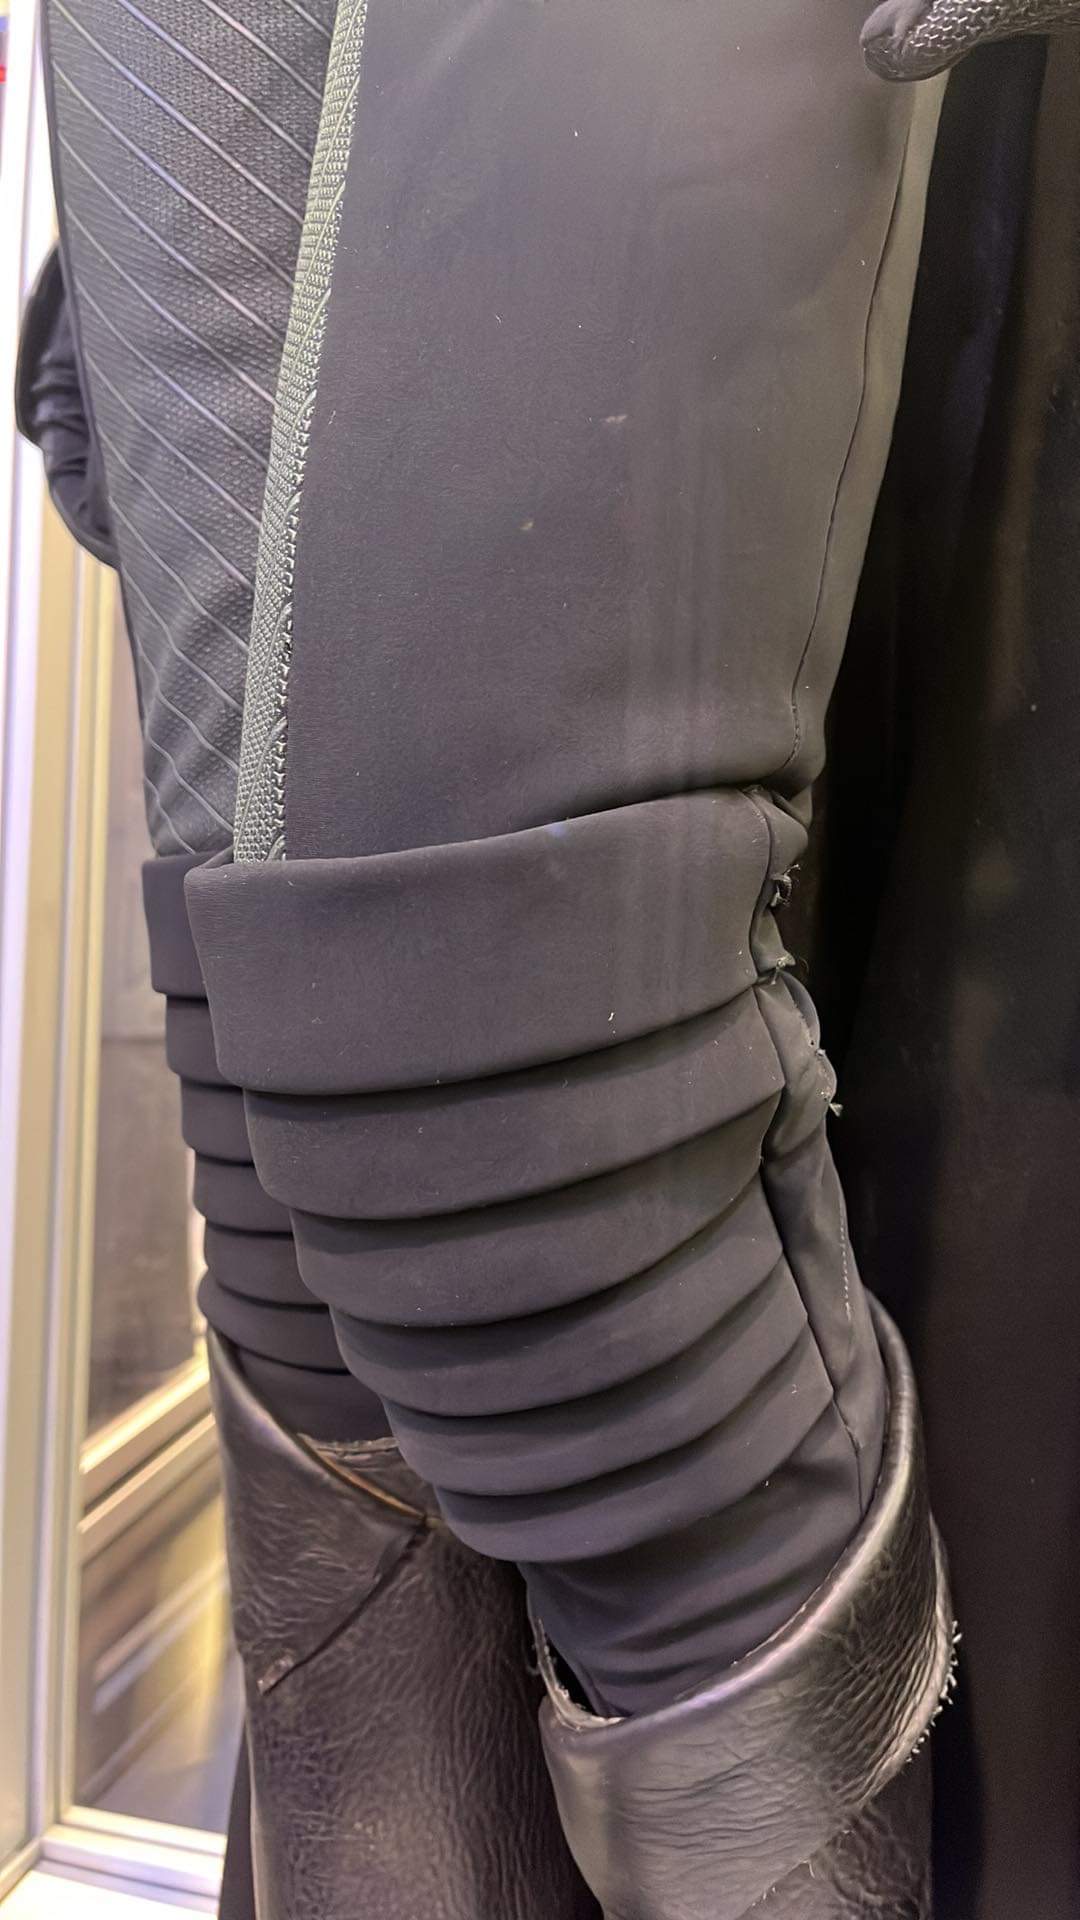
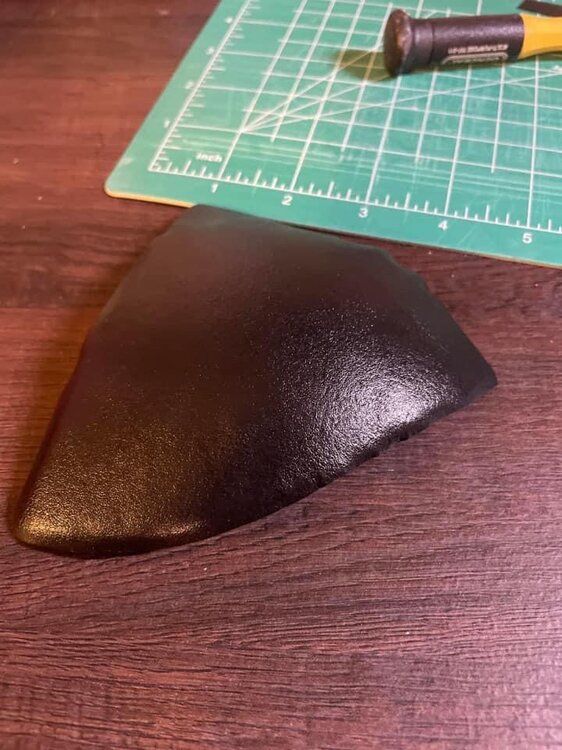
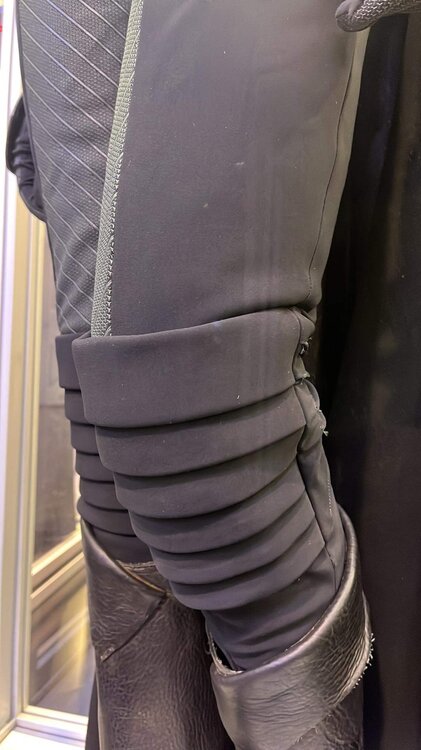
Did a quick experiment today to try and figure out the front of the costume bodice. I’ve been speculating that it’s some kind of rubber seal but it’s been tough finding something that looks right. These are the closest so far. They are tacked in with industrial strength hot glue. This is an image of the original embellishment on the bodice front. This attempt number one. Very flimsy rubber seal and lopsided looking. This is attempt 2. The edge isn’t as defined as in the image. I am highly tempted to just sculpt it what I need in Fusion 360, print it and mold it to glue on the front. I also tested out the method I want to use for the armor. EVA foam and faux leather are my current choice. I plan to weather the costume a little bit but it’s not as shiny as the image appears to be. Before shaping the foam I applied the faux leather with contact glue. Then I heated the front and back with a heat gun and shaped it. Worked really well. more to come! Cutting out the cape tomorrow and should be doing my final fitting of the armor before covering and shaping the foam. I also plan to finish the gloves and leggings tomorrow. Hoping my final screens arrive tomorrow or Saturday so I can print the last bit of fabric I need for the bodysuit.

-
Live action Third Sister (Reva) build
Officercato replied to Officercato's topic in Third Sister: Reva
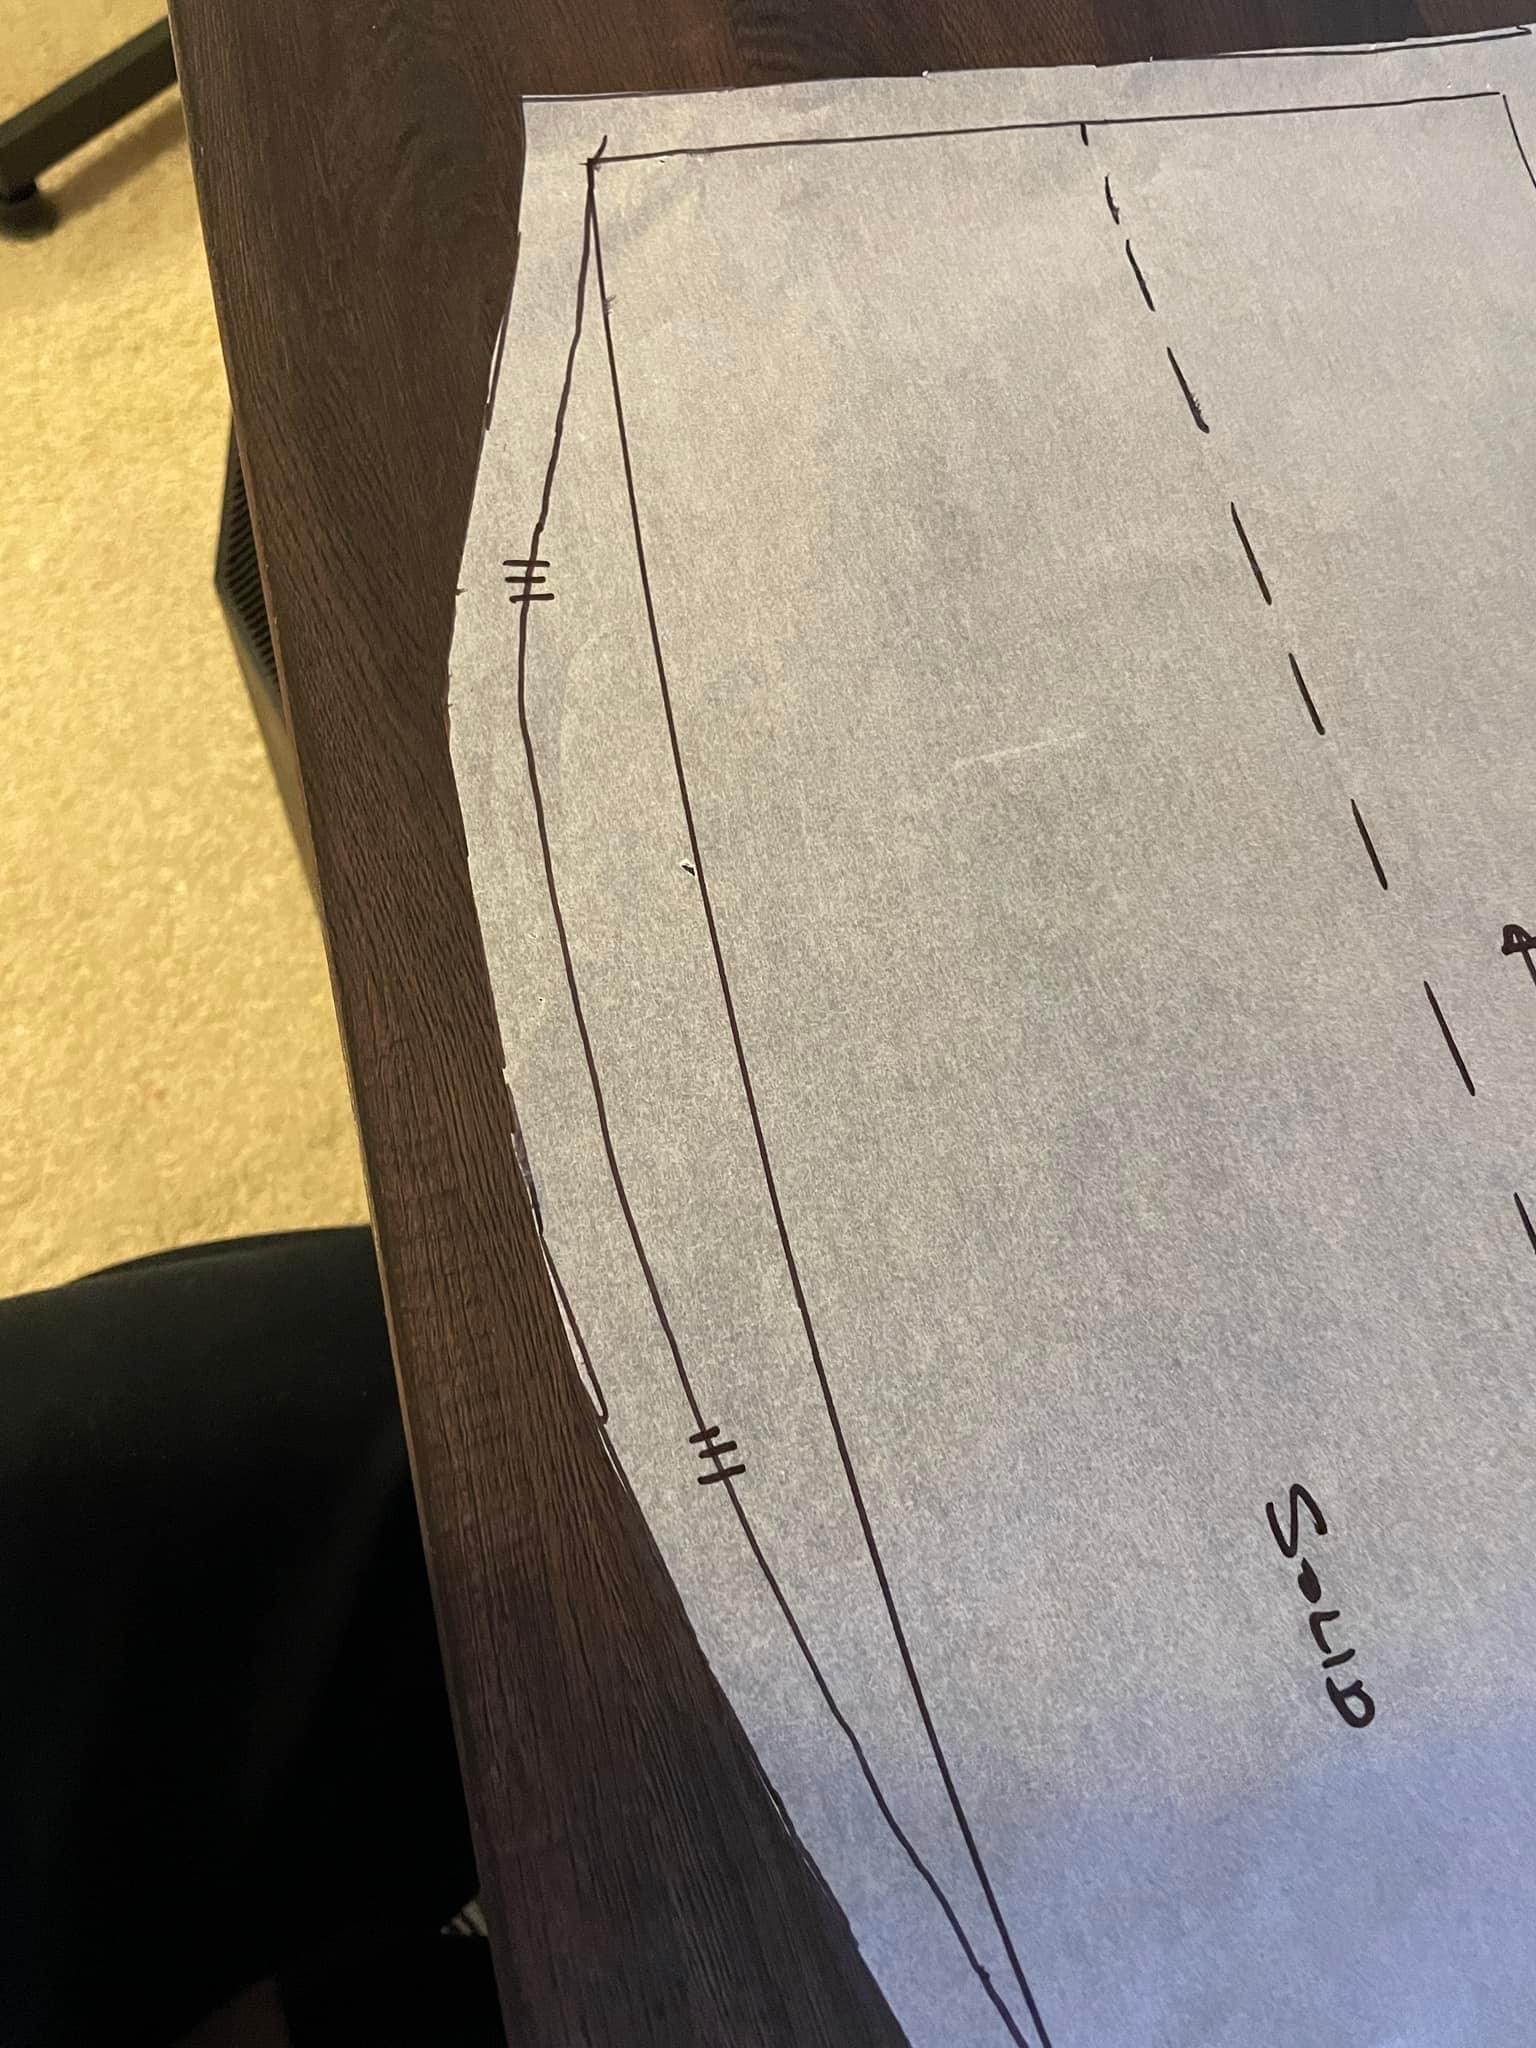
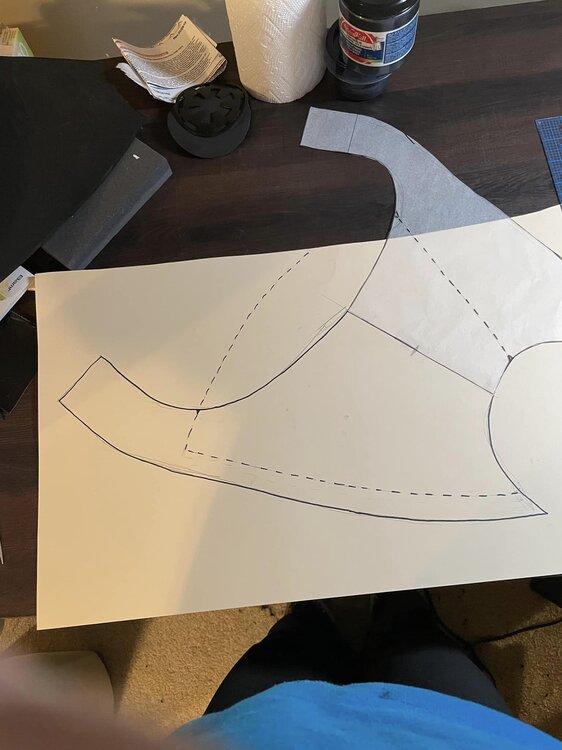
Pattern review: Third Sister Pattern (from Etsy) https://www.etsy.com/listing/1255438991/third-sister-inquisitor-reva-costume?ref=yr_purchases DISCLAIMER: This opinion is only based on the use of the pattern for accuracy. It’s probably fine for basic cosplay. There were many issues I found so I’ll talk about that first and then how to possibly fix them if you really want to use the patterns. 1. Sizing - there is no information on the size ranges that fit the pattern (I.e. bust, waist, and hips). The listing says M/L and that larger is available upon request but it needs to be more specific since that is arbitrary unless ASTM measurements are used. There is only one size in the purchase so if you don’t fit it it you’ll have to buy the next one up. 2. Accuracy - this is the main reason I wouldn’t recommend the pattern. It’s pretty clear from the patterns that the maker never saw reference photos that included a back view. * the collar is missing the back piece and greeblies * the shaping of the back shoulder armor is incorrect Boots pattern is odd. It isn’t tall enough to cover a tall boot. It’s better suited to an ankle length. This isn’t a con per se but the pattern is made for EVA foam and not for sewing. That makes some of the shapes odd. If you still want to use the pattern anyway you’ll need to do some redrafting. - mock up everything to check fit. You’ll need to make sure your proportions are correct. (I had to redraft using a basic bodice pattern that fit me) - discard the belt and pauldrons and the waist pieces will take some work. as for the materials, I’m actually using EVA foam covered in faux leather for my armor, but I’ll share those details in the next post. The important point is that I didn’t piece curved parts. Instead everything is heated and curved on the body as needed. In conclusion, the pattern is not for a beginner. I have over 20 years of costuming and patterning experience and I gave up on most of it as salvageable. Now I may be knit picking but I am a stickler for accuracy. -
Live action Third Sister (Reva) build
Officercato replied to Officercato's topic in Third Sister: Reva
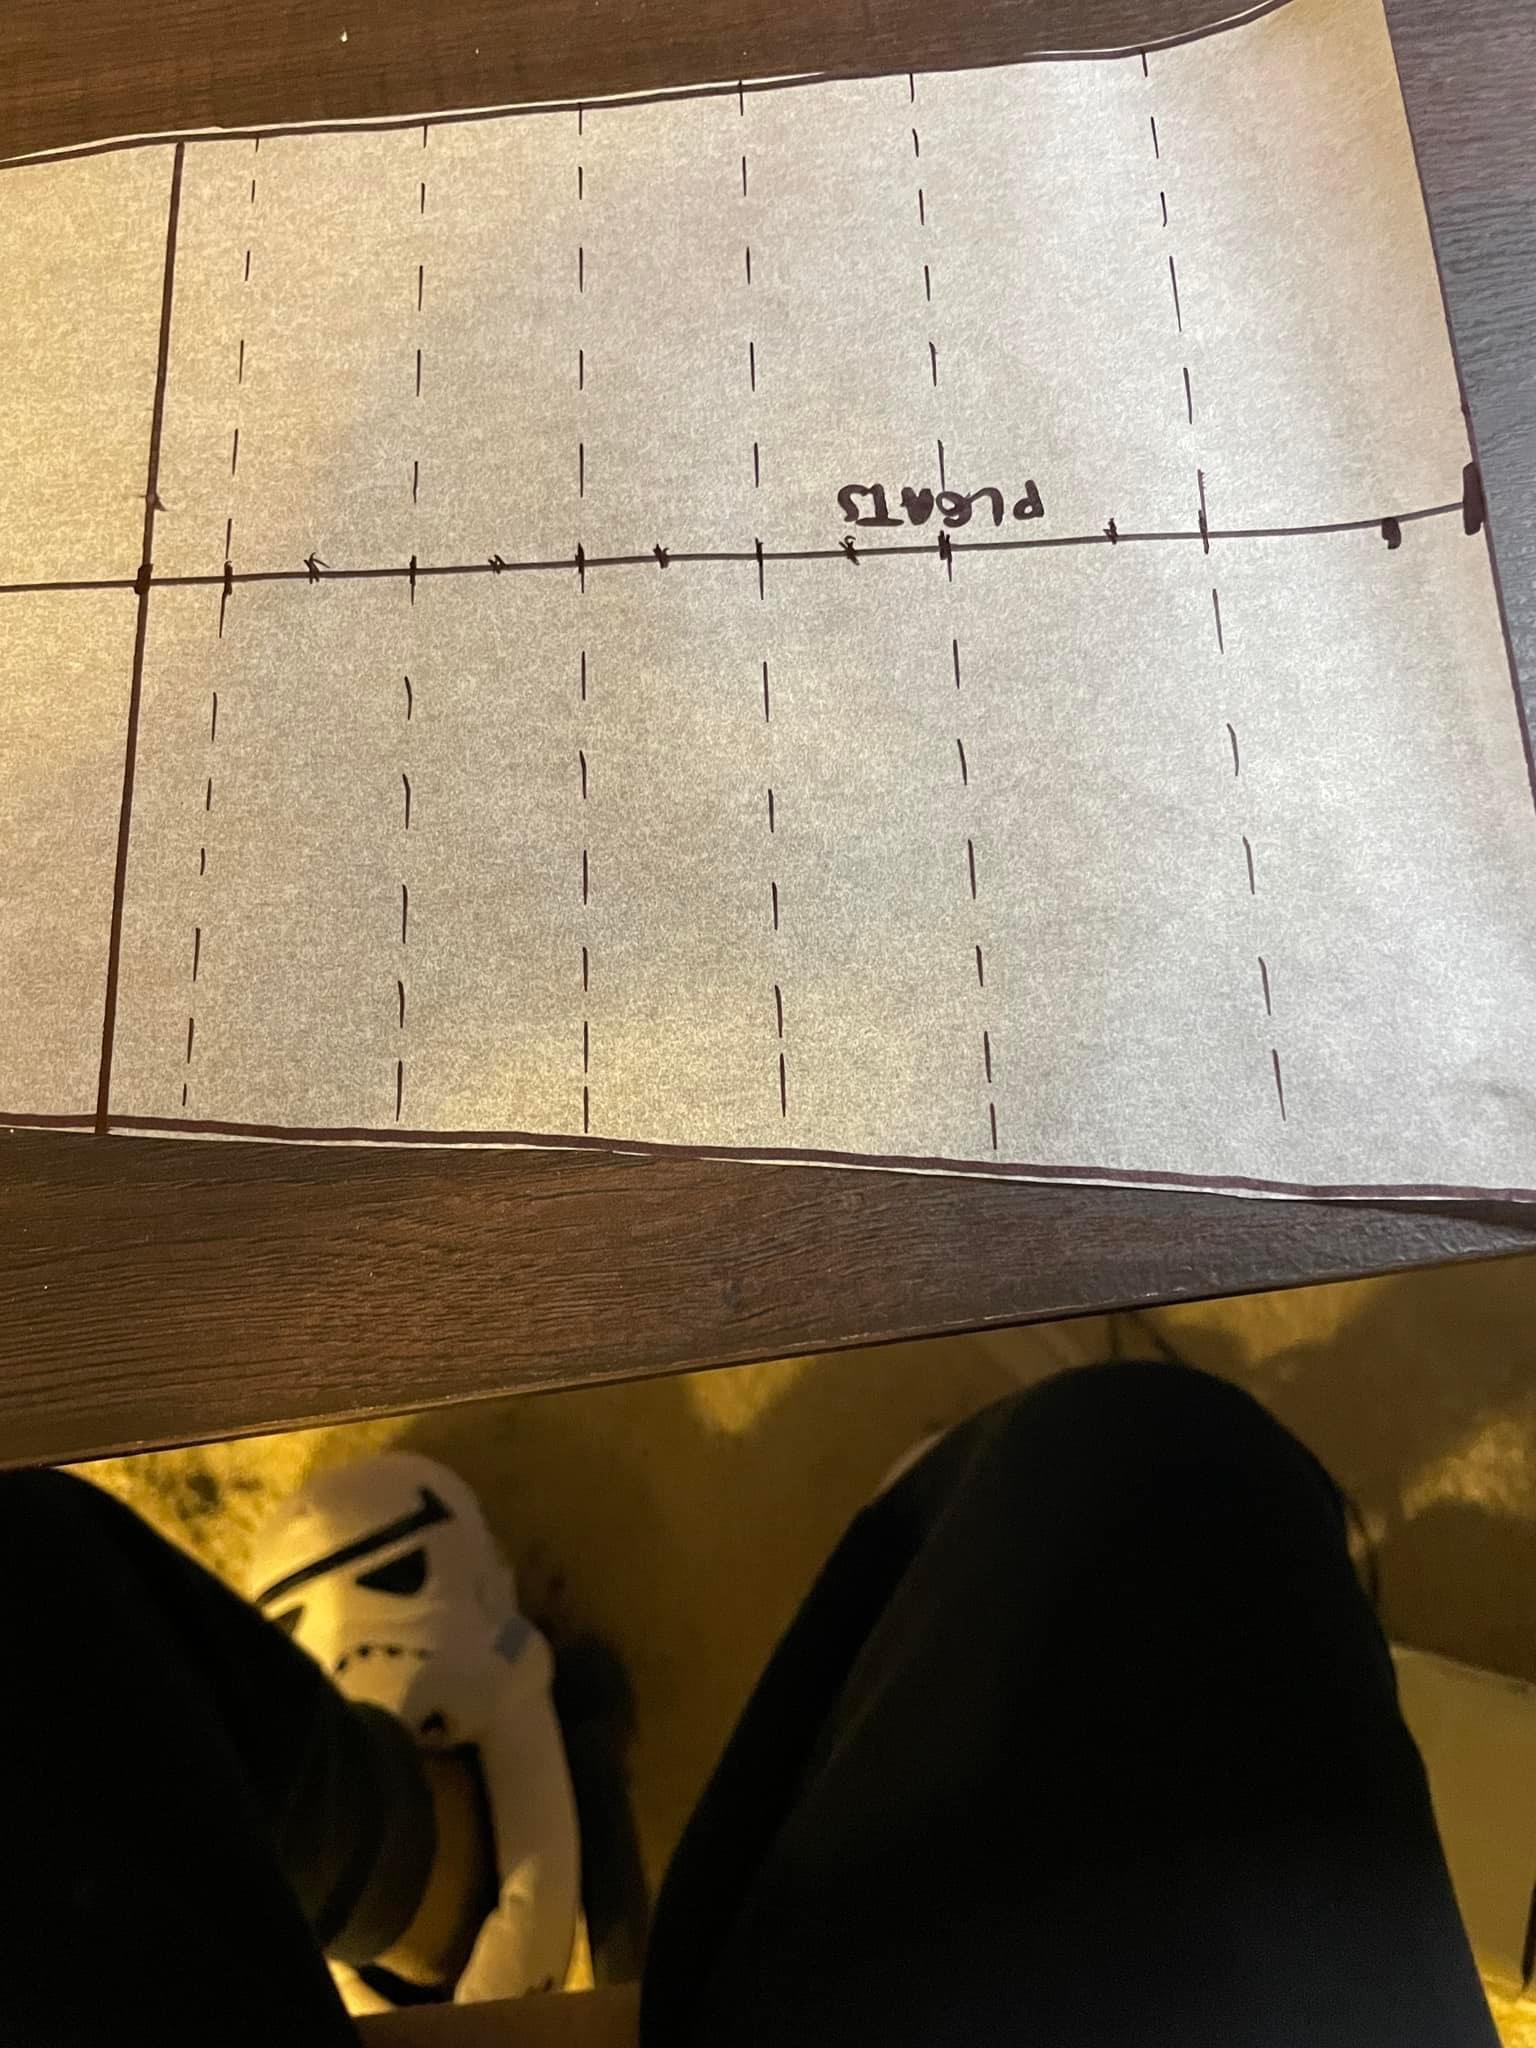
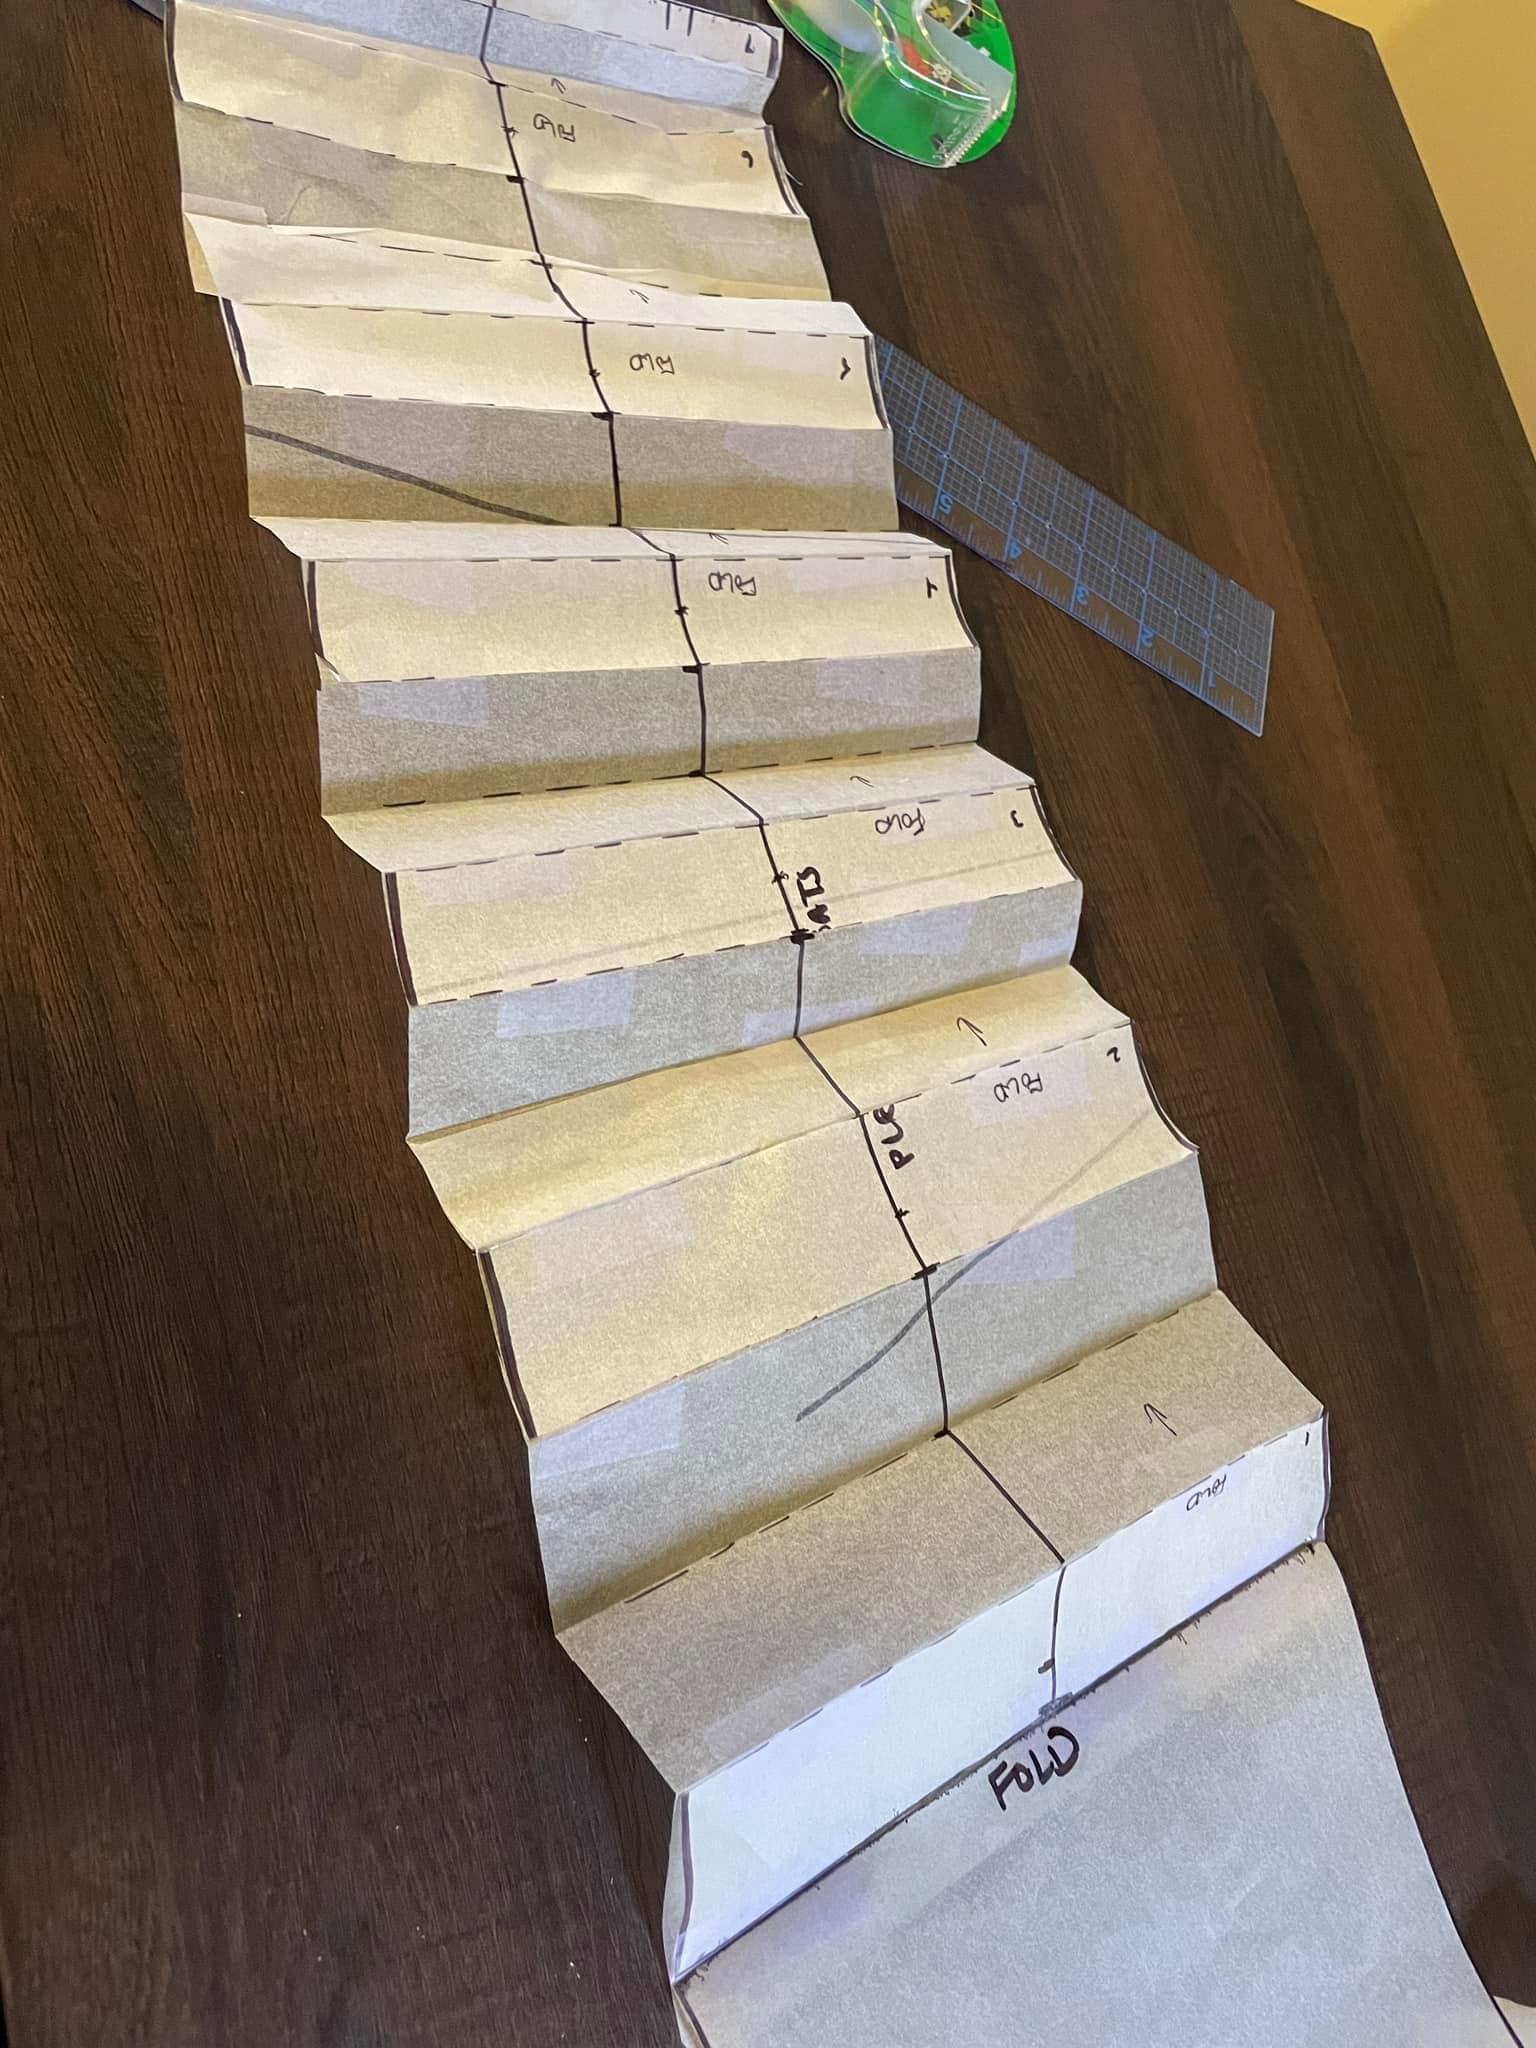
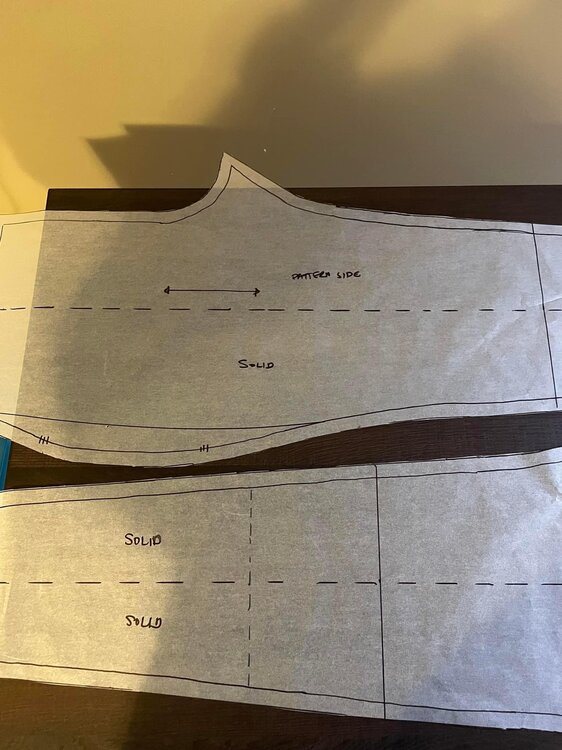
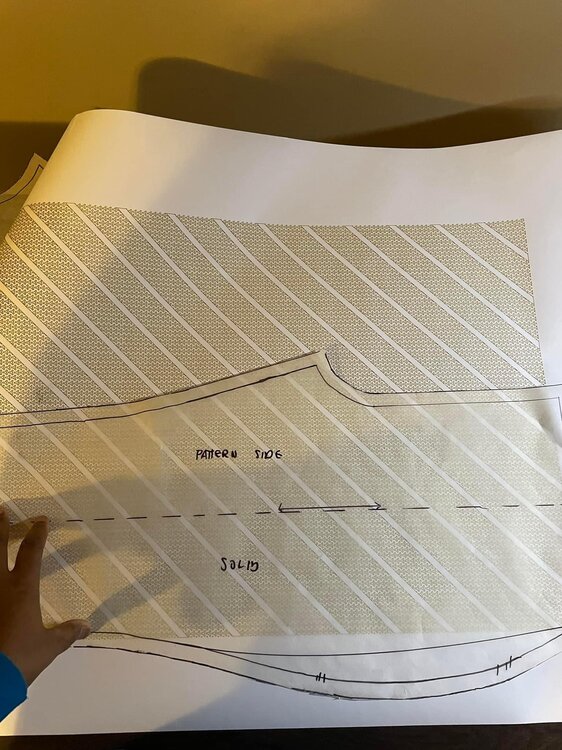
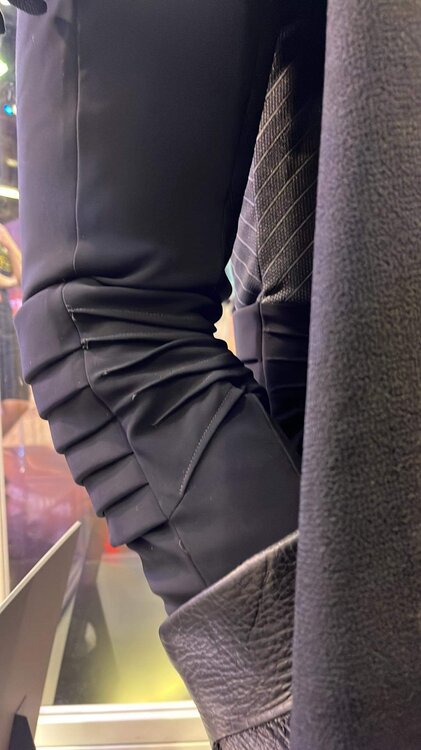
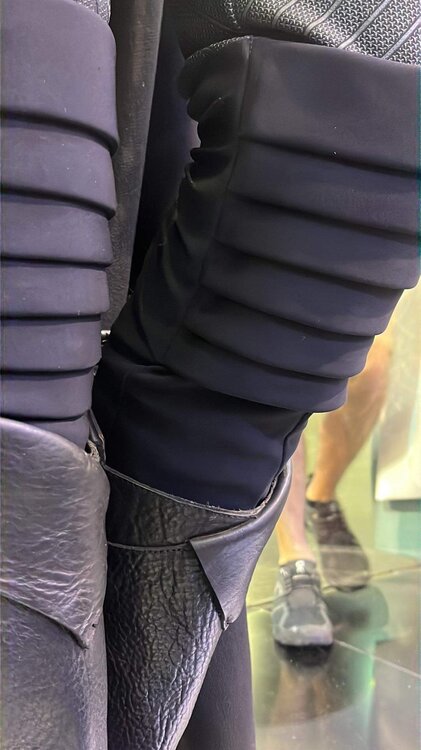
Did a lot of pattern work today. Mostly on the bodysuit, but I also did some work on the screen prints for the bodysuit (ordered a mirror of the one I already have so I don’t have to laser cut it.) I’ll try and explain what I did a bit. The bodysuit pattern is actually not bad. The sizing is true to what the packaging claims. The only thing I don’t like about it is the weird roundness at the hips. It’s not a natural curve and I had to edit out. I still highly recommend it. this is the pattern I’m using and a link https://www.etsy.com/listing/719618406/catsuit-with-long-sleeve-and-front?ref=yr_purchases I used a curve to adjust the side seam line and I was much happier with the fit. After I did a mock-up I had to cut the pattern into parts. There are 4 panels to the legs but I cut it again at the calf. The reason for this is because my screen size is only 17” x 24”. Doesn’t cover the entire leg and would look terrible pieced together. Since the pleated legging will cover that, I’m not worried about it. More to come on the legging bit. Both the internal and external seams can be seen clearly in the 2 images above. it was tough to get a good image since the pattern pieces are so large. I split both the front and back pattern in half. Then I measured up from my ankle to determine we’re to cut at the calf. I marked which parts will be printed fabric and then cut them all apart. I removed the seam allowance too. I don’t really need a 1/2” allowance and I’ll be serging and trimming the seams down anyway. I prefer to add allowances to the fabric with chalk after I’ve traced the pattern pieces on. The above image shows the vinyl screen I laser cut. It was good to see how things would line up. if you plan to make this costume keep in mind you’ll need 3 screens. One for the gloves and 2 for the bodysuit since there is a left and right slant to the pattern. After I finished this part of the bodysuit I tackled the leggings. Not sure what else to call them. Originally I thought it was all part of the bodysuit but I don’t think that’s the case now. After closer inspection there are a few things that stand out: 1. The stitched gathers at the back of the knee were to tighten the fit, but that wouldn’t be necessary if it was all one bodysuit 2. There is gathered fabric above the pleats which indicates a difference in fabric volume between the legging and bodysuit leg or at least enough pressure from the legging to squeeze the fabric underneath. 3. the calf side of the legging is really lumpy and looks like it’s layered over something else. 4. it is much much easier to make it as a separate part and slip it on. With all this in mind I patterned out a separate part for the leggings. I kind of eyeballed the length needed and made sure I had 6 pleats. I plan to use a doubled layer of fabric that will fold down from the top. That and the pleats themselves should give enough volume but I’ll find out tomorrow. I still have some pattern work to do for the torso and I need to model and mold the greeblies since I couldn’t find practical solution. I also need to patted the gloves. While perusing Etsy, I found a vendor selling patterns for this costume. It consists of the armor, belt, greeblies, and boot covers. So far I don’t have complaints. The sizing seems to be okay, but I’ll need to mock up some of the parts to be sure. I won’t be using the belt as I don’t agree that it’s something other than a straight black belt blank with embellishment. Everything I’ve found so far has odd shaping, but unless you have a hip tilt to accommodate the curve it’s not a good pattern option. I have a belt blank on order and will talk more about it when I have the parts printed. Here is where I got the patterns for the armor: https://www.etsy.com/listing/1255438991/third-sister-inquisitor-reva-costume?ref=yr_purchases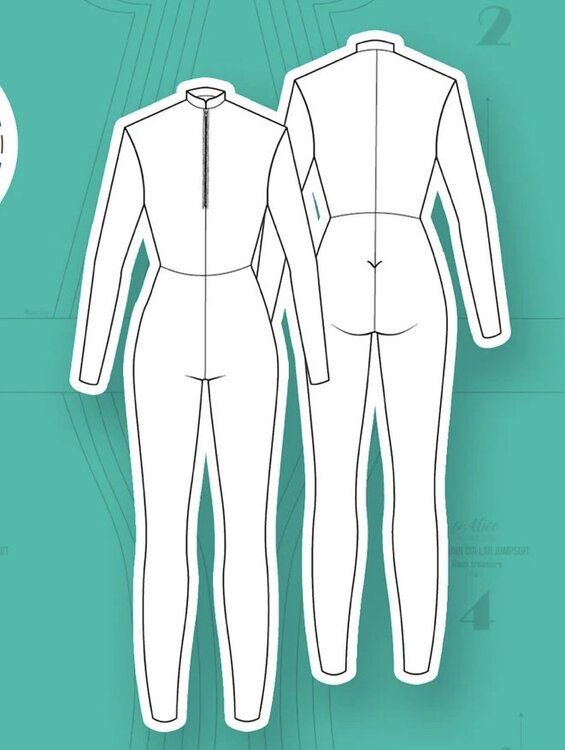


-
Live action Third Sister (Reva) build
Officercato replied to Officercato's topic in Third Sister: Reva
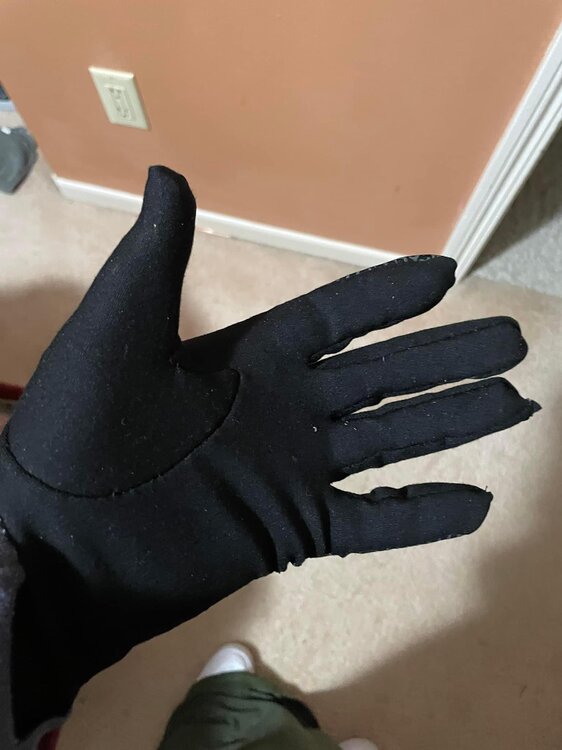
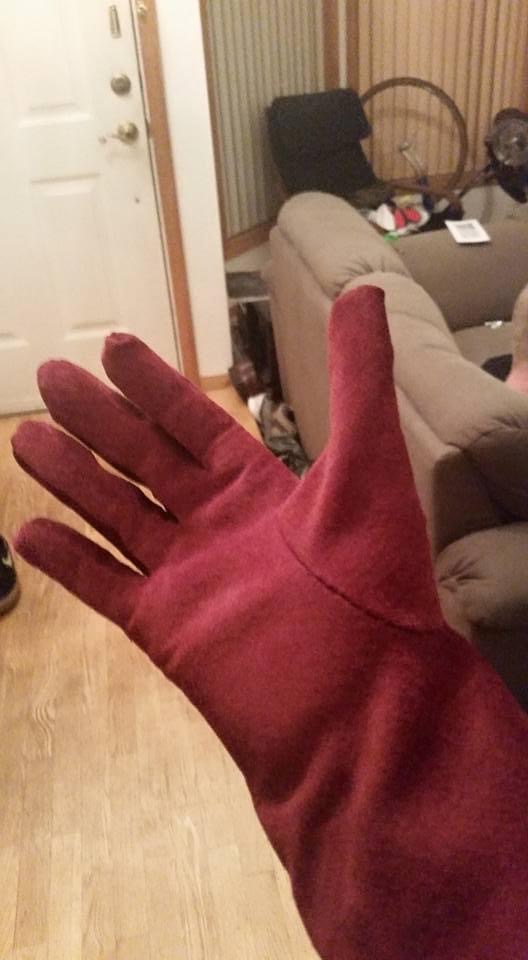
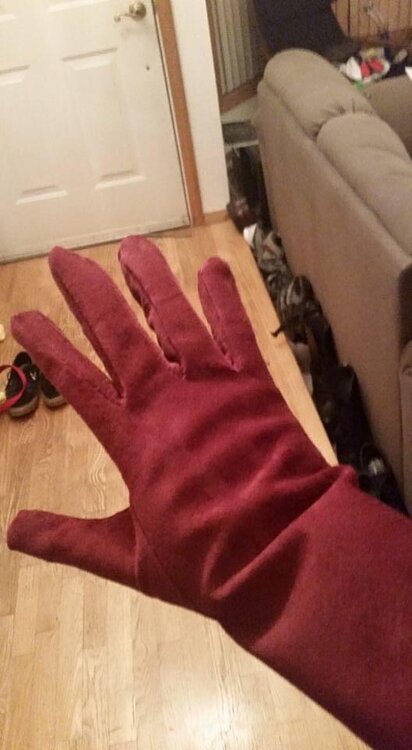
So after struggling to stitch the gloves cleanly I’ve come to the conclusion that I hate the pattern. To be fair it was designed for leather, but the shape of the fourchettes (parts in between fingers) are awkward at best. The thumb is unnecessarily complex. The last time I built gloves was for a different costume and I drafted the pattern myself. I think I should go back to that.

-
Live action Third Sister (Reva) build
Officercato replied to Officercato's topic in Third Sister: Reva
Been getting work done as I have time. Made a glove but should have gone with a larger size so I’ll remake. I also sewed this one by hand. Normally that’s not an issue for me but it’s a bit more challenging with 4-way stretch fabric. Not using a sewing machine was just pure laziness. I sucked it up and bought a walking foot for my machine so I could do it right. I also borrowed a serger from a friend, but the seam allowance is a bit small for that. Hopefully I’ll finish these this weekend and start working on my boots. :)