
-
Announcement
Welcome to the forums!
If you are a newly-approved member, make sure you check out the New Member Checklist!
If you are a Detachment member and can't see the member-only area, post here for access.
-DV

NotRookie
-
Posts
17 -
Joined
-
Last visited
-
Days Won
1
Content Type
Profiles
Forums
Gallery
Events
Everything posted by NotRookie
-
The costume looks great! How did you make the boot covers? I'm still trying to figure them out.
-
Right now, I think I'm going to keep it black. In my reference pics it looks to me like the armor is a shade or two darker than her cloth parts, and the cloth looks charcoal grey. In the worst case scenario where it just looks too different from the helmet, I'll spray some Blindfold on it from really far away to get a light dusting. I *really* don't want to have to repaint the helmet. I should point out that I am not artistically talented or inclined, and this CRL being so unreliable is really not helping. I'll just keep on muddling through and hopefully figure this out eventually.
-
I've been trying to figure out Flickr. Hopefully this works: https://flic.kr/p/VHoqzk https://flic.kr/p/VEDnTs It looks like the creator used a very light coat of blindfold over some sort of black (matte? Satin? Semi-gloss?) on the sides of the helmet. So it looks like you were right. The bracers are too light. I'll have to try and test out the various blacks I have on it. I am glad I used the Blindfold, though. It's given the bracers a nice texture, so I'm going to paint the other bracer Blindfold as well before covering it with black.
-
I have my doubts about the color as well. Unfortunately, I have the helmet and bracers in two different locations (there's not enough room in the apartment for all my crap), and I've been too lazy to bring the bracer home to compare to the helmet. Now that I've got someone depending on the answer, I'll make it a point to hold them next to each other in the sun and take a pic today.
-
Thanks for the tip. I just bought a tub of the stuff for this costume and my next (R1TK- because apparently costumes with very few WIPs to reference are my thing now :/ )
-
I finished "hero" bracer. I was worried at first because no matter how finely I sanded it, the ABS paste I used on the seams had little micro holes that wouldn't go away, but luckily the paint I'm using to match the helmet ("Blindfold" by Valspar) has a nice, rough texture to it that hides a lot. I could've saved a few hours of sanding had I known this ahead of time, but you live and you learn. Since Photobucket's trying to extort us all now, I'm putting up a link to Imgur until I figure out what I'm going to do about photo linking. https://i.imgur.com/qEPK2gX.jpg I'm not looking forward to spending several hours going through all my posts and replacing the pictures. :/
-
I like having the opportunity to try again if I screw up. I had to pull things apart once already on the first bracer and give it another go. I think I'll just refer to them as "stunt" and "hero" when I'm done.
-
I know it's been a while, but I'm still here. I've just been doing one bracer at a time so I could apply my lessons learned to bracer #2. I hope to be done with this bracer business in another 2 weeks or so. E6000 is a harsh mistress. She requires her 24 hours each and every time.
-
I was using this picture as a reference (left side). The original is from the Star Wars rebels wiki. I'm not sure, but I think I might've gotten (stolen) this pic from you guys. If you zoom in under the hilt of the saber, you can see the armor goes right up to her elbow.
-
I'm having a bit of an accuracy dilemma with the bracers. I made a small semi-circular cutout on the inside of the elbow side so my wife could bend her arm. Should I have...not done that? I can trim the whole thing to be shorter, but in the reference pics I have the bracers run almost up to the elbow. So, I'm not sure if I should go for accurate length or accurate shape. Worst case scenario: I can always leave them like this and if they get turned down due to the cutout I can make them shorter and be done with it.
-
Yep. These things are large. As I was working on them, I remember thinking to myself "I should've just bought some flat plastic. I'd be doing about the same amount of work". I have a jar full of ABS paste that should see me through cracks for the foreseeable future (there is *some* benefit to these things being super large). How did you do the bracers? I couldn't think of any of way to get them seamless without sealing at least one side.
-
I've finally gotten around to trimming both bracers to fit my wife's forearms. I also molded them somewhat with the hot water bath technique, although I think I need to try again. Every WIP I read makes it seem like the plastic becomes super soft, but mine didn't. I think I'm being too conservative with the amount of time I leave them in the water. I just don't want to ruin the armor; it isn't cheap! I also glued a pair together using the overlap method (and E6000), but it left a sizable lip that I don't think I'll be able to smooth over. I'm not happy with it, so I've torn them apart and I'm going to try making an inside cover strip and butt-joining the two halves. Whatever seamline is left can then be filled in with ABS paste. I really want the seam on the outer edge of the bracers to be invisible. My plan for the inside edge is to Velcro them together so that my wife will be able to comfortably get her hands in and out. I also picked up some Valspar spray paint in "Blindfold" and flat white to have my armor match my helmet. So there's some progress being made!
-

501st/SLD and/or TFE Detachment Access Requests
NotRookie replied to DarthBrute's topic in Welcome Area and Forum Help
Requesting SLD status. DS 55305 http://www.501st.com/members/displaymember.php?userID=22687&costumeID=379 Det XO Edit: Done -
501st/SLD and/or TFE Detachment Access Requests
NotRookie replied to DarthBrute's topic in Welcome Area and Forum Help
Hi, Requesting 501st member access: DS-55305 http://www.501st.com/members/displaymember.php?userID=22687&costumeID=379 -
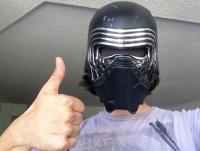
First up is the helmet. This thing is beautiful. It has light-up LEDs (not lit in the photos), a removable mask for Face character options, and just looks amazing overall. The only complaint I have is that the eyeslits are slightly asymmetrical. It's not a lot, in fact, no one's noticed it unless I mention it, so I think the right solution here is for me to stop mentioning it. This thing is a challenge to pad properly, though. It's weirdly shaped and has small eyeslits, so it needs to sit JUST right for the wearer to get any visibility. I'm thinking of trying a hard-hat liner, since padding alone can't get it to sit right without bobbling like mad whenever my wife moves her head. Next up is the armor. I've done the rough trimming on the bracers so far, but that's about it. Does anybody know what type of LED's would go well on these? I'd let to get them to light up as well. We can't have the helmet lighting up but not the arms! What might be a bit of a challenge is that this armor is sized for a large person. My wife is 5'3" and petite, so I'm going to have to cut this down a LOT. I might need to spend some time on FISD reading up on the shorter troopers and seeing how they handle the forearms there. These will also need to be painted. I'm going to ask Atlis what sort of paint he used on the helmet and try to match it. The helmet's paintjob looks beautiful.
-
Hi everyone. I'm NotRookie from Miami, FL. I'm a recently approved Kylo, and, after going with me to a few troops, my wife is also interested in joining the 501st. She's a huge fan of the OT (she didn't like TFA and HAAAATES the prequels), so I was quite surprised when she chose to go with the Seventh Sister, especially since she spent the entire first season of Rebels referring to Ezra as "Aladdin". This costume really speaks to her (I think it's an amazingly designed character as well), and I've been slowly getting the pieces she'd need for it. I started collecting the parts before the costume was approved, but now that our toddler has started part-time day care, I've finally been able to put some time into it, and now seems as good a time as any to start my WIP. I've done some research on this costume, but there's still a lot out there for me to learn, so please feel free to offer any advice or suggestions you may have. Anyway, without further ado, here's the current parts list. Helmet: Ordered and Received from Atlis Armory. Armor: Ordered and received from Jawa Chop Shop. Lightsaber: Ordered a Dominix LE V2 from Ultrasabers, and I plan on getting the semi-circular hilt pieces 3d-printed from Keltaria Designs (my Squadmate) to slot it into. Boots: My wife has an appropriate pair. I'm not sure how to make (or where to buy) the spats. I'll burn that bridge when I get to it. Soft parts: The current plan is to buy some black slacks (corporate wear-type) that are form-fitting and buy some matching fabric to get the jacket and gloves made by a local seamstress. Neckseal: I have an old neckseal I first used for Kylo that should fit the bill. Belt: I legitimately have no idea what to do about the belt.
-
Introductions and Pending Forum Member Approval
NotRookie replied to DarthBrute's topic in Welcome Area and Forum Help
Hi, I'm Ruky. I live in the Florida Garrison's Everglades Squad territory, and I'm still in the process of building my Kylo Ren (I should be done by mid-December. My wife is also interested in joining- she's a theatre actress, so this is right in her wheelhouse. She has no interest in actually building a costume though, and that's where I come in. She really loves the Seventh Sister from Rebels, so I'm here to do some research, see what vendors are available, and generally do all the legwork. Any help or guidance would be greatly appreciated. Thanks.
