
-
Announcement
Welcome to the forums!
If you are a newly-approved member, make sure you check out the New Member Checklist!
If you are a Detachment member and can't see the member-only area, post here for access.
-DV


Volund Starfire
-
Posts
188 -
Joined
-
Last visited
Content Type
Profiles
Forums
Gallery
Events
Posts posted by Volund Starfire
-
-
As if by the grace of the Force, I just got a 40% off for Home Decore fabrics for next month.That material looks phenomenal. Seriously. i remember the convo about the blankets I think they will be close enough. The material on the right seriously is so close though. But eww 35.00 Painful.
Im headed to the Fabric District on monday (again) to scour (again) for more material of what I used for mine. I cant believe how hard this stuff is to find
Specifically, it is for the weekend just after payday! Yeah, guess what I'm getting some yardage of.
-
It's a
It's a material from a local place in Portland, OR. It's $35/yd, but I'm getting some coupons soon.Ok so where did you get the material on the right? Its really nice
-
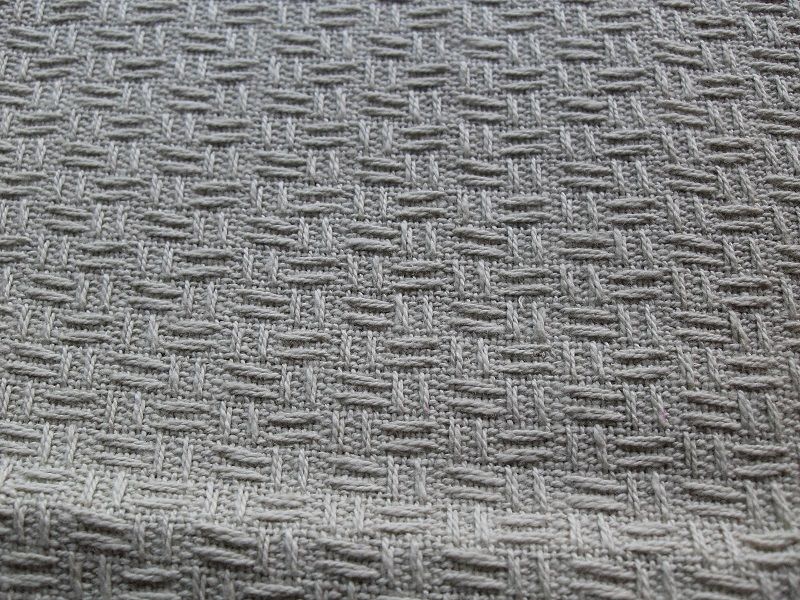
Here’s a close-up on the surcoat/cape material for my first version robe. I still need to dye it, which I’ll
be doing after I cut it out.
As you can see, there is enough for me to make mine and perhaps another… muahahahaha. Ehem.
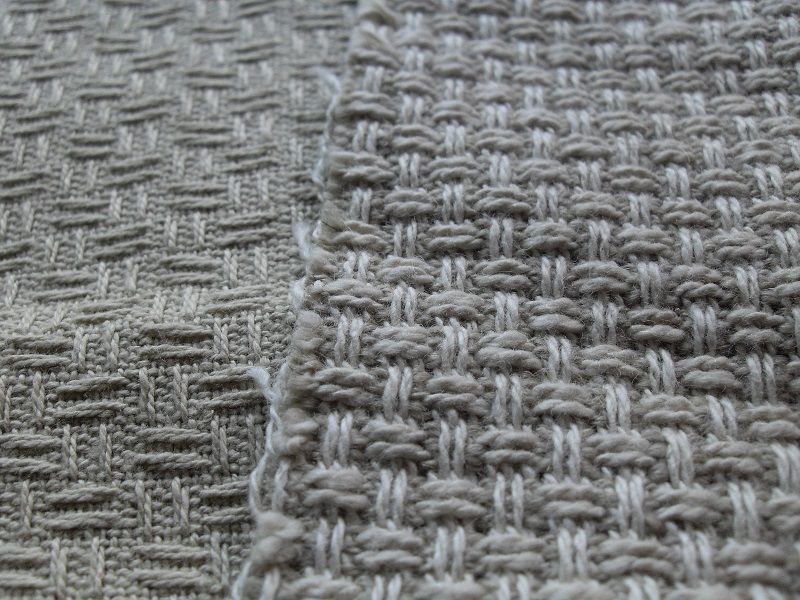
Here is my version two material. It’s a little more expensive, but I want to make sure I have the pattern
down before I attempt it with such and expensive piece of material. Oh, and did I mention the back is
actually coated?
-
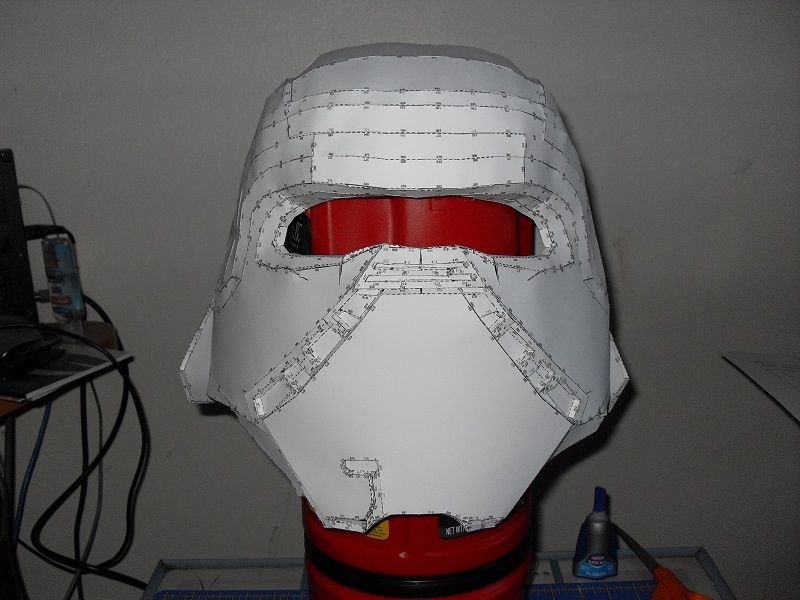
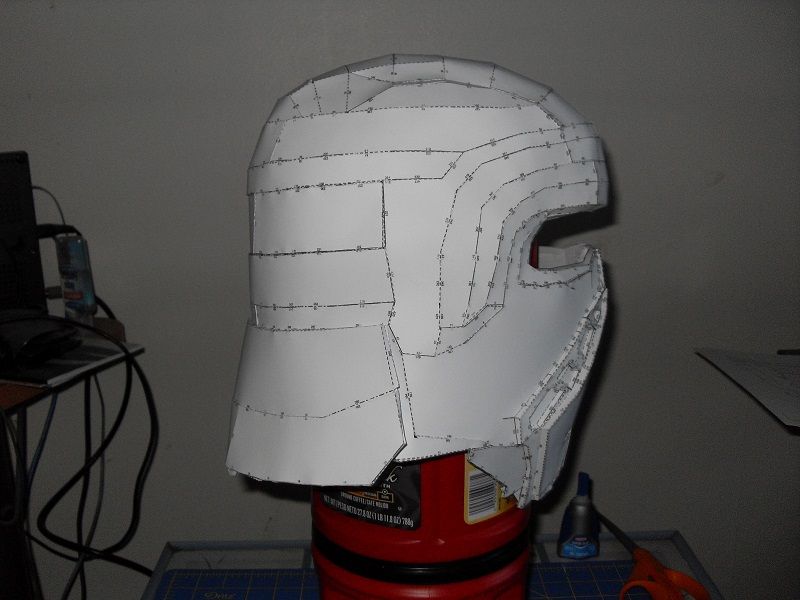
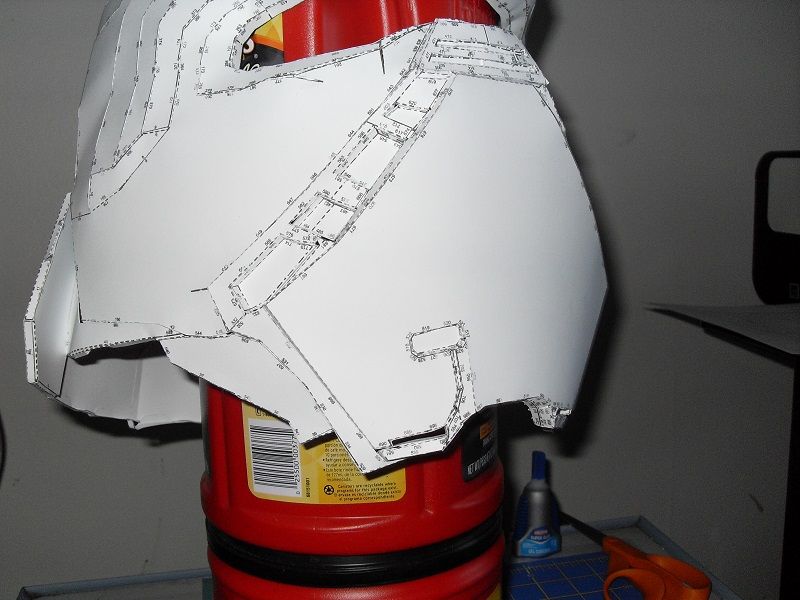
The helmet is built! I will be hardening it tomorrow. I know it looks a little misshapen, but that’s just
because I don’t have it braced in the proper position or anything. Updates will be coming after it’s
hardened!
Oh, and the raised detail on the face will be installed after it’s built.
-
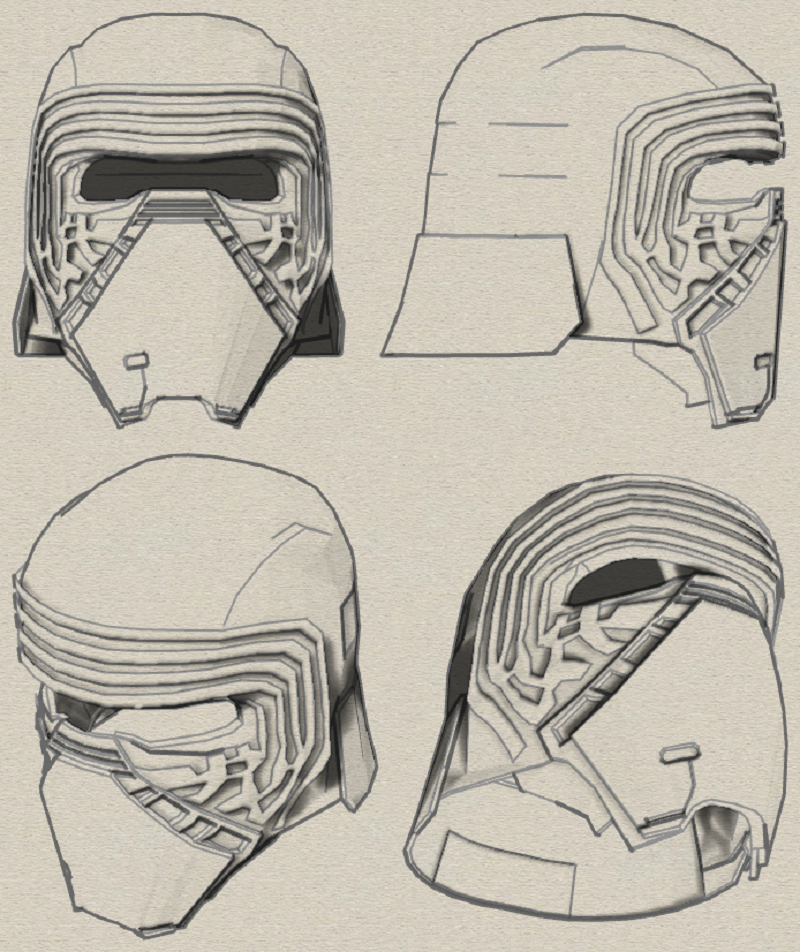
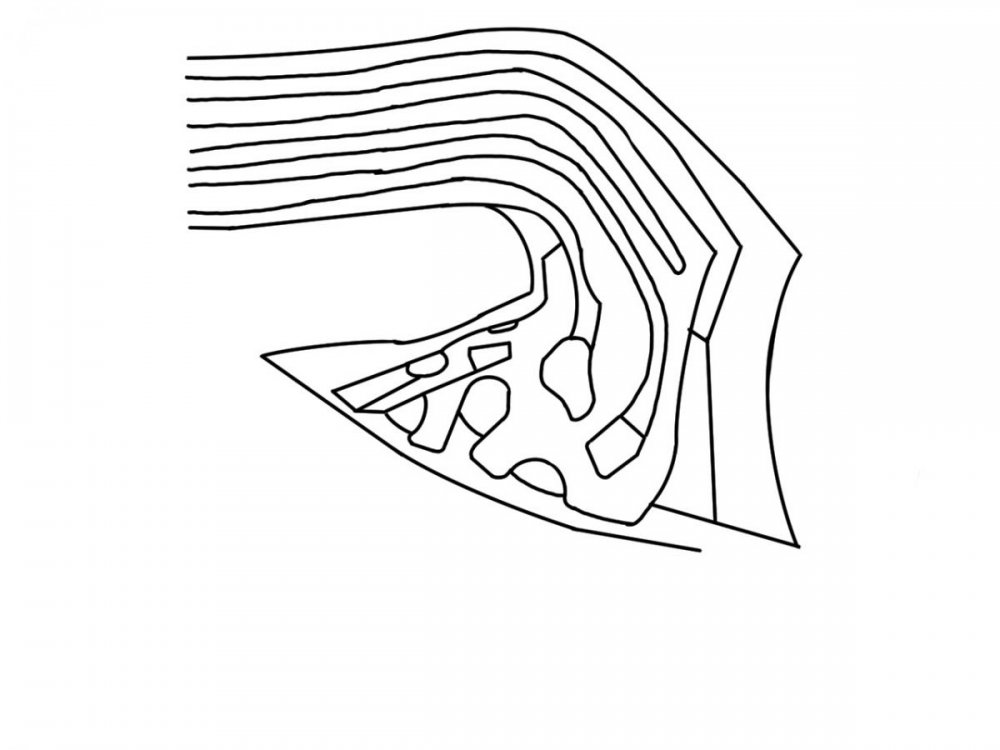
I have the pepakura file for the Kylo Ren helmet! I will begin building it later this week as I’m still in the
process of unfolding it and finishing up a couple of other pepakura projects. I’m looking to clear the
palette and start on this project with a fresh set of tools.
There are a couple of things wrong with the file that immediately jumps out at me. These include the
raised details, the cheeks, and the vent details on the sides.

The raised details on the cheeks and brow are identical on both sides in the file. In reality, they are
asymmetrical. However, fear not, because the details are actually floating faces over the model! So, I
am planning on drafting out the proper design of the left cheek based on sketches I found on the RPF.
The cheeks of the helmet are actually cut out under the raised details. After I get the helmet hardened, I
am planning on cutting out the cheek and sanding it into the proper shape.
Finally, the vent detail on the side will be made using 1mm layered sintra behind another piece of sintra
to give it a vent-like look.
-
The Vanity Fair shoot confirmed the tunic length of the action figure. I was right!

-
I’m shooting for “as close as possible” without having to buy one of the ANOVOS helmets. I like mine to
fit and not cost an arm and a leg. Though, I might buy one just for collecting and actually looking at to
get the details right (reference, not recasting).
-
*cough* Prepare for battle come next Monday my lord! Ill have my saber in hand on sunday ^.-
And this is me being jealous. My saber is probably going to be the last thing I purchase and
make. But, before then, I still have my collection of 4 dueling-grade sabers, a MR Force FX Vader, and a
couple of the Hasbro toys. And, yes, I know how to use them. Muahahahahaha!!!
As noted above also Yes I agree
The images posted in the mask are Not 100% accurate. I tried using them they are kind of incorrect. They dont line up the same as on the mask.
Ill be posting my template with side by sides of my mask as soon as my costume is in queue
I can’t wait to see your progress! I’ll probably use those templates as a base, but sketch out
my own before I start cutting sintra. I might also mock it up with a foamy before I do it in the
sintra.
-
Yes, unless I get bored with him fiddling, then I’ll just buy the $30 one and start building it.yep those are the ones i posted, and when your friend is done his pepakura file, can you share it on here?
-
and here is a link to a kylo ren pepakura helmet all though the mouth piece is wrong and it cost $30
and i have some templates i found online of his mouth piece if you want them.
I have the mouth and eyebrow/cheek templates that someone in SLD posted (see attachments). I was
definitely looking at the propzone helmet pep, but there is a guy in a facebook group I’m part of who is
also making the pep with the cheek/brows as floating faces (a pepakura term for something you cut out
and add on after the item is put together). But, if your templates are different, please definitely link
them.
…
Volund you're very right, and I've definitely had the cops called on me for showing up to a troop thanks to the balaclavas we all wear. On the flip side, we were able to carry our blasters on a military base at an Air Show, so... yeah. We may have detained a few real-life officers for fun.

…
You should try being part of a group of Halo ODST costumers… holy cow. Though, the SWAT team that
responded to the troop got lots of pictures with us and there is a great picture of us sitting in the back of
their military troop transport!
But, let’s not get off topic.

-
 1
1
-
-
This is VERY well written
…
Can I respectfully ask to borrow this when I write my WIP? Seriously fantastic job on this!
If you need certain photos I took 500 of just this costume
Please feel free to use my dissection however you wish. As I do some work, I’ll post what I find (tricks
and such) for getting things done. The way I write WIPs are for others to follow in my footsteps for their
builds. My dissections (do a search on Flagship) are freely given.
For instance, one of the things I’m already planning to do is “Nihilus” the sleeve inside of the doublet. It will cut down on heat and still retain the layered look. Unless, of course, there are shots of the full inside tunic.
The pants are one of the things I’m looking for today. Thank you for the suggestion, but my girlish figure is a little more manly than yours
 However, I will definitely search out Levi trousers at my current hunting grounds (8 Goodwill stores in a 30 minute radius of my house).
As for the pictures… do you have them posted to a google+ account or would you like my email address?
I would not go in assuming the lightsaber to be optional. CRLs are split down the line on required vs. optional. I suggest planning for needing it, rather than assuming it isn't needed. And as it is clearly a focal point for the character, I'd err on the side of needing it.
There are some garrisons that the local laws don’t allow lightsabers. Personally, I like having them. It’s
a cool part of the costume and one of the most iconic pieces of movie history. I mean a Jedi without a
lightsaber is just an oddly dressed Samurai.
Heres some photos of the materials i found and the gloves
…
Do you do commission work? If so, I might order a set of gloves from you or see if we can work out a
trade.
Also, I’m basing my doublet on the action figure tunic length. From the “poster” shot it looked like there
was a dropped part to the doublet. I was looking at using a sleeveless version of the ‘A’ jacket below.
I’d include an Imperial Officer style collar, remove the caps, and give it a riding split to the waist. Does
that sound right?
-
leave this here ... Here you can see some images of Kylo Ren and his lightsaber ...
I hope you find them useful
regards
SL-874
Thank you! I’ll be using a couple of those, for sure.
they said at the force awakens exhibit that the mask was hand crafted and made out of i think a poly urethane plastic, and why do people keep calling the lightsaber clip a magnet, last time i checked 3d printer plastic is not magnetic nor was there any metal on the hilt. the hilt as a thin bar on the bottom back and the clip has a track system where the hilt slides onto and locks in place.
and if your saber is going to have sound or lights, dont use a magnet or it will ruin it.
I know the helmet was originally molded poly, but I don’t have the ability to mold or cast in poly.
However, I do have the skills and abilities to make pepakura and make it shine. It might not be a screen-
accurate material, but technically neither is Episode IV TK armor because it doesn’t just have painted-on
eyes.
I’m not really planning on using a magnet for the lightsaber, it just looks like it connects magnetically in-
universe. One of the shots of the saber in the link above (which isn’t in any of the other major pictures),
indeed shows the saber’s attachment is wider than its base. You might be right, but I haven’t seen a
high-detail shot of the belt clip.
As for the magnetics issue, I definitely plan on not using magnets anywhere near my saber. I might
upgrade to sound at some point, but not initially. I hate the battery set-up needed for most of the
sound systems.
-
It’s been about a year since I used my special talent at costume dissection, but let’s see if I can shake the
dust off of it. To do this, I plan to use the pictures of Kylo Ren from the new movie coming out this
December.
As always, if I miss a detail or something, please let me know. If you have a picture contradicting
something I’ve written, same thing. I’m always looking to do better and I look to you all to help me
make the details right for those who want to do the costume and/or write the CRL.
And fear not, this will not just be a WALL-O-TEXT™. I will be adding pictures as I fine tune it in the
coming days. As I get things purchased and get them built, I’ll be updating it. I like this character, even
though I know nothing about him other than he can breathe in his helmet (see below)!!!
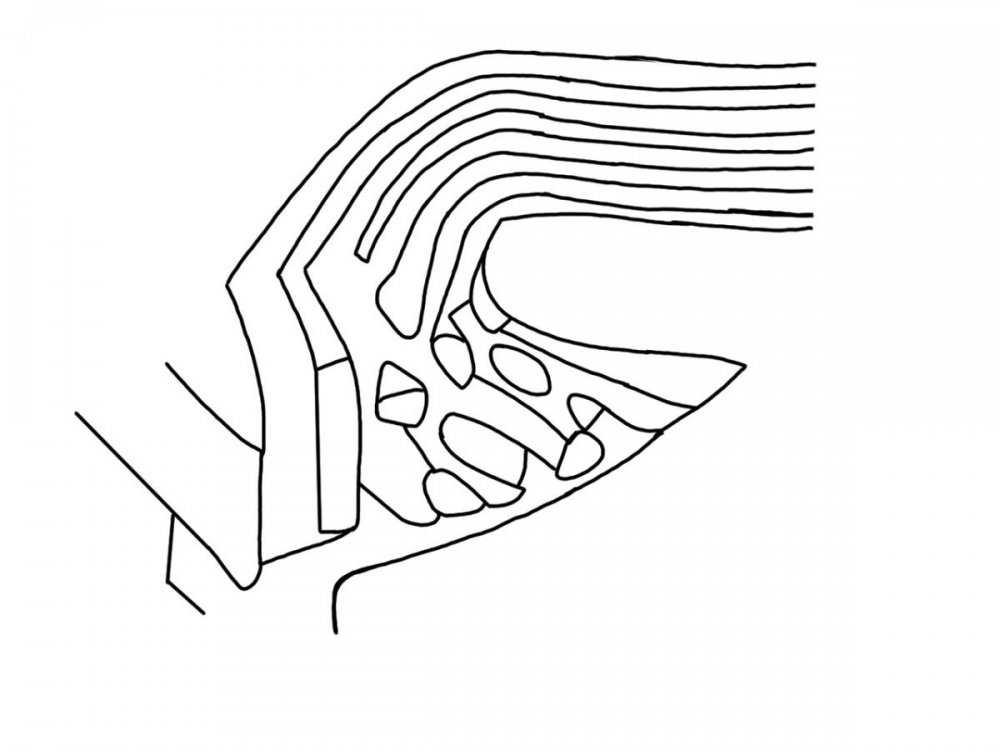
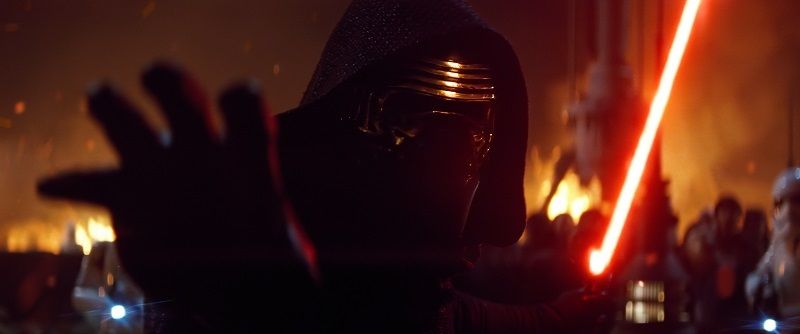
HELMET
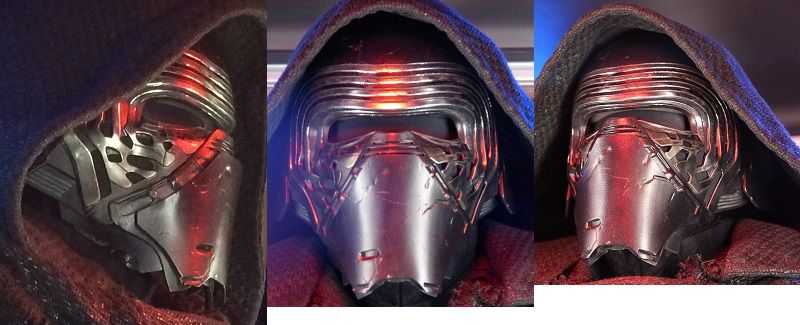
There’s not much I can say about the helmet that hasn’t already been covered a million times. It looks
to be 3D printed or pepakura built. It is a full helmet, not just a mask, and that is one detail that most
people didn’t fully get until the Celebration display.
Of special interest is that the raised face details do more than just add flair to the helmet. If you look
closely at the cheeks of the helmet, you will see the holes in the face detail hide the same black-out
cloth that covers the eye hole. That’s right, this helmet is something you can breathe in.
I will be building the helmet using pepakura with the raised details being sintra. Some of the smaller
details I will also be using the 1mm sintra for (such as the vent looking things on the sides).
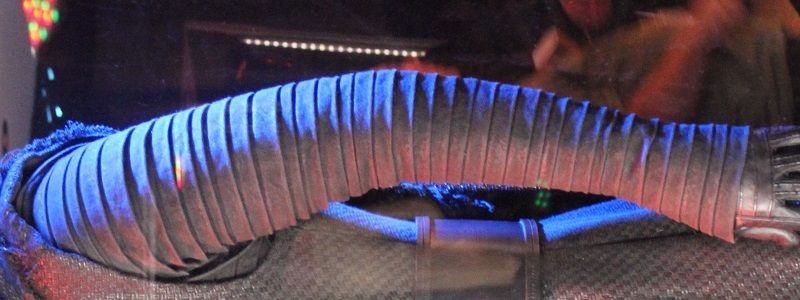
INNER TUNIC SLEEVES AND DOUBLET
After reviewing several pictures of the exhibit, I have come to the conclusion that I will be doing both
the inner tunic and doublet as one piece. I will also be doing it with a twist I learned costuming as
Vader.
The inner tunic sleeves will be made using the 38 flaps. Based on the measurements of my arm (31”), I
have determined that the visible length of the flaps is 7/8” long, since there are a couple that don’t look
the same size. I’ll double that underneath of them for 1-1/2” for the sew-down. Rather than line it, I’ll
just use my underarmor rather than add more layers (to keep it cooler). So, I’m looking at 5 yards of
material.
It will be sewn directly to the doublet under the sleeve much in the way as the faux inner sleeve of a
Darth Nihilus; sewn not at the point of the sleeve, but back at the top of the shoulder. It will also
feature a separated locking zipper that zips from the wrist to the armpit. I guess this means there are
zippers in Star Wars (besides Luke zipping up his orange coverall in TESB).
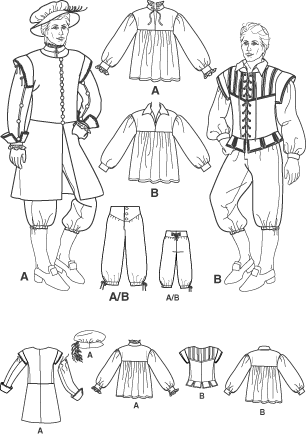
For the doublet, I’ll be using Simplicity 4095 as a base. I plan to modify it by adding a zipper up the front
rather than buttons. Other than that, I also plan to add a yolk with Imperial Officer-style collar and a
“yolk” around the arm holes. Except for the skirt, it will be made out of a nice moisture-wicking
material. The skirt and yolks will be made using the horizontal-tucked wool that is visible through the
arm and neck.
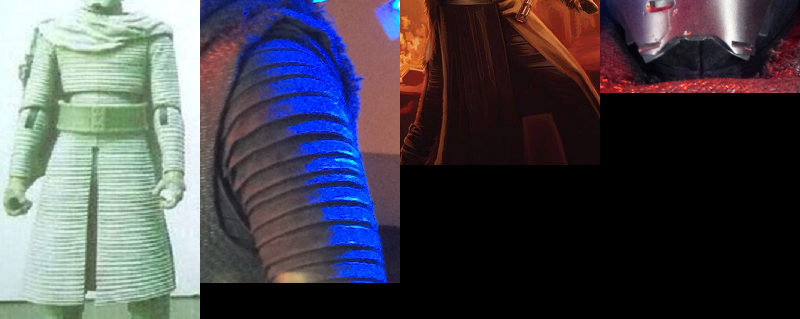
SURCOAT, HOOD, AND SHAWL
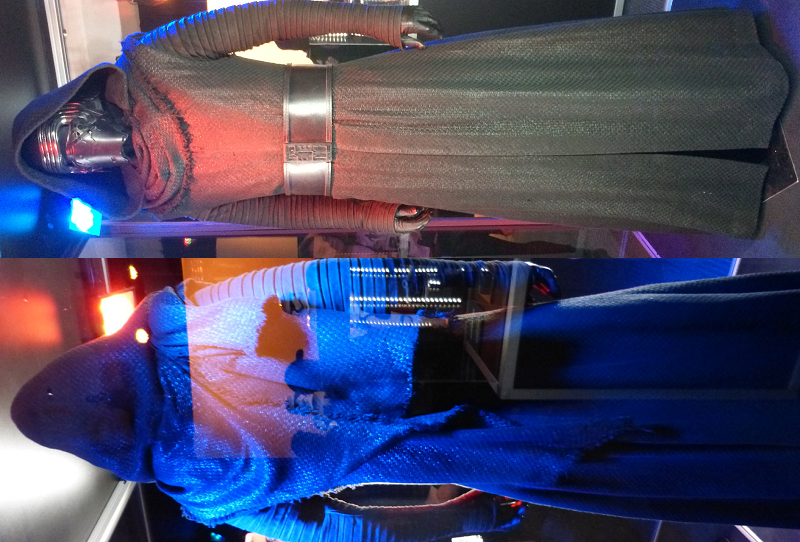
For the surcoat, I’ll be using a modified version of the Simplicity 4795 pattern. Specifically, I’ll be using
piece number 1 with a flat shoulder and cut waist length. The 4-panel skirt will be made square and
pleated at the waist seam, since the pattern of the material is straight all the way down. I will also be
including a separated zipper up the left side of the body and a closed zipper just behind the neck to
make the opening smart around the collar.
The hood is part of the shawl, not the surcoat. The hood is identical to a Jedi robe hood and I’ll be
putting a piece of plastic canvas in the front edge so it sits right when it’s up. Additionally, I’ll add a
small magnet pocket inside so it sticks to the helmet regardless of how I turn my head (nothing’s worse
than having to continually pull your hood up).
The appearance of the shall looks quite like a Ranger cloak from Destiny. I’ll have to whip up some test
builds to make sure it hangs right, but there are patterns in the Destiny costuming community (once I
find them). Oh, and the edge of the shawl is frayed. There is also a fully visible seam where the hood
connects to it.
GLOVES
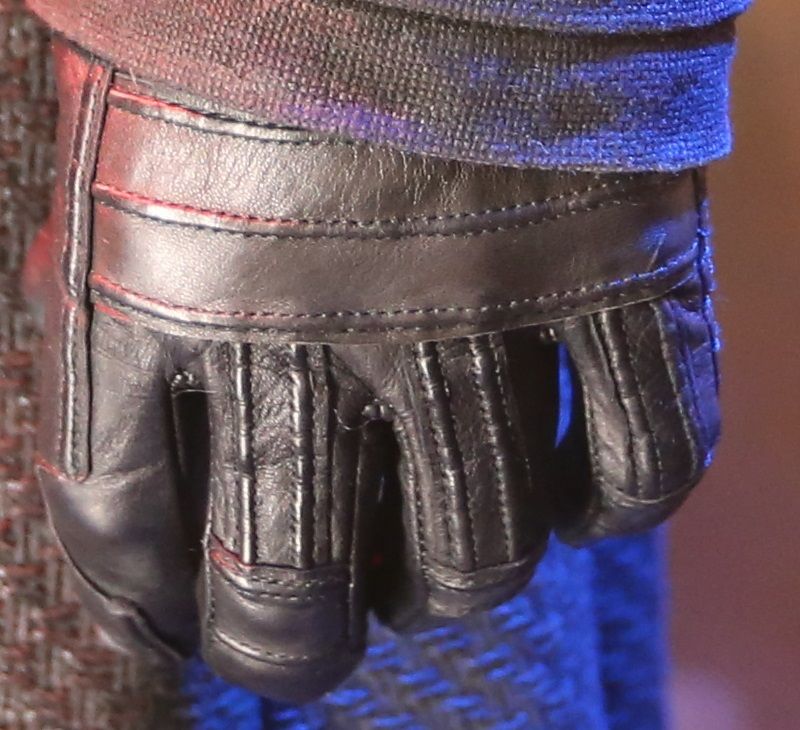
I’m looking into giving a local glove-maker some pictures of these gloves and asking them to make me
up a set. I have yet to find anything that looks even close to these gloves (that weren’t hand-made by
Amidala). However, I’ll still keep my feelers out there in case they were a purchased item.
BELT
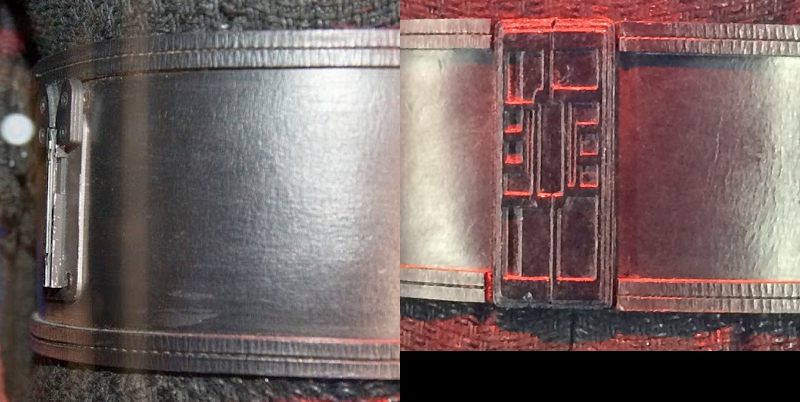
The belt is 5” wide with a pair of 1/2” wide top-stitched straps. The belt closes in the front with Velcro
that I’ll just sew down to the straps and epoxy under the belt.
The buckle will be layered sintra that’s 5” high, 2-1/4” wide, and 3/8” thick. It will Velcro to the exposed
strap that closes the belt.
The lightsaber clip is the female connector for a stanchion queue barrier or tensabarrier. It is built into a
small setup with a pair of teardrop guides to put the lightsaber into the cradle. The base of the clip is 3”
high and I’ll Chicago screw it all down to the belt.
TROUSERS
The trousers will be a purchased item. They are denim trousers, but not jeans. I’m hoping to find
something at a local Goodwill, but will probably get them online.
BOOTS
The boots look to have a separation between the actual boot and the leg. For this reason, I believe they
are similar in design to the Imperial boots in Star Wars Rebels. My boots will be a pair of paddock boots
with a half-chap over them.
There are four 1” straps around the leg of the boot, two on the bottom and two on the top. I’ll most
likely connect them with snaps around the proper point until clearer shots can be seen.
LIGHTSABER
The base for the cross-guard lightsaber will be a purchased item from a saber maker. I’ll custom build
the detailed shroud over it using PVC pipes and wires. It will be interesting to build, especially because
of the number of details on the main body. I had considered 3D printing it, but I think building it will
give it a better feel. Additionally, it will feature the male end of the stanchion queue barrier or
tensabarrier, so I can wear it on my belt when at a “no weapons” troop.
-
-
The lightsaber clip on the belt and on the lightsaber look to be magnets. They are both the same size
and shape.
As for the gloves, I've seem some almost identical to those. I purchased them from an AAFES at Ft. Hood
back in 2004 before I took my first hop to Iraq. They're a leather combat glove.
-
You could always do them in foam, so you don't accidentally put out a little kid's eye with one. Also, in foam, they would bend right back to their original shape and are cheap enough to be remade many times over.
-
My wife just told me that I am finishing this in time for Celebration VII, so I guess I am finishing it in time for Celebration VII. Will Kyle Katarn be at Celebration?
Oh, and the actual WIP will begin soon!
-
I'm getting it, too. Don't know why, but pages take about a minute to load.
-
what about blade length? 36" or 40"? mid grade or heavy?
do the 'stunt' blades still light up? I don't care for the sound much anyway.
I'm shopping for The Malice since I'm currently building my Malgus, and getting close to buying, so looking for confidence tips lol (:
With the Malice, get the smaller blade size and the 40" heavy ultra edge.
I use a heavy ultra edge on my dueling saber and it doesn't even bend when it smacks another saber, even if it is harder than I would like.
-
I just looked at my Star Wars Saga Edition and actually agree with your assessment.
-
If you can give some closer pictures, that would be appreciated. Also, could you spread out your skirting so we can see the volume, it appears a little flat in the photo, from what I can see.
-
Most of those pictures show only darkly robed figures. However, since they are named, if you can find a good clear picture of what they are wearing under their robes (enough to put together a costume), then you can do it. I believe we require only one source of visual evidence for non-game characters.
-
Everyone wearing the Sith Acolyte armor uses the exact same saber. The only difference between the "generic" acolytes and the Adraas was the paint job and he was the only one who really used any Force powers.I'm not sure if every Aco uses this kind but it seems like.Maybe Lord Adraas got his own, but I have no information about that.
-
You take care of yourself. We all want you healthy and making costumes! Not to mention, my wife and I might kidnap you and your husband for dinner or something at C-VII.


Kylo Ren Dissection and WIP
in Kylo Ren
Posted · Edited by Volund Starfire
is also really stiff. When I ran it through the wash, it pretty much disintegrated.
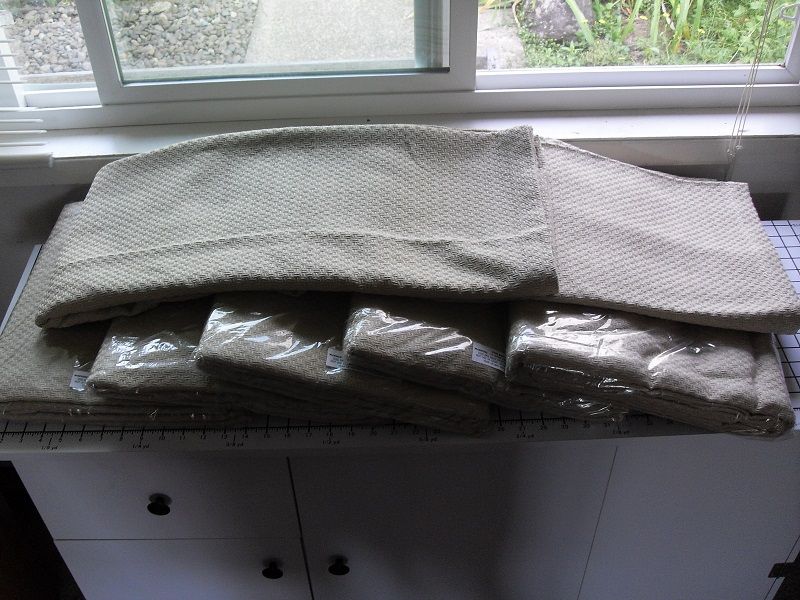
But, I'm in the final stages of a material that I found that I'll be offering as a run.
It's from a local vendor and they sell it in bulk.