
-
Announcement
Welcome to the forums!
If you are a newly-approved member, make sure you check out the New Member Checklist!
If you are a Detachment member and can't see the member-only area, post here for access.
-DV

Mynock
-
Posts
85 -
Joined
-
Last visited
-
Days Won
2
Content Type
Profiles
Forums
Gallery
Events
Everything posted by Mynock
-
You could dremel three slits in the hand plate where the claws would go, fit the claws through and secure from the underside using hot glue. This would add a lot of support and strength to the setup. Even though my handplates are cast and not vacuum formed, I personally use this method as the concept is the same. My first prototype was so strong and held so firm, that I had to change the thickness of the claws in the the subsequent version to prevent injury or damage - not to claws but to other things.
-
Sith Acolyte Armor - Mynock's build - Completed and 501st Approved!
Mynock replied to Mynock's topic in Sith Acolyte
Hand armour fully done! Hand plate was modified a bit from my first prototype to be more accurate; claws are now accurate shape as well, and are thinner and more flexible to prevent injury (seriously, my initial claws were deadly!). Also, now cold cast in aluminum as opposed to being painted. Thumb armour cold cast in aluminum as well, while the finger/knuckle pieces are vacuum formed from .04 gauge ABS plastic and painted to match the rest. Both hand and thumb plates are strapped to the hand using two elastic straps each, while the finger pieces are glued onto the glove using hot glue. Lightsaber in the photos is by Jedi Master of the store Holocron on Etsy.com, modified with Makoto Tsai's V3 Super Plus red LED string blade and electronics. You need sunglasses for this thing! -
Sith Acolyte Armor - Mynock's build - Completed and 501st Approved!
Mynock replied to Mynock's topic in Sith Acolyte
Sith Acolyte thumb armour completed. Initially drawn on paper, traced onto an ABS sheet, cut out and folded to the correct shape, and finally cold cast in aluminum using ONYX resin. Working on the fingers now. I have them cast in resin, but I think I will vacuum form them instead to decrease weight and bulk. -
Sith Acolyte Armor - Mynock's build - Completed and 501st Approved!
Mynock replied to Mynock's topic in Sith Acolyte
Chest plate finally done. Lots of mistakes and trial and error making this, but it is finally done! Initially, built the model out of foam, then progressed through two casts in resin to get the master to this form. Anyway, full production notes are now posted on my website, http://mynocksden.com Youtube vide here: I have fingers and thumbs cast as well; will post photos soon. -
Sith Acolyte Armor - Mynock's build - Completed and 501st Approved!
Mynock replied to Mynock's topic in Sith Acolyte
Next will be gauntlets, abdomen, and fingers. I need to get a robe, so I can start demonstrating this build in character! -
Sith Acolyte Armor - Mynock's build - Completed and 501st Approved!
Mynock replied to Mynock's topic in Sith Acolyte
Chest plate now ready for rubber molding! -
Sith Acolyte Armor - Mynock's build - Completed and 501st Approved!
Mynock replied to Mynock's topic in Sith Acolyte
Chest plate nearing completion, and should be ready in a few days! This was by far the single most intimidating piece of the armor that held me back from undertaking the full armor project this entire time. Aside from the mask,to me the chest plate can make or break the whole set! So, hopefully when it's done, it achieves the former and not the latter lol. I'm going to sacrifice light-weightness for best and sharpest detail retention here and stay away from vacuum forming.The chest plate will therefore be cast in semi rigid urethane resin, backed with ABS plastic for extra durability. -
Sith Acolyte Armor - Mynock's build - Completed and 501st Approved!
Mynock replied to Mynock's topic in Sith Acolyte
It starts with just one piece. Glad to see you're tackling this armor, Mynock! Can't wait to see the chest plate...and then the finished armor. SteveO Trooper Wraith I finally committed to the armour. I was too afraid to tackle the project, but I let my fear fuel the dark side, and so, here we are lol -
Sith Acolyte Armor - Mynock's build - Completed and 501st Approved!
Mynock replied to Mynock's topic in Sith Acolyte
Just finished the shoulder plates. Also working on the chest plate, which should be done soon! -
Sith Acolyte Armor - Mynock's build - Completed and 501st Approved!
Mynock replied to Mynock's topic in Sith Acolyte
Just finished my hand plates, cast in urethane resin. Build diary can be found on my website, herehttp://mynocksden.com/projects/sith-acolyte/sith-acolyte-hand-plates.html Also working on the chest plate and biceps, which are almost done. -
I do have a question regarding the following requirement: "A back piece may be employed and must align with the front piece." I started offering a back cap with the Imperial logo with my version 3 masks, which some people really liked as an option to having nothing on the back (for when having the hood down is desired). I'm now on my Version 4 mask, and though I no longer offer the old back piece, I still get a lot of inquiries about it. The reason I no longer offer the back cap is because I am reading the above CRL clause to mean that the back piece must join with the front to complete it to an enclosed-ish helmet. Am I correct in assuming that because my back piece is only a cap, it is in itself inadmissible? I have not seen any screen material that addresses the back portion of the helmet, so I am curious as to how this requirement came into being. Either way, whether my back piece meets the requirement or not is irrelevant to me (and my ego ) personally, since it was of my own design, having no basis at all in reference material. I would simply like some clarification so that I can better answer questions from those members of the community who would like one of my back caps with their mask for their 501st SA builds.
-
Thanks a lot! I know most people build the KOTOR version, but I figured I'd give SWTOR version a go. Now I'm toying with the idea of armour, though I must admit I am intimidated by the mere thought of all that sculpting lol. Here are a few more pix of another one I made with a slightly different colour scheme and weathering. The cold cast metal look really comes out nice in this photo. And the plain, anti-climactic inside:
-
Thanks. I make my molds thick and strong in case I ever need to reuse them. If there is interest, I am happy to offer the mask to others on a made-to-order basis.
-
(Posting this on my blog, mynocksden.com, and a handful of select community forums.) I will never forget the cinematic in Knights of the Old Republic when Darth Revan takes off his mask to reveal your character's face underneath. What an EPIC moment! That scene will forever be etched in my mind as the greatest plot twist in video game history. When the story of Revan was later continued with the release of Drew Kapryshyn's novel Revan and Bioware's new Star Wars: the Old Republic, I knew I couldn't put off tackling the mask any longer! So, I built it. As a few people have taken note, my passions lie mostly in making helmets and masks, so I have no plans to make the Revan's full armour at this time. *************** To start, I used my trusty old V1 Sith Acolyte Bondo Mold to use as a base, and used Sculpey to create a rough shape of the face. Realizing it would be easier to tackle the visor later, I filled this in, and continued to work on smoothing out the surface. Next, I threw this onto a baking tray and put the whole thing in the oven on 275F for about 70 minutes. While putting Sculpey in the oven is quite safe (and is exactly how you're supposed to cure it), in retrospect, I would NOT recommend putting anything Bondo in the oven. It stinks to high heaven and is actually quite toxic. I did it once, and will never do it again! Anyway, once the sculpt baked, I used an electric sander to smooth everything out. As Revan's mask looks to be made of layers, I decided to use some spare ABS sheets I had lying around to create the features. To make things easy, for each layer of detailing, I took a long sheet of paper, folded it in half, and drew half the design on it. I then cut the design out, unfolded the paper, and got a perfectly symmetrical cutout which I then traced onto a sheet of .06 ABS, and cut out with scissors. I then glued the first layer onto the cured Sculpey using superglue (which bonds really well to it, by the way), and proceeded to do the same fold-draw-cut-trace method with subsequent layers of the features. Next I needed to do the two little speakers (or whatever) at the bottom of the mask. I rolled up some sculpey, cured it with a heat gun, then cut two small pieces at an angle, and superglued two snap button (male ends) to make the speakers (or whatever). (At this point, the snap-button assembly had to be at an angle as in the above photo in order to face straight ahead on the curved mask surface. This will prove a needless set of steps when I later decide to alter the length and shape of the mouth/chin area). After cutting out more plastic pieces and supergluing them on, I ended up with this. Next, I applied some Bondo to fill in the transitions, sanding it down to create some smooth Bondo goodness. Next, I sprayed the whole thing with mold release, and over the course of 16 hours used two coats of Rebound 25 thickened with Thi-Vex to make the rubber mold. And finally, the first cast. At this point I realized two things: 1) the mask was a tad too long, and 2) the front chin section was curved way too much compared to the reference photos. I could have left it as is, but no: it has to be perfect! I cut off the chin, shortening the mask by about an inch. (I also cut out the eye slit just to see what it would look like, though I should have left this untouched for now). I used a little bench belt sander I just bought on clearance for $80, to shorten the bottom trapezoid, careful not to chew too far into the surrounding area. You may notice the curve of the cranium is slightly different from that of the Bondo Mold. This is because I used Smooth Cast 325 resin for this casting, which has a tendency to remain quite rubbery after demolding. This allowed me reshape the curvature of the forehead simply by bending and twisting the resin, thereby letting it harden to correct shape. I used SC 325 for this very purpose: it is a lot easier/cleaner/healthier to bend rubbery plastic into shape than it is to sand a pound of Bondo off a mold to reach the desired shape (which often requires adding more Bondo, more sanding, more Bondo, rinse and repeat). Next, I dremelled some more lines on the mask, filled in a few trouble spots with Bondo, and used a heat gun to curve out (or flatten) the bottom of the face. I then used a fresh pair of snap-buttons to add the speaker (or whatever) detail. I then used a progression of 120, 220, 400, 800, and 1000 grit sandpaper to smooth down the surface to get the thing ready for rubber moulding (again *sigh*). I used a piece of ABS to cover the eye slit from the inside, slapped the mask back on the Bondo mold (after busting off the original Sculpey-ABS master), and used a bit of Sculpey to fill in the gaps between the Bondo mold and the mask. I left the Sculpey uncured. Once again, using two separate coats of Rebound 25 thickened with Thi-Vex, I created a new rubber mold; using PlastiPaste 1, I then created the mother mold. Now I decided to try something I haven't successfully done before: cold casting. Cold casting is a process by which a fine metal powder is mixed in with resin, which upon curing, can be buffed and polished to a real metal look. I've seen it done before, and the effect is truly amazing - if done right, you cannot tell it's not solid metal! So, I acquired 5 pounds of 325 mesh aluminum powder and set to work! Using Smooth Cast 65D as the main medium, I measured out equal parts of part A and part B to about 3 parts of aluminum powder, and mixed it all in a red solo cup. NOTE: though the pictures show only 1 part powder, after snapping the photos, I quickly added two more scoops. I read somewhere that you can add as many as 10 parts of powder, though I didn't want to go that far. Anyway, I didn't have time to take a photo of this as I had very little time left to mix (as technically, the powder should be mixed into part B first, before adding part A). Also, a breath mask is crucial at this point, as the aluminum powder is extremely fine and can be easily inhaled. I dumped this mixture into the mold, smushed it around with my finger to drive out any bubbles, and slush cast the first layer. Since the mask only needs to look metal on the outside, the two subsequent layers were done using 65D without adding aluminum. The final cast came out quite nice. Next, some trimming and sanding, and buffing using #000 and #0000 steel wool, and the mask began to shine! Really happy with the way it turned out! Since the photo doesn't really do it justice, here is a video of the results. Lastly, I used some #000 and #0000 steel wool to buff the forehead, and a combination of various Testors paints to both paint the face and weather the cold cast-metal, and behold the finally completed mask! Thanks for looking, and happy crafting!
-
Sith Acolyte Armor - Mynock's build - Completed and 501st Approved!
Mynock replied to Mynock's topic in Sith Acolyte
Some people have asked about the fit, so here it is -
Sith Acolyte Armor - Mynock's build - Completed and 501st Approved!
Mynock replied to Mynock's topic in Sith Acolyte
Thanks guys. I'm starting the armor build now, but it will most likely take a while. I have so many fingers in so many project pots righ now, I'm surprised anyhign is getting done at all lol. Some great Acolyte builds happening out there. Always interested to see what others are dong. -
Sith Acolyte Armor - Mynock's build - Completed and 501st Approved!
Mynock replied to Mynock's topic in Sith Acolyte
From first sculpting the mask in Sculpey, to making the molds and casting in resin, to finalizing the paint job, the process took over a month. But alas, the mask is finally done, and I can now move on to making the armour! And an alternate paint job: -
Sith Acolyte Armor - Mynock's build - Completed and 501st Approved!
Mynock replied to Mynock's topic in Sith Acolyte
Thank you for the kind words. If you look at the first post in this thread, you can see how the design has progressed over the past year (hard to believe it's been a year!) I have updated my website with the production diary up to this point in the process, so I won't repost it all here. There are LOTS AND LOTS of photos and a pile of information documenting each step of the build that some may find interesting or maybe useful (to see what NOT to do, since I've made a pile of mistakes along the way!) I will be casting the mask in a day or two, once my shipment of silicone comes in. Will update the thread with photos then. -
Sith Acolyte Armor - Mynock's build - Completed and 501st Approved!
Mynock replied to Mynock's topic in Sith Acolyte
After a month of work, my new Sith Acolyte mask mold is nearly completed! Just a few things to touch up, and it will be ready for casting! I went to the drawing board and rebuilt the thing from scratch, incorporating some details that were not available to me previously. I sculpted it using Sculpey, then cast in in 65D resin, did more touchup work using bondo. Lastly, I pulled an ABS sheet over this to create a shell, from which I cut out the detailing as in my previous masks. There is now symmetry to the detailing so that left mirrors the right, whereas perviously I had different patterns in each quadrant of the mask. The detailing alone took a week to complete, and several more days to smooth out and blend in. Once I get my shipment of silicone in (which should be in a day or two), I will be able to begin casting, at which point I will move on to the rest of the armor! I will not be doing a different back portion at this time, and continue to use the one with the Sith Empire logo from my version 3 mask. I will be posting a full A-Z step by step production diary shortly. -
Sith Acolyte Armor - Mynock's build - Completed and 501st Approved!
Mynock replied to Mynock's topic in Sith Acolyte
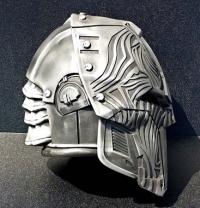
Another example of a completed version 2 mask. -
I have this completed mask available as we speak. PM me if interested.
-
Sith Acolyte Armor - Mynock's build - Completed and 501st Approved!
Mynock replied to Mynock's topic in Sith Acolyte
You will love your mask! -
Sith Acolyte Armor - Mynock's build - Completed and 501st Approved!
Mynock replied to Mynock's topic in Sith Acolyte
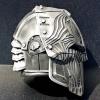
Version 2 (prototype) fit: Thanks! PM sent. PM replied. -
Sith Acolyte Armor - Mynock's build - Completed and 501st Approved!
Mynock replied to Mynock's topic in Sith Acolyte
Version 1 fit: Version 2 (prototype) fit: -
Mask now finished. PM interest; if enough interest exists, I'll do a run.