
-
Announcement
Welcome to the forums!
If you are a newly-approved member, make sure you check out the New Member Checklist!
If you are a Detachment member and can't see the member-only area, post here for access.
-DV
Yankee71
-
Posts
547 -
Joined
-
Last visited
-
Days Won
29
Content Type
Profiles
Forums
Gallery
Events
Posts posted by Yankee71
-
-
Are you trying to make this costume?

If you posted a pic, it might help others know exactly what you are intending on making.
-
When I was looking at costumes that interested me, that I could find a supplier for the parts I could not make myself, this was one of the options I had looked at.
Little did I know that so many things from MWA were not accepted by the 501st for this costume, and would have to be changed out.
Now I am really glad I went for my 1st choice, Starkiller hoth. I got all the hard armor parts also from MWA (I got his very last shoulder armor) and I did the rest myself, but I have to say for my costume, everything was in order, I can't complain, as his work is a lot better than other builders for my costume.
-
I should be done with Vest V3.0 in a couple of hours, if I can keep going to finish it.
The wife and the Honey-do-list cut into a lot of my time this weekend.
Edit: Nope ran out of time, and brain power.
The vest it self is done and half of the back plate closer looking thing.
I have to say I am a lot happier with V3.0, its the right cut and size, its lighter than V2.0, the back is made out of the same material as the vest so it looks better.
Just need to make the other half of the back, transfer the cord and boxes from the other one, and add some velcro, and its good to go.
I might finish it during the week if I find the time, if not it will have to wait till next weekend.
-
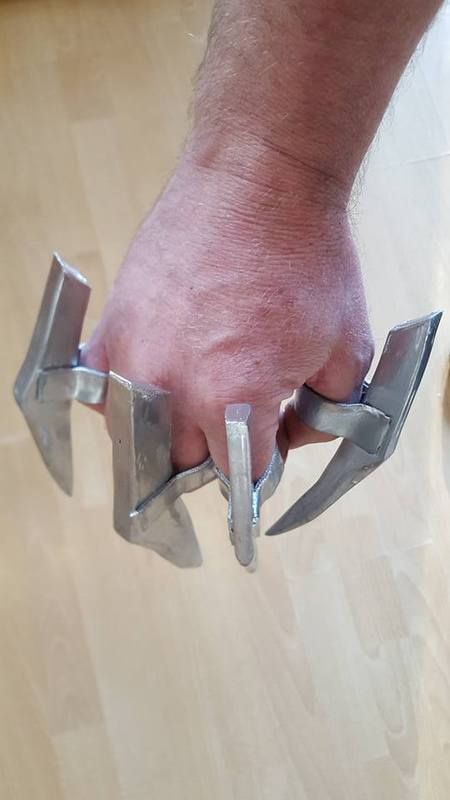
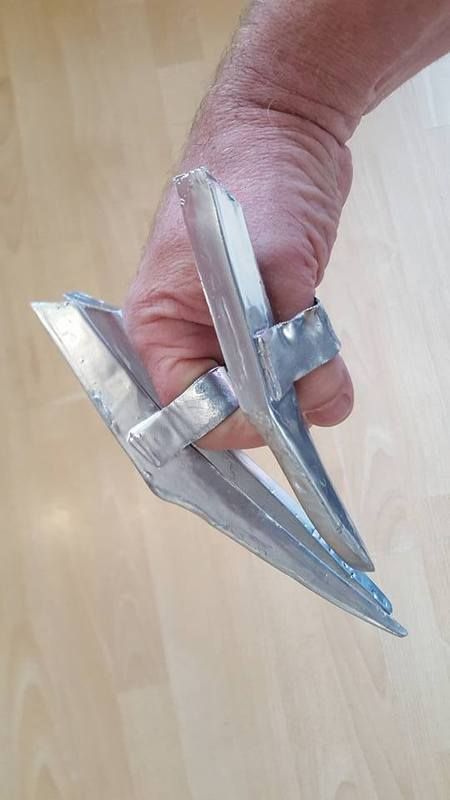
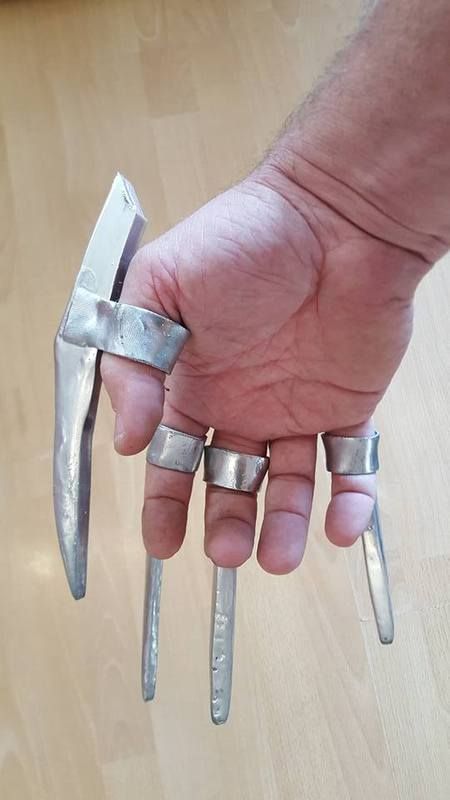
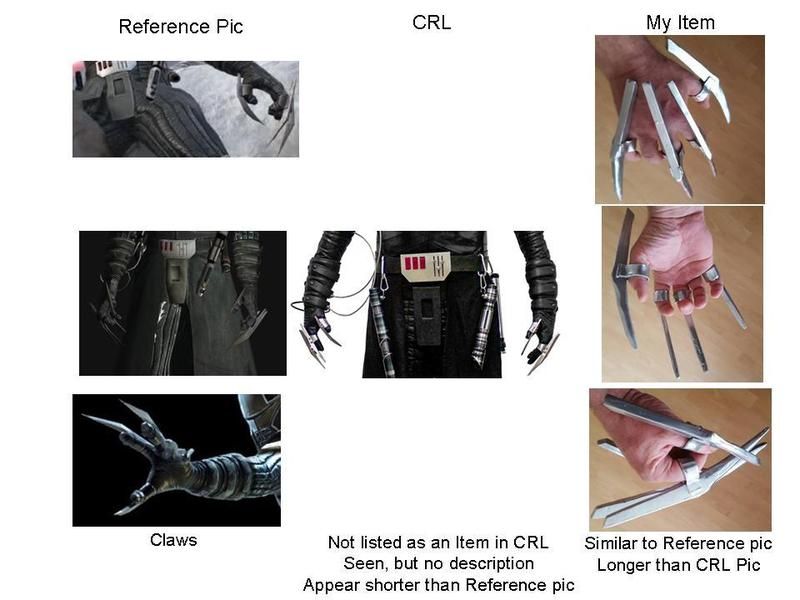
Claws V2.0, I took a bit off the back side to make them more accurate:
-
I can only see 1 pic (the 1 with the covertec wheel), so makes it kind of hard!
-
The last thing I heard was that my costume satisfied the minimum requirements and was sent forward.
Where it got sent to, I can only guess to some other part of the 501st or person in the 501st to look at and get more approval.
I am very new here, so I don't know any of the inner workings of the 501st or the Detachments. As its a rather large organization, I can only guess that it has complex inner circles.
This is all voluntary work, people have their own lives and jobs outside of the 501st, so I understand that this process could take days or weeks or even months.
That is why I am continuing on with bettering my costume, because that is what I planned on doing anyway lol.
Once my costume is approved, I will still be improving it and bettering it.
My plan for the foreseeable future is to make this the best version of this costume in the entire 501st. This is to be my only costume, and therefore I can focus all my time and energy into making it the best I possibly can. That will not happen overnight, as I also have a life and work, but it is a worthy goal to set. I have put out a ton of cash in making this costume, and I will probably be paying that off for the rest of this year, or maybe even into next year lol.
In doing this, I will also offer any assistance I can, in helping to better the CRL for this costume. Be that pictures of parts of this costume, or the entire costume, or descriptions of Items, whatever it is I can do to help, I would like to help if I can.
If anyone in this Detachment is trying to improve the CRL for this costume, and needs anything from me, just ask, and I will do all I can to help.
When the example people look to in the CRL when trying to build this costume or in judging this costume has so many mistakes, it makes it rather hard to make it or to judge it right. I have studied this costume exclusively, everyday, for the last 5 months. I have compared every part of the CRL with reference pics. While I feel pretty confident in my knowledge of this costume, my costume is not yet the best it can be.
I am a patient man, even if I am forming Costume OCD lol.
-
No word yet chris2706.
I am a bit of a perfectionist, so I may never be 100% done with this costume lol. When I find something that dosen't look just right with my costume, I start brainstorming how I can make it better. I am very busy with work M-F, so I only have time on the weekend to make changes, but I am starting to think I have costume OCD, because it really bugs me when I find something not 100% right with my costume. 95% is not good enough lol.
I really just wanted to get in the group to have more contact with those in my area, and then keep modifying my costume to get it to be perfect, but I guess the powers that be will let me in, when I have gotten to the point my costume has met the minimum requirements, for what they are looking for.
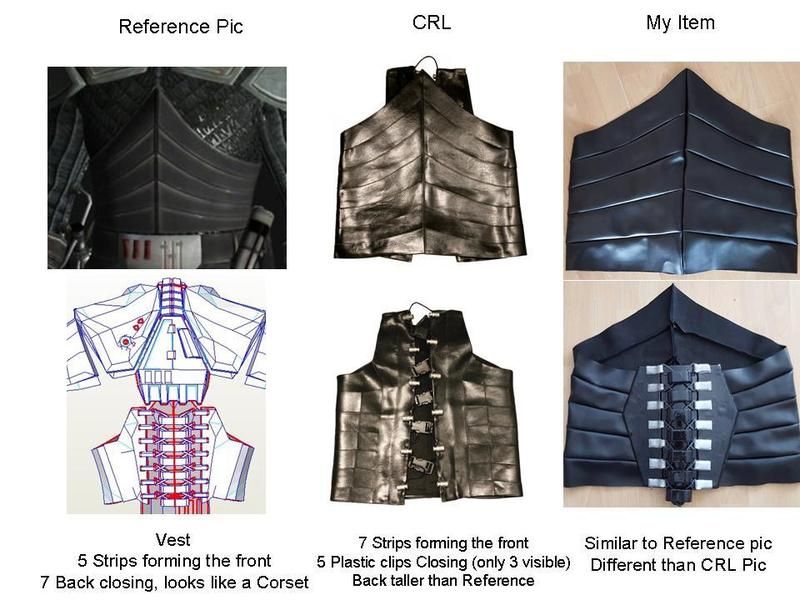
I am making a new vest V3.0 this weekend.
I am going to try and better copy the vest in my avatar pic reference the front of the vest. It is going to be shorter in height. I am going to make the individual strips of the vest more accurate to the picture.
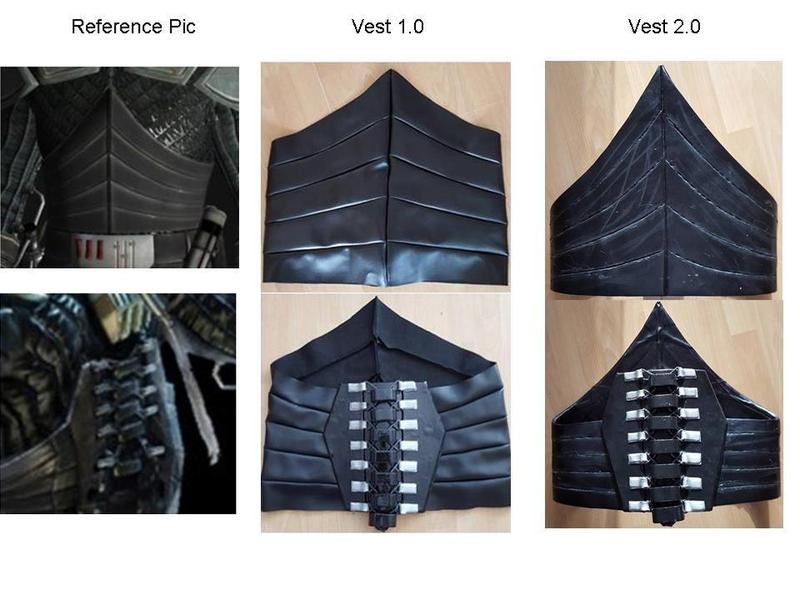
Vest V1.0 had the wrong cut and was 48 cm tall and was paper thin.
Vest V2.0 had the right cut and was 45 cm tall and was too thick and heavy. The top strip and bottom strip were correct, but the 3 middle strips were too wide.
Vest V3.0 will be half as thick as V2.0, the 3 middle strips of the vest will be smaller in the front, so more accurate to the ref pic. I have to put on the shirt and pants to take another measurement of the height the Vest will be, but I am guessing it will be roughly 40 cm tall in the front, so the height of the vest will be reduced by another 5 cm. V3.0 I am also going to incorporate the back plate into the vest itself, so it will no longer be an individual piece that sits over the vest, it will be part of the vest. For the closing of the vest that looks like a corset, I have a few ideas how to make it look accurate, yet be easier and quicker to put on, than having to have someone else lace up my back everytime I put the costume on, but I have not nailed down which Idea I am going with yet. I was also considering making the back look "Battle Damaged" as seen in one of the reference pics. I may make 2 versions of Vest 3.0, 1 being "Clone trooper Clean", and the other being scuffed up and damaged. I am still very new to the whole costume culture, so I don't know what my taste are reference clean or weathered look. There is also an extra stich to the back of the vest that someone pointed out to me here in Germany, so V3.0 will also include this extra stitch part.
I am also going to be cutting off about 2 inches off the back of the claws, as someone pointed out that mine are too long on the back side. I am happy when people point out things wrong with my costume, because I want to make it as accurate as possible.
-
As per all the pics I have seen here and elsewhere,
Belt and saber Hilts:
Level 2 Certification:
Darth Vader
Part of Darth Maul
Part of Kazdan Paratus Saber Pike
Rahm Kota
Galen Marek
no other trophy hilts are ever seen,
should be removed from the current list in the CRL:
Shaak Tijust my observation.
-
 1
1
-
-
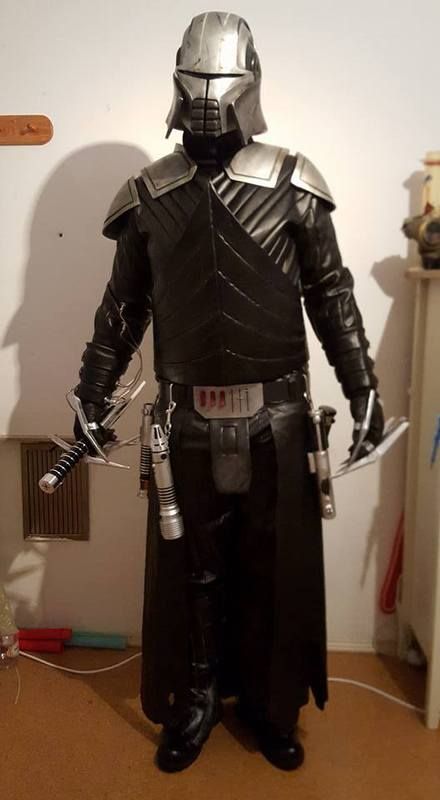
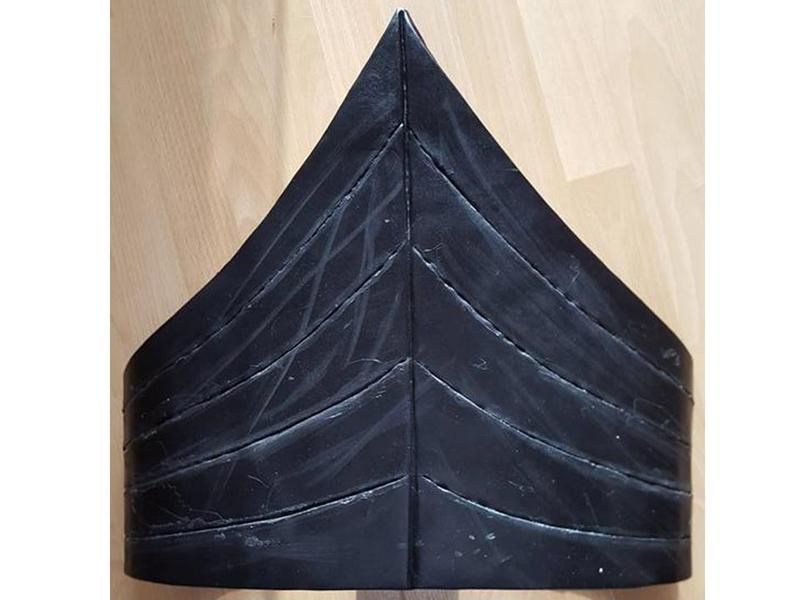
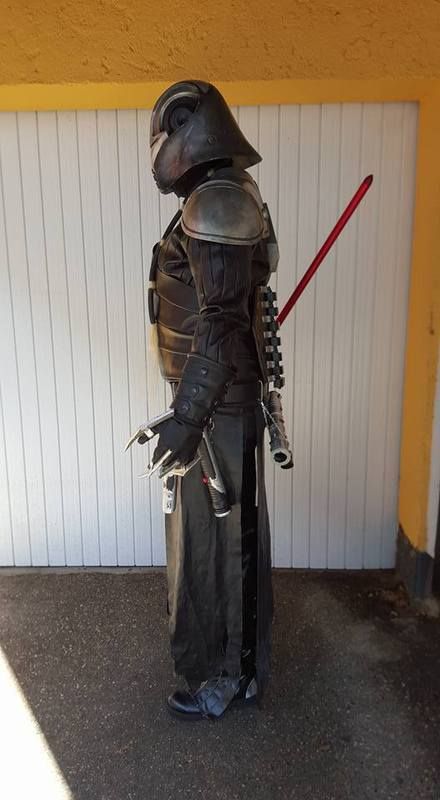
Just an update photo, this is what it is looking like with Vest V2.0
-
Good eye darthcashman, good catch.
After looking at the same thing for months, sometimes you become blind to something.
I was more or less only looking at the front part of the claws, and how far they should stick out.
I guess I will be making Claws V2.0, which is not a big deal, just have to cut a bit off the ends.
-
1
-
-
Looks amazing....I cant sew.
If you are a Revan fanatic, maybe you can answer a question I have about Revan?
Revan was my 2nch choice when trying to pick a costume to make, but I ended up going with Starkiller Dark Lord (hoth), which was my 1st choice.
Anyway, my question. When I was researching Revan, he either had his 1 or 2 lightsabers in his hand(s), or his hands were empty.
The question is, where are his lightsabers carried when they are not in his hands?
You never see them hanging on his belt from a D-ring or covertec wheel, so where is he storing them when they are not in his hands?
Only guess I could make was they were on his back, since that is covered.
But i'm still curious,
-
Well this is my new hobby.
Once my costume is accepted, my plan is not to stop there or make another costume, but rather keep improving on this costume, till I cant think of anything to do to better it anymore.
If I just say I am done, then I would have nothing to do between troops lol.
Things I plan on improving on this costume in the near future:
Making a Vest V3.0, where the back of the vest is connected to the vest, and actually ties up like a corset in the back, so making it functional and even more real.
Getting the lvl 2 Cert for the lightsabers, having all the correct named lightsabers on the list (still waiting to hear if Shaak Ti Lightsaber hilt will remain on the list or be removed).
Making the Spine (neck armor).
Putting a leather wrap on my lightsaber hand grip.
Getting a cooling system installed in my helmet.
Getting a voice modulator, that will make my voice sound more star wars starkiller like.
and once that is all done, I will probably have looked even harder at this costume, and found something else I can improve on lol.
My wife just doesn't want to hear another word about star wars, my costume, and I am not allowed to take over the living room with my costume work anymore lol.
The Struggle IS real...lol
-
Thanks for the sharing of knowledge.
Your pics look amazing.
Yeah the pvc plastic is black, comes in sheets, and is very thick and strong. I guess the best example for what it is really used for is a pool or pond liners, or what you lay under plants, when you don't want weeds and grass to grow up between the plants..
Also if you are a fan of heat guns, you could melt it over solid objects.
I think I am going to get more glue and fake leather on Monday, and do a new outer look again, and this time make it "Clone Trooper New", because it really looked amazing, before I scuffed it up, and I want to go back to that look, as that is more to my taste.
-
V1.0 Total cost €113. Total time 3 weeks (tailor made)
I always start out with paper lol, for the cut out. V1.0 was 48 cm middle, 27 cm ends
V1.0 was just fake leather taken to a tailor (I cant sew) with the paper cutouts, and then they sew it together.
On Paper V1.0 looked right, but once you wrap it around your body it was just too straight edged and paper thin, but it was strong, but felt like nothing.
Here is the kicker
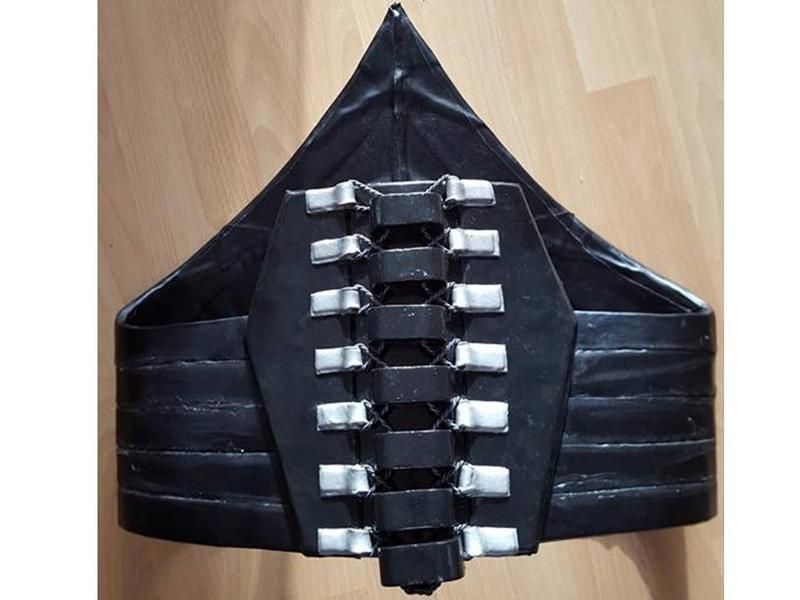
V2.0 Total cost €43. Total time 18 hours (self made)
V2.0 was 45 cm middle, 17 cm ends, and 18 cm in from each end I made 15 cm, because the vest always seem to look like it dips lower on the sides, but then it comes back up again.
It looked really way to pointy when I 1st made it, but once you wrap it around your body it looks right.
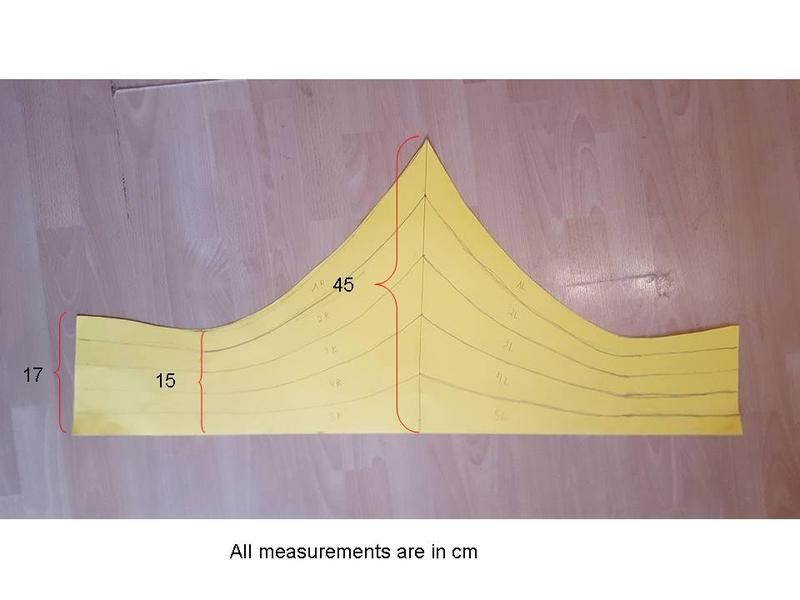
Then I cut out 1mm thick PVC plastic and Linoleum, in Complete and individual strips.
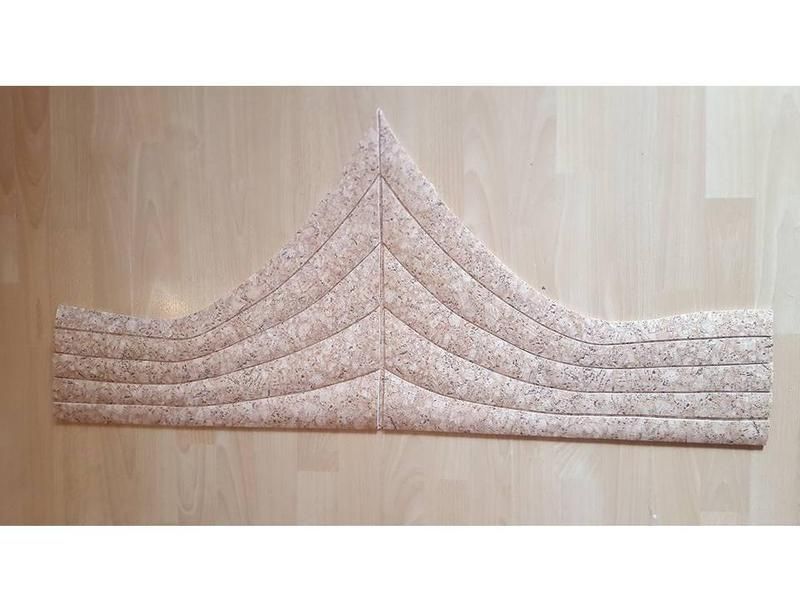
The layers went from outside to inside: Fake leather, PVC Plastic strips, Linoleum strips, PVC Plastic base, Linoleum Base, Fake leather. (with glue between every layer).
I would guess it is 1-1.5 cm thick, but I have not measured its thickness.
Then I cut off 1 mm of the inner and bottom edges of the strips, which made spaces between for the "Ribs".
It looked really really clean and beautiful, before I scuffed it up. Not sure I am happy with the weathered look, I think I am more of a "Clone Trooper New" lol
To get it back to Clone trooper new, I just need another piece of fake leather and some more glue (€17 and about 1 hour time), so not a big deal if I want to change it back.
V1.0 was garbage in comparison to V2.0 and cost about 3 times the price. Even if V1.0 had the new cut, I am still much happier with the way I built it this time as it is strong, yet still soft to the touch. There is also the satisfaction of doing something new all by yourself, and having it turn out wonderful, why I was a bit sad when I had to scuff it up lol.
-
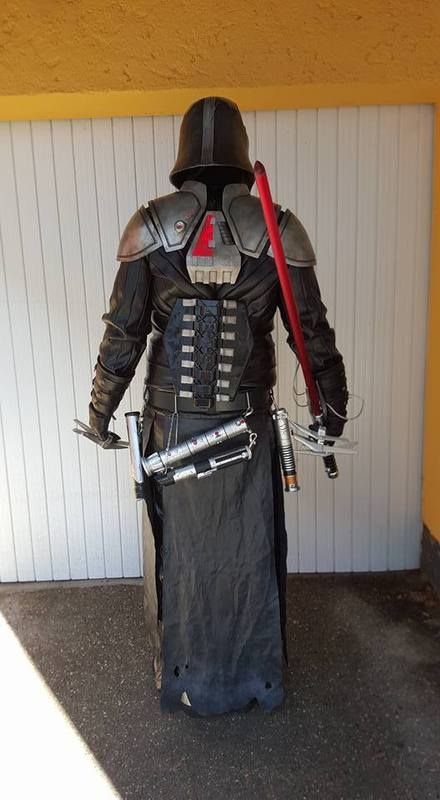
I redid my vest for my dark lord's armor (hoth) costume.
The old Vest was the wrong cut, too high in the back, The back plate didn't line up as it should, was paper thin, looked brand spanking new out of the box.
Someone commented on my costume, that it looked "Clone Trooper New", as in going into your 1st battle, and your armor looks clean as a whistle. lol
So I made a new vest, made the right cut, right height in the back, the back plate lines up as it should, thick and more stable.
Oh yeah and I scuffed it up so it doesn't look "Clone Trooper New" lol
What do you think?
-
-
So, what do you all think?

-
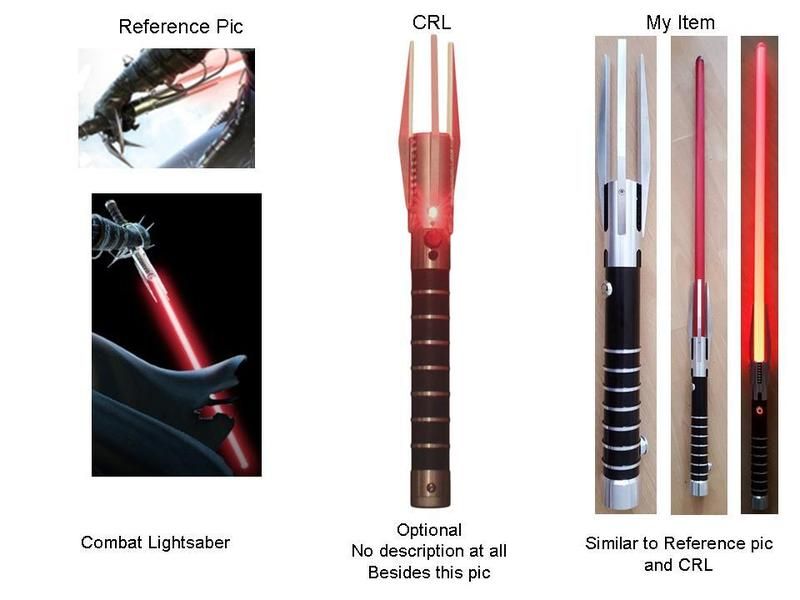
Lightsaber:
No description whatsoever besides a pic.
Possible Description:
- 3 long spikes at emitter end.
- 3 cutouts in the emitter, between the spikes, showing black and silver stripes.
- Black saber body with 7 silver rings.
- Silver Pommel.
- Lightsaber is usually held backwards in his right hand.
- When saber is not in his hand, it is hanging in front of his right leg on a covertec wheel.
- A leather (or leather like) wrap can be put around the area where he holds the saber.
- If a Blade is used, it is always Red.
-
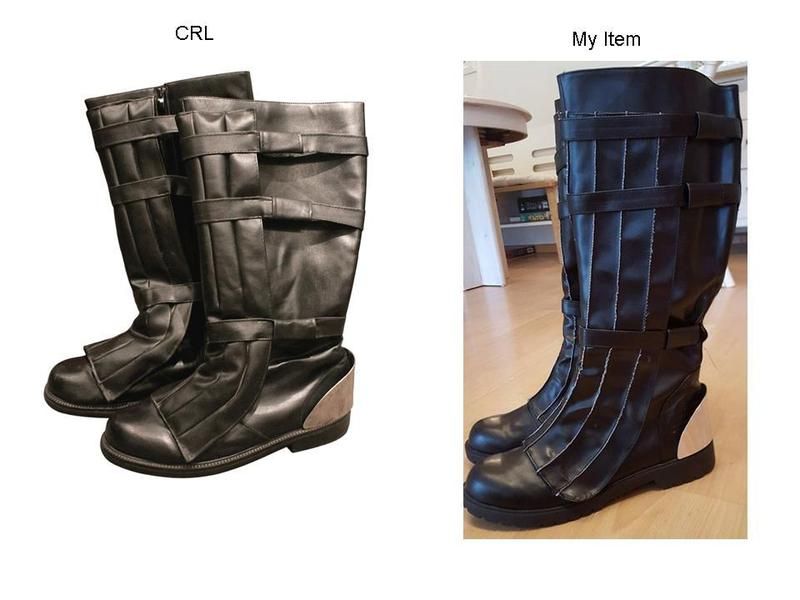
Boots:
I went with what the CRL has.
-
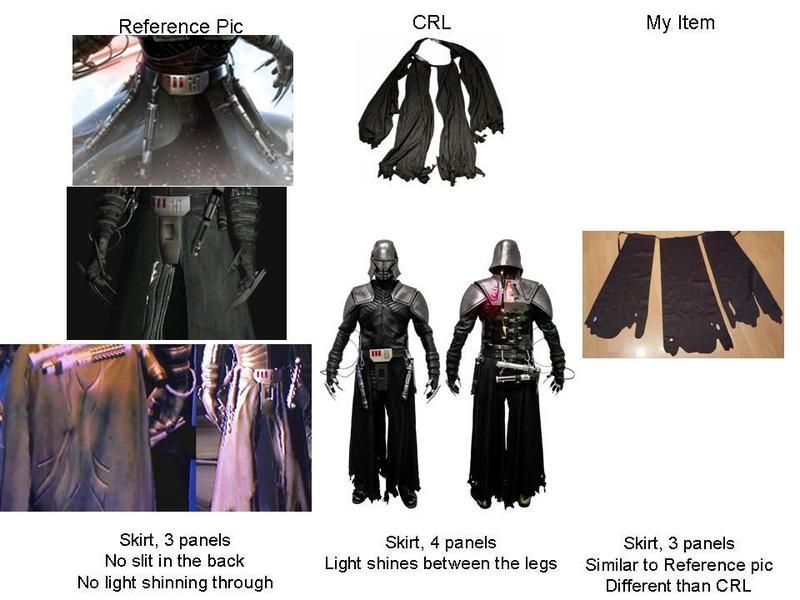
Skirt:
CRL says made out of 4 panels.
I made mine out of 3 panels as it appears in the reference pics.
-
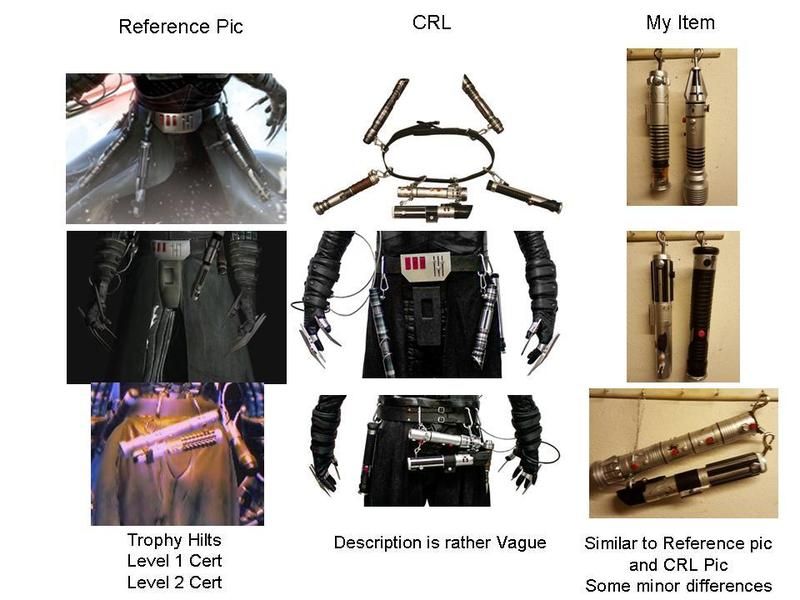
Trophy Hilts:
Level 1 Cert:
CRL has a very Vague description.
No number of sabers to be worn.
No Type of sabers to be worn.
I took this to mean any 5-6 saber hilts as trophy's would qualify for Level 1 Cert.
In the Reference pics you only ever see 5 Trophy Hilts.
Always the same 5 hilts, just sometimes those on his right leg and back side are in a different order.
His left leg is always the same 2 hilts.
Sometimes his combat saber is in his hand, sometimes it is hanging off his belt in front of his right leg.
In the top reference pic all the Trophy hilts are hanging down off of snap links. Vader and Mauls sabers in front of his right leg.
In the middle Reference pic there is no hilt in front of his right leg, The sabers appear to be hanging off of Covertec wheels, not links.
In the Bottom Reference pic Darth Maul and Darth Vader sabers are hanging laterally on his back side, with the emitters facing left, the rest appear to be using covertec wheels..
The CRL Limits us to mounting the lightsabers with "Metal snap links",
I would argue Covertec Wheels were also an option.
Most pics look like covertec Wheels are being used, with only a few Pics showing the "Metal snap links".
The CRL also shows the Vader Maul emitters facing right, not left.
I would suggest 2 different options for hanging the sabers, and several different orders.
Level 2 Cert:
The CRL has 6 specific sabers listed.
I know that he fights Shaak Ti in the game.
I can find no reference pic anywhere showing Shaak Ti hilt hanging off his belt.
I would suggest that the are only 5 Trophy hilts, plus his combat hilt he sometimes wears on his belt, not 6 trophy hilts plus his combat saber.
I would suggest removing the Shaak Ti hilt from the Level 2 Cert, unless someone can find a reference to it somewhere, because I cant.
I am going for Level 1 Cert at this time.
I have 6 random sabers, even though I believe the number to only be 5.
I also have his combat saber. I planned on hanging off my right leg, with a covertec wheel, when it is not in my hand.
I will be going for the Level 2 Cert in the near future.
I would rather not have to make the Shaak Ti Hilt, if it is not actually part of the costume.
If it is part of the costume, then I have no problem making it.
-
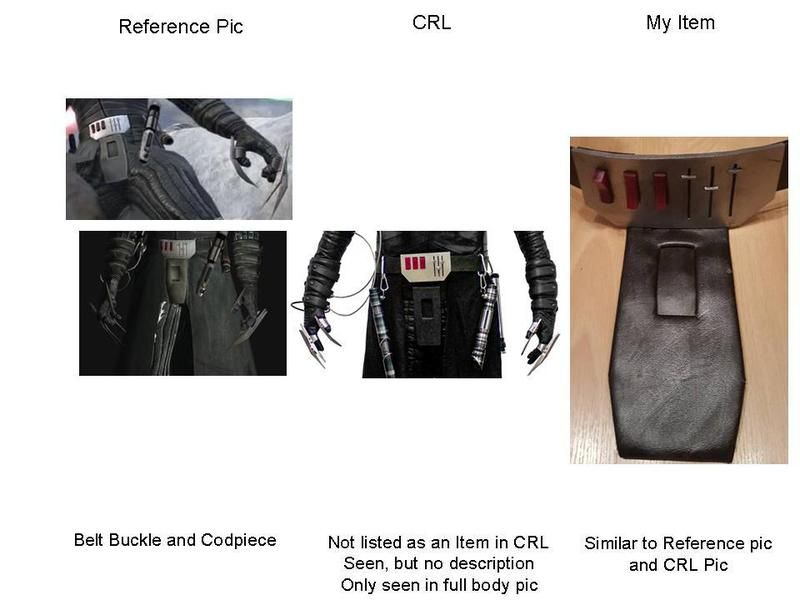
Belt Buckle and Codpiece:
Not listed as an Item in the CRL.
Seen only in the Full body pic in the CRL.
No description in the CRL.
Possible Description:
- Metallic Belt buckle with 3 red switches and 3 gray levers.
-Codpiece is made of rectangular leather (or leather-like material) with a Rectangular indent that hangs below the Belt Buckle.
-
Vest:
Reference Pics differ from CRL
In addition to the description in the CRL, I would suggest saying: -The Vest is made out of 5 Parts or strips.
-
Claws:
Not listed in the CRL as an item.
Seen only in the CRL in the Full body pics.
No description in the CRL.
The reference pics are longer than those seen in the CRL.
Possible Description:
- 8 Claws, metallic in color,
- Worn on all fingers and thumbs, except for the ring fingers.
- Index finger and middle finger claws are longer than those of the thumb and little finger claws.


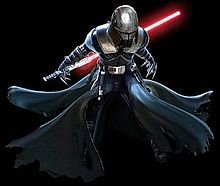
Starkiller Dark Apprentice
in Starkiller
Posted
Looks like a combo of Darth Vader mixed with Darth Malgus. Be an interesting build.