
-
Announcement
Welcome to the forums!
If you are a newly-approved member, make sure you check out the New Member Checklist!
If you are a Detachment member and can't see the member-only area, post here for access.
-DV

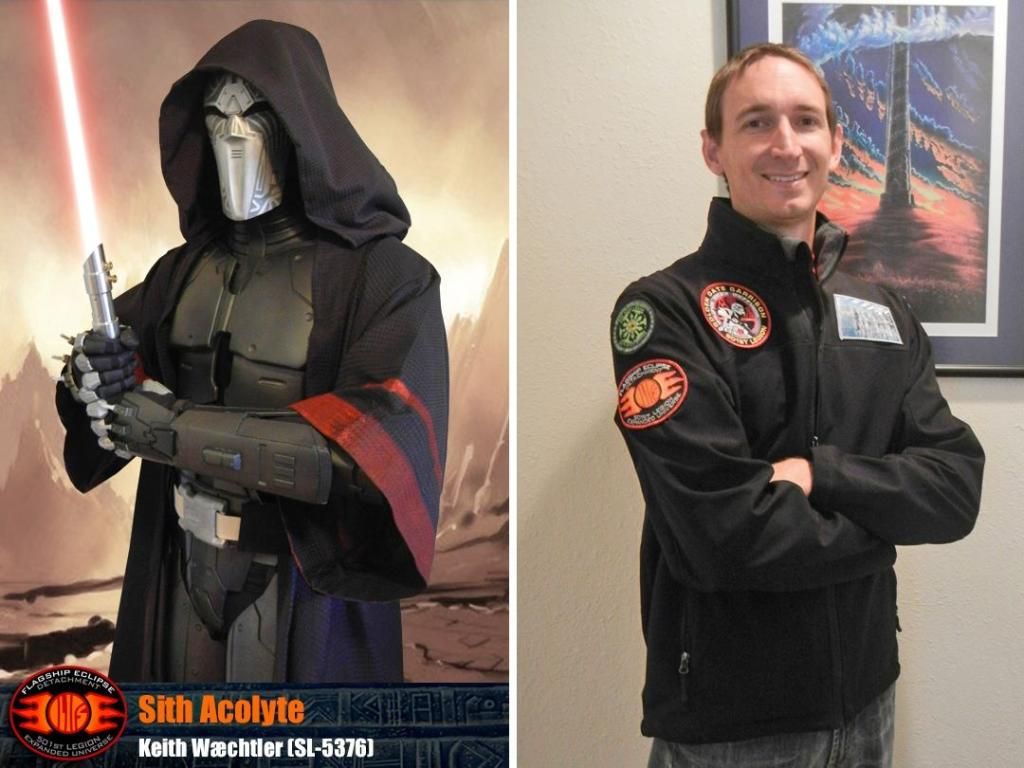
TK Keith
-
Posts
336 -
Joined
-
Last visited
-
Days Won
16
Content Type
Profiles
Forums
Gallery
Events
Posts posted by TK Keith
-
-
I don't know a lot about this costume's requirements, but I think it looks really good. What materials did you use and how long did the build take?
Thanks for sharing the pictures!
-
Nice job Keith! When are we gonna get the SL bros together?

Celebration for sure; I will have to keep my eyes open for a troop I can make before then.
-
Wow, looks awesome man
Thanks a lot! It was a long, long process since I ended up building two different acolytes, but I am really happy with how it turned out and I am proud of my perseverance with completing the build.
-
Thanks so much
You're welcome. Be sure to update us along the way, we love build threads and progress updates!
-
That's really really cool! I am impressed by your skill; I have no talent in this area. Keep sharing your pics and good luck with your build. It's so fun to start a new project!
-
Congratulations on your approval. Your costume looks great!
-
Thanks for sharing your pictures. It's great to troop in the costumes we work so hard to create!
-
 1
1
-
-
It is really cool to see all of your work together. It is looking great!
I've lost track of which pieces are cold cast aluminum vs resin. I am curious- how heavy are the aluminum pieces compared to say, if they were ABS?
Once again, what a beautiful job! (And I still love my version 2 mask!)

-
Yup I know it is discouraged but I have the impression that it was only discouraged because of the lack of details, and how the TOR Jedi is not consistent with the TOR sith in some details like the cod and gaunts.
Kevin B's gaunts were too long for me so I got the KW gaunts along with the handplates as it fit me better.
Hope the additional missiles and deeper groove lines that I am planning to do will make it detailed enough to be approvable. I think that the word "discouraged" becomes a stigma to not get the kit and do your own modifications and have fun with it. So far in my opinion,based on the CRL I got:
"Forearm Armor
For 501st approval:
Must be fully-encased gauntlets ( check
 ) complete with the appropriate greeblies consistent with available references. (double check )
Must be painted a metallic grey that is weathered in a pattern consistent with the rest of the armor.(will do)
The use of TOR Jedi armour is discouraged " (just this
 )
)Thanks for the heads-up!
I definitely hear what you are saying and I hope it works out for you! Your build looks like it is coming along well, and I like the way you constructed your boot armor.

-
Some updates... Ordered the rockets from maynock and they fit perfectly on my kwdesigns gaunts!

Are those the same gauntlets that are shown in the pics from your first post? Your kit in the first post looks like the Kevin B armor, but as you said here, these gauntlets are from Kevin W's "TOR Jedi Armor."
The way the CRL is written right now, the TOR gauntlets are "discouraged" which I believe is the same thing as saying they won't be approved. On the other hand, the Kevin B gauntlets could very well be approvable; I don't know if anyone has gotten the Kevin B armor approved yet.
Good luck on your build!
"Forearm Armor
For 501st approval:
Must be fully-encased gauntlets complete with the appropriate greeblies consistent with available references.
Must be painted a metallic grey that is weathered in a pattern consistent with the rest of the armor.
The use of TOR Jedi armour is discouraged "
-
hello my name is Maxi and I am from Argentina Buenos Aires !!
I'm working on a sith armor acolyte too !!
and oregunta is: where I can buy Sith neck for my armor?
from already thank you very much for your time !!
your armor is excellent
Thanks for the compliment! I will send you a PM.
-
Both "6925" (Wolfgang) and Mynock have created beautiful armor. You should contact one or both of them about their options.
-
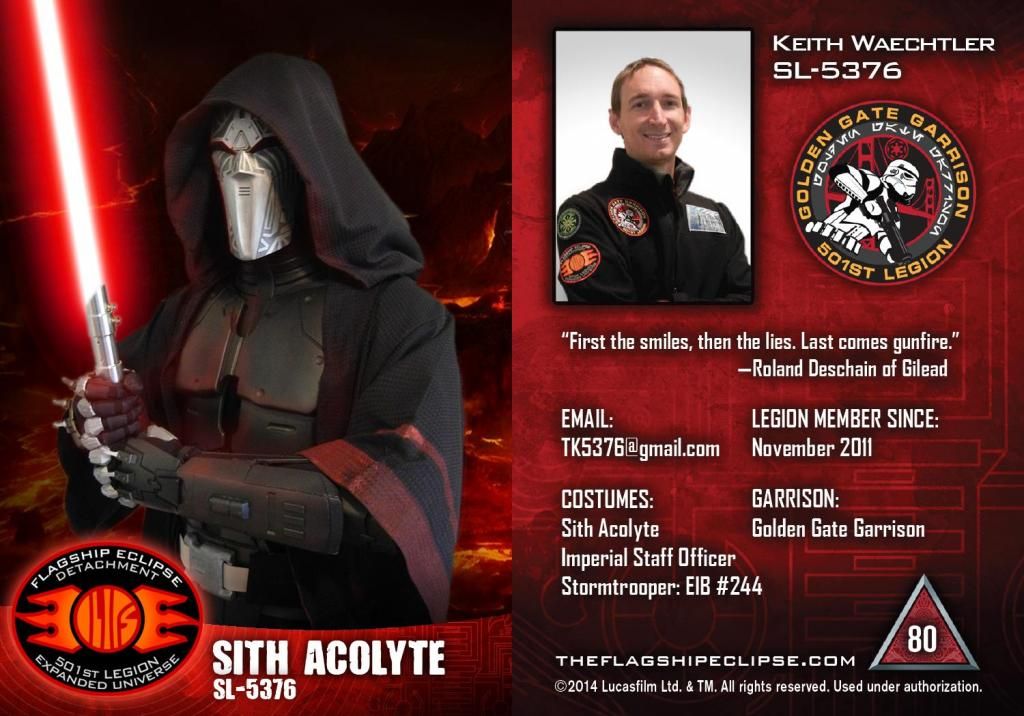
The SL merchandise
Once my Acolyte was approved, I wasted no time in getting my TFE patch sewed onto my patch jacket. Thomas Spanos reached out to me about putting my pics on the TFE Facebook page, but it took me a while to get the right pictures to send to him. I was really happy to see them get posted on the group FB page though.
I was also extremely excited when the Sith Lords Detachment started producing more trading cards, and I immediately sprang on that opportunity. Michael Capell and Chris Greene did a great job turning my images into an amazing card.
-
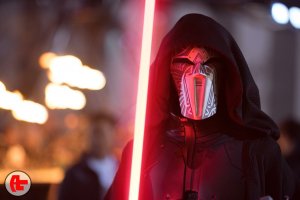
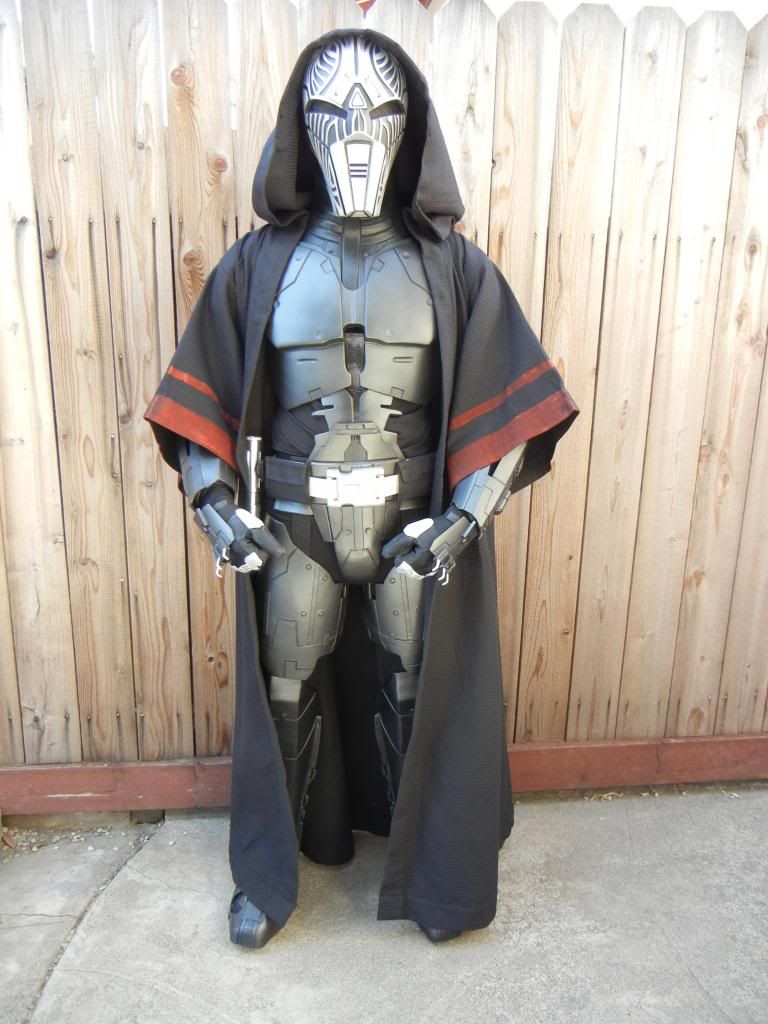
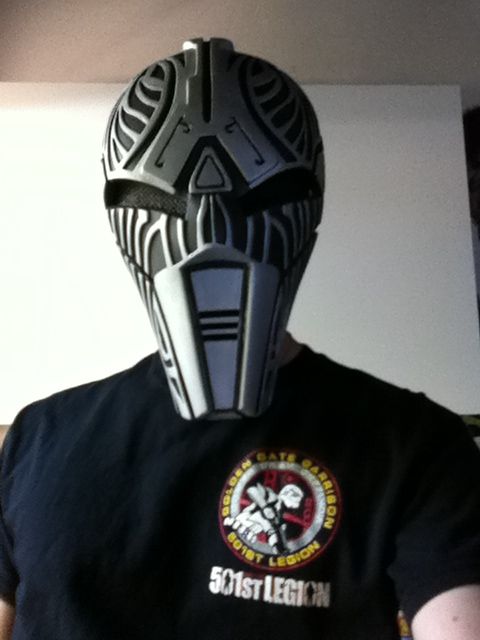
First Troop
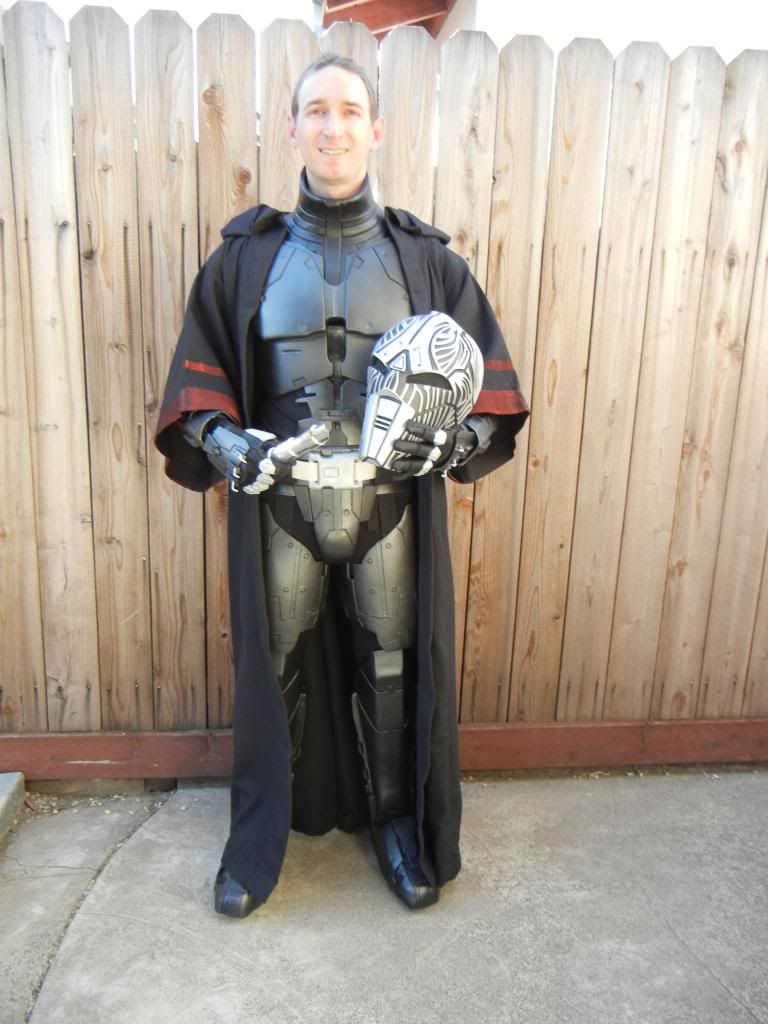
My first troop in the Acolyte was at the Marin Country Fair in July. The day before the event, I did a fair amount of trimming to the toe armor in order to prevent them from clacking around when I walk. This was a little stressful because I was afraid of trimming too much, but in the end I just went for it and took off around half an inch in some places while having the cut follow the bottom edge of the boot sole. I was pleased with the results: looks good and no noise when I walk.
I trooped with it one two separate days at the fair, once with the Wolfgang mask and once with the Mynock mask. I actually like the Mynock mask a little better even though the paints are a little different. I think it is a little slimmer and looks a bit more balanced. I was very pleased with the appearance of the armor and was excited to finally be able to troop in it!


-
June 20-July 2
Playing the waiting game. Sometime after I submitted the approval pics to my GML and requested that he pass them along to the LMO, the CRL was changed; now the Sith Acolyte could be approved by the GML. It took me a little over a week, but when I realized the change had been made, I emailed the LMO and asked him if he wanted to look over my application, or if my GML should do it. He told me that my GML could do it, so I emailed him to let him know it was okay to proceed.
July 2
I was on vacation with limited internet access when I finally got the news…
Hello Keith,
I am writing on behalf of the Golden Gate Garrison of the 501st Legion to officially thank you for your additional costume submission.
I have reviewed your photos and I am pleased to APPROVE your Sith Acolyte (SL) costume.
***Your photos will be processed by the Garrison Website Liaison and then uploaded to the 501st and GGG websites.
I am now a SL; woo-hoo!!!!!
-
June 20
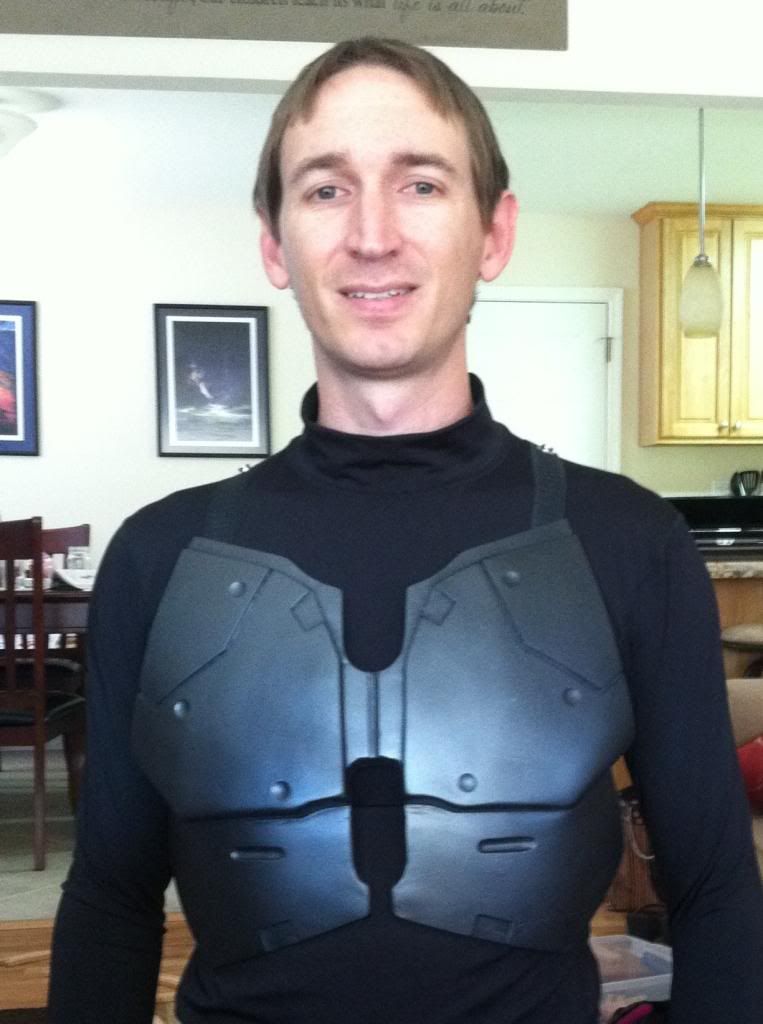
Finally- it’s time to take the submission pictures! The whole family got into the act: my mom babysat the kiddos, my dad acted as a handler and kept an eye out to make sure all of the pieces stayed in the correct spot, and my wife took the pictures. It was really fun to wear everything at the same time. I noticed that my robe was cooler than I had anticipated, even in the summer sun. After the pictures were taken, I reviewed them before taking off the armor just in case we needed to reshoot any of the pics. The last step was to send everything to my GML and request that he pass things along to the LMO. And then the waiting began.

-
Week 6:
June 16-17
After a few days off and with everything basically ready to go, I decided to test out all of the pieces together to see how things worked. There were a few final touches that needed to be taken care of:
• My dad helped me add some padding to the shins to help them look balanced around my legs
• I added some black tape to the shin magnets to help keep them in place when they are trying to attach to each other. (I still need to improve this attachment method. I am planning to roughen the magnets with some sandpaper to give the glue more of a surface to grip to, and will use a stronger glue to attach the magnets to the shin armor.)
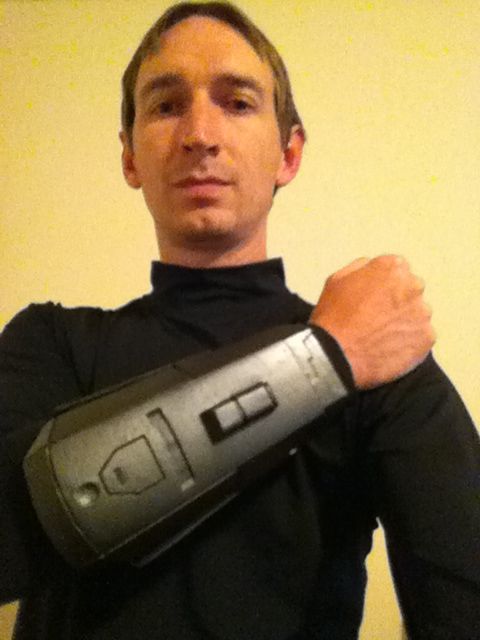
• I added some padding inside the forearms. I can squeeze my arm into it fairly easily, and once they are on, I have a little bit of cloth padding that I insert to take up the extra room and prevent them from sliding around on my arm.
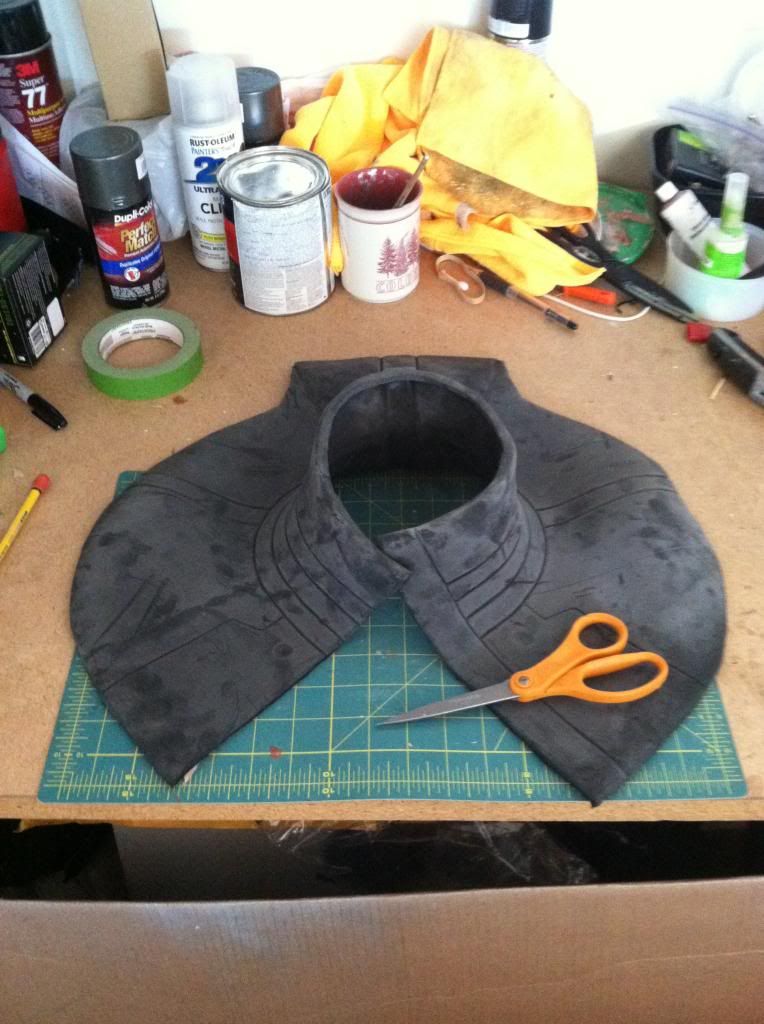
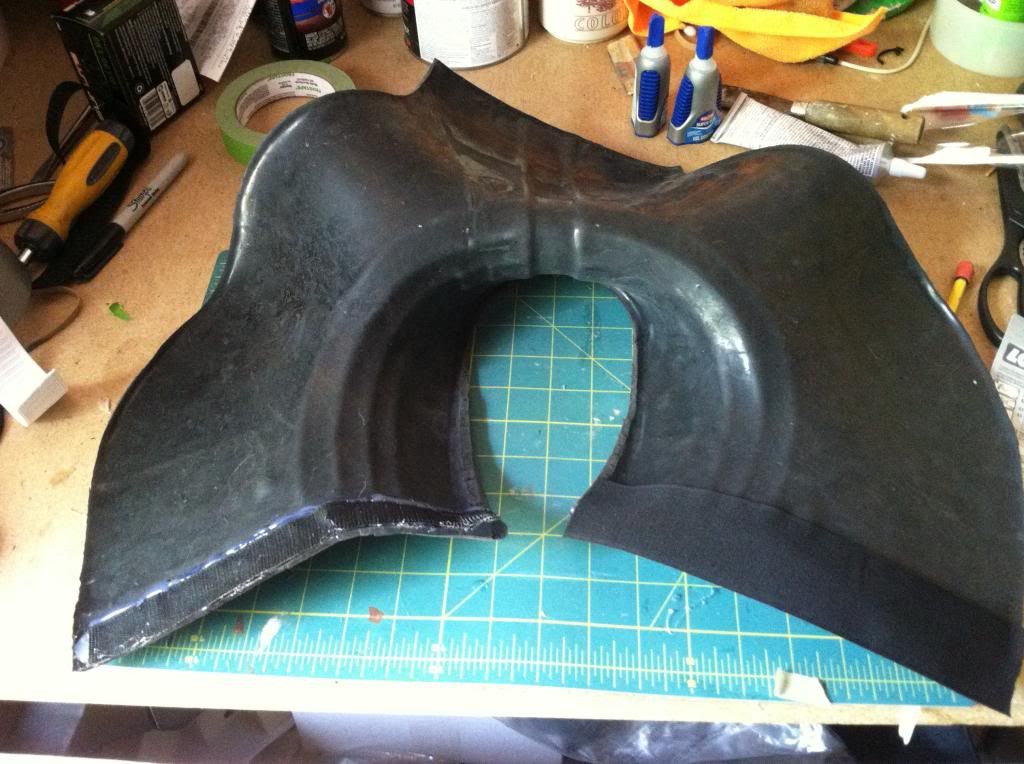
• The Loctite used to attach Velcro to the neck seal isn’t perfect- the Velcro has a tendency to pull up at the edges when taking it on and off. My solution was to run a thick bead of hot glue along the edge to help keep the edge from peeling up.
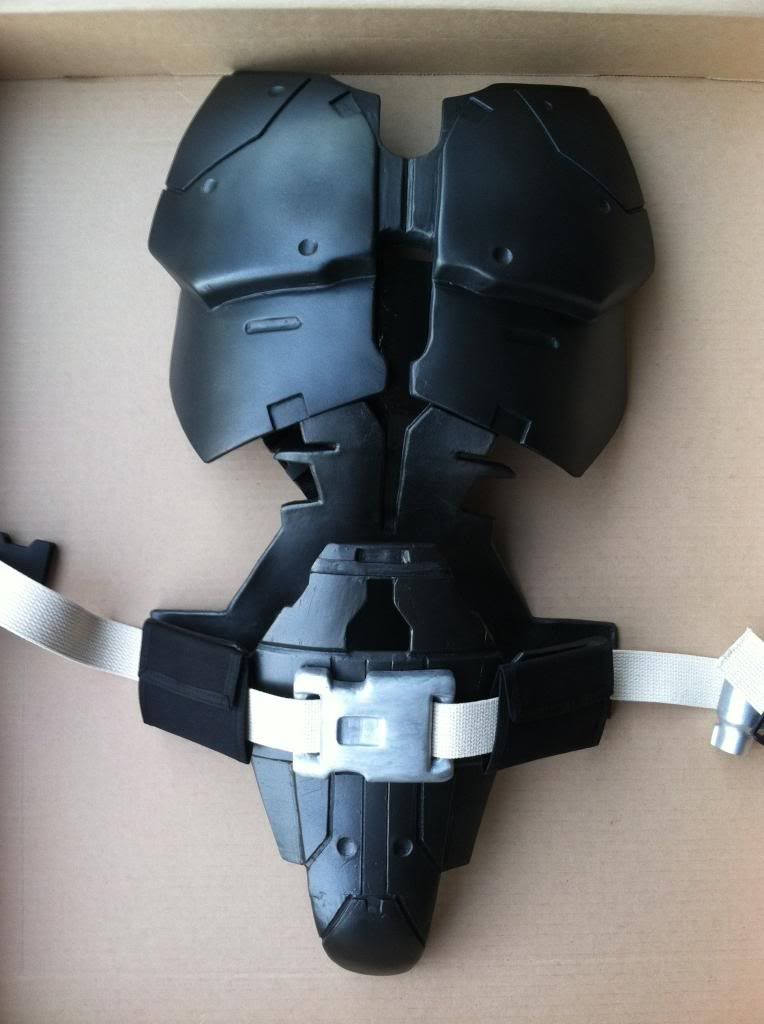
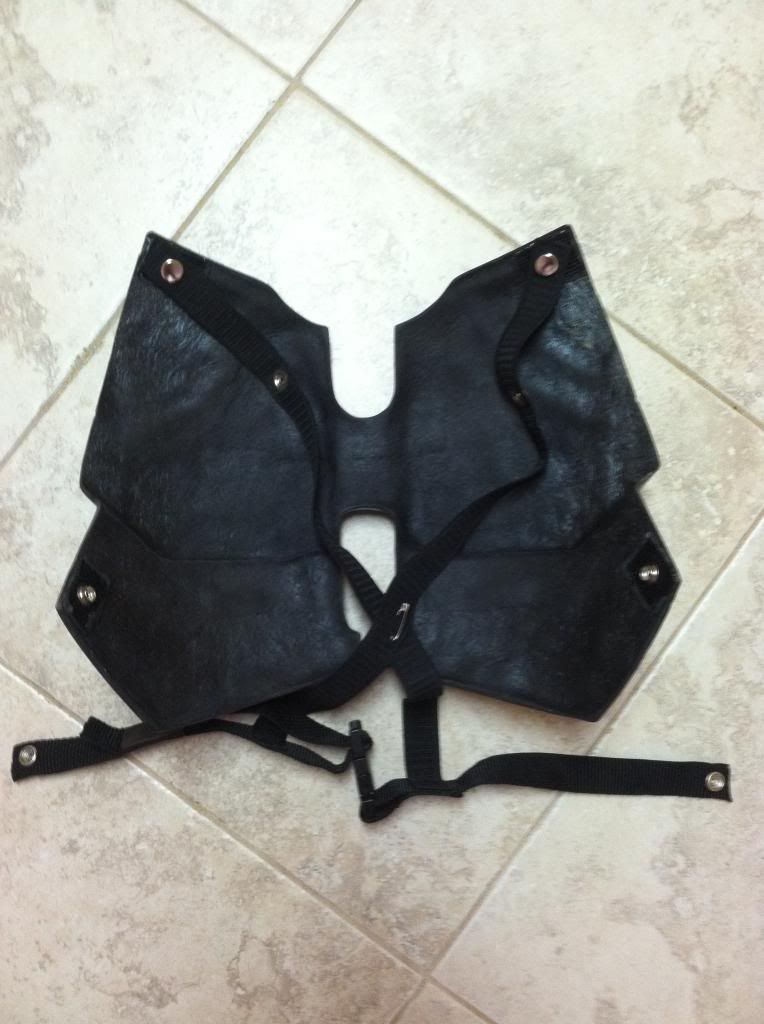
• The final step was to attach snaps to the bottom of the latex midsection to correspond with snap pieces on the underside of the ab piece. I used snaps because I wanted to make sure it attached to the same spot each time. I secured the top of the latex midsection underneath the chest armor using Velcro. I plan on leaving these two pieces together all the time, but I want the ability to separate them if they ever need adjusting.
-
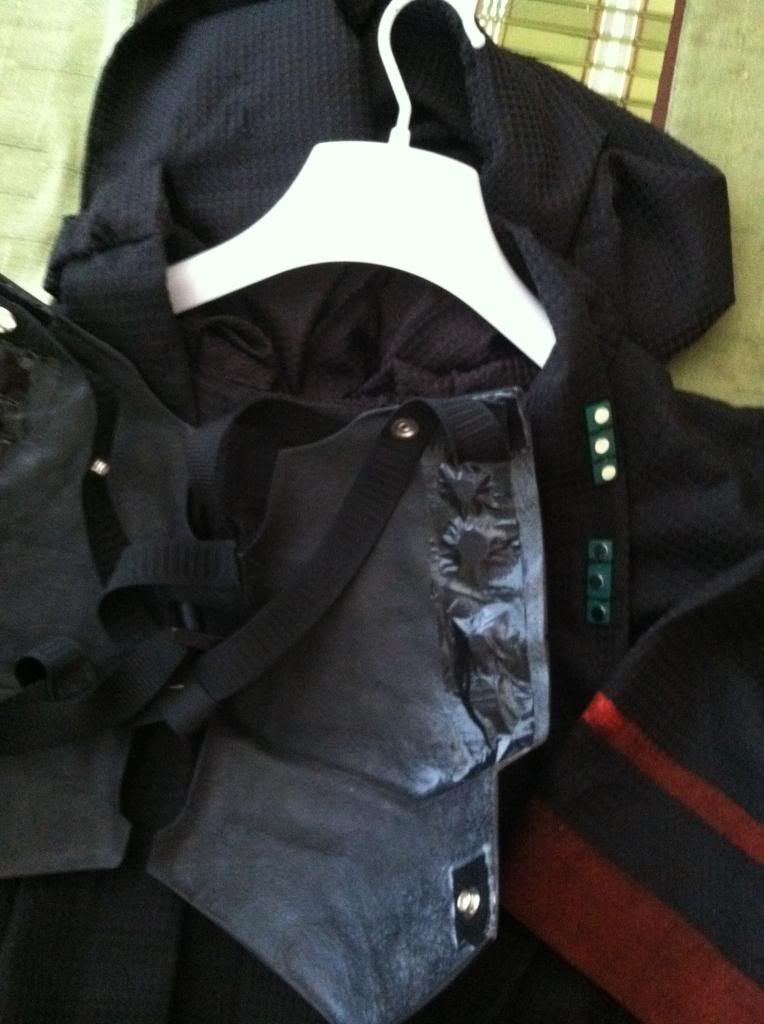
June 12-13
I set up the shoulder bells with straps that would connect to the chest harness assembly- very similar to my TK build. Then my mom helped me sew name badge magnets into the chest of the robe which will attach to magnets under the armor and help keep the robe in place. I don’t recall if this was my idea or someone else’s, but it works great!
-
June 11
Happy Birthday Mom!
I salvaged the chest strapping system from my previous build and placed new snaps on the chest armor that would align with the snaps in the chest harness. Then I went to my mom’s birthday dinner.
-
Week 5:
June 7-8
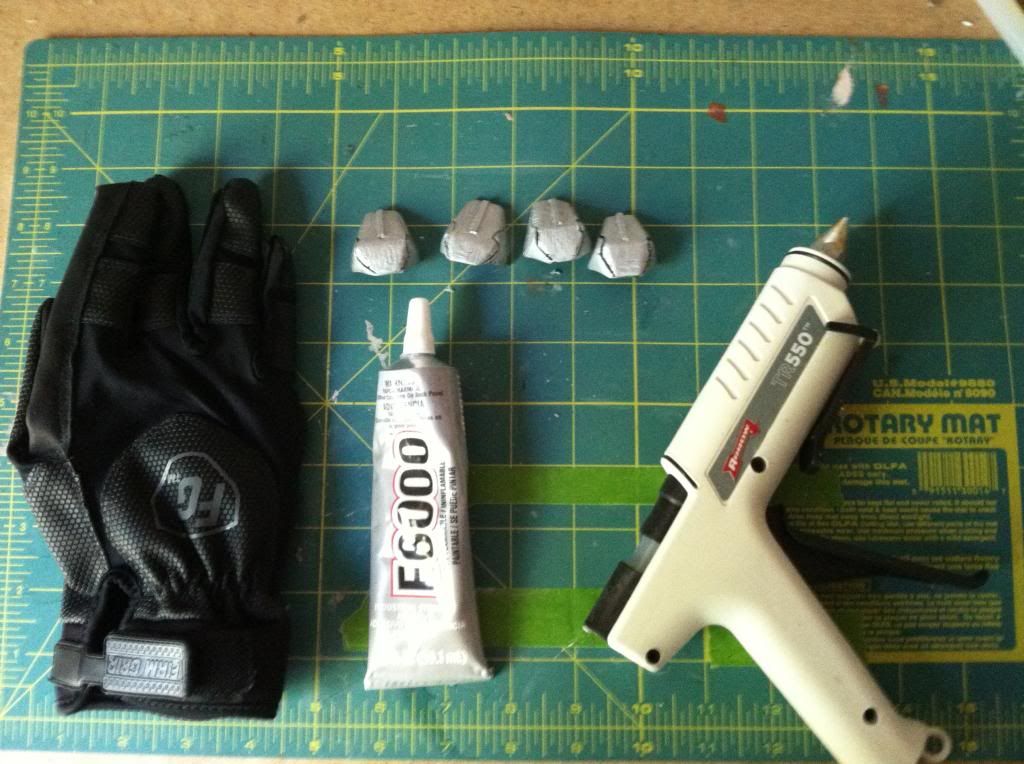
With most of the armor done (or close to it) I decided to tackle the latex neck seal. Again, Dan B was a great help and sent me several pictures showing me how he attacked the neck seal. First I cut along one of the back seams to open it up. Then I attached Velcro to the underside of both edges, with one thicker piece of Velcro extending past the edge to catch/hook to the Velcro on the other side. (Similar to the way the top of my shins attach.) The biggest challenge was finding a glue that would adhere to the latex. I tried E6000, hot glue, and a Loctite super glue. In the end, I found that the Loctite seemed to work best.
-
Week 4:
May 31
Just a little glove-work today. I attached a piece of black Velcro (the soft side) to the glove to cover a cap near the wrist where my skin could show. I also spray painted the logo on the gloves black.
June 1
I heard back from Dan B about how he attached the front and back of the shin armor in a way that would allow them to come on and off easily. I call this the Thalizar Method
1. Glue rare earth magnets to the inside of the front shin and the outside of the back shin near the ankle. Line them up so they will connect to each other when you put the shin on.
2. Attach the shin buckles to the shin using velcro. You’ll need to take these on and off each time you suit up.
3. Attach about 3 inches of Velcro to the interior/ top of the shins- front and back. Half of the Velcro on the front shin should hang over the side of the shin- this is what will attach to the Velcro located on the interior of the back shin. It’s kinda like how TK’s attach their shins, but there is no cover strip used here.
June 2-6
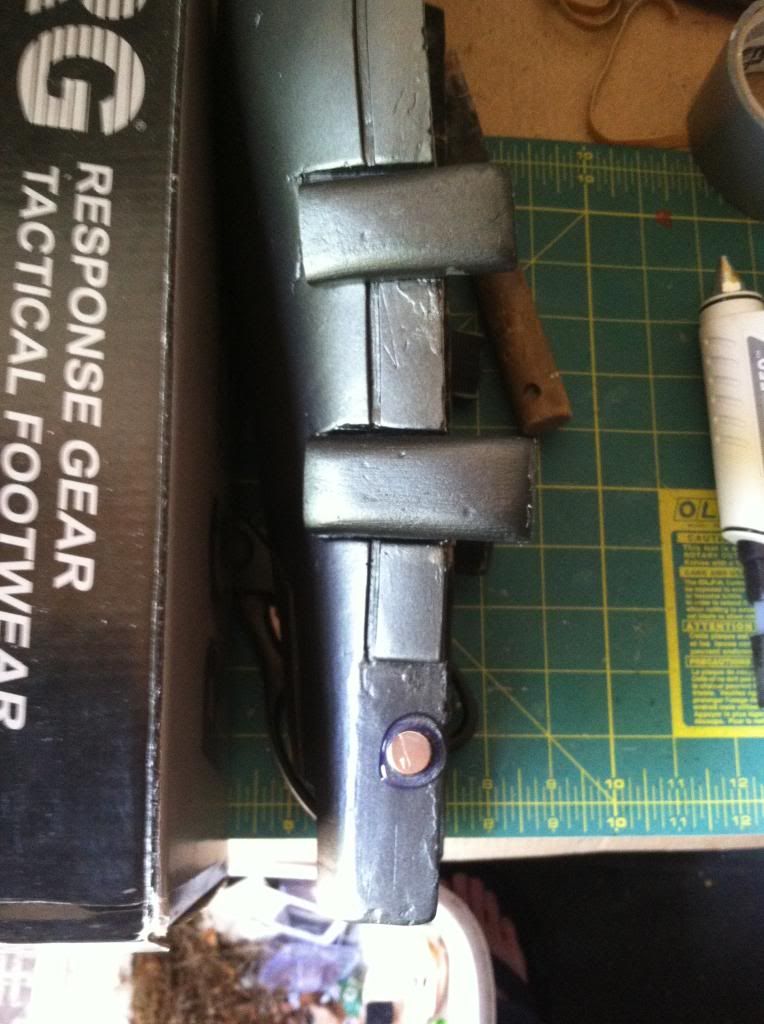
Assembling the boot armor was another slow undertaking, but Dan B had sent me several pics of his assembly strategy, so I felt pretty confident about the process. I placed the sides and toe armor around my boot to see how they would fit. Luckily I didn’t need to trim very much armor. Then I used wider pieces of black elastic and E6000 to start hooking them together and cover the gaps between the individual armor pieces so that none of my boot will be visible. I attached a small piece of foam under the toe armor so that it would stay level with everything else, and finished off by running a strap from one side to the other underneath the boot. This will help keep everything in place when I walk around.

-
1
-
-
May 28
On a whim, I decided to see if Home Depot had re-stocked the glove I am using. I found multiple pairs in the correct size, which made me regret my phone order from yesterday. I purchased a pair and will keep the pair that I ordered on the phone as a backup. Now that I had the gloves in the correct size, I attached the finger and thumb armor using the same method as before.
Panic! I tried to put on the shin armor and discovered that attaching them completely together was a mistake. They don’t fit past my ankle. I disassembled the shins (thanking my luck stars that E6000 is so forgiving!) and sent a text to Dan B (Thalizar) asking him for advice.

May 29-30
More painting today, so more running in and out of the house. I painted the chest and shins with several coats of primer and dark gray spay paint. I also realized that caulking doesn’t go well with spray paint, so I did a little Bondo work on a small crack at the bottom of the shin. A little touch up work allowed me to more forward with two clear coats on May 30.

-
May 26
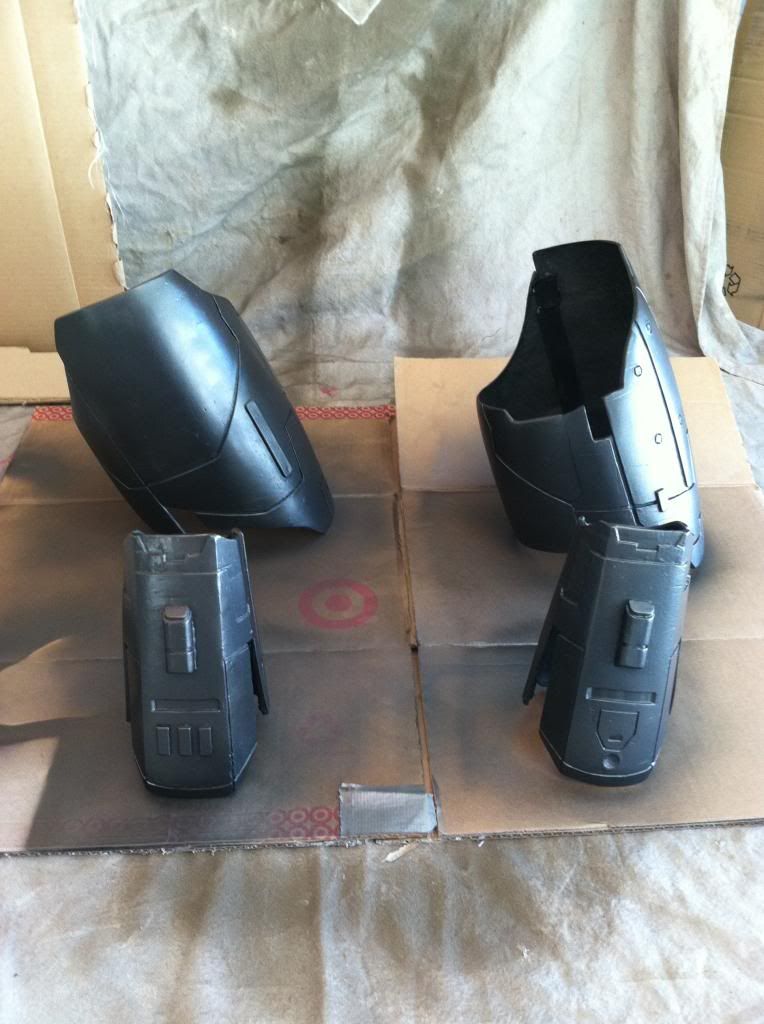
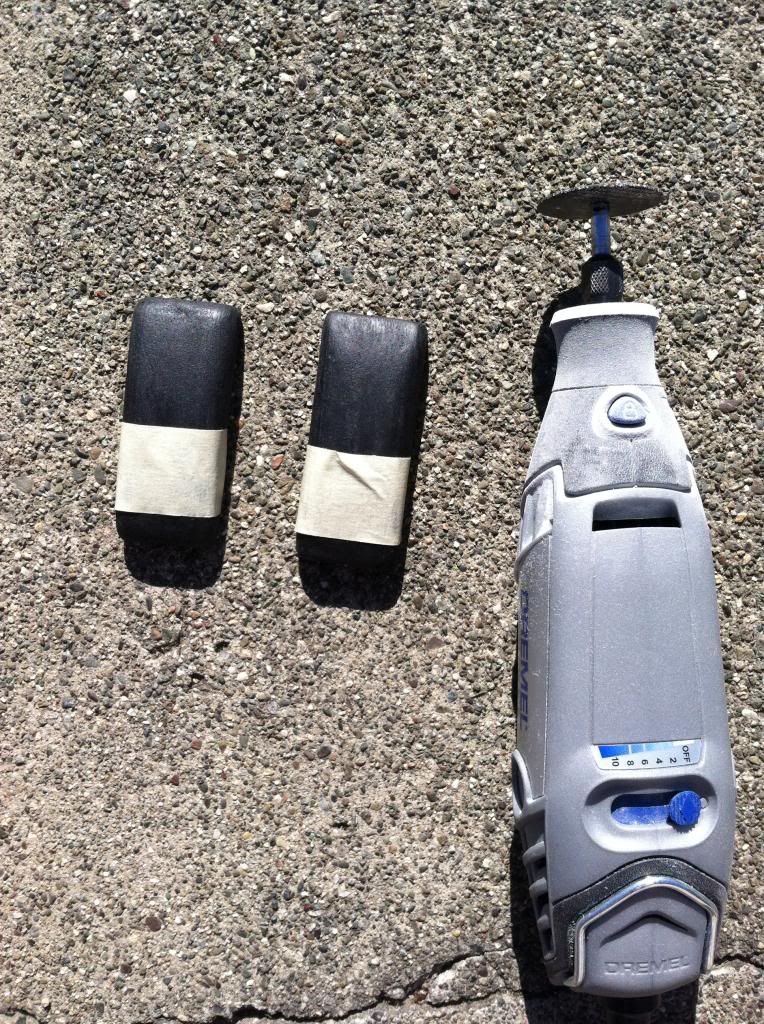
Lots of painting today: two primer coats, three light coats of dark gray, and two clear coats of paint were applied to the forearms and thighs. This meant I was constantly running in and out of the house, but my wife and kids were great sports about it. I also used the dremel to trim down the shin buckles, which I attached to the shins with E6000.
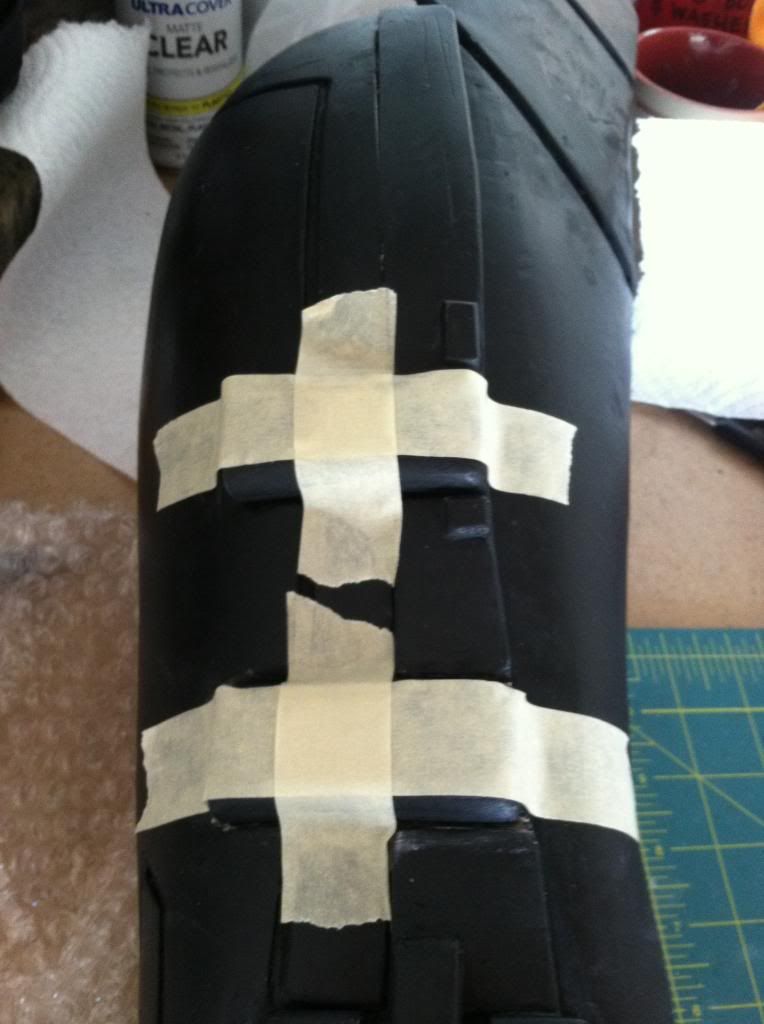
May 27
The new gloves arrived today! I mean, the wrong size of the new gloves arrived today. I spent some time on the phone with Home Depot to re-re-order them. Sigh. This ate up a lot of my available work time for today, so I ended the time by adding some foam padding to the inside of the mask.
-
Week 3:
May 24-25
In addition to working on the butt joint support strapping I got a few odds and ends done: attaching elastic straps to the elbows and biceps, and attaching the elastic strap to the back of the helmet. Now I am able to wear the mask though, and it looks sick!


SW Rebels: Inquisitor
in Grand Inquisitor
Posted
You look great in the picture posted above. Nice job, and good luck writing the CRL!