
-
Announcement
Welcome to the forums!
If you are a newly-approved member, make sure you check out the New Member Checklist!
If you are a Detachment member and can't see the member-only area, post here for access.
-DV


TK Keith
-
Posts
336 -
Joined
-
Last visited
-
Days Won
16
Content Type
Profiles
Forums
Gallery
Events
Posts posted by TK Keith
-
-
My mom made my robe for me. She started with this tutorial, but making the hood with no visible seam was trial and error to get the right shape. I hope this helps!
-
 1
1
-
-
On 7/22/2020 at 7:04 PM, WW2Reenactor44 said:
I can ask the maker if they can follow the CRL guidelines
Sent from my iPhone using TapatalkAwesome, I hope they will be able to do that!
-
On 7/9/2020 at 1:07 PM, JamesMapes2017 said:
Hi TK Kieth.
I have been working on small bits here and there but I don't feel I'm at the stage where I can show much progress from my last update. I know that was some time ago now but as soon as I feel happy with the work I will post up more pics for feedback.
Work has also slowed my build down a fair bit as well.
Thanks for asking though.
James
Sent from my SM-G920F using Tapatalk
I hear ya- many builds have an ebb and flow to the amount of time we can put into them.
LOL I have a FO-TK riot baton kit that has been sitting on my workbench for like 2 years.
Stay healthy and enjoy your build!
-
6 hours ago, WW2Reenactor44 said:
Overall I like the appearance of this robe. However, the second red stripe (top-most stripe) on this one appears rather thick compared with the CRL. The CRL says the second stripe should be approximately 1/2 inch wide. I might suggest looking around to see if there are other options.
Here's another option on Etsy, but I wish it had pictures of the robe on a mannequin or person. I also don't see details on what the robe is constructed from. https://www.etsy.com/listing/159853467/sith-acolyte-costume-poplin-robe-in?ga_order=most_relevant&ga_search_type=all&ga_view_type=gallery&ga_search_query=sith+acolyte+robe&ref=sr_gallery-1-3&organic_search_click=1&frs=1
-
Hi Lee, it's been a while since you've posted so I wanted to check in. How have you been doing? Any recent luck with finding work?
And of course, if you have any progress or questions on your acolyte build, please share!
-
Hi Justin, I just wanted to check in and see how things have been going. Have you made any progress on your build that you could share with us? We love pics!
-
Hi James, how is your beautiful build coming along? Do you have any updates to share?
-
Hi Florian! Just checking in to see how your build is going. I've loved seeing your pictures so far. Have you been able to print any new pieces recently?
-
1
-
-
On 5/8/2020 at 4:07 PM, Bogan said:
witch one
") ?
?
haha do you have more than one? I’d love to see more pics. -
On 5/26/2020 at 9:43 AM, DarthValkyria said:
Looking great! I would say go a bit heavier on the weathering from the photos.
I agree with Nina. -
23 hours ago, JamesMapes2017 said:
Sorry forgot to add.
The picture in previous post is a sample pic from another WIP.
I haven't weathered my abdomen plate yet.
I just needed to know if it is right or not.
Apologies for the multiple posts
Want to get it right first time, rather than making a costly mistake.
Thanks
TK44921
Sent from my SM-G920F using Tapatalk
This is your thread! No need to apologize.
") You're doing great!
You're doing great!
-
1
-
-
I think it's coming along nicely!
When it comes to coloring, the CRL is pretty open and simply calls for armor that "Must be painted a metallic grey that is weathered in a pattern consistent with the rest of the armor." My personal preferences is for a darker metallic gray, but I have seen great looking acolytes that are both on the lighter and darker side.
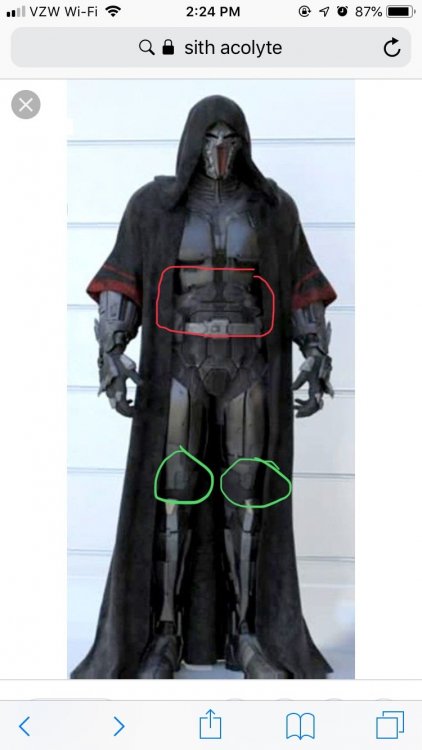
Regarding the center piece of the abdomen- the reference image does show that it is a darker color. But in my opinion the two hues are closer in value than in the picture you posted above. In the reference image below it appears that the abdomen is a dark grey and the center of it closer to black. In the image you posted the abdomen is more of a bright grey and the center part close to black.
Of course, one thing that makes this even trickier is lighting... the abdomen armor you posted above may actually be darker in most real-life settings than it appears in the photograph.

-
On 4/18/2020 at 2:47 PM, JamesMapes2017 said:
Thank you for your comment TK Keith.
It is taking it's time but I am aiming to do a really good job for this build.
Still have a long way to go.
Painting is next on the list but I am having to wait a while for the paints to arrive due to deliveries being prioritised.
The paint job alone will take a few weeks to complete.
Thank you.
TK44921
Sent from my SM-G920F using Tapatalk
When the paint finally arrives and you're able to get started, I'd love to see some progress pictures of the painting process. I always enjoying seeing that aspect of a build... the transformation of white ABS to realistic looking armor.
-
Wow thanks for sharing all of the individual pictures. What beautiful pieces of armor!
i absolutely love his mask. I have a very early version of it, long before he started doing the back piece. That’s something I’ve been thinking about upgrading to.
you must be so excited to be on your way! I’d love to see more pictures as your build progresses.
-
1
-
-
Thanks for sharing your progress pictures. The mask looks really cool- how many hours was that to print?
-
Thanks for sharing the pictures you used for the neck seal reference and the detailed pictures of your neck seal. I‘m not sure what other references Wolfgang used in making his neck seal, which is the one in the CRL.
Edited- looks like you’ve been approved. Congratulations, you look great!
-
I just use the under armor top and bottom that I use to troop with my stormtrooper. The CRL is pretty vague about this item:
“Under Suit
Black non-textured material, either one-piece or two-piece construction with no visible zippers or logos/designs. “
-
I hope you’re able to land a job that you love soon! I hope you’re doing ok in the meantime... I would imagine that’s a lot of stress to deal with.
Regarding the thighs, I have the Wolfgang armor which doesn’t have any raised elements, so I was picturing that adding a ship here (see pic) would work. It sounds like your armor is going to be trickier though. Reaching out to your GML for advice is a great idea too.
-
Hi Florian! I thought I would check in to see if you have made any recent progress on your build. We always love to see pictures, if you have any!
-
On 10/21/2019 at 6:44 PM, hikuro1983 said:
Okay so I did make some decent progress. I still can't find those damn missing pieces for the left boot but I played with my gauntlets, belt and abdominal. I do have a big concern over the thighs though.....they don't fit, at all, not even close to getting them around my leg they're maybe 3 inches to short. The thought is crossing my mind to doing a shim extension but I dunno if that's gonna hurt me or not cause the two ends should be but joined and contain details.
I don't believe the two ends of the thigh need to be butt joined. I would think adding a shim in the back part of the thigh and then using bondo or a similar product to smooth out the line where the pieces join should be ok. You can also ask your local GML for their thoughts.
-
You put a lot of effort into your build and it is looking good! I liked seeing the pictures of how you made your saber.
I am a little curious about your neck seal- it's hard to see the details in your pictures. Did you make it yourself or purchase it from someone?
-
Congratulations! I like how the paint job turned out. You’re looking quite intimidating like an Acolyte should!
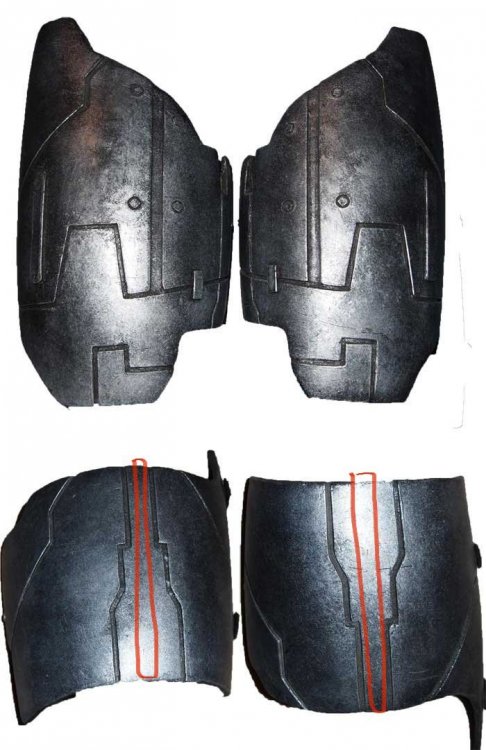
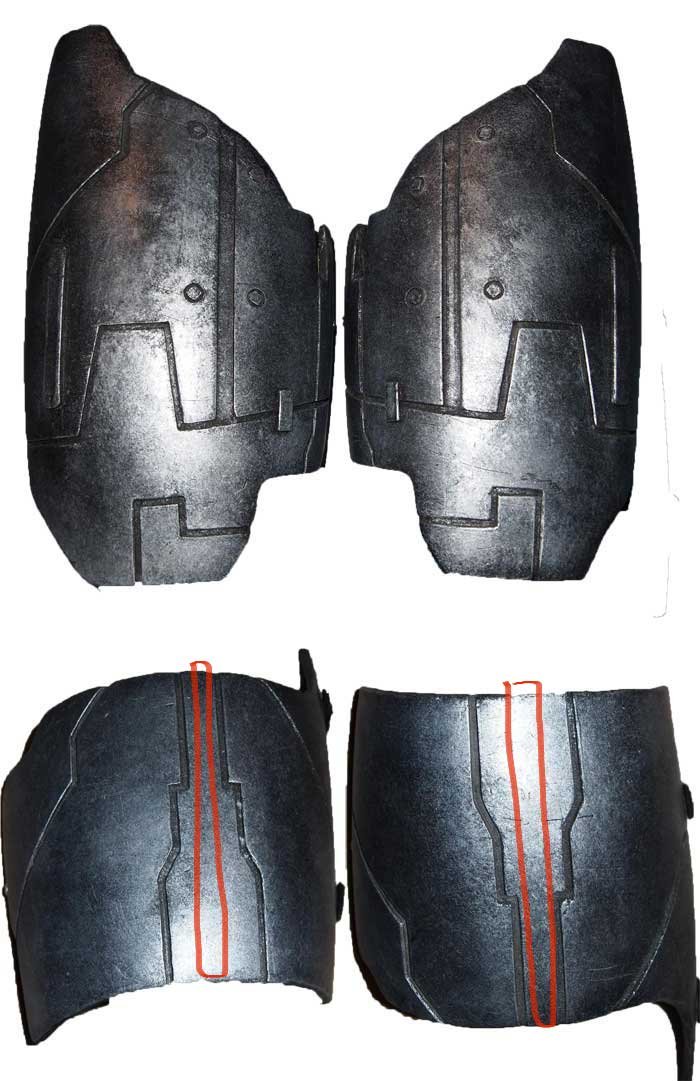
If I might offer a suggestion or two: are you able to raise the cod piece to eliminate the gap between it and the ab piece? (See red circle on reference pic.). This might give you space to raise the thighs. You may also want to rotate the thighs so the the long tab at the bottom is more directly in line with the knee and the top of the shin armor. (See green circle on reference pic)
I hope you take my feedback well, as my intent is to be respectful of your hard work.
-
Glad to see you are making progress. Hope your thumb is ok!
I always feel doubt when I start assembling too. I like to have a garrison buddy or even my dad sometimes help lend me an extra set of eyes and hands when it comes to that stage. I usually use e6000 which is forgiving if I make a mistake. The only build where I didn't primarily use e6000 was my TK-FO build. I used zap-a-gap but had an experience garrison mate with me for most of the gluing, and he convinced me that since we were going to paint it anyways, it didn't matter if we had a few drips that we needed to sand out. What a different experience that was!
Great job so far. Keep at it!
-
It always feels good to see a build coming along. How long did those pieces take you to print?


mynock's den sith acolyte armor
in Sith Acolyte
Posted
I don't have Mynock's Den armor, but I agree with Chris that there is usually a return edge to give the appearance of depth.
Do you have any specific pictures you'd like to share at this point, either with finished pieces or pieces you have questions about?