
-
Announcement
Welcome to the forums!
If you are a newly-approved member, make sure you check out the New Member Checklist!
If you are a Detachment member and can't see the member-only area, post here for access.
-DV

rezori
-
Posts
36 -
Joined
-
Last visited
Content Type
Profiles
Forums
Gallery
Events
Posts posted by rezori
-
-
I sewed interfacing in mine to keep it stiff - works well! I don't actually have it do up in the back, it stays in place when I put the belt on top. I think I ended up making mine slightly smaller than the CRL so it is in proportion to my size, as I am only 5'5". Pattern I used (Simplicity Jedi costume) to make my costume came with it so I used that.
Sorry to hear about your sewing machine - R.I.P.
-
 1
1
-
-
Awh, thanks for the kind words!they have a facebook page that goes by Khro's nest and they make some pretty cool stuff other than the nihilus mask
 We will be opening for masks this weekend!
Nef is correct, our mask is the KOTOR style. My Nihilus build is KOTOR mask and COTF body, because I like the two aspects of each best - personally. We are fortunate to be able to do that with Nihilus.

Eek! I hope you can get your sewing machine up and running again soon - can't wait to see progress pics of your build! I've seen sewing machines at thrift stores for cheap, also maybe try your local kijiji/craigslist/etc sites. There are also some facebook groups for free items people don't want called 'Buy Nothing [your local city/town]' - might be able to get lucky there too.
-
Yay! Hi! (it's Kim!)
-
Nice! Sculpting is so fun!
-
My husband has finished up perfecting the master mask and we have the first layer of silicone curing right now!
For updates on the mask status (and other cool stuff we are making!) check us out on-
Website:
On Facebook:
https://www.facebook.com/khrosnest
On Instagram:
http://instagram.com/khrosnest
Twitter coming soon!
-
Nice work Rejean!
-
Just note that 3D printers generally require a lot of tweaking and troubleshooting. However if you are technically inclined then it would be a very useful purchase for costuming. My husband used his 3D printer to make the center detail of my mask. I didn't want to print the whole thing as I personally find asymmetrical faces more appealing and wanted to sculpt it myself.
Some libraries/comminuty centers also have 3D printers that you can use for a fee. Would probably be worth looking into. Have fun!
-
-Soft parts need to be made.
-Boots are just black riding boots (probably have better luck in the women's department, fall/winter).
-Belts can be found at thrift stores (or buy leather), glued together, little nub things bought from Tandy leather (link is in the forums somewhere).
-Gloves from a lady in Bulgaria on EBay - Pandurska92 or Leather Mystics. I have both, Pandurska's are much nicer.
-
Awesome! Post up pics as you go! Print off lots of reference photos of your favourite mask style and just have those around as you work to refer to.
-
Nice! Much better!!
-
For sure! I'm sure you'll discover clay easy to work with once you start. Use water to smooth it out. I used a basic face template from a local art store and sculpted on that. It's vaccuforming or the silicone and fiberglass molding afterwords that can get tricky... Depends on how you want your final mask to be!
You might be able to find something like Sculpey to bake and use right off the bat. I imagine Sculpey itself would be very heavy though. Could possibly use paper mâché pulp on a mask template, you'd just have to make sure to bondo and sand it to smooth it out after.
-
We are hopefully going to start production on these early this year. I'll definitely spread the word once we are ready. Prices will be based on cost of materials and time. Thank you!
-
Buying one already made would be easiest, lol!
-
Agreed with the other comments! I'd also try to pull in the cape around the sides of the head, so that the silhouette of the neck area isn't so triangular. I did some hand-stitches from the underside of my cowl to pull the fabric down. Hope that makes sense!
-
^ What she said!
My Nihilus was my first sewing venture as well and it was so fun. One thing I also did was sew the robes out of an old bedsheet first to get comfortable with the pattern before using the actual material.
I look forward to seeing your progress!
-
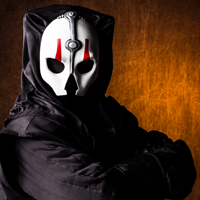
how did you do the cowl? I love how clean the flat style cowl looks!
Thank you! It's a construction helmet base, and the ears/cowl shape is done with aluminum strips riveted together and to the construction hat base. Nice and light, very airy, and stays put on my head perfectly!
Can kinda see it in these pictures:


-
I took scissors and cut out sections, including holes farther up so the weathering didn't stop abruptly. Then used a wire brush on a cutting board (to protect whatever surface you are working on) and go at it with that. It's a good arm workout and stress relief! Have some beer and have fun with it!
-
Thank you so much! Finally getting around to posting this, lol!
Here is a facebook album of my build progress, as well as a couple completed photos:
https://www.facebook.com/media/set/?set ... 734d7e0043
And some photos of the mask before we painted it - we will be selling these once we order the proper matierals.
https://www.facebook.com/media/set/?set ... c344226258
and a couple shots on troops!


-
I realize this is a few weeks old now, but I kept forgetting I wanted to start a thread here for this. Post up your ice bucket ALS videos if you did them in costume!
Here is mine as Darth Nihilus.
-
Hello and welcome! Excited to see your progress!
-
Looks great! I'd personally go crazier with the tattering of the bottoms of your tunic & skirts, and maybe use some shoulder pads/foam to make the shoulders a little more prominent.
-
Hahaha yeah I find either kids are terrified or they LOVE me! Rarely do people know who he is though. :/
Glad you are trooping lots - congrats!
-
I've been a member since May! YAY! SL-17771! Thanks for your help guys! I'll post up some pics of my completed costume and mask when I have a bit more time.
-
Looks much better!
Nihilus WIP
in Darth Nihilus
Posted
Scout out your local thrift store too for belts - I was able to find black leather belts of perfect widths for both pieces. Came to $7 total for them both and they are pre-weathered!
Painted the buckle black on the wider one, glued the thinner one on (after cutting off the ends) and added the leather studs from Tandy (referenced here already) and done! It's adjustable and the buckle works well , I do it up in the front and then just spin it to my back so I can do it myself no problem.