-
Announcement
Welcome to the forums!
If you are a newly-approved member, make sure you check out the New Member Checklist!
If you are a Detachment member and can't see the member-only area, post here for access.
-DV


CrazyMarlin
-
Posts
23 -
Joined
-
Last visited
-
Days Won
4
Content Type
Profiles
Forums
Gallery
Events
Everything posted by CrazyMarlin
-

New Inquisitor (Tales of the Jedi)
CrazyMarlin replied to TheLoneInquisitor's topic in Miscellaneous Characters
Thanks! I'm pleased with how it came out for a complete scratch build. At this time I'm not going any further with it. Based on the feedback, it's going to take a lot of changes to get it to where it could be considered for the 501st. I may revisit it later but for now I'm just going to keep using it as a fun costume at cons when I'm not trooping. It gets tons of great response. That being said, feel free to reach out with any questions and I'm happy to help out. -
New Inquisitor (Tales of the Jedi)
CrazyMarlin replied to TheLoneInquisitor's topic in Miscellaneous Characters
Update: uploaded reference and costume photos. Also, got a chance to show it off at Nashville Comic Con and it was very well received!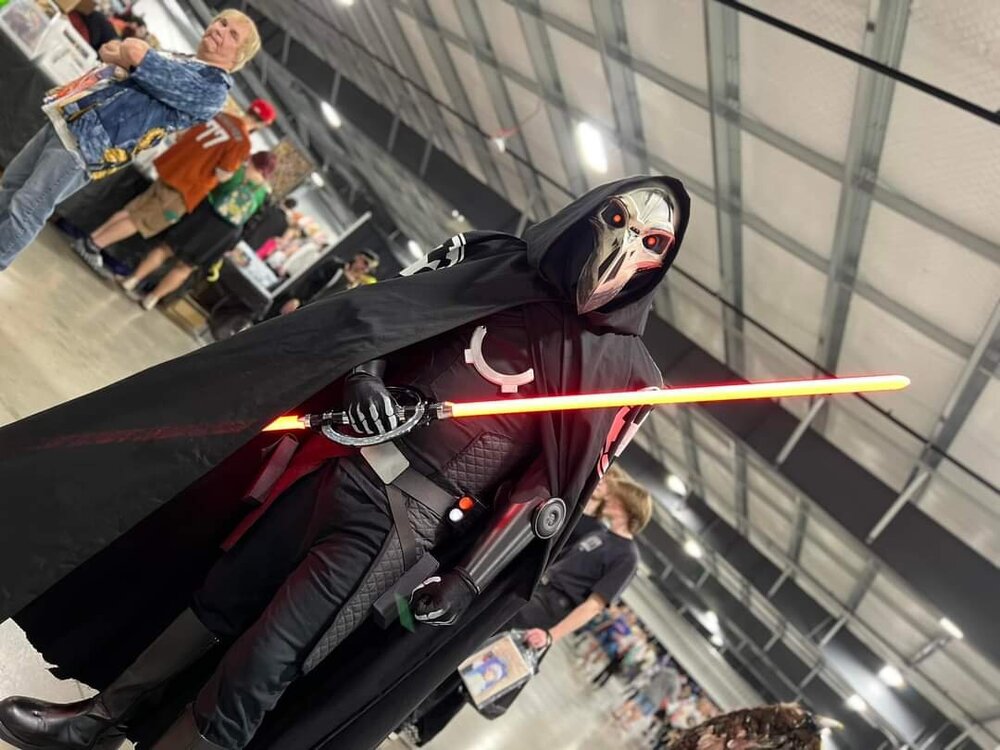
-
New Inquisitor (Tales of the Jedi)
CrazyMarlin replied to TheLoneInquisitor's topic in Miscellaneous Characters
Just as way of an update, I'm working on uploading the reference pictures and will be taking submission photos of the costume soon. I want to make a couple of adjustments for accuracy as well as add a couple of pieces to the gauntlets(elbow guards), also for accuracy, before taking the pictures. -
New Inquisitor (Tales of the Jedi)
CrazyMarlin replied to TheLoneInquisitor's topic in Miscellaneous Characters
DM me and I can send you some pics, its a pretty simple rig with leather strapping I purchased and a pretty basic belt buckle. -
New Inquisitor (Tales of the Jedi)
CrazyMarlin replied to TheLoneInquisitor's topic in Miscellaneous Characters
Sorry if that came across incorrectly, I was at work and gave a too short answer. When it was announced that it could be an RLA costume I reached out for clarification from the LMO as i was not familiar with the process and was informed that a CRL had to be written. So since no one else was doing anything with it I started one and was going to present to the detachment. I'm certainly happy to step aside from it. -
New Inquisitor (Tales of the Jedi)
CrazyMarlin replied to TheLoneInquisitor's topic in Miscellaneous Characters
So, I just started writing out a potential CRL today. My understanding is that the 501st won't be making this a regular CRL but could make it a Legion Level Approval costume. I have been in contact at the Legion level and was instructed to provide a serviceable CRL first. -
New Inquisitor (Tales of the Jedi)
CrazyMarlin replied to TheLoneInquisitor's topic in Miscellaneous Characters
Thanks! I had to scratch make nearly everything myself, including the belts and under clothing. The gloves are simple butler style gloves that I made bone templates for and then hand painted with fabric paint. At some point I'm going to pattern and sew some new gloves with fingertip extensions to better match the character, but making gloves is harder than I anticipated. I'm happy to walk though or show detailed photos of the tunic or any other pieces if it helps. -
New Inquisitor (Tales of the Jedi)
CrazyMarlin replied to TheLoneInquisitor's topic in Miscellaneous Characters
Was able to debut the kit at a convention this past weekend. Overall response was overwhelmingly positive! Also identified several fixes that will need to happen before the next outing. -
New Inquisitor (Tales of the Jedi)
CrazyMarlin replied to TheLoneInquisitor's topic in Miscellaneous Characters
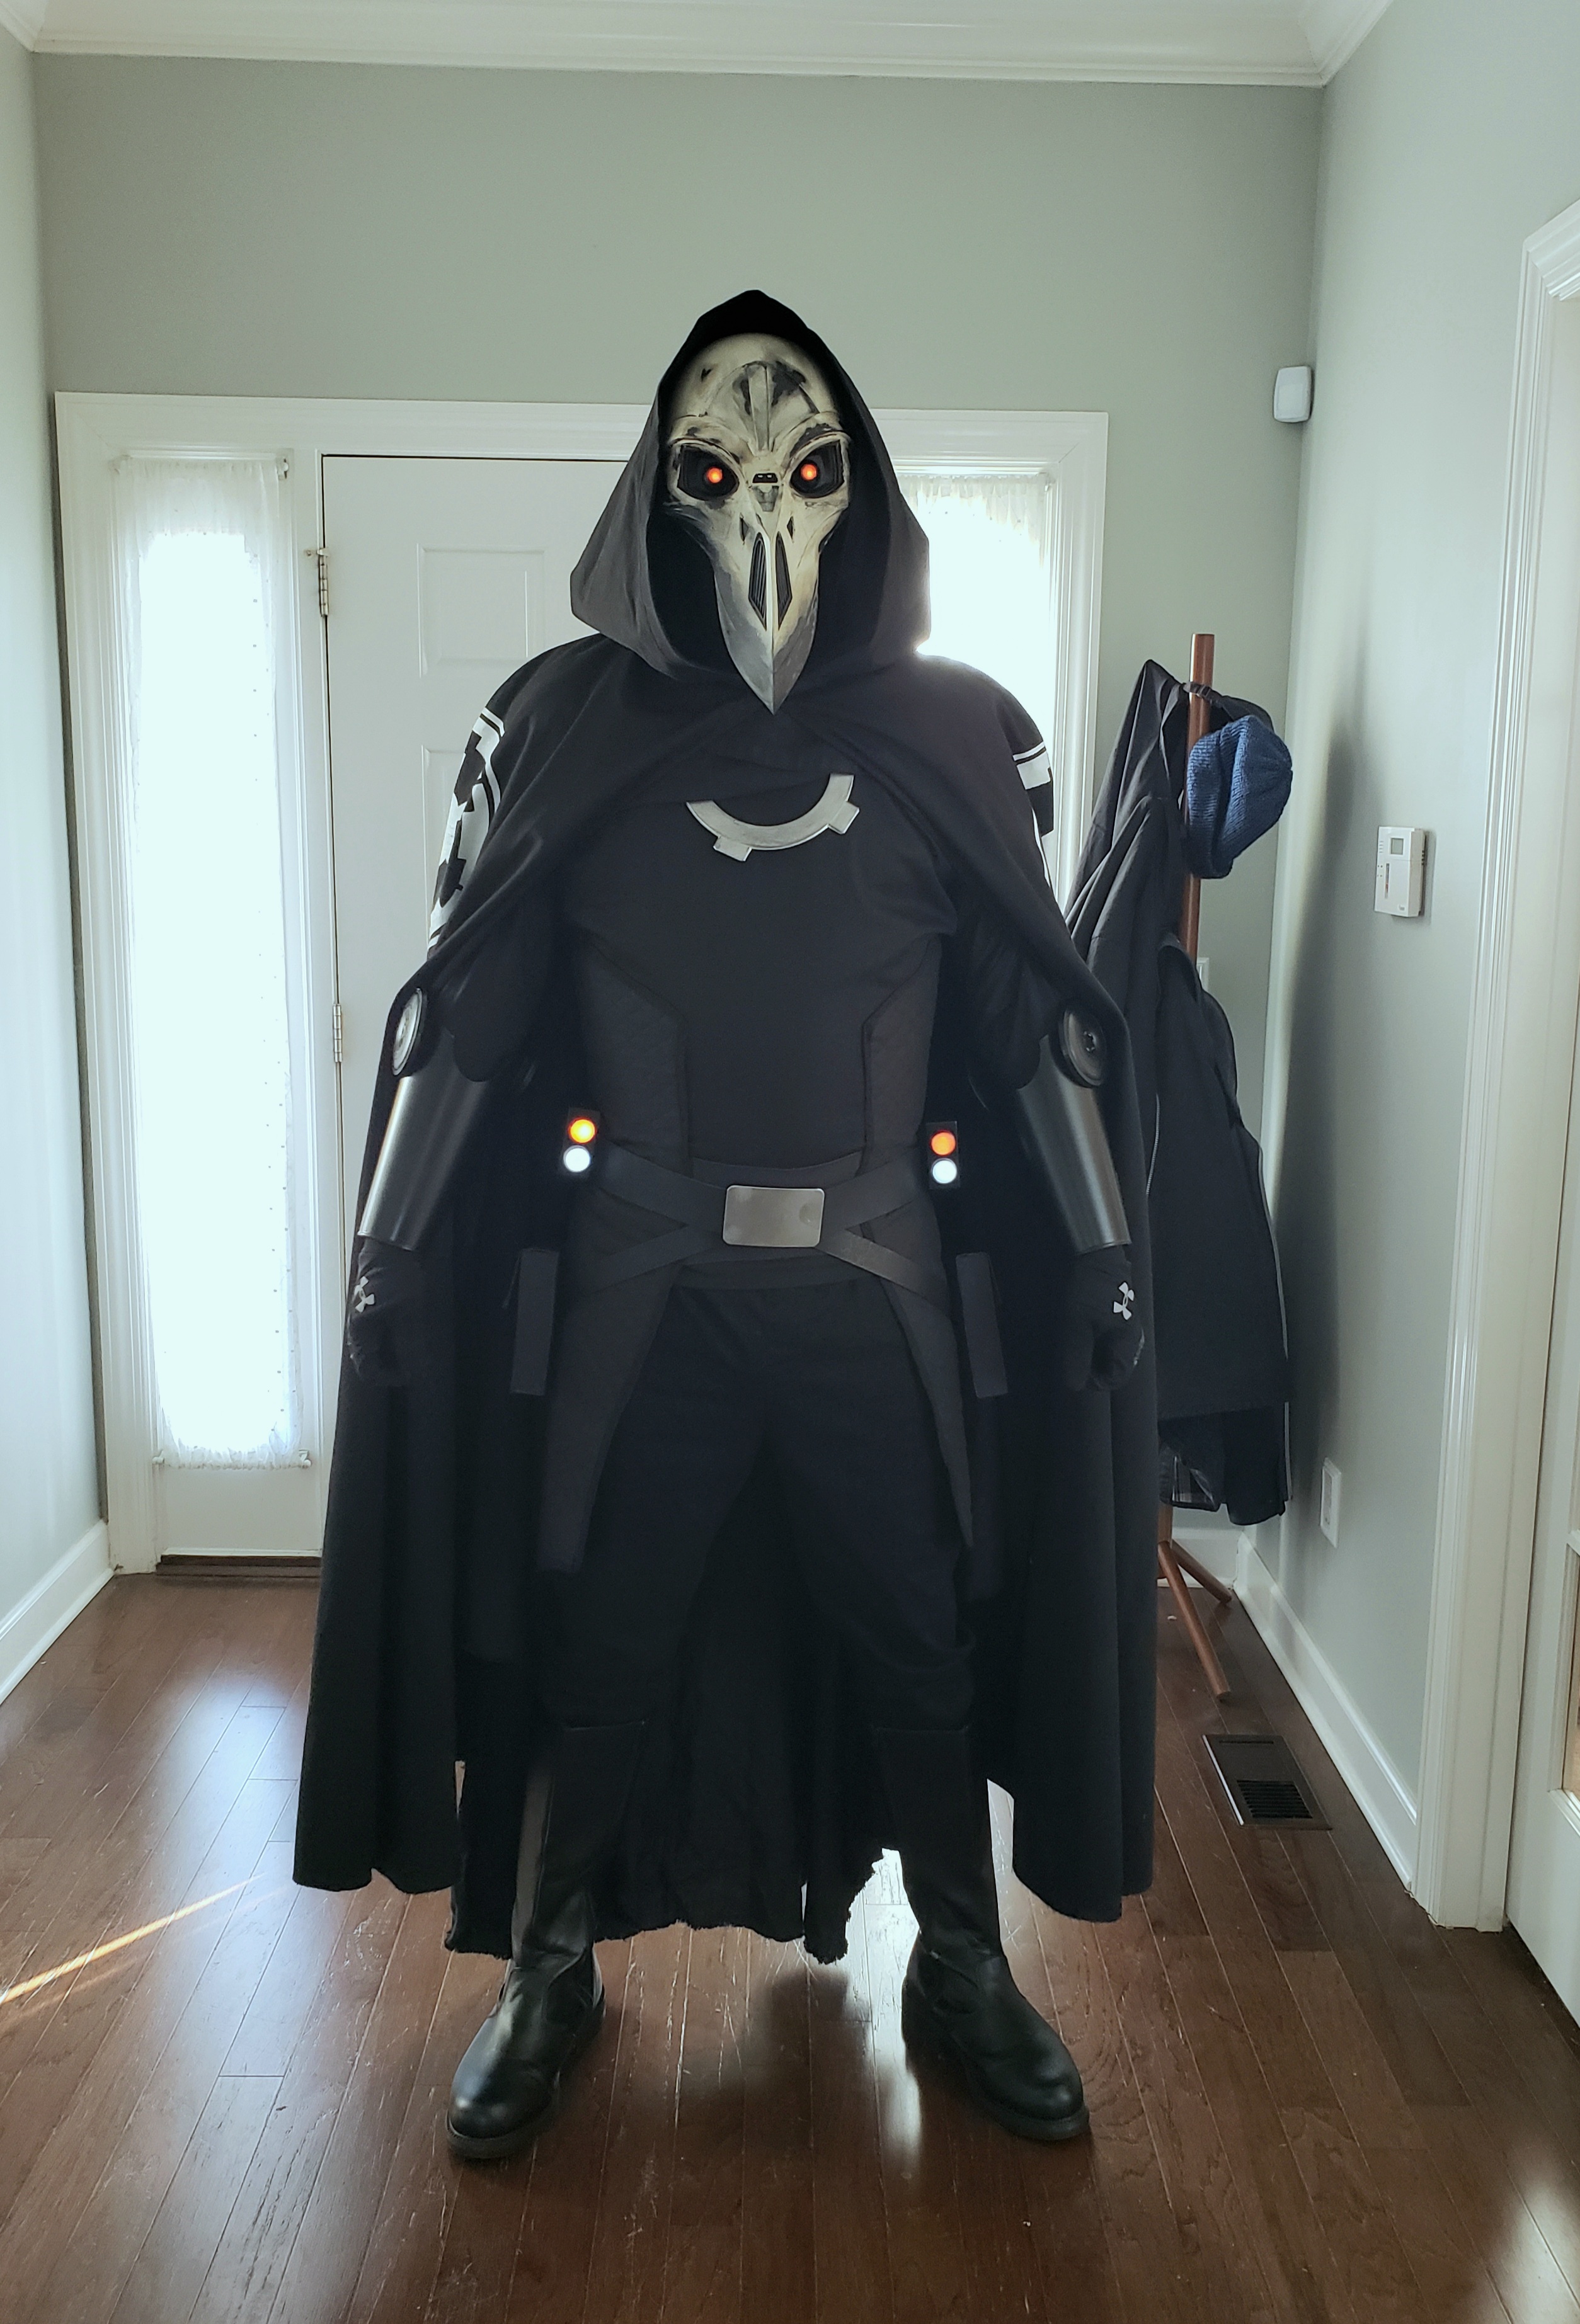
Ok, full suit up day! Still have lots of finishing touches and I'm just using a pair of underarmor running gloves until I finish the gloves, but this is all the pieces. Double cloaks, bracers, belts, etc. Also did a walking test outside and the double cloaks look awesome when walking. Link to other pics.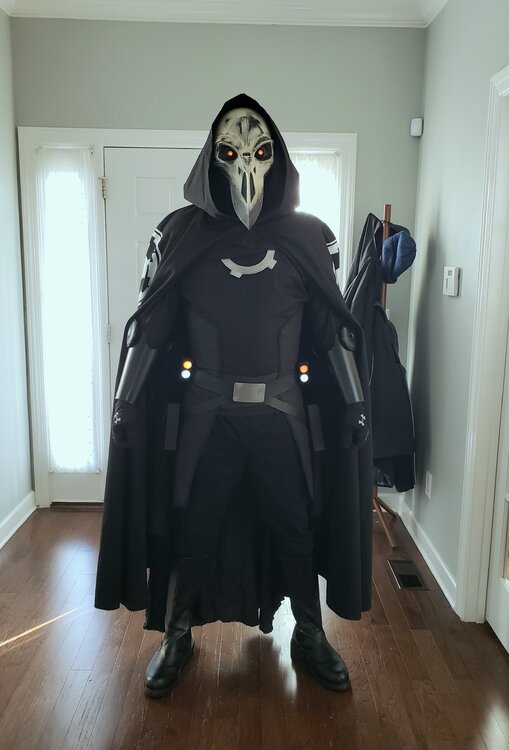
-
New Inquisitor (Tales of the Jedi)
CrazyMarlin replied to TheLoneInquisitor's topic in Miscellaneous Characters
Ok, a few updates. Outer cloak is almost done. I stenciled the large shoulder cogs today and once they dry will touch them up and that should be done. Inner cloak is almost done, just need to finish and attach the half cog clasp. Also pictured are the bracers and lighted belt boxes. Will need to design and print the elbow guards to attach to the bottom of the bracers. Progress! -
New Inquisitor (Tales of the Jedi)
CrazyMarlin replied to TheLoneInquisitor's topic in Miscellaneous Characters
Yeah, I'm planning on stenciling on the skeletal look with glossy fabric paint. -
New Inquisitor (Tales of the Jedi)
CrazyMarlin replied to TheLoneInquisitor's topic in Miscellaneous Characters
Took a run at making my own gloves to accommodate the longer fingers and clawed fingertips. 3D printed a two inch extension for each finger that ends in a point. Still needs some tweaking but looks good with the bracer on. Hoping for warmer temps tomorrow to start priming and sanding the bracers.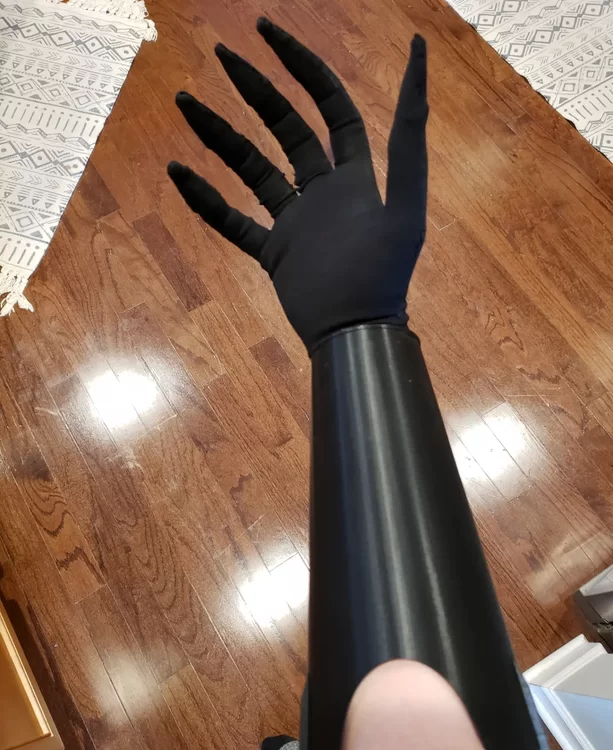
-
New Inquisitor (Tales of the Jedi)
CrazyMarlin replied to TheLoneInquisitor's topic in Miscellaneous Characters
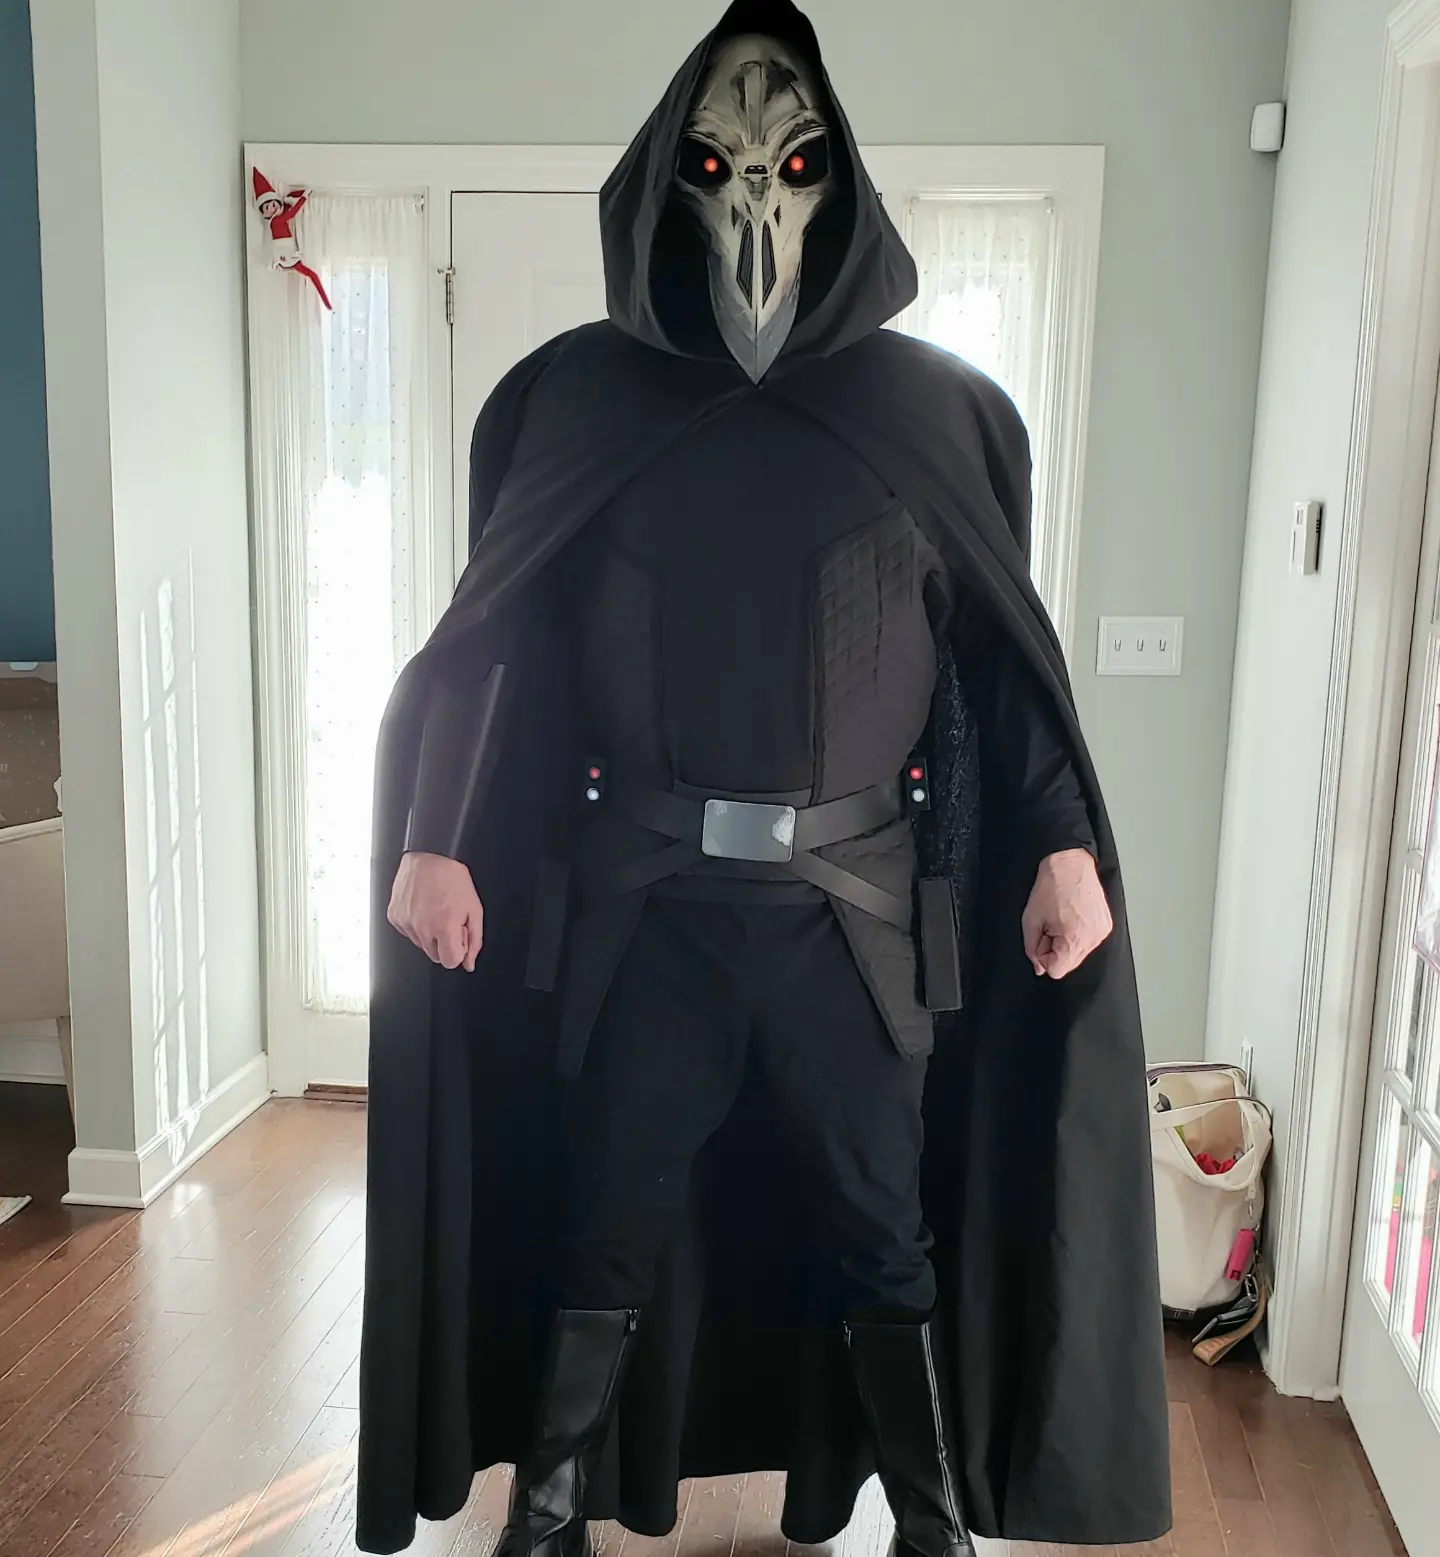
Okay, so I am going to preface this that this is way to early to be suiting up. It started as just a test fit of the top, which I'm glad I did before finishing it up as the side/kama pieces are way to high. But once I started a figured I would try the other pieces on. Belt, pouches, pants, boots, even an unfinished bracer. I am simultaneously excited and disappointed. Will have to rework the top and it will look better overall once I get the undercape done. But anyway, here's a suited up progress pic...
-
New Inquisitor (Tales of the Jedi)
CrazyMarlin replied to TheLoneInquisitor's topic in Miscellaneous Characters
The eyes look sharp! -
New Inquisitor (Tales of the Jedi)
CrazyMarlin replied to TheLoneInquisitor's topic in Miscellaneous Characters
There is less screen time and visual reference for Dark Rey and she has a CRL...heck I just approved one a week ago. Thats pretty disappointing, considering this is a character with actual speaking lines and everything! -
New Inquisitor (Tales of the Jedi)
CrazyMarlin replied to TheLoneInquisitor's topic in Miscellaneous Characters
Did a test fit with the mask and a cloak. I turned a hard hat backwards and have the mask attached to it so it gives a bit of room between the mask and my face. Wearing a balaclava underneath for the test. But for a 5 min test, I'm really happy with it. And visibility through the eye suits I cut is not as bad as I expected.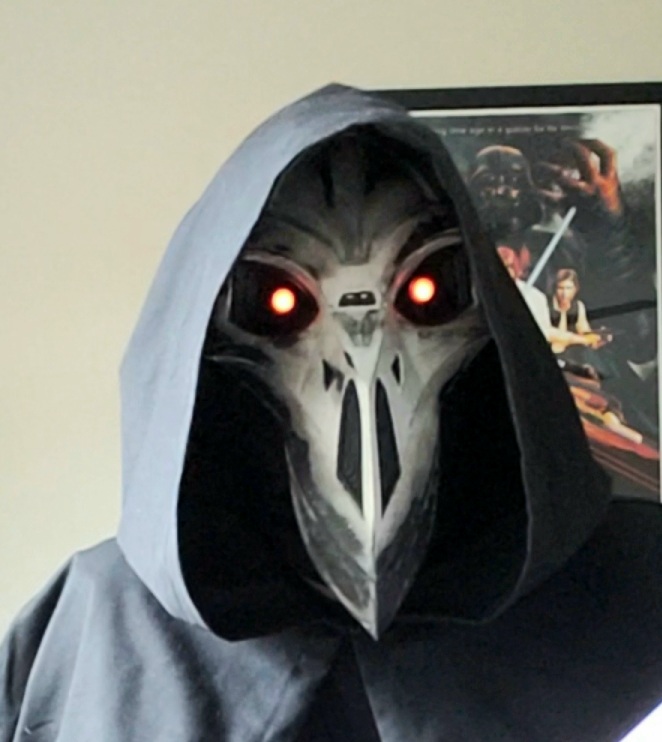
-
New Inquisitor (Tales of the Jedi)
CrazyMarlin replied to TheLoneInquisitor's topic in Miscellaneous Characters
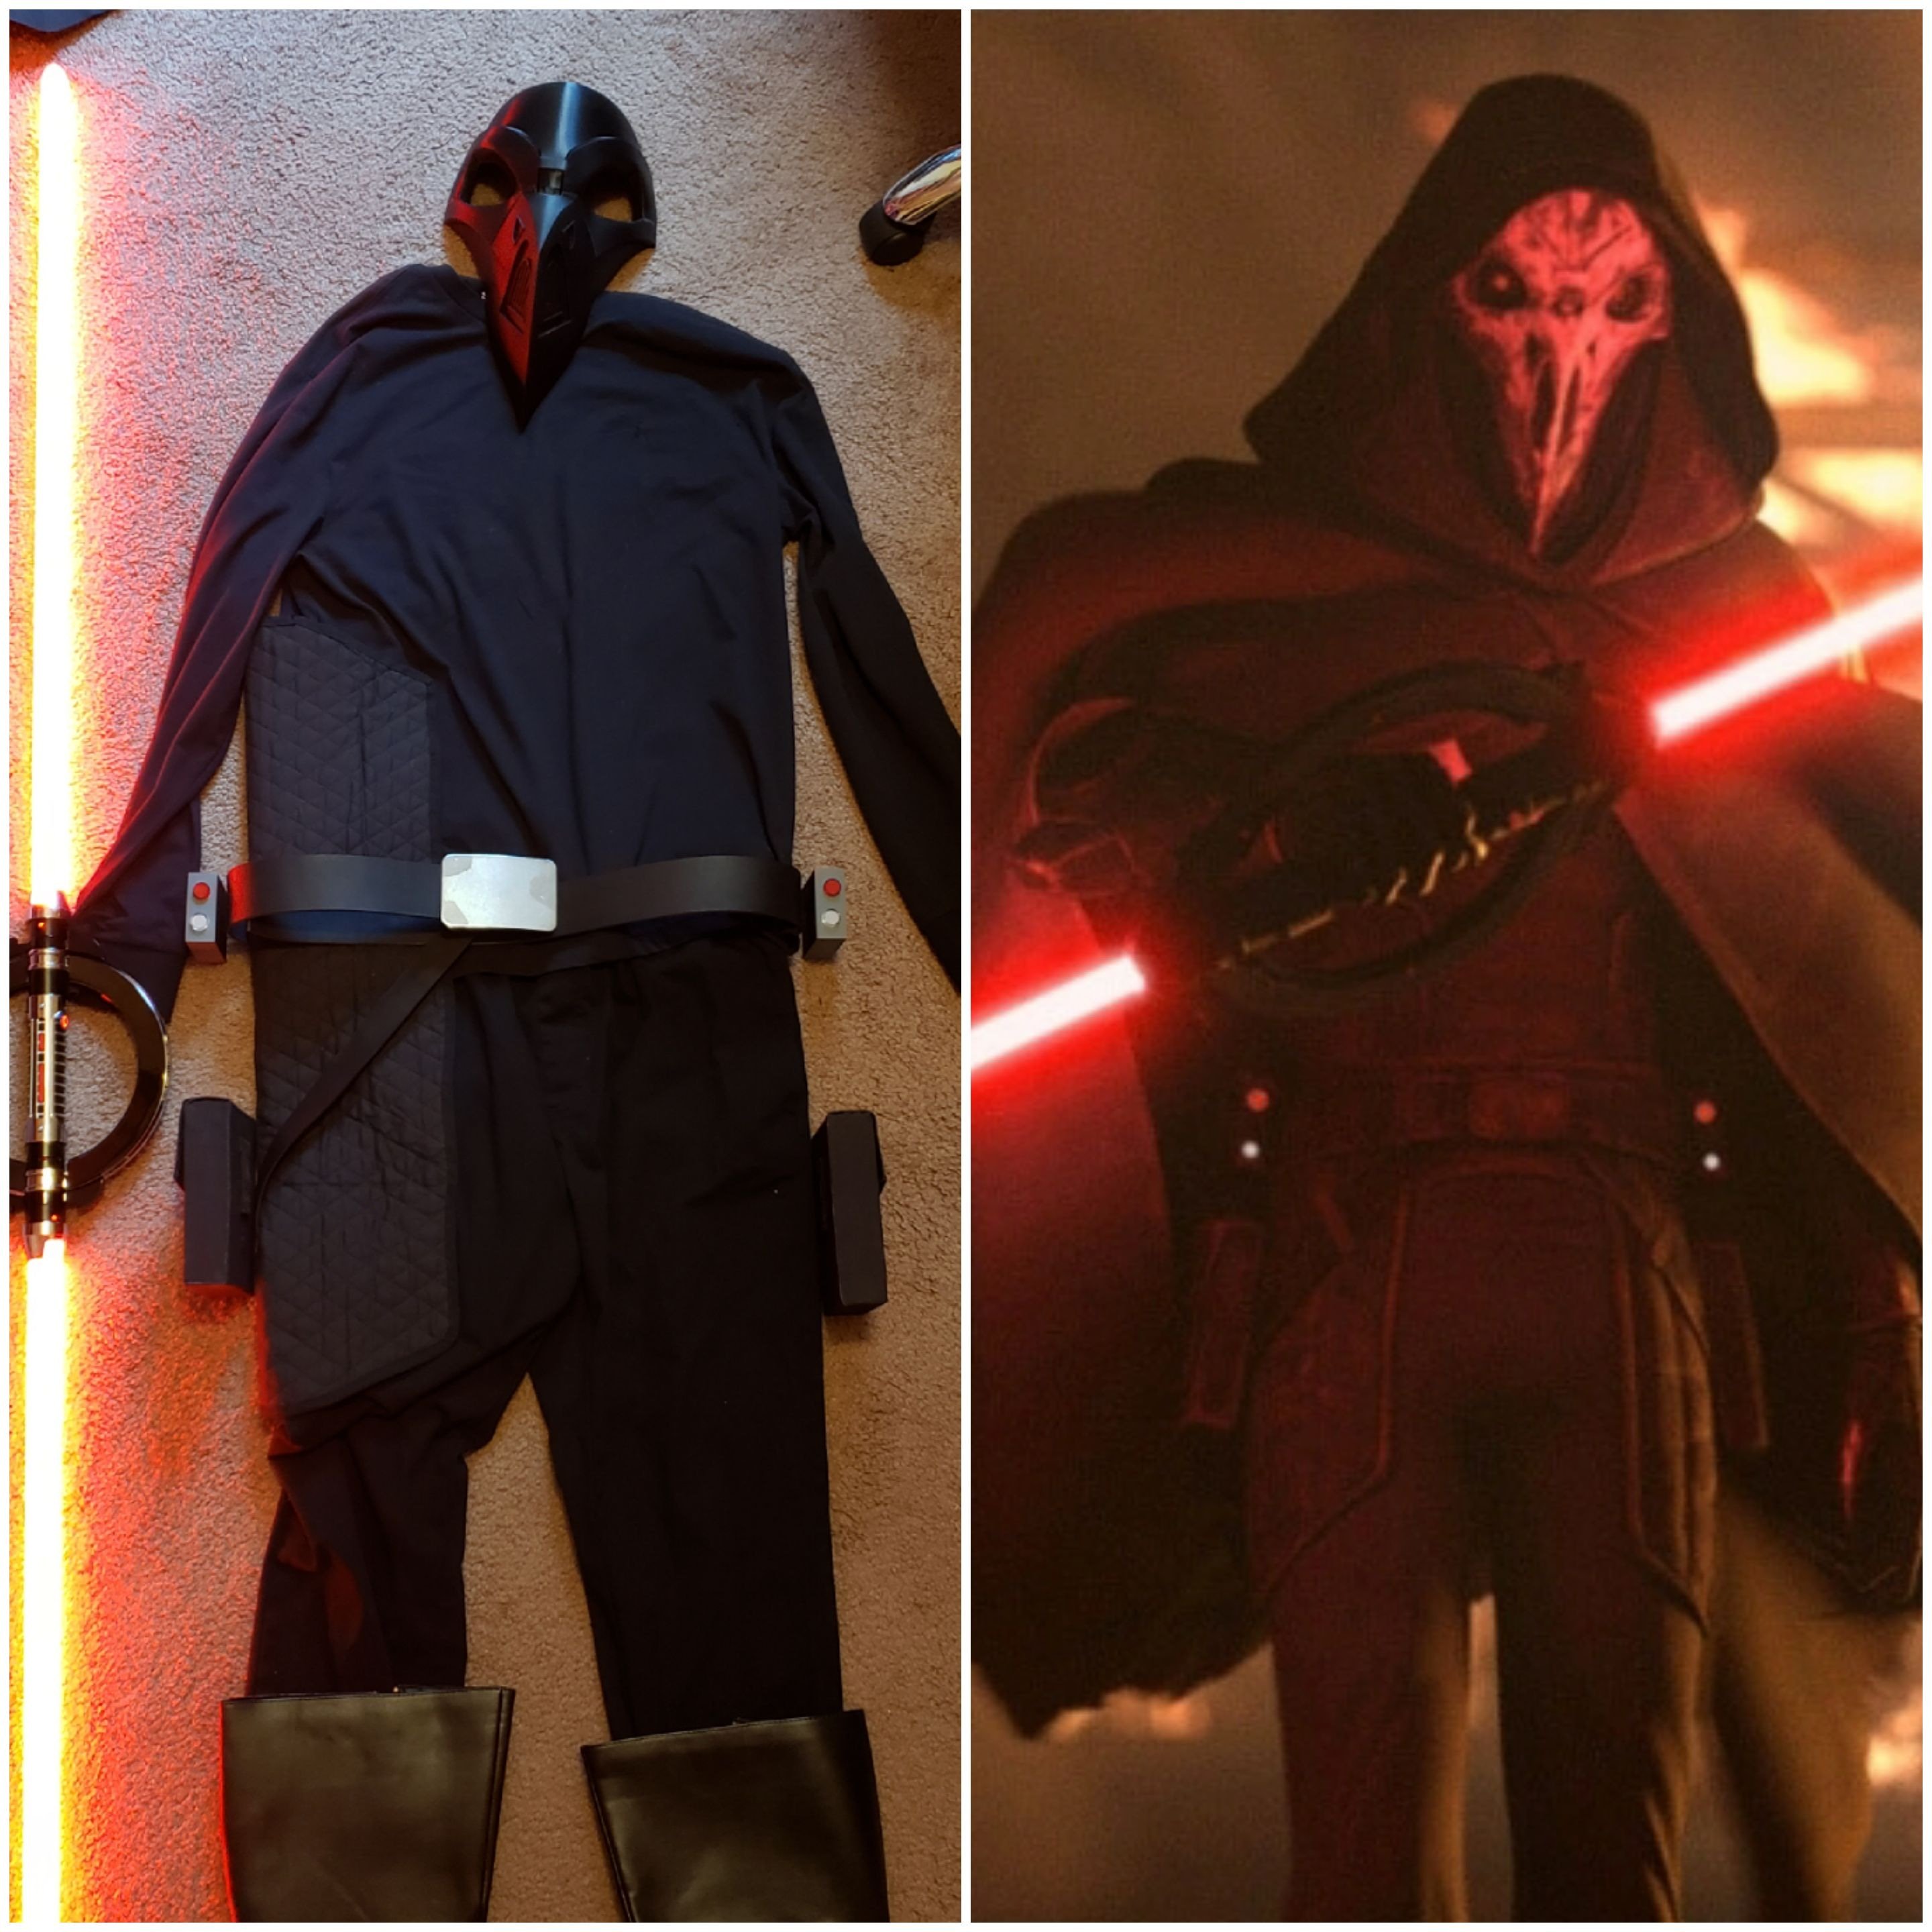
Ok, there are parts still drying, its not sealed, and I may weather it a bit more in spots, but here is my nearly completed mask while doing an LED eye test.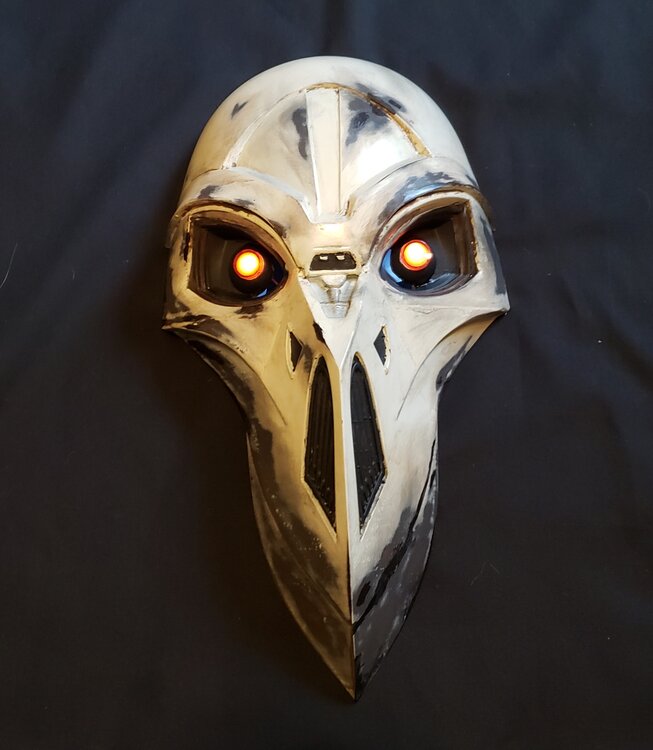
-
New Inquisitor (Tales of the Jedi)
CrazyMarlin replied to TheLoneInquisitor's topic in Miscellaneous Characters
So, I printed the same mask. I've got a plan for the LED eyes. What about visibility? Those eye holes are small as it is and depending on how one does the LEDs, visibility could drop to 0. My current thought is to actually cut out the layer that contains the eyes and back it with black sheer fabric(similar to Kylo Ren), take a bit of black Sintra behind the fabric to attach my LED eyes to through the fabric and then see around the LED eye essentially. Other option was using something like these costume glasses and trying to just see through the LED. https://www.amazon.com/NORK-Glasses-Eyeglasses-Halloween-Accessories/dp/B0BBVLXZF7/ref=sr_1_15?crid=1SLPHAEZWI2P6&keywords=led+cosplay+eyes&qid=1668696866&sprefix=led+cosplay+eye%2Caps%2C170&sr=8-15 -
New Inquisitor (Tales of the Jedi)
CrazyMarlin replied to TheLoneInquisitor's topic in Miscellaneous Characters
Makes sense, after she beheads him you see the whole hood, mask contraption deflate as if it were a self contained life support bubble that the air was just let out of. -
New Inquisitor (Tales of the Jedi)
CrazyMarlin replied to TheLoneInquisitor's topic in Miscellaneous Characters
That was my thought as well. Given how large they are I was going to try a two piece cricut stencil and use fabric paint. Probably blotted on with a sponge to try and get a little weathered look. -
New Inquisitor (Tales of the Jedi)
CrazyMarlin replied to TheLoneInquisitor's topic in Miscellaneous Characters
Took this pic yesterday. The belt boxes need to be sanded and painted, but I finished the lights yesterday. This is everything I have up to this point. No laughing as its still really early! That's the version 1 mask from Galactic Armory. The correct version is finishing printing today. Not pictured is what I guess I will call the outer cloak that I've got from a previous kit. It also would look better on a person and not laid flat.
-
New Inquisitor (Tales of the Jedi)
CrazyMarlin replied to TheLoneInquisitor's topic in Miscellaneous Characters
So on the "kama", if thats what we want to call it, I took it as two separate pieces, or at least, two panels joined in the back as you can see that there is no piece extending down from the rear between his legs. I sewed two panels that I intended to attach with some strapping in the back. It also looks like there is a roughly 4 inch(assuming the standard 2 inch belt) belt/girth piece that attaches the two side panels together. I was also going to attach the upper portions that end under the chest to the shirt directly, but leave the bottom pieces free like a kama. I started designing some gauntlets but had not seen those screenshots. The underside is much more complicated. Almost looks like a free floating elbow guard in one shot then just an extension in another. The cloak looks much longer in that drawing than it did in the show. Which I like better. Knee length capes look kind of silly IMO. -
New Inquisitor (Tales of the Jedi)
CrazyMarlin replied to TheLoneInquisitor's topic in Miscellaneous Characters
Nice. I'm in the middle of printing the updated version myself. I drew up and printed a couple of belt boxes with the red/white light combo and have made hip pouches for the side belts. Have boots, pants, shirt, and am currently sewing up the side cloth armor(I went with a quilted look like old D&D padded armor, as you can see some lines that look like quilted squares on his left side) and making the belts. I have an oversized cloak from another project that I may convert. Trying to figure out how to paint/print the oversized imperial cogs on the shoulders.