
-
Announcement
Welcome to the forums!
If you are a newly-approved member, make sure you check out the New Member Checklist!
If you are a Detachment member and can't see the member-only area, post here for access.
-DV


Koda Vonnor
-
Posts
334 -
Joined
-
Last visited
-
Days Won
1
Content Type
Profiles
Forums
Gallery
Events
Everything posted by Koda Vonnor
-
I finally got all 185 photos processed and posted. Shooting from the hip means more cropping and micro-rotations. Most all of these were taken with a Canon EOS Rebel T3i 18mpx. If you would like the original resolution (5KPixelWidth) for any image please PM me. Here are a few highlights, the rest are in the bucket. ~ Vonnor
-
If any Starkillers are interested in trooping a TFU mobile photo-op group at Celebration VI, shoot me a PM. I will be in Tie-Factory Kota most of the day on Saturday and likely Friday as well. ~ Bill C.
-
Back in Black ... and Red (Daritha's Starkiller Sith Robe)
Koda Vonnor replied to a topic in Starkiller
Looks good! ...boy. ~ Koda "Old Man" Vonnor -
I'm not yet a Sith Lord, but I'll be there.
-
How did you do the weathering, may I ask? Is that freehand air-brushing? If so, that's one skill I really need to embrace. Looks very nice. ~ Bill C.
-
Make-A-Wish charity helmet project; HRG Trooper
Koda Vonnor replied to The Clone Emperor's topic in Off Topic
I looked at the maquette and how the lateral head ridges flow smoothly into the center ridge and wondered how you'd get them to blend with the leading ridge point, then I saw that they'll follow along side the centre ridge. Was hard to see that at first glance. Also, very fine solution on the recessed ovals. I can attest to the ofttimes necessity and measurable benefit of approaching a problem from another angle. I'm not surprised however, as you strike me as being about as comfortable in-the-box as a pacing tiger. Do you envision jaw articulation or will it be fixed? It looks like hinge points there. Really starting to look good now. ~ BC -
After sanding down the Bondo correction coat, I added the axial edge stripping. The radial edging will not go on until after the wrist-clip sculpt. I jigged it up with some temporary spacers and center-line markers, then cut the strap slots semi-freehand with a Dremel dental bit. I did use a metal guide that I clamped to the work piece, and just ran the spinning shaft up against the guide as I cut the initial slots. It took a few hours just to widen and angle the slots to receive the straps. The slots still need to be about a millimeter thicker to get 3mm straps into them. Using the cutting guide and taking it slow on the slot widening really came out a lot cleaner than the first attempt. I'm going to sculpt the wrist clip on the left arm, as the symmetry came out much better than the right. One interesting thing I stumbled upon as I practiced free-hand Dremelling on a previous failed vambrace plate: I might cut the straps out of the junk hard models. The contour curve is about perfect and the 4-layer laminate allows a bit of flex. Using the polyester resin to bond them will make a ultra-durable production piece. The only challenge will be insuring uniform strap thickness. I also noticed after taking the hi-rez close-ups below, that my cut corners were not so sharp. I have since rectified the situation. You super-observant folks will notice how many layers of cloth were used in the laminate. Next up, straps, elbow guard and forearm plate. The closure design is slicker than the TFU version, and just as hidden. You don't wanna miss that. ~ Vonnor
-
I used the Z-Poxy (Zee-Proxy I call it ) on the insides of the plates, and they cured very hard and shiny. A little 320grit should keep them from sticking to the shirt fabric. I chose not to use the stuff on the outsides, because after I sanded the surfaces with wet220 they lost all the stickiness. They did have a lot of surface ripples though, so I spread a thin rondo (25/75 resin/bondo) correction coat and after it set up I wrapped the somewhat sticky surfaces with plastic wrap. One of the google'ations suggested that. It' keeps the air from getting to the air-inhibited resin and lets it set up completely. We'll see if it works. I also poured the production hand guards this morning. Here are the rough pulls using the mold bottoms as forms while they fully cure. The plastic-wrapped vambrace plates are in the BG. I'll hit them with the mouse sander at the Garrison Tyranus armor party this Sunday. Stay tuned. ~ Vonnor
-
I was wondering why the surfaces of the plates were still sticky after 3 days. I used about 60/40 mix of Bondo/poly-resin to coat the outsides and insides. The insides really need to be smooth and dry so as not to bind up on the shirt during pronation/rotation. According to google, the resin you can buy at Home Depot is what they call laminating resin, and contains an air inhibitor that keeps the surface tacky so that subsequent layers of laminate (glass cloth in my case) will adhere more easily. Bondo does not have that property, and normally you'd apply the final spread of full Bondo, like in auto body work. The Bondo keeps air from reaching the resin below, so the resin cures fully. My surfaces are still tacky because I used a resin/Bondo mix. There was a lot of advice on how to remedy the situation, and the quickest solution was to use an epoxy finish coat. I got some Z-Poxy from a local RC model shop and will see how that works. More later. ~ Vonnor
-
most awesome.
-
Vambrace plates: They came out very nice contours and fit. I did get a small bit of damage on one of the edges, but the edge trim and fill will fix that. I also gel-coated the inside surfaces smooth to help facilitate free rotation/pronation over the shirt. I'll polish the surfaces and add the edge trim at the Garrison Tyranus armor party next weekend. Right now they're still a little tacky so I need to let them dry. Stay tuned. ~ Vonnor
-
Here is the left vambrace plates sculpt, with tapered mold walls added and right vambrace molds in the BG. Note the major wall taper at the ends of the channel divider cuts. This is so that the skewed edges of each mold half will clear the plaster armature when removed from the model. I broke a mold a couple tries ago and after adding these tapers had no problems the last go-around. More to come. ~ Vonnor
-
Never presumed but always appreciated, Maestro. If fates are kind, the General will be returning to The Javits in the fall, sporting a much spiffier (though no less obscure) shell:
-
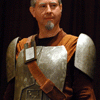
When I entered the EU costume recreation fray back in 2006, it was primarily because I'm a great fan of the EU. In 2008 I decided to expand my crafting universe to include scratch-build armor. This time, to be honest, it was also to prove to myself that I could hang with the big dogs of the uber-accuracy school. While I still have a ways to go on that ambition, I'm having a ton of fun learning and practicing the craft. As to what makes shrouding myself in SW "obscurity" worth the effort: During the Dragon*Con2008 parade, while debuting TFU's Rahm Kota, I passed a young boy along the route. He saw me and his eyes went as wide as his grin. He shouted, "Force Unleashed!" Keep in mind this was two weeks before the game was released. In a crowd of TK's, a plain white clone gains hardly a second glance. But when a rare singularity of ultra-accurate recreation is recognized, it often steals the spotlight. ~ Vonnor
-
Speaking of practice, this sculpt went much faster and easier than the last ones. Here it is shaped, scraped, smoothed and walled. I kept the edges very thin this time based on lessons learned from the other two fiberglassing attempts. The edge trim will add the right thickness. The divider cuts are still a bit off, but I can live with 0.125 diff. Won't be noticeable when worn. Will take the molds later today or tomorrow then sculpt the left arm - I want to do all the fiberglass castings on the same day. ~ Vonnor
-
Here are the rough break-out vambrace halves. At first glance they look pretty good. The contour and taper are much closer to the reference images and they came out feather light. But looking at the end view of the aligned pieces, you can see that I accidentally cut one of the skewed split lines wrong on the sculpt. I broke the cardinal rule of all crafting: "Measure twice, cut once." Look at the difference in the twisted cuts. Not sure how it happened, but the rear half is almost 3/4" bigger around at the elbow than the front half. That caused the "under-bite" misalignment of the two halves seen on the left side of the photo. At the wrist they are both equal. I thought about trying to make it work, but it's going to be quite noticeable near the cross straps so... I will do one more sculpt/mold/casting. I'll likely go 5 layers of fiberglass this time as 4 was a bit flimsy. Luckily the only significant loss was time. I have plenty of clay, Hydrocal, and resin/bondo. Third time's a charm, they say. Practice, practice, practice... ~ Vonnor
-
Back on the project again. Some lessons learned were applied to this re-build. After measuring the first attempt at the arm vambrace halves, I had a good half inch diameter to play with at the elbow. The re-sculpt was completed in about 4 hours. I did that along with the new molds last weekend. Here is the fiberglass lay-up I did today. Some things I did differently: - Built up the mold-walls around the sculpt so that there was only about 1/8" model thickness around all edges. - Split the mold halves along the divide so I could fiberglass each half separately - Cut a paper contour template and used that to cut out the FG cloth - Wanted to lay 4 layers of cloth one piece per layer - that really came out much cleaner! - Mixed the Rondo gel-coat thinner but hotter (little more resin and hardener than normal) - The cool weather helped a lot, had time to brush on the goop then hit it with a blow-dryer and it kicked real fast. - Let the gel-coat set up a bit longer so the first resin brush-in didn't funk up the gel - Used MUCH less resin - took a lot of time to dab and stipple the resin into the cloth each layer I still have to add little break-away tabs between the halves, to hold them together while the surface is sanded, slots are cut, and the cross-straps are added (That's what the registry keys are for). Will be rolling the updates much faster again. Stay tuned. ~ Vonnor
-
EmenyZero, I find your signature ... disturbing. (not really, just tired of all you guys destorying me) ...but your costume fantastic! How did you do the fabric weathering, may I ask?
-
Check your PM's Pam. ~ BC
-
Pour production left handguard Sculpt wrist clip Mold wrist clip Fiberglass wrist clip Shape/sand wrist clip model Make block mold for wrist clip Pour two production wrist clips Make 2 sintra elbow guards Sculpt left gauntlet front Sculpt left gauntlet rear Make left gauntlet molds Fiberglass left gauntlet front Fiberglass left gauntlet rear Shape/sand left gauntlet front model Shape/sand left gauntlet rear model Repeat previous seven steps for right gauntlet Make sintra left forearm plate Make sintra right forearm plate Make mandrel for belly plate Cut/bend sintra belly plate Lifecast torso Sculpt backplate Mold backplate Fiberglass backplate Shape/sand backplate Sculpt breastplate (BP) Mold BP Fiberglass BP Shape/sand BP Fit backplate/BP to armature Sculpt scapula plate Mold scapula plate Fiberglass scapula plate Shape/sand scapula plate Build bandoleer ribbed straps Make metal strap for bando Assemble bandoleer Make shirt Mark hip straps and assemble Assemble main belt with custom hardware Make clips for saber holster frame Sculpt contour mandrel for saber holster Mold holster mandrel Cast holster mandrel Lay fiberglass over holster mandrel Shape/sand saber holster Paint and lace-up saber holster Paint armor Weather armor Build armor mountings/closures Paint glove fingers and belt front Weather boots 58 items. 24 weeks. Not likely to happen by CVI/D*C, but it will happen. ~ BC
-
As a way of a bump-slash-update, I spent the morning attempting to build custom leather gloves with straps around the wrist. This was to approximate the look of the CG model. I had purchased a couple of sheepskin hides but one turned out to be paper fragile and tore almost by just looking at it. I reverse-engineered (seam-ripped) an old gauntlet that was too large for me and used it to cut out patterned pieces, then tried to sew them up with a machine. Yep, another "fail" post. The second hide turned out to be a "napa" hide. Basically a cheap split-grain with an artificial surfacing applied to it. The seams ripped out as soon as I put my hand into it. So after a frustrating but educational waste of a precious weekend (my Sundays are all shot), I decided to punt the custom gloves. In the interest of short-cutting the CVI countdown clock I ordered a pair of these. That's the company I bought the TFU1 Kota fingerless gloves from. I'll use some of the cheap hide to make wrist straps for them, sew some velcro to the backs to hold the handplates, and call it a day. Well, not exactly "call" it yet. I'm heading off now to lay some clay on the ARMature for the vambrace re-dux. Sculpting is therapeutic by comparison. ~ Vonnor
-
That's hot, Brian. If mine don't settle in to close to that color I guess I'll have him go over them again.
-
I actually looked at yours Maestro, for inspiration on placement and scaling. The color of the glyphs in the lower right of your first photo is closer to what I was shooting for. I found an artists blog where the pronounced delayed darkening of the Starbrite 010 was described and seconded, so I am still hopeful. Regarding the black border, I compromised with a lower right shadow to create some depth. I still need to get the vertical star-point shadow corrected after it fully heals. See these early (needle+2hr) photos of the well-ointmented art: I'll get some better focused ones taken in a couple weeks. ~ BC
-
My niece does male anime characters and goes about between a C to D cup bra size so I know it can be done. I first saw her wrapped and in costume at Otakon a couple years ago and as a costume builder was impressed by the transformation. Do some googling I'm sure you can get good info on techniques. ~ Vonnor
-
Hey Brian, What did they use for your dark red? He used Starbrite 010 Deep Maroon for mine. It's supposed to go in kinda pink fuscia and darken over time. I hope it does cuz after the initial peel-away it's pretty candy-red looking. I was hoping for the color of this website's bg. ~ Bill C.