
-
Announcement
Welcome to the forums!
If you are a newly-approved member, make sure you check out the New Member Checklist!
If you are a Detachment member and can't see the member-only area, post here for access.
-DV


TK Keith
-
Posts
336 -
Joined
-
Last visited
-
Days Won
16
Content Type
Profiles
Forums
Gallery
Events
Posts posted by TK Keith
-
-
It’s been quite a while but these look very similar to what I use.
-
Hi! I just use the under armor compression shirt and leggings. I did not attach the armor to the bodysuit pieces. I used black webbing straps for most of the pieces like the chest piece, cod piece, and shoulder bells. The thighs hang on nylon straps from a belt under my l cod piece. My forearms are padded a little on the inside to keep them in place.
-
Welcome back to your acolyte build! It’s good to see the progress you’re making.
About your missing pieces. I have seen a few different types of belt patches get approved. I just picked mine up online as I recall. So hopefully you’ll be able to find some thing small that looks close.For the boots armor, are you able to 3D print some armored pieces for that area?
lightsabers- remember that these are optional. You can always submit your costume for approval without it. I doubt anyone would notice the difference if you used yours during a troop.
-
 1
1
-
-
I know several troopers have used the neck seal made by Darman. He's on etsy and I'll include the link.
I have the one made by Wolfgang that is picture in the CRL. It is heavier and not made from fabric.
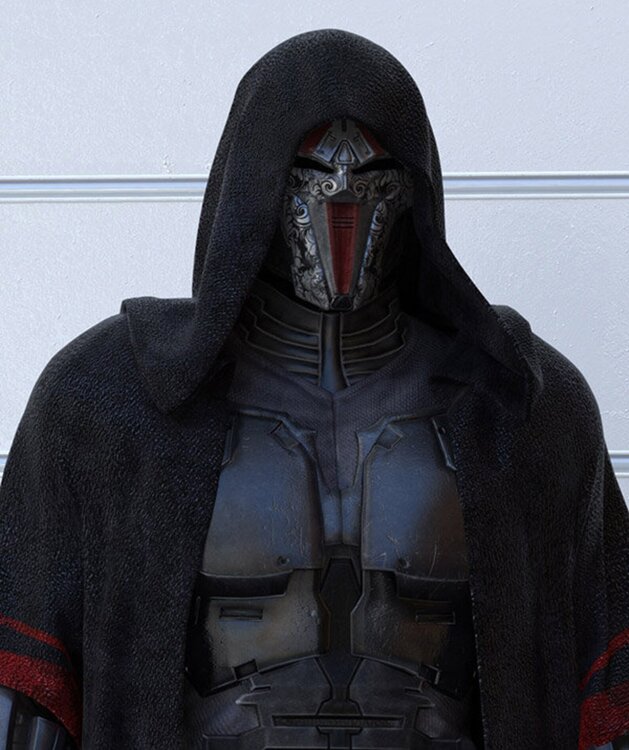
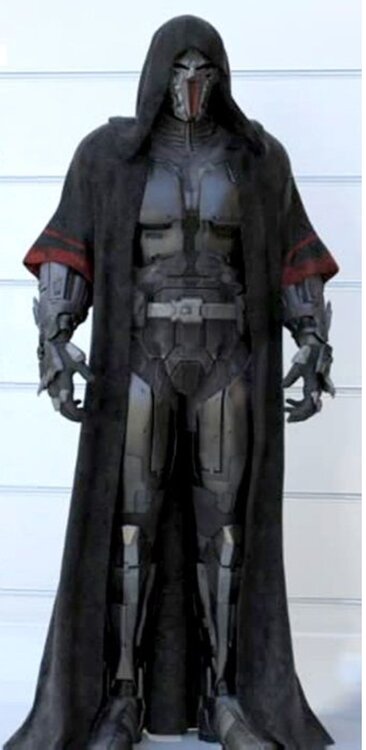
Here's a nice hi def screen shot of the reference image. I hope this helps!
-
Congratulations on your progress! It is really coming together.
I have a question and feedback about your robe. I drew a yellow line in the picture below- is that where the hood drapes? If so, it seems to extend too far. The CRL says it should drape to the shoulder. (Reference picture included below.)
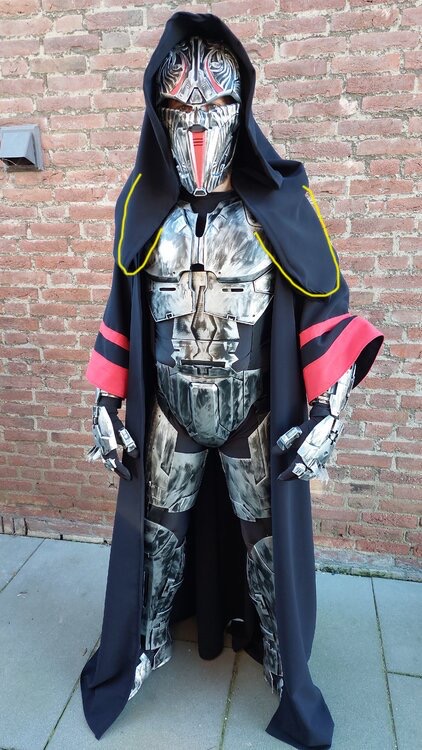
I might also recommend shortening the sleeves so that we can see more of the forearm armor. The CRL says the sleeve should terminate just below the elbow.
-
I used some tan cotton webbing 1.5 inches wide.
what strips are you referring to? The CRL description is not very specific so I would think something plain would work well.
-
1
-
-
I know your first link from do3d has been used successfully and that would be a good resource to go with. https://www.do3d.com/product-page/sith-acolyte-star-wars-body-armor-3d-model-project-2577
I am not as familiar with the armor in your third link.
The armor file in the second link has a discrepancy with the thigh armor detailed. For more details, you can see the February 2019 discussion on this thread.
-
Hi Jan! I'm glad to see you are already starting to get some feedback.
There used to be a tutorial for creating a Jedi Robe, which my mom modified to create my robe. I believe she shortened the sleeves and altered the hood construction so that there was no visible seam. The site that the tutorial was on looks like it has been archived, but there is a pdf that was saved. I'll attach that.
-
2
-
-
Update: the website hosting the robe pattern has been archived, but here is a pdf of the pattern that was saved.
-
Hello! My name is Keith and I am the Sith Acolyte costume mentor. Thanks for starting a build thread on the forum! I look forward to seeing your build pics.
")
Your glove armor is looking good! A question about the armor on your thumb... it's hard to see in your picture, but it appears the longer section of the armor is pointed towards your thumbnail. In the reference image the longer section of the thumb armor heads is pointed down towards the forearm. (See reference image below.)
It also appears that your saber doesn't really match the reference images. The saber is an optional accessory, but I thought I'd mention it. I know Vaders Vault makes a version of the acolyte lightsaber, but it isn't inexpensive.
I hope to see more progress pics soon. Best of luck on your build!
https://databank.501st.com/databank/File:Acolyte_gloves.jpg
https://databank.501st.com/databank/File:Sith_Acolyte_Saber_hilt.png
-
Hi Salvatore,
The Sith Acolyte is a terrific set of armor. I am the costume mentor and will do my best to help where I can. I did not 3d print mine, but in the forum there are build links from several members who did 3d print their armor. There is also a group on Facebook focused on 3d printing armor from SWTOR, in case you haven't found them yet. They are called "3D-PROPS SWTOR Buildgroup"
I know that forum member Darth_Harold did a 3d print set of armor from DO3d.
Here is his build thread
-
On 1/4/2022 at 3:29 PM, mpression said:
I am 3D printing all the parts, but to make the cloak, is there a pattern that is a "standard" or is it a cloak from another outfit, and if so, is there a pattern I can get to make it?
Also, what type of material should I use?
I used black waffle weave fabric. My mom used the patterns here are a starting point. I believe she made the hood larger though. And we definitely had some trial and error with the hood attachment.
-
You’re looking awesome. The robe turned out well!
It looks like your thigh and shin armor are pretty close together. How does walking go for you?
-
Your robe is looking good. How did it go with getting no visible seams in the hood?
-
I would recommend you ask the UKG GML specifically. I believe I have seen that robe get approved by other troopers.
I’m not sure if other troopers have used that neck seal or not.
-
1
-
-
Looking amazing! Thanks for continuing to share pictures of your progress with us!
-
1
-
-
Your progress looks excellent! I really admire the effort that went into the gauntlets. But yes I agree that matching the armor to the helmet more would be a good idea. ?
-
1
-
-
No need to apologize. Builds progress at their own pace. Just enjoy the ride.

-
14 hours ago, Tarok said:
I’ve got the 3D Props NL armour. Haven’t started printing it yet though as I have other projects queued first.
ABS armour, specifically vacuum formed ABS armour, is more pliable and more forgiving its 3D printed equivalent in PLA, PETG or even ABS. I took a fall in my stormtrooper costume about a year ago. Apart from a few scratches, there wasn’t much damage. Had it been printed, the parts would at best have cracked, at worst shattered.
The advantage of 3D printed armour is that one can easily resize parts to ones own unique dimensions.
The strength of the parts depends on a variety of factors though, such as print material, print wall thickness, infill %, and even heat the plastic was fused at. This is in addition to how the parts are finished, e.g. spray filler/putty vs. Plastic wood filler vs. Bondo, vs. Auto car putty, vs Epoxy resin, vs UV resin.
I don’t believe there’s one best medium for our hobby. One has to pick those that one is most comfortable working with.Thanks for leaving this detailed response Rudi! I was very much hoping to see the insights of other builders. I have a 3d printed FO-TK blaster. It was fun to assemble and paint, but I am definitely more cautious with it because I'm afraid it'll break if it gets bumped against something hard. Once I was trooping with a fellow FO-TK. We were walking down some stairs. The blaster attached to his right thigh bumped against the railing of the stairs. It broke off his thigh holster and clattered down the steps, leaving pieces as it went. I know a little blaster pistol is probably more fragile than larger armor pieces, but I've never forgotten that "oh no!" moment as I saw it break apart.
-
Hi Joe!
I've never actually done a 3d print build of armor before, so I can't give you any advice about that. Maybe some of our other members can? I'm including the names of two forum members who 3d printed their acolytes. I'd encourage you to reach out to them about their experiences.
I know that forum member Darth_Harold did a 3d print set of armor from DO3d.
- Here is his build thread
- I think this is the armor he used. https://www.do3d.com/product-page/sith-acolyte-star-wars-body-armor-3d-model-project-2577
Member PaulTR also did a 3d print build. Here is his thread.
-
Things are coming along well! Your mask looks awesome.
-
1
-
-
Great! Please let us all know how it goes.
-
One thing I always struggle with when looking at pictures is determining how dark the gray actually is. Sometimes what appears silvery actually looks darker in the sunlight in person. I personally prefer a dark gray, but I have seen acolytes get approved with both a darker gray and a silvery gray finish.
-
1
-
-
On my FO-TK armor I used a plastic primer coat first, then multiple coats of the white paint. I didn't actually sand it first, but it came out very well.


Lee's Sith Acolyte WIP
in Sith Acolyte
Posted
Your progress is looking great! I like the robe but you’re right that you should take it up a little. The CRL says:
“The length of the robe should fall no more than 1 inch from the ground.”
what glue are you you using that is giving your problems on your thighs?
For the shoulder pauldrons- since those are under the robe they really just help add to the appearance of some armor and bulk beneath the robe.