
-
Announcement
Welcome to the forums!
If you are a newly-approved member, make sure you check out the New Member Checklist!
If you are a Detachment member and can't see the member-only area, post here for access.
-DV

Darth Sunshine
-
Posts
34 -
Joined
-
Last visited
-
Days Won
3
Darth Sunshine's Achievements
11
Reputation
-
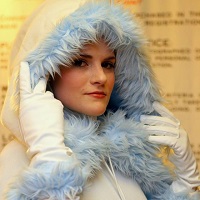
It's been about six and a half years since I debuted this costume, and I wanted to talk about how the Siser EasyWeed Heat Transfer Vinyl I used for the gold trim is holding up. I was getting everything ready to troop with my Visas costume for the first time since the Before Times a few weeks ago, and found that the top part the golden trim on the veil had begun to crack and flake off a bit. Everything else looks great, but this particular piece is subject to more wear and tear than the others since the veil gets stretched a bit when I put it on, and sometimes I tug on it if the veil rides up during a troop. Fortunately the Lumiere paint in True Gold, a popular choice for painting the gold details on, is a good match to the EasyWeed in Gold, and it touched up nicely. However, I'm going to replace it so that it's back to looking 100% since this is a part of the costume people tend to scrutinize carefully when they try to figure out how I see out of it. So to anyone researching this costume: buy some extra chiffon for your eyepiece for so you can replace it as needed if you choose to use Heat Transfer Vinyl for your trim. And be mindful of tugging on this part so that the vinyl will last longer.
-
I was approved in both the RL and 501st with an Ultrasaber Shock. It's bigger than I'd like and bit awkward in my hands. When I tried to replace the pommel with a more accurate one it managed to make it look bulkier and odd. But it shipped super quick, was in my budget, and is still working well after a couple of years. I'm planning on replacing it with a Vader's Vault Rev-n at some point to have something more accurate and a better fit for my hands. A friend of mine has one and I love it, he has a couple other sabers from them and also heartily recommends them. I have a Saberforge, the sound stopped working after a few months and then the light stopped working after a year. A couple of friends of mine had issues getting theirs shipped in time for an event recently... and they had ordered waaaaaaaaay in advance.
-
Gotten a few questions about my makeup, so for future reference here's what I use. Foundation - I didn't do anything to make myself pale. That's just my skin color and the foundation I use on a regular basis. >___>;;; I contour my cheekbones to give myself a gaunt look, but I haven't done the whole full-blown veiny dark side look yet. Lipcolor - I use Maybelline's Superstay 24 Hour Lipcolor in Constantly Cabernet. It really lives up to its name; this will stay on for hours and hours and hours. (I usually need a remover to get it off). It's perfect for conventions.
-

501st/SLD and/or TFE Detachment Access Requests
Darth Sunshine replied to DarthBrute's topic in Welcome Area and Forum Help
Thank ya thank ya! I figured it was something to do with the forums being buggy. I appreciate the update and approval! -
Is there any reliable way to contact the admins? I pm'ed Darth Brute a week ago but haven't received a reply. I also sent an email to the Webmaster and Detachment Leader. The email to the Webmaster was bounced back, and have heard nothing from the Detachment Leader.
-
Thanks!
-
Approved yesterday, got my numbers this morning! SL-32906!
-
501st/SLD and/or TFE Detachment Access Requests
Darth Sunshine replied to DarthBrute's topic in Welcome Area and Forum Help
Requesting Detachment Access! http://www.501st.com/members/displaymember.php?userID=21379&costumeID=115 -
It'll definitely last a day at a convention. I used Ben Nye paints before switching over to alcohol based, and had no problems with it fading over the weekend. I had to do touch ups from time to time between conventions, but I think the only times I had to repaint mine were when I changed the shade of blue I was using.
-
The gloves were done with Jacquard Lumiere silver fabric paint. I used thin strips of tape to determine where I wanted the stripes to go. When I was happy with the placement, I masked off the tape with more tape, peeled off the place holders and painted them. Still haven’t sent in submission pics. After I saw full body pictures from my first round of submission photos, I realized the hem was a little uneven and long overall. But soon… I’ll get there eventually, so sad I missed out on the shirts. ;w;
-
The sash is all one piece. I chose a thin viscose with a soft drape since it appears sort of bunched all the references. I made the first version out of three layers of viscose, but then remade it because it quickly stretched and warped with no stabilizer. I cut one long piece of a regular cotton to act as a stabilizer, one piece of viscose cut to the exact same shape as the cotton, and a third piece about an inch wider. This extra wide piece was the outside, and I allow it to fold on itself however it wants, creating that bunched look. For more details, check out Vera’s self-scrunching obi tutorial. - http://www.forum.rebellegion.com/forum/viewtopic.php?t=26587 There are four snaps total. Two at the ends to hold it together, and one in the middle and the end to stabilize it. That way I don’t have to worry about it shifting.
-
Regarding the veil and trim – I really really wish I’d documented this part better. The veil was the most frustrating part, but I just didn’t think to stop and take a lot of pictures. It’s kind of hard to describe how I did it, because a lot of it was just sticking it on a wig head, draping, pinning, stitching and seeing what happened. But hopefully just knowing how I shaped the back will help people out in the future. The back of it is all one piece. I cut the top of it on a fold, and started a seam in the middle a few inches back from the forehead seam. The front of this piece is curved slightly forward. I cut it at first where it’s outlined in red. The green is where the final cuts roughly ended up being after I stuck it on a wig head, and cut it to where it should hang. It was self lined with another identical piece. I wouldn’t recommend tracing this pattern; it’s just a quick sketch. The trim was done using Siser Easy Weed Heat Transfer Vinyl. I won’t go into the specifics of applying it, because you can find all that information elsewhere. But basically, it’s a super thin vinyl with adhesive on the back. You cut it out (by hand, or in my case, my friend’s did it with their plotter), place it on your fabric, and press it. It bonds permanently to the fabric. It’s super thin stuff, and won’t affect the way your material drapes…. Unless you cut some excess and fold it under and press it like I did. I’m glad I folded the trim of the eye piece under, but wish I hadn’t done that with the sleeves and hem of the veil, it made them a little stiff. :/
-
Some notes on the outer dress - Like a lot of people, I used Simplicity 7078 for the outer dress. I picked my copy up from ebay. I modded the neckline by grabbing a jacket pattern with a turtle neck from my pattern stash, traced its neckline over the dress pattern, and used the turtle neck pattern as it was for the collar. Worked out well on the first try. As I mentioned before, some friends of mine made giant vinyl decal stencils; the results were awesome. I didn't have to worry about lining up a stencil correctly each time, or trying keep the paint even with each new section. I just hit each panel with several light layers. Unfortunately, I was running out of paint when I did a couple of the back panels. I didn't notice until after I had taken all the stickers off. :'D (Sunlight really makes them pop, regardless of how heavy the paint is, so they looked fine next to the other panels out side where I'd been painting them. Inside, where I peeled them off, it was kinda dark and I couldn't actually see the pinwheels on any of the panels.) So those pinwheels came out super pale. A very kind friend of mine used her CO2 laser cutter to make a stencil for me to touch those pieces up with. The stencil material I chose is .125" thick cast acrylic. I do not envy those of y'all who had to paint the entire dress this way.... When sewing, I used binder clips to keep the pieces together, since vinyl doesn't recover from pinholes the way other fabrics do. I used bits of parchment paper when I had to clip them to the "right" side of the fabric; other wise they stuck and left nasty indents. Pressing this fabric was very time consuming. A direct hot iron warped it, so I had to place a cloth between the seams and iron, press them, then lay a heavy book on top it and let it cool. Felt more like working with thermoplastics than sewing, lol. (Although since this is PVC, I guess I was doing a combo of both.)
-
Thanks ya ladies! Still haven't sent it in yet; waiting to get pictures back. It might need a couple of small tweaks, but no more than a day's worth of work. In the mean time, here are some construction notes. The inner dress is based off of Simplicity 2917. I removed the front center seam, lengthened it, and then took out a lot of the fullness to make it A-Line. I was quite nervous to keep taking it in, I'm used to making very full dresses. XD I used the sleeve pattern piece it came with as a starting point, and free handed the bell sleeve pattern. The unmodified sleeve for version B might very well work for KoTOR II Visas as is. Rather than leaving the hem of the sleeves straight, I tapered it to avoid a pointed look. One of the FAQ's I got over the weekend was how I did the gold trim. I'll get to that in another post.
-
Submitting my photos for approval soon! I'm so happy to have this done!
