
-
Announcement
Welcome to the forums!
If you are a newly-approved member, make sure you check out the New Member Checklist!
If you are a Detachment member and can't see the member-only area, post here for access.
-DV

kaabous
-
Posts
40 -
Joined
-
Last visited
-
Days Won
1
Content Type
Profiles
Forums
Gallery
Events
Everything posted by kaabous
-
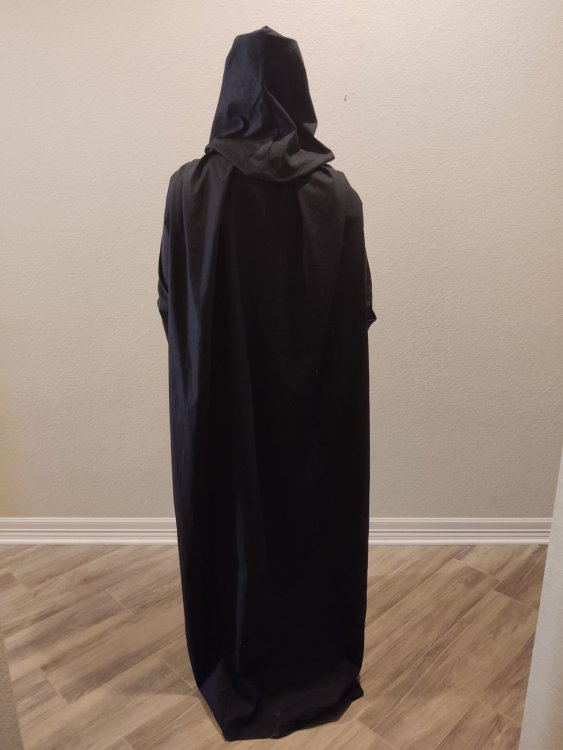
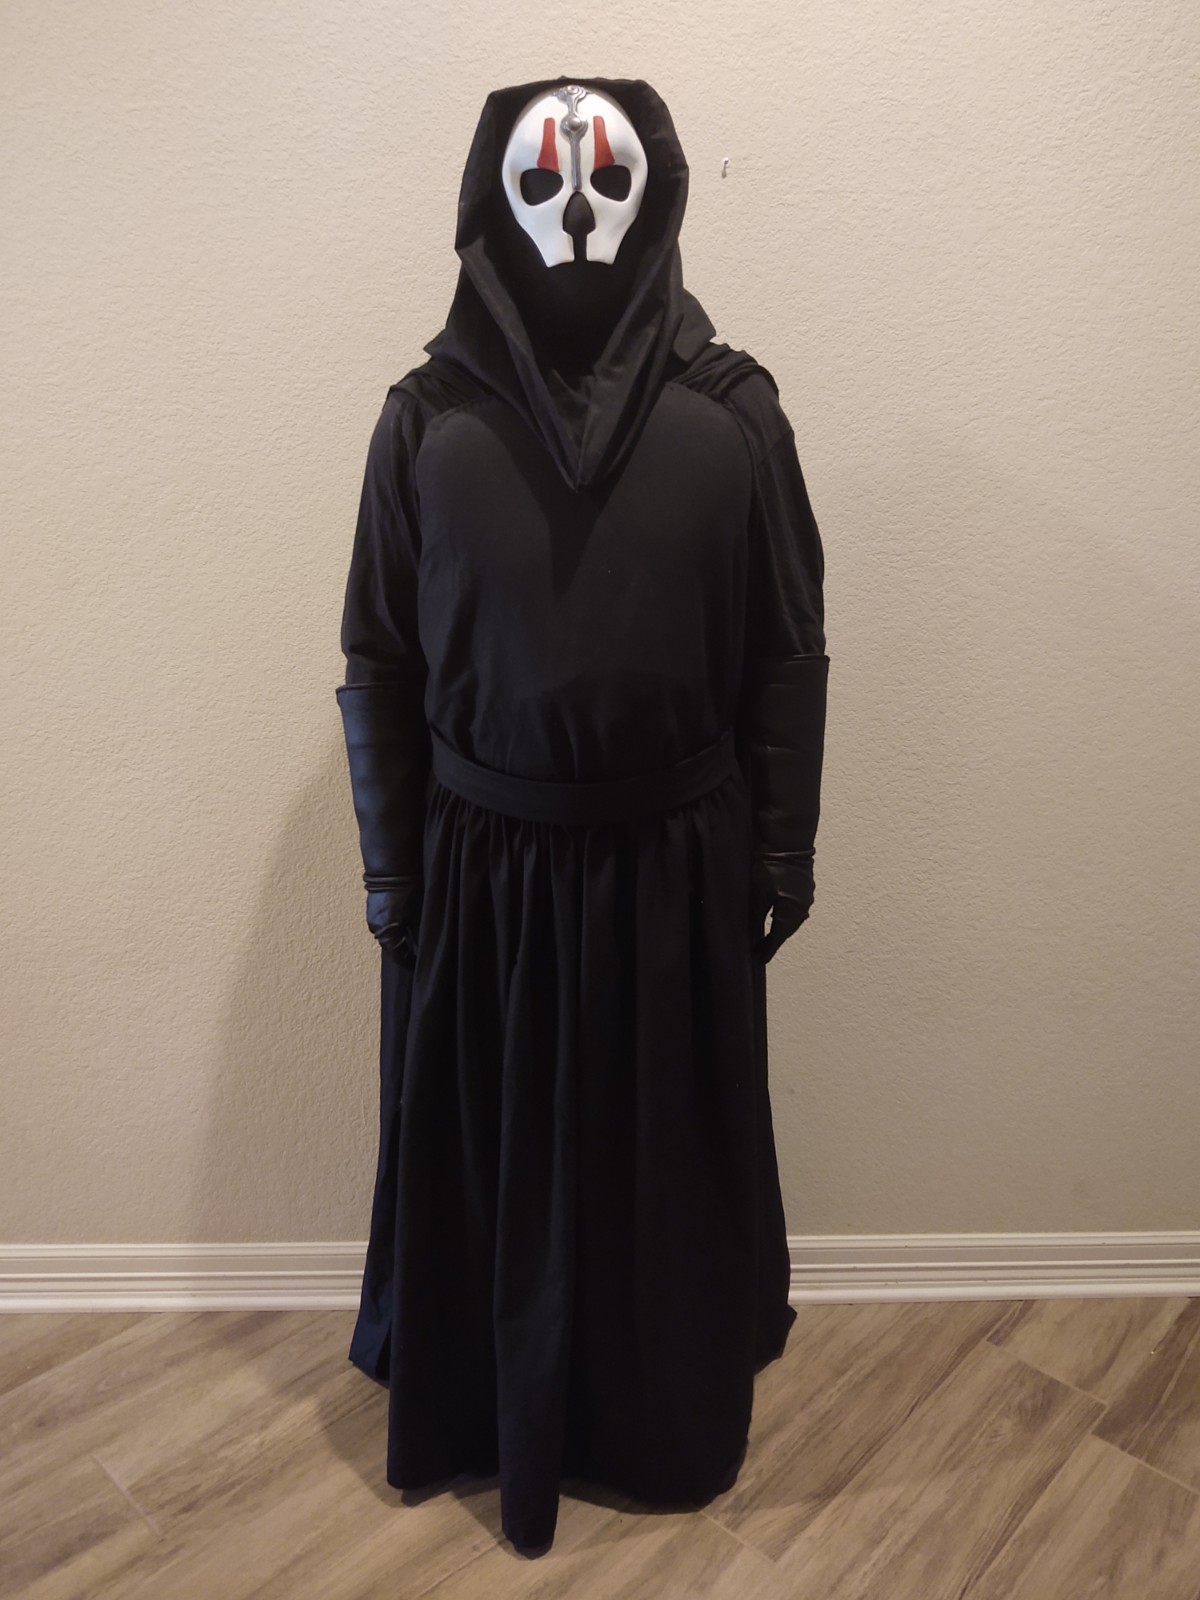
I have finally gotten some time to get this finished up. I think it is a keeper. The material is a little stiff since is just off the bolt (especially on the cowl), but I think it will lay better once it is broken in a bit. I'm working on some modifications for keeping the cowl aligned better and returning to "true" after moving around.
-
Wow, you've been busy! Looks great! I admire you're willingness to take a dremel to it after all of that work. Is the weathering all air brushed? Or did you use other media too? BTW, what 3D smoother do you use? I've use XTC 3D, but I'm always on the lookout for better options.
-
Nice work! You are making great progress on this kit!
-
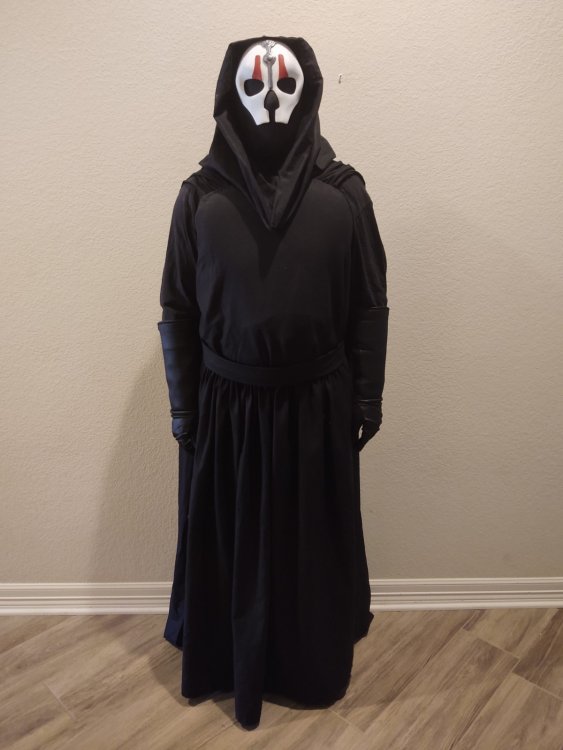
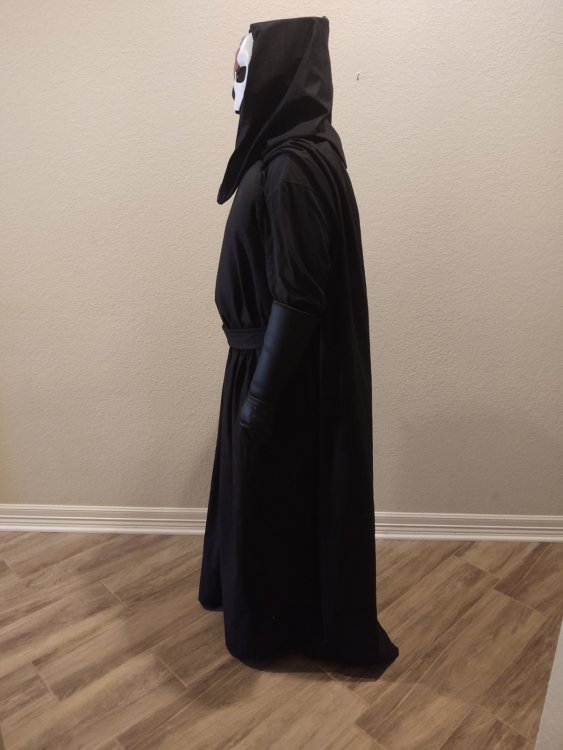
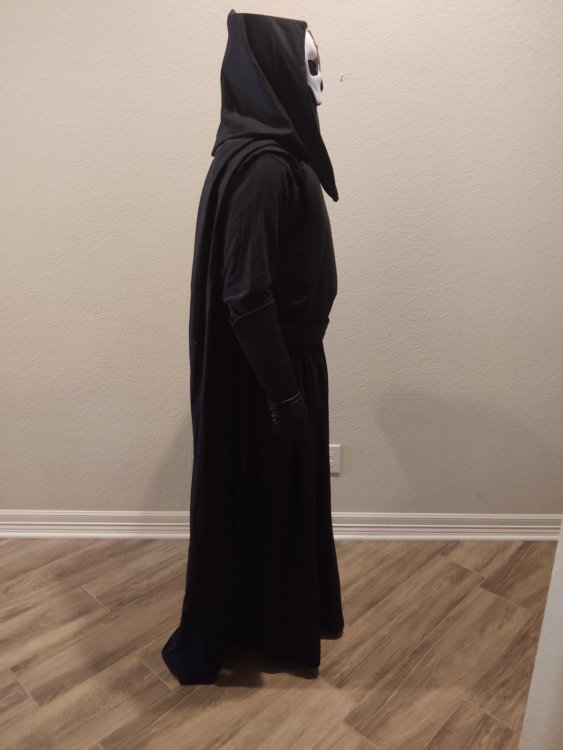
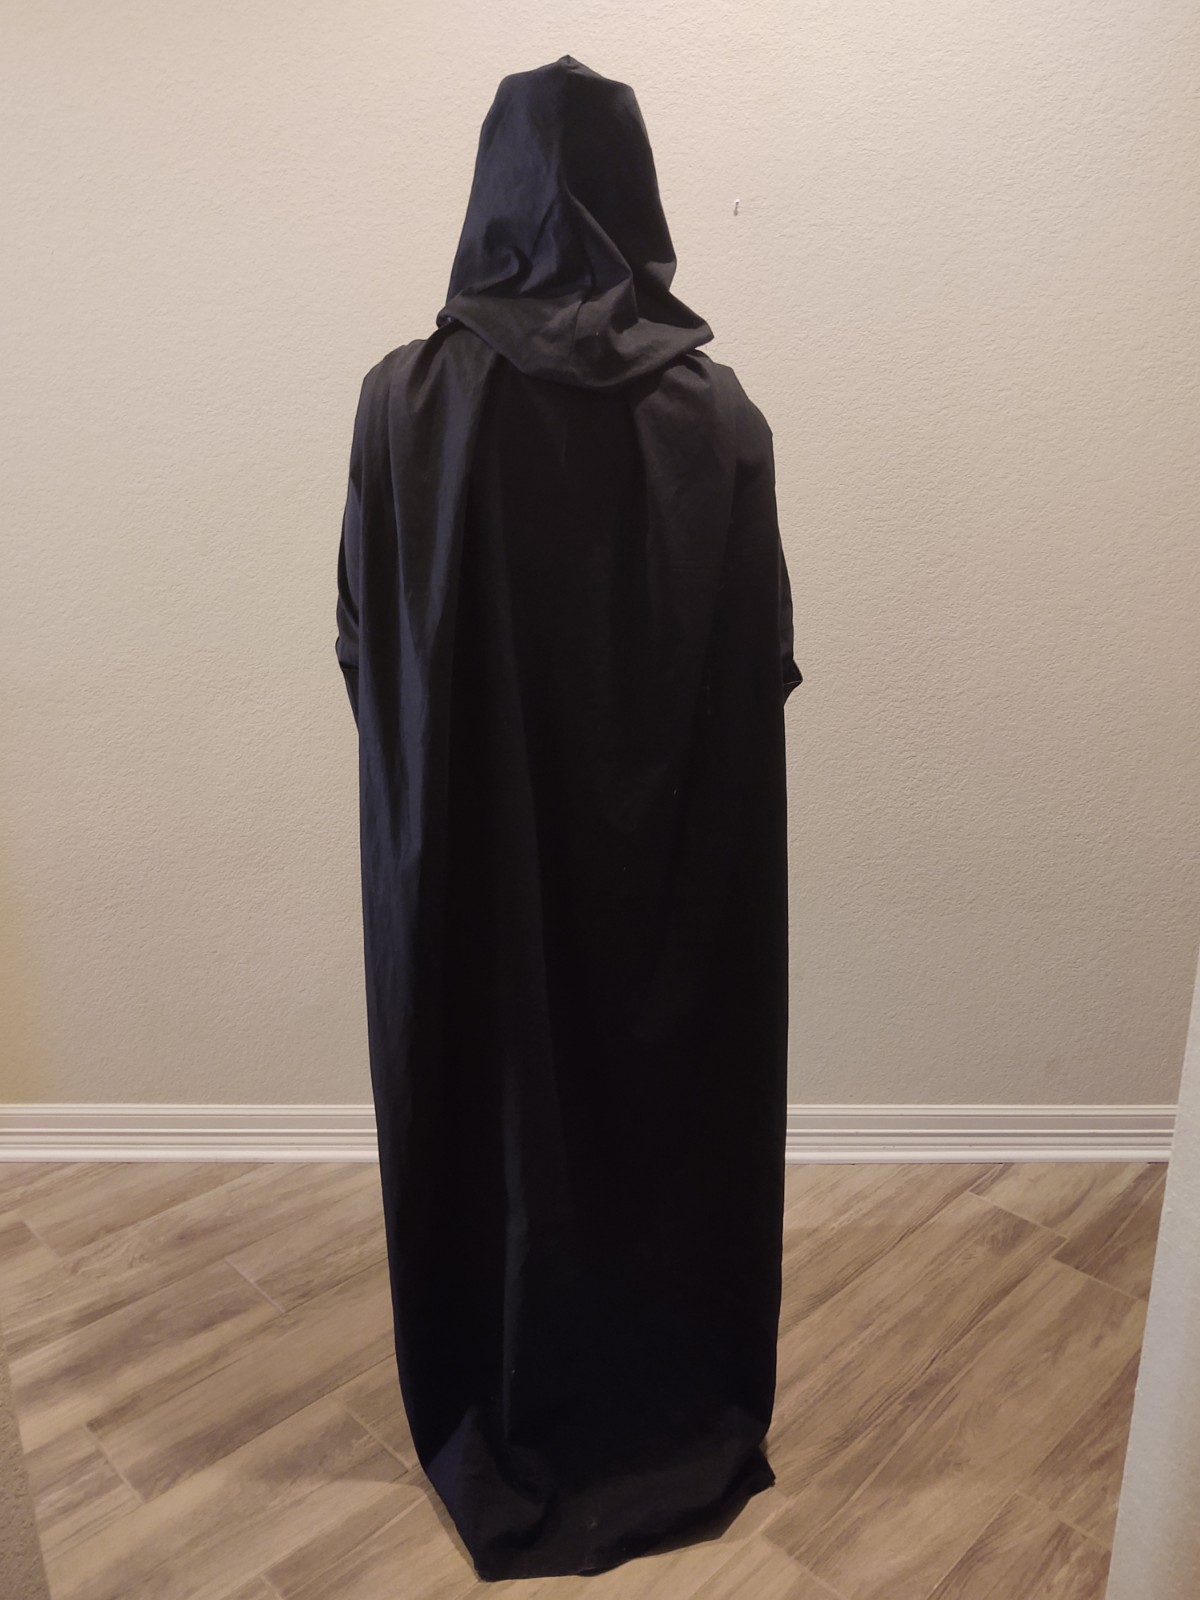
Got some work in on the hood. I think it is getting to a place I'll be happy with it. It is still mostly just pinned, I have only sewn a bit of the structural shaping. I threw the big pieces on the dummy to see how it is coming together: Still a lot more work to do, but it is at least starting to look like the Lord of Hunger
.thumb.jpg.37a4eebad786d2fcf3df28aab2dbacac.jpg)
.thumb.jpg.68f19acc7d6a9c2e8e43d2e9d793d2b1.jpg)
-
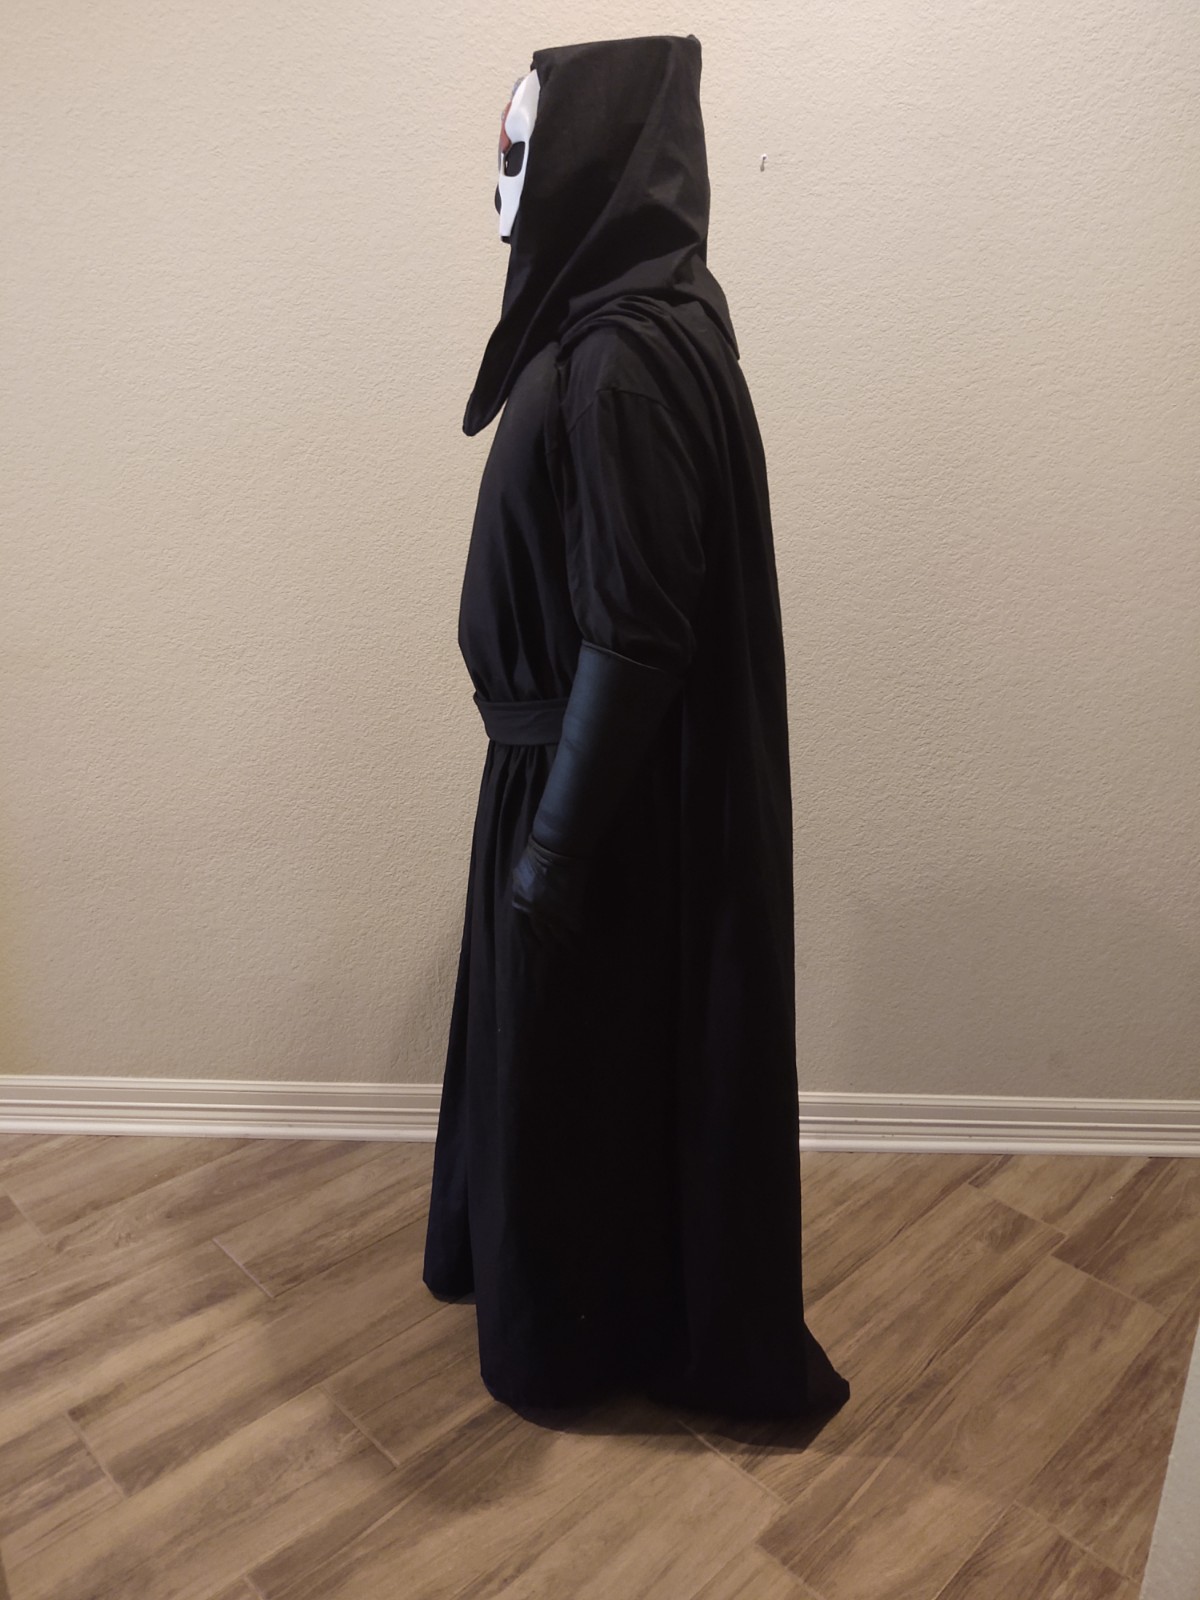
Long time no post! However, I have been working on this costume off and on for the last year and a half. Version 3 is almost complete and I think it will be approval worthy once I get it tightened up and finished. The big issue I'm having right now is the hood, particularly getting the right amount of drape and right proportions. Here is an in progress shot of my current working hood. It is mostly just pinned with a lot of excess still there so I can adjust it before the final sewing. I left the head sock off becusse I think it iis easier to see how everything fits together without black on black on black. The dummy head is a bit smaller than mine and the nose is smashed in a bit, so the mask sits a bit lower in the pic than on my face, but its pretty close. The hood has plenty of extra fabric to poof out at the sides, but the shots of the hood vary and I tend toward the slimmer look because the hood is not a traditional style. I still have a lot of sewing, fit and finishing to do, but I want to get some input on the proportion of the various elements (triangles, face oval, etc.), basic sizing and fit.
-
Welcome! Looks like you have done a lot of research already and have a great plan for getting this awesome costume done. One thing I'd be sure of is that the leather suit is patterned off of the Starkiller CRL and not Vader (since it sounds like that is what the maker is familiar with). It is similar but there are differences that are important such as the angle of the stitching. I imagine you covered that with them, but I thought I mention it because that is not a cheap suit to make! I do my own electronics, light panels, LEDs and such, so I can give you some help with the box if someone who has actually built it doesn't chime in before you get to it. Can't wait to see your progress on this build!
-
Welcome to Starkiller costuming! Great to have more people in here! I am looking forward to watching your progress on this build! Nina is very helpful and she will be able to give you great advice as you go through. I can add what my experience was in building this costume as well. Approval will ultimately come down to what your GMLs decide. My advice would be to stick to the wording of the CRL as closely as possible, I think that is what GMLs use as the official guide (the pictures in the CRLs are just extra examples, not official references). However, if there are discrepancies, have the visual references ready to show why something is different from the CRL. From my understanding of the process, the actual references are the ultimate authority, the CRL is just a tool to help GMLs to make a determination of acceptability of a costume because they cannot be experts in every costume in the Legion. Having a build thread like this really helps too, not only for you to check your build progress but also a reference for the GML, when you get to that stage of the process. As to the specifics of the chest plates, I think the angle looks exaggerated because the cape covers some of the top of the plates in most references. The CRL doesn't give specifics about the angle of the top of the plates, so there is some leeway currently.
-
Trooper looking to access his Sith side - Starkiller Sith Robes build
kaabous replied to kaabous's topic in Starkiller
As far as I could tell when building this, the CRL appeared to be built of off two different concept art iterations, the one you posted and this one: However, the costume that actually made it into the game was slightly different as well. I split the difference on a few things that weren't explicit in the CRL. The shape of the chest plates in pretty much all of the reference material is angled at the top, but the sample within the CRL is flat across the top. I gave mine a less sharp angle initially, but I'm reshaping and resizing the plates for the chest armor. I'm also doing all of them out of 6mm sintra this time, instead of 3mm. The 3mm looks like the reference works, but in person 6mm looks a lot more convincing as armor. I just got done doing a mando and the difference between the look and feel of the 6mm vs 3mm is pretty drastic. I definitely think 6mm is better aesthetically and looks a lot better in pictures so I am switching all of the hard parts of my costume over to that. As to the belt loops, pretty much all of the references have some, except that concept art you posted that lacks the two smaller belts. My loops are positioned exactly according to what is on his belt in the game as it was the best reference I could find for the positioning of them around the entire belt. The other concept art has them positioned more similarly to full costume pic at the beginning of the CRL, but only about half of the belt is visible and it is pretty low res. There are a number of other small differences, like edge seams on the armor and obi, that are present in the CRL samples that are not in the reference materials. I don't think any of them are dire though. I was keeping a list as I went through to help with the next CRL revision. BTW, I have lots more high res screen caps from the game, if you want any other angles I can put them up. They aren't strictly the right costume because of the color differences, but it does show more details on a lot of the pieces that are the same across all of the iterations of concept art, promo art and in-game costume. I have the all black version from the game pretty much ready for submission as a NttL costume (along with a draft CRL). Although at this point, I will probably wait until I get the new hard parts done to actually submit it. -
Trooper looking to access his Sith side - Starkiller Sith Robes build
kaabous replied to kaabous's topic in Starkiller
I have made some significant improvements to my costume since approval, both for comfort/wearability and in appearance: I remade the chest, torso and sleeves. I think the chest looks much better now and fits much more similarly to the game files and promo art. I can also put the whole thing on by myself now (in a parking garage, even). I have another iteration of a couple more parts in the works, but overall I am happy with the fit and finish of this kit now. I am still putting together the black version of the whole costume for NttL submission. -
Update: I am still actively working on this costume and took it out for a spin last night: By the time the these pictures were taken, the head sock irritated my eyes to the point where I had to take it off, but this is the gist of what it looked like. I am still working on a number of elements and improvements, but it is coming along. I'll get some better pics up as I finish up the pieces.
-
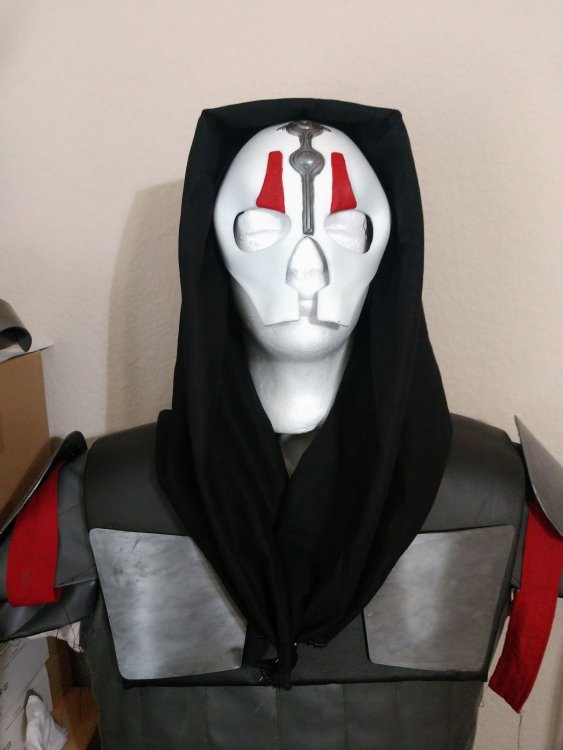
After working on the mask I got, I don't really like how it is coming out. This one looks like the KotOR version, but I'd like to get confirmation that it would be approvable before I order it: https://www.etsy.com/listing/478213428/darth-nihilus-resin-cast-knights-of-the?ga_order=most_relevant&ga_search_type=all&ga_view_type=gallery&ga_search_query=nihilus mask&ref=sr_gallery-1-27&organic_search_click=1 I like that this one seems go a bit farther back, which I think will be good for securing it to the cowl and cat ear rig. There lots of options for the CotF version but the kotor one seems harder to find a good version.
-
You can't stop at just one... Now that my Starkiller is approved, of course I have to start a new project. I am partial to a number of TFE characters so I am looking at building a number of them eventually. I had started (and I'm still planning on completing) a Revan, but we seem to have recently sprouted 4-5 active Revans locally, so I decided to move something else up in the queue. Darth Nihilus is a great character from a great game and very iconic, so the Lord of Hunger is up next. Here are the first few pieces, the skirt and a couple of obis (the thin game version and the wider figure version.). I have been messing around with the cowl but it is puzzling med a bit and I want to make sure I get it right. How do people do them? I had planned on modified hood-like construction with two pieces. However, the game renders do not seem to have a seam anywhere that I can see. So, I have been trying to figure out a way to sew it without a visible seam. However, I also noticed a number of pictures of approved costumes have seams, so maybe it isn't a big deal. There also seems to be a lot of variation in the drape of the cowl. The in-game model has a long point going down to the mid chest. A lot of the approved pictures seem to have a more rounded look that up on the collar bone. Is either OK? I like the pointier look, but I know a number of CRLs are in revision, so I want to make sure mine will be in compliance.
-
Trooper looking to access his Sith side - Starkiller Sith Robes build
kaabous replied to kaabous's topic in Starkiller
Awesome! Thank you for your help along the way, made the approval pretty painless., -
501st/SLD and/or TFE Detachment Access Requests
kaabous replied to DarthBrute's topic in Welcome Area and Forum Help
Finally got my SL, requesting Detachment access. Newly approved Starkiller costume added to my Legion profile: https://www.501st.com/members/displaymemberdetails.php?userID=24902 Thanks much! -
Trooper looking to access his Sith side - Starkiller Sith Robes build
kaabous replied to kaabous's topic in Starkiller
Woohoo! My costume was just approved by my GML! I can't wait to troop in it! -
Trooper looking to access his Sith side - Starkiller Sith Robes build
kaabous replied to kaabous's topic in Starkiller
I just submitted for approval with the concept costume. Hopefully if that goes well, I will then start on the NttL for the in game version of the Sith Robes costume. -
Trooper looking to access his Sith side - Starkiller Sith Robes build
kaabous replied to kaabous's topic in Starkiller
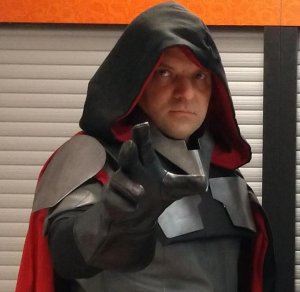
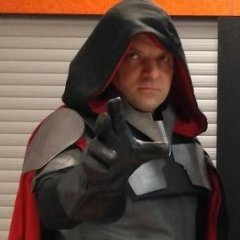
Update time. So I went ahead and did the CRL version to submit and hopefully wear while the game version goes through the NttL process. Front Right Back Left Any feedback welcome! The red is actually growing on me, the more I work with it. -
Trooper looking to access his Sith side - Starkiller Sith Robes build
kaabous replied to kaabous's topic in Starkiller
Weathered soft armor: I went with some of my good inks for this and I think it went pretty well. It definitely dinged them up a bit, but they don't look overly fake. I think I am pretty much ready to submit pics for approval. Are there any red flags I should fix before I do? Thanks in advance for any more feedback! -
Trooper looking to access his Sith side - Starkiller Sith Robes build
kaabous replied to kaabous's topic in Starkiller
Weathered hard armor: My phone isn't really capturing any of the weathering well, but I am happy with it in person. The pieces have more depth and look used now. -
Trooper looking to access his Sith side - Starkiller Sith Robes build
kaabous replied to kaabous's topic in Starkiller
Did some more work on this costume today. I think I improved the fit of it overall. The vest has been taken in a bit (a bit more even after these pictures) and fits with less wrinkling. I tinkered with the skirt, sashes and cape too and I think they all fit a bit better now. I did some shading and highlighting on the armor, so it looks less pristine. The pictures don't seem to capture it much, it is different when I compare it to the pieces I remade that have not been weathered. The boot armor straps are complete and on in these pics, as is the belt pouch. I think the weathering is the last outstanding issue? Is there anything else that needs to be fixed before I look at doing some approval pics? I really appreciate the detachment leadership feedback on this, it has been helpful in getting this ready. I am very excited to be getting close to (hopefully) getting approved and joining TFE officially! EDIT: So I went after some more weathering after really going through and getting some more game images. The armor is just base weathering in the pic, no dry brushing or highlighting. This is the vest (still the old vest, not my current one!) with some more aggressive inking: It doesn't photograph well, but is that about right? -
Trooper looking to access his Sith side - Starkiller Sith Robes build
kaabous replied to kaabous's topic in Starkiller
I'm trying out some weathering on my first prototype vest: Good? Bad? Too much? Too little? It looks washed out because of the flash, but the right side of the picture shows it. I mixed a few colors to get a dark grime color and brushed it on in the seam lines, tapering up from the bottom. It stops around half way up. I also did some light scrubbing to make it look less pristine. I'm trying to keep it pretty light because there isn't much weathering visible on the game images or the concept art. -
Trooper looking to access his Sith side - Starkiller Sith Robes build
kaabous replied to kaabous's topic in Starkiller
Awesome! Thank you for the feedback! I was planning on dry-brushing and shading the hard armor to give it some more character. I am fairly skilled at that. However, I have not weathered pleather before. Any tips on that? I was mostly looking at scuffing it up as bit, but I'll have to do some homework on it first. Also, the pouch and boot armor straps are done, so I am pretty much finished up the construction. So I am doing some final fitting and the weathering this weekend. Hopefully that will be it and I can submit for approval really soon. -
Trooper looking to access his Sith side - Starkiller Sith Robes build
kaabous replied to kaabous's topic in Starkiller
OK, progress time! I'd like to get some feedback on the fit of this costume thus far. I think it is getting close to submission worthy, but I want to get the fit and finish just right before I do. Front: Right: Back: Left: A few things: The boot straps are done, I just didn't put them on for these pics. They are pretty straight forward though. The flap on my belt is a placeholder for the pouch. I wasn't happy with the first few I did, so I have another in process that I think will work. The primary issue I see is how the cloak rests on the shoulder armor and the draping on the right side. I think I may need to secure it in the back somehow or put a draw closure to get it to hang better. Any suggestions for this would help a lot. I am also working securing the shoulder armor to the vest. I think I am just going to hook & loop it to keep it in place. Any suggestions on that? I also need to think about securing the skirts to the obi or vest or to belt them more heavily to keep them in place. I also think I'm going to add some hem weights, at least at the front corners. -
Well, it looks like a will not be able to get a helmet for my Starkiller Hoth for a while, so my next endeavor will be Darth Revan while that is back-burnered! I am working on getting the sizing and spacing right for hard bits. Do these roughs look right? The bottom of the ab armor is sitting just at the top of my hip bone and I think I have the space at the top about right to show the hood and shirt properly. From the reference pictures and pictures on this board it looks like that is about where they fit, but not having it done it before I'd appreciate some input from folks who have done this costume. I am planning on some suspenders/suspension straps to keep the cuirass in place, an elastic belt backing the flexible gap seal and a webbing and elastic belt backing the ab armor. I'll be attaching all three together with direct hook and loop and some strapping, probably. I am planning the hood, caplet and cape to all be separate pieces so it will be easier to fit, adjust and upgrade each piece. I have duck cloth for the hood and capelet and some stiffer upholstery fabric for the cape. I want it to really hold the knife pleats like the reference images and this fabric should be great for that. I have questions on the pleats for the cape. How many are there? The main reference pic I have seen going around has what looks like 5 knife pleats per side and the center box pleat. A lot of the approved costumes and the CRL pics seem to have some variation in number, but 3-4 knife pleats per side seems common. I just want to check if there is a preferred or approved number before I get to sewing. Similar question about the skirt, it is split in the front and back with about 3 box pleats on each side. Is that right? I have tons more questions, but this should kick it off.
-
Trooper looking to access his Sith side - Starkiller Sith Robes build
kaabous replied to kaabous's topic in Starkiller
I have a few new questions. The CRL says the belt closes in the back. Is there any guidance on that closure? I plan on using hook & loop, because it won't show much and I can't get a view of the back of the belt. I doubt it gets rendered in game since he never has the cloak off. The art for the the concept costume shows some rivets or snaps, but I can't tell what the rest of the closure is. What have other people used? I plan on securing the shoulder armor to the vest with some hook and loop. Is that common? Is there a better method? I have also been talking to my garrison's senior GML. He said I'd need to get a CRL to get the costume approved. It is essentially the same as the concept costume that has a CRL, just with a couple of color changes. I hope if I get it "approved" by the detachment, he'd approve it, but this stuff is all pretty new to me still. I'd be happy to help with a CRL, but I gather it is a lot of work for the leadership and I know you are all working on many others. On another note, I have the hard parts shaping done and they are primed (except the foot pieces while I work out the strapping): I'll get them painted, then finish up the belt and I'll be ready to post some full costume pics to get feedback on the build!

.jpg.a6bcb3361861dab9c0f77de3eb19d319.jpg)
.jpg.8e7f8336059ff580b992922221579d77.jpg)

