
-
Announcement
Welcome to the forums!
If you are a newly-approved member, make sure you check out the New Member Checklist!
If you are a Detachment member and can't see the member-only area, post here for access.
-DV


Kwalt04
-
Posts
17 -
Joined
-
Last visited
Recent Profile Visitors
464 profile views
Kwalt04's Achievements
2
Reputation
-
Hello hello, my fellow Revanites! About a year and a bit, maybe closer to 2 years ago, I made a thread detailing my Revan build. I never really did finish the thread, despite working on the costume. I just sorta work and forget to take pictures about it all. Anyway, I have just finished my kit, it’s pretty well ready to go, and I’m going to be taking my pictures on Sunday. My question is, what kinds of pictures do it take? I have scoured this forum in search of the answer but have come up with no answers regarding my question. I’ve figured I could get away with a picture of both sides, front, and back, with and without my saber, as well as individual photos showcasing each piece listed in the crl. To those who have been approved, is that enough? Do you think I need more or different photos than those? if there is a place answering those questions for me, would someone give me directions? As I said, I’ve searched each section of the forum, and short of scouring hundred upon hundreds of pages of posts, I have yet to come up with an answer. Thanks ahead, and may the force be with you all.
-
@Nightshine It's an excellent hilt, really comfortable to hold. I saw someone else on here use the same model, I figured I'd follow suit. XD @Teraxis I don't know if they are futasma, I'm not sure exactly where my Aunt and Uncle got them from, but the front part is just attached with velcro. It hides the laces that are there, but I have tried moving the flap up to where its not on top of the boot and to me it looks fine. Just waiting for a reply on the CCG forum about if they are alright or not.
-
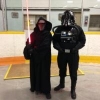
Hey there, folks. Been a while since I made a post or any progress on the costume. I'm gonna get more work done soon. However, I have acquired some minor pieces for the costume: my lightsaber, and my boots. I got my lightsaber from Ultrasabers. I got the Liberator V3 and got the Archon Pommel to go with it. I painted the emitter and pommel brass. I got the blade colour in red, but I did a little twist with it. Since I'm only wielding one saber, I made the saber flash purple as a nod to the second saber (I thought it was clever, at least ) As for my boots, I'm hoping they will work. My Aunt and Uncle got me a pair of Anakin Boots for my birthday. They are black, with no visible laces, and have a fairly low heel, so I'm hoping they will be fine. I'll double check with the GMO, but I'm hoping they will work. So yeah, little update for now, big stuff to come as soon as I can get to work on it. Have a great day, folks!
-
Personally, I think scratch building is the best way to go. You can really call the armour yours, and the skills you build from it too can help out a lot in future build. That's what I'm learning from my build at least.
-
That's an interesting product. Must be relatively new, don't see too many people mention it.
-
I've never heard of the stuff either, so I did a quick google search. Do you mean the insulation foam, or is it something different? I've seen someone on YouTube to amazing things with insulation foam, you can get some really nice detail with it, and it holds up REALLY well.
-
Nice, a foam mask, that's gonna be nice and lightweight. . It's looking good, can't wait to see more.
-
That's a cool looking mask, what are you making it out of?
-
Introductions and Pending Forum Member Approval
Kwalt04 replied to DarthBrute's topic in Welcome Area and Forum Help
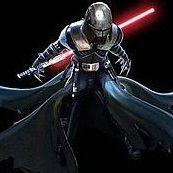
Revan has long been a favourite of mine. Who wouldn't want to portray one of the most power characters in all of Star Wars? Plus, the mask is just pure awesomeness. -
That's one thing I've heard, body sweat is foam and glues absolute worst enemy. No matter the medium used. I much appreciate all the advice I'm getting though, this is great insight from people who have used the material and from multiple methods. I've got some idea now what could happen when I go to make my armour, so thank you both, and everyone for the help.
-
Those are good points, I'll keep that in mind when I go to try it, thanks for the tips! Just got back from the shops, got some leather, a nice roll of craft foam, and some wood glue. Canadian Home Depot, or at least, the one in my city doesn't carry the steel rings, I'll look at other places, maybe one of the other hardware stores here might have them, and if not, I'll just order them online, when I order the buckles.
-
I never even thought of rolling the worbla up and putting it on top for the details. (Kicking myself for derp moment of the moment) That seems so much easier than everything I've thought of so far. I've done as much research as I can on the material; read blog posts, and prop threads, I've watched countless videos on making things and apply finishing layers. By the end of this build, I'll be an expert on the stuff as well. XD But yeah, I've seen both gesso and wood glue used, I've even seen regular white glue used. Just takes lots of layers, so I'm already prepared for that. As for sandwiching, I agree completely, I'd rather have the durability, even if it has a little more cost. Though, worbla doesn't seem too too expensive to me, for what you get. I got a large sheet, which are 60$ and after tax and shipping, it came to 67$. Not too bad at all, really, when you can use the whole sheet, with almost no scrap and waste whatsoever. Perhaps that's just a movies way on seeing things though. Also, going out to the shop as soon as I can, so I'll keep in mind the thickness. I've got several places and items recommended to me already, just from this thread, so it sounds about time to do some recon on these items. Thankfully, Revans armor doesn't have too many curves to it, it's mostly details on the front. The chest piece seems to be a pretty standard shape, when it comes to chest pieces. How were you trying your sandwiching? I'm planning on having the visible side overlap into the back, then putting on a back sheet to seal it on. I guess that might not be sandwiching, more like making a wrap, or a burrito. XD an awesome Star Wars burrito. What costume were you trying to build with the worbla?
-
Awesome! Thanks for all the tips, I'll be sure to keep an eye on my fabrics. I wonder what kind of looks I'd get, wearing the hakama to the fabric store to compare colour and thread. XD I do have a couple questions on the worbla, if you'd be so kind. Firstly, did you do full on sandwich for your armor, or just enough to leave a border on the back? What thickness foam did you use? What did you use to get the raised textures on the armor? I picked up some mesh tubing that is kinda like a Chinese finger trap sorta stuff. It stretches to a nice thickness, and I hot glue it onto the foam in the proper shapes before laying the worbla. And lastly, how far did you seal the armor? Does it still have some texture, or did you make it completely smooth? I've watched a few videos on the stuff, and different ways people finish it. I noticed that after 2-4 layers of whatever glue people use, it looks kinda like a hammered metal look, which I quite liked. Though I should probably double check the CRL to see if I could have a little texture. That's a few more questions than I thought I'd ask, Thanks though, and you've helped me out even more than just here with your thread on the midsection tutorial. I had no clue how I was gonna attempt that, and now I've got a full on tutorial to do it. WHOO! XD
-
Thanks guys! I'll definitely check out my Home Depot and Michaels for those parts. I might try and see if I can add a waistband to my hakama, but I was thinking, if I can manage to hide the ties, I might be able tot away with them as they are now. I'd probably be able to hide them under the midsection piece. The mask comes from a prop maker in BC called Obsidian Props. I ordered it from him off etsy. The mask itself was really nice to work with, sanded well, and painted very nicely. I might need to adjust some padding around the nose to block my breath from fogging the lens, but it's quite comfortable, and a pretty good weight to wear.
